
【Android开发学习笔记之一】5大布局方式详解
Android中常用的5大布局方式有以下几种:
- 线性布局(LinearLayout):按照垂直或者水平方向布局的组件。
- 帧布局(FrameLayout):组件从屏幕左上方布局组件。
- 表格布局(TableLayout):按照行列方式布局组件。
- 相对布局(RelativeLayout):相对其它组件的布局方式。
- 绝对布局(AbsoluteLayout):按照绝对坐标来布局组件。
1. 线性布局
线性布局是Android开发中最常见的一种布局方式,它是按照垂直或者水平方向来布局,通过“android:orientation”属性可以设置线性布局的方向。属性值有垂直(vertical)和水平(horizontal)两种。
常用的属性:
android:orientation:可以设置布局的方向
android:gravity:用来控制组件的对齐方式
layout_weight:控制各个组件在布局中的相对大小
第一个实例
①效果图:
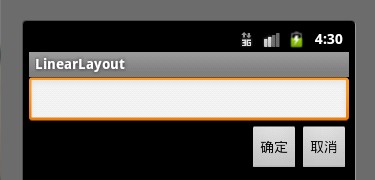
②核心代码如下:
main.xml
     <?xml version="1.0" encoding="utf-8"?>

     <LinearLayout xmlns:android="http://schemas.android.com/apk/res/android"

         android:orientation="vertical"

         android:layout_width="fill_parent"

         android:layout_height="fill_parent"

         >

         <LinearLayout

             android:layout_width="fill_parent"

             android:layout_height="wrap_content"

             android:orientation="vertical"

             >

             <EditText

                 android:layout_width="fill_parent"

                 android:layout_height="wrap_content"

                 />

         </LinearLayout>

         <LinearLayout

             android:layout_width="fill_parent"

             android:layout_height="wrap_content"

             android:orientation="horizontal"

             android:gravity="right"

             >

         <!-- android:gravity="right"表示Button组件向右对齐 -->

             <Button

                 android:layout_height="wrap_content"

                 android:layout_width="wrap_content"

                 android:text="确定"

                 />

             <Button

                 android:layout_height="wrap_content"

                 android:layout_width="wrap_content"

                 android:text="取消"

                 />

          </LinearLayout>

     </LinearLayout>
第二个实例
①效果图:
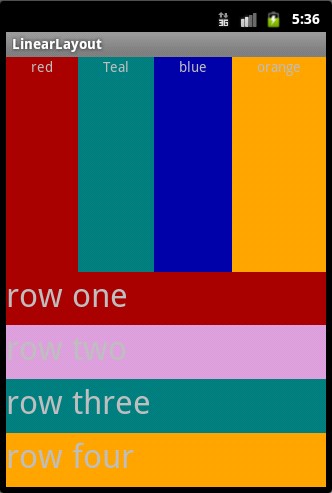
②核心代码:
     <?xml version="1.0" encoding="utf-8"?>

     <LinearLayout xmlns:android="http://schemas.android.com/apk/res/android"

         android:orientation="vertical" android:layout_width="fill_parent"

         android:layout_height="fill_parent">

         <LinearLayout

         android:orientation="horizontal"

         android:layout_width="fill_parent"

         android:layout_height="fill_parent"

         android:layout_weight="1">

         <TextView

             android:text="red"

             android:gravity="center_horizontal"

             android:background="#aa0000"

             android:layout_width="wrap_content"

             android:layout_height="fill_parent"

             android:layout_weight="1"

             />

          <!--android:gravity="center_horizontal"水平居中 -->

          <!--layout_weight属性以控制各个控件在布局中的相对大小。layout_weight属性是一个非负整数值。

              线性布局会根据该控件layout_weight值与其所处布局中所有控件layout_weight值之和的比值为该控件分配占用的区域。

             例如,在水平布局的LinearLayout中有两个Button,这两个Button的layout_weight属性值都为1,

             那么这两个按钮都会被拉伸到整个屏幕宽度的一半。如果layout_weight指为0,控件会按原大小显示,不会被拉伸;

             对于其余layout_weight属性值大于0的控件,系统将会减去layout_weight属性值为0的控件的宽度或者高度,

             再用剩余的宽度或高度按相应的比例来分配每一个控件显示的宽度或高度-->

         <TextView

             android:text="Teal"

             android:gravity="center_horizontal"

             android:background="#008080"

             android:layout_width="wrap_content"

             android:layout_height="fill_parent"

             android:layout_weight="1"/>

         <TextView

             android:text="blue"

             android:gravity="center_horizontal"

             android:background="#0000aa"

             android:layout_width="wrap_content"

             android:layout_height="fill_parent"

             android:layout_weight="1"

             />

         <TextView

             android:text="orange"

             android:gravity="center_horizontal"

             android:background="#FFA500"

             android:layout_width="wrap_content"

             android:layout_height="fill_parent"

             android:layout_weight="1"

             />

         </LinearLayout>

         <LinearLayout

         android:orientation="vertical"

         android:layout_width="fill_parent"

         android:layout_height="fill_parent"

         android:layout_weight="1">

         <TextView

             android:text="row one"

             android:textSize="15pt"

             android:background="#aa0000"

             android:layout_width="fill_parent"

             android:layout_height="wrap_content"

             android:layout_weight="1"

             />

         <!--  -->

         <TextView

             android:text="row two"

             android:textSize="15pt"

             android:background="#DDA0DD"

             android:layout_width="fill_parent"

             android:layout_height="wrap_content"

             android:layout_weight="1"

             />

         <TextView

             android:text="row three"

             android:textSize="15pt"

             android:background="#008080"

             android:layout_width="fill_parent"

             android:layout_height="wrap_content"

             android:layout_weight="1"

             />

         <TextView

             android:text="row four"

             android:textSize="15pt"

             android:background="#FFA500"

             android:layout_width="fill_parent"

             android:layout_height="wrap_content"

             android:layout_weight="1"

             />

         </LinearLayout>

     </LinearLayout>
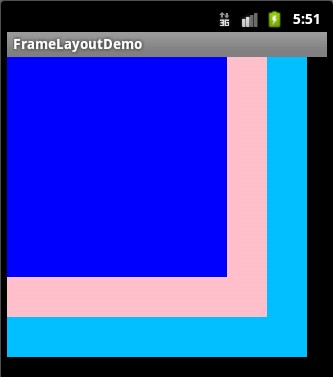
     <?xml version="1.0" encoding="utf-8"?>

     <FrameLayout xmlns:android="http://schemas.android.com/apk/res/android"

         android:layout_width="fill_parent"

         android:layout_height="fill_parent"

         >

         <TextView

             android:layout_width="300dp"

             android:layout_height="300dp"

             android:background="#00BFFF"

             />

         <TextView

             android:layout_width="260dp"

             android:layout_height="260dp"

             android:background="#FFC0CB"

             />

         <TextView

             android:layout_width="220dp"

             android:layout_height="220dp"

             android:background="#0000FF"

             />

     </FrameLayout>
android:shrinkColumns:收缩指定的列以适合屏幕,不会挤出屏幕
android:stretchColumns:尽量把指定的列填充空白部分
android:layout_column:控件放在指定的列
android:layout_span:该控件所跨越的列数
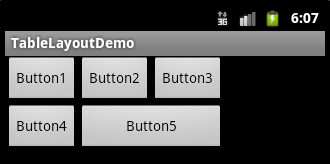
     <?xml version="1.0" encoding="utf-8"?>

     <TableLayout xmlns:android="http://schemas.android.com/apk/res/android"

         android:layout_width="fill_parent"

         android:layout_height="fill_parent"

         >

         <TableRow>

             <Button

                 android:text="Button1"

                 />

             <Button

                 android:text="Button2"

                 />

             <Button

                 android:text="Button3"

                 />

         </TableRow>

         <TableRow>

             <Button

                 android:text="Button4"

                 />

             <Button

                 android:layout_span="2"

                 android:text="Button5"

                 />

         </TableRow>

     </TableLayout>
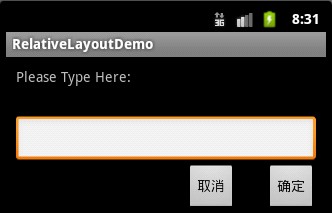
     <?xml version="1.0" encoding="utf-8"?>

     <RelativeLayout xmlns:android="http://schemas.android.com/apk/res/android"

         android:layout_width="fill_parent"

         android:layout_height="wrap_content"

         android:padding="10px"

         >

         <TextView

             android:id="@+id/tev1"

             android:layout_width="wrap_content"

             android:layout_height="wrap_content"

             android:layout_marginBottom="30dp"

             android:text="Please Type Here:"

             />

         <EditText

             android:id="@+id/tx1"

             android:layout_width="match_parent"

             android:layout_height="wrap_content"

             android:layout_below="@id/tev1"

             />

         <Button

             android:id="@+id/btn1"

             android:layout_height="wrap_content"

             android:layout_width="wrap_content"

             android:layout_below="@id/tx1"

             android:layout_alignParentRight="true"

             android:text="确定"

             />

         <Button

             android:id="@+id/btn2"

             android:layout_height="wrap_content"

             android:layout_width="wrap_content"

             android:layout_below="@id/tx1"

             android:layout_toLeftOf="@id/btn1"

             android:layout_marginRight="30dp"

             android:text="取消"

             />

     </RelativeLayout>
【Android开发学习笔记之一】5大布局方式详解的更多相关文章
- 【转】Android开发学习笔记:5大布局方式详解
Android中常用的5大布局方式有以下几种: 线性布局(LinearLayout):按照垂直或者水平方向布局的组件. 帧布局(FrameLayout):组件从屏幕左上方布局组件. 表格布局(Tabl ...
- Android开发5大布局方式详解
Android中常用的5大布局方式有以下几种: 线性布局(LinearLayout):按照垂直或者水平方向布局的组件. 帧布局(FrameLayout):组件从屏幕左上方布局组件. 表格布局(Tabl ...
- Android开发之5大布局方式详解
Android中常用的5大布局方式有以下几种: 线性布局(LinearLayout):按照垂直或者水平方向布局的组件. 帧布局(FrameLayout):组件从屏幕左上方布局组件. 表格布局(Tabl ...
- android开发学习笔记000
使用书籍:<疯狂android讲义>——李刚著,2011年7月出版 虽然现在已2014,可我挑来跳去,还是以这本书开始我的android之旅吧. “疯狂源自梦想,技术成就辉煌.” 让我这个 ...
- Linux防火墙iptables学习笔记(三)iptables命令详解和举例[转载]
Linux防火墙iptables学习笔记(三)iptables命令详解和举例 2008-10-16 23:45:46 转载 网上看到这个配置讲解得还比较易懂,就转过来了,大家一起看下,希望对您工作能 ...
- (转)live555学习笔记10-h264 RTP传输详解(2)
参考: 1,live555学习笔记10-h264 RTP传输详解(2) http://blog.csdn.net/niu_gao/article/details/6936108 2,H264 sps ...
- 【Android开发学习笔记】【第八课】五大布局-下
概念 五大布局上一篇文章已经介绍了 LinearLayout RelativeLayout 这一篇我们介绍剩下的三种布局 FrameLayout 五种布局中最佳单的一种布局.在这个布局在整个界面被当成 ...
- 【Android开发学习笔记】【第七课】五大布局-上
概念 Android程序各式各样,依靠的就是布局,先来看看布局都是怎么来的: 白色部分就是我们经常用的几种布局,主要说说介绍下面五大布局 FrameLayout AbsoluteLayout Line ...
- 【转】Android开发学习笔记(一)——初识Android
对于一名程序员来说,“自顶向下”虽然是一种最普通不过的分析问题和解决问题的方式,但其却是简单且较为有效的一种.所以,将其应用到Android的学习中来,不至于将自己的冲动演变为一种盲目和不知所措. 根 ...
随机推荐
- Cygwin - windows系统下运行linux操作 --代替linux虚拟机安装、双系统的繁琐
我把Cygwin视为Windows用户熟练linxu系统操作的良好途径.它不需要虚拟机.双系统等安装对电脑知识.硬件的要求,只需要基本的软件安装操作即可.以下是安装步骤供小白同胞参考. Cygwin安 ...
- Windows历史
1983年11月:Microsoft宣布Windows的第一个版本:以字符为基础 的窗口系统: 1985年11月:Windows1.0: 1990年5月:Windows 3.0(成功版本),16位OS ...
- hdu4821 String
您也可以在我的个人博客中阅读此文章:跳转 题意 一个字符串S 问其中有几个子串能满足以下条件:1.长度为m*l2.可以被分成m个l长的不同的子串问题就变成了如何快速的判断着m个子串是否存在相同的 思路 ...
- 微信公众平台开发接口PHP SDK
以前没接触过微信公众平台开发,前几天刚找到实习公司就要求我做一个微信公众平台的应用,于是乎开始学习微信公众平台开发接口的调用,看开发文档之后还是不知道从何入手,只好上网找入门资料,终于在方倍工作室找到 ...
- 浅析Java源码之LinkedList
可以骂人吗???辛辛苦苦写了2个多小时搞到凌晨2点,点击保存草稿退回到了登录页面???登录成功草稿没了???喵喵喵???智障!!气! 很厉害,隔了30分钟,我的登录又失效了,草稿再次回滚,不客气了,* ...
- JS框架设计读书笔记之-动画
基础概念 CSS样式可分为两种,一种值接近无限的集合(color,width),一种值只有几种(display),可以进行计算的样式,产生了动画效果.\ 1. 动画的第一步是获得元素的精确样式值. 2 ...
- Shell中bash的特性小结
Shell: 用户与操作系统之间完成交互式操作的一个接口程序,为用户提供简化了的操作:上世纪的70年代中期在贝尔实验室,Bourne位Unix开发了一个shell程序Bourne Shell,简称sh ...
- SQL注入技术
TalkTalk的信息泄漏事件导致约15万人的敏感信息被暴露,涉嫌造成这一事件的其中一名黑客使用的并不是很新的技术.事实上,该技术的「年纪」比这名15岁黑客还要大两岁. [译注:TalkTalk是英国 ...
- [Bayesian] “我是bayesian我怕谁”系列 - Continuous Latent Variables
打开prml and mlapp发现这部分目录编排有点小不同,但神奇的是章节序号竟然都为“十二”. prml:pca --> ppca --> fa mlapp:fa --> pca ...
- BabeLua常见问题
BabeLua常见问题 来源: http://blog.csdn.net/babestudio/article/details/27228865 怎样升级BabeLua? https://babelu ...