
Hibernate学习笔记三:对象关系映射(一对一,一对多,多对一,多对多)
如需转载,请说明出处:http://www.cnblogs.com/gudu1/p/6895610.html
Hibernate通过关系映射来表示数据库中表与表之间的关系,关系映射可以通过两种方式:配置文件映射和注解映射,本文主要讲解配置文件映射。
关系映射:
1.单向关联关系,表示只有一方维护关系,而另一方并不知道有这种关系,在解除和删除关联关系的时候也要在有外键方进行,否则会抛出异常,因为有外键的约束。
2.双向关联关系。双方都维护关系,无论在哪一方解除和删除关联关系,Hibernate都能够获知,都能够正确的进行操作。
关系映射中,即使你在类中添加了属性(即相关联的类对象),通过配置inverse属性,也可以设置它是否维护关系,默认为true,可以设置为false表示不维护
一:单向关联
单向多对一:
单向(many-to-one)是最常见的单向关联关系:
<class name="Department" table="department">

        <id name="id" column="id">

            <generator class="native"/>

        </id>

        <property name="uname" column="uname" type="string" length="20"></property>

</class>

 <class name="Employee" table="employee">

        <id name="id" column="id">

            <generator class="native"/>

        </id>

        <property name="uname" type="string" length="20" column="uname"></property>

        <many-to-one name="department" class="Department" column="department_id"></many-to-one>

</class>
下面是对应数据库表

单向一对多:
基于外键关联的单向一对多关联是一种很少见的情况,不推荐使用它。
<class name="Department" table="department">

        <id name="id" column="id">

            <generator class="native"/>

        </id>

        <property name="uname" column="uname" type="string" length="20"></property>

        <set name="employeeSet">

            <key column="employee_id"></key>

            <one-to-many class="Employee" />

        </set>

</class>

<class name="Employee" table="employee">

        <id name="id" column="id">

            <generator class="native"/>

        </id>

        <property name="uname" type="string" length="20" column="uname"></property>

</class>
下面是对应数据库表,可以看出跟上面是一样的

单向一对一:
基于外键关联的单向一对一关联和单向多对一关联几乎是一样的。唯一的不同就是单向一对一关联中的外键字段具有唯一性约束(unique)。
<class name="Department" table="department">

        <id name="id" column="id">

            <generator class="native"/>

        </id>

        <property name="uname" column="uname" type="string" length="20"></property>

</class>

<class name="Employee" table="employee">

        <id name="id" column="id">

            <generator class="native"/>

        </id>

        <property name="uname" type="string" length="20" column="uname"></property>

        <many-to-one name="department" column="department_id" class="Department" unique="true"></many-to-one>

</class>
看图好像和(一对多|多对一)结构一样,确实是一样的,你可以插几条数据试一下,因为是一对一关系,有可能会出错的哦!

二:使用连接表单向关联
单向一对多:
基于连接表的单向一对多关联 应该优先被采用。请注意,通过指定unique="true",我们可以把多样性从多对多改变为一对多。
<class name="Department" table="department">

        <id name="id" column="id">

            <generator class="native"/>

        </id>

        <property name="uname" column="uname" type="string" length="20"></property>

        <set name="employeeSet" table="empl_depa">

            <key column="department_id"></key>

            <many-to-many column="employee_id" class="Employee" unique="true"></many-to-many>

        </set>

</class>

<class name="Employee" table="employee">

        <id name="id" column="id">

            <generator class="native"/>

        </id>

        <property name="uname" type="string" length="20" column="uname"></property>

</class>

单向多对一:
基于连接表的单向多对一关联在关联关系可选的情况下应用也很普遍。
<class name="Employee" table="employee">

        <id name="id" column="id">

            <generator class="native"/>

        </id>

        <property name="uname" type="string" length="20" column="uname"></property>

        <join table="emplo_depa">

            <key column="employee_id"></key>

            <many-to-one name="department" class="Department" column="department_id"></many-to-one>

        </join>

</class>

<class name="Department" table="department">

        <id name="id" column="id">

            <generator class="native"/>

        </id>

        <property name="uname" column="uname" type="string" length="20"></property>

</class>

单向一对一:
基于连接表的单向一对一关联也是可行的,但非常少见。
<class name="Department" table="department">

        <id name="id" column="id">

            <generator class="native"/>

        </id>

        <property name="uname" column="uname" type="string" length="20"></property>

</class>

<class name="Employee" table="employee">

        <id name="id" column="id">

            <generator class="native"/>

        </id>

        <property name="uname" type="string" length="20" column="uname"></property>

        <join table="emplo_depa">

            <key column="employee_id"></key>

            <many-to-one name="department" class="Department" column="department_id" unique="true"></many-to-one>

        </join>

</class>

单向多对多:
<class name="Department" table="department">

        <id name="id" column="id">

            <generator class="native"/>

        </id>

        <property name="uname" column="uname" type="string" length="20"></property>

        <set name="employeeSet" table="emplo_depa">

            <key column="department_id"></key>

            <many-to-many class="Employee" column="employee_id"></many-to-many>

        </set>

</class>

<class name="Employee" table="employee">

        <id name="id" column="id">

            <generator class="native"/>

        </id>

        <property name="uname" type="string" length="20" column="uname"></property>

</class>
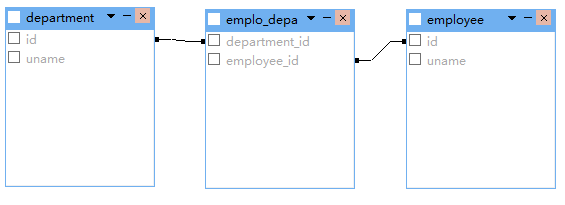
三:双向关联
一对一双向关联
<class name="Department" table="department">

        <id name="id" column="id">

            <generator class="native"/>

        </id>

        <property name="uname" column="uname" type="string" length="20"></property>

        <one-to-one name="employee" class="Employee" property-ref="department"></one-to-one>

</class>

<class name="Employee" table="employee">

        <id name="id" column="id">

            <generator class="native"/>

        </id>

        <property name="uname" type="string" length="20" column="uname"></property>

        <many-to-one name="department" class="Department" unique="true"></many-to-one>

</class>
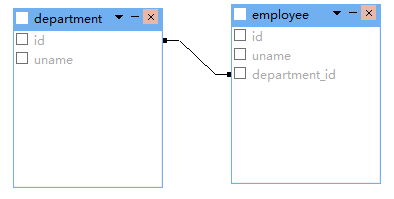
一对多双向关联
<class name="Department" table="department">

        <id name="id" column="id">

            <generator class="native"/>

        </id>

        <property name="uname" column="uname" type="string" length="20"></property>

        <set name="employeeSet">

            <key column="department_id"></key>

            <one-to-many class="Employee" />

        </set>

</class>

<class name="Employee" table="employee">

        <id name="id" column="id">

            <generator class="native"/>

        </id>

        <property name="uname" type="string" length="20" column="uname"></property>

        <many-to-one name="department" class="Department" column="department_id"></many-to-one>

</class>
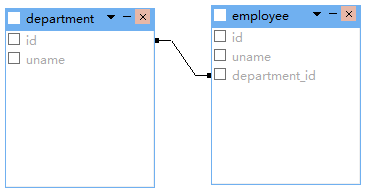
双向多对一关联把上面权限反转一下就好,这里就不贴代码了。
四:使用连接表双向关联
一对一双向关联
<class name="Department" table="department">

        <id name="id" column="id">

            <generator class="native"/>

        </id>

        <property name="uname" column="uname" type="string" length="20"></property>

        <join table="emplo_depa" inverse="true" optional="true">

            <key column="department_id" unique="true"></key>

            <many-to-one name="employee" unique="true" column="employee_id"></many-to-one>

        </join>

</class>

<class name="Employee" table="employee">

        <id name="id" column="id">

            <generator class="native"/>

        </id>

        <property name="uname" type="string" length="20" column="uname"></property>

        <join table="emplo_depa" optional="true">

            <key column="employee_id" unique="true"></key>

            <many-to-one name="department" unique="true" column="department_id"></many-to-one>

        </join>

</class>
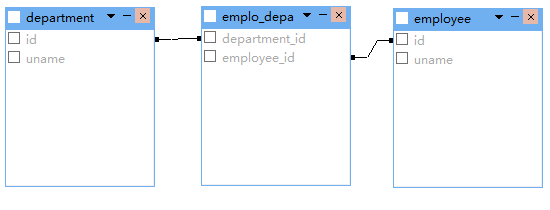
多对多双向关联
<class name="Department" table="department">

        <id name="id" column="id">

            <generator class="native"/>

        </id>

        <property name="uname" column="uname" type="string" length="20"></property>

        <set name="employeeSet" table="emplo_depa" inverse="true">

            <key column="department_id"></key>

            <many-to-many class="Employee" column="employee_id" ></many-to-many>

        </set>

</class>

<class name="Employee" table="employee">

        <id name="id" column="id">

            <generator class="native"/>

        </id>

        <property name="uname" type="string" length="20" column="uname"></property>

        <set name="departmentSet" table="emplo_depa">

            <key column="employee_id"></key>

            <many-to-many class="Department" column="department_id"></many-to-many>

        </set>

</class>

一对多双向关联
<class name="Department" table="department">

        <id name="id" column="id">

            <generator class="native"/>

        </id>

        <property name="uname" column="uname" type="string" length="20"></property>

        <set name="employeeSet" inverse="true" table="emplo_depa">

            <key column="department_id"></key>

            <many-to-many unique="true" class="Employee" column="employee_id"></many-to-many>

        </set>

</class>

<class name="Employee" table="employee">

        <id name="id" column="id">

            <generator class="native"/>

        </id>

        <property name="uname" type="string" length="20" column="uname"></property>

        <join table="emplo_depa">

            <key column="employee_id"></key>

            <many-to-one name="department" column="department_id" class="Department"></many-to-one>

        </join>

</class>

除此之外,还有更多映射配置(继承映射,组件映射),本篇就不写那么多了,希望读者能够查阅文件学习。每天一小步,人生一大步。
Hibernate学习笔记三:对象关系映射(一对一,一对多,多对一,多对多)的更多相关文章
- [原创]java WEB学习笔记81:Hibernate学习之路--- 对象关系映射文件(.hbm.xml):hibernate-mapping 节点,class节点,id节点(主键生成策略),property节点,在hibernate 中 java类型 与sql类型之间的对应关系,Java 时间和日期类型的映射,Java 大对象类型 的 映射 (了解),映射组成关系
本博客的目的:①总结自己的学习过程,相当于学习笔记 ②将自己的经验分享给大家,相互学习,互相交流,不可商用 内容难免出现问题,欢迎指正,交流,探讨,可以留言,也可以通过以下方式联系. 本人互联网技术爱 ...
- Hibernate学习笔记二:常用映射配置
转载请注明原文地址:http://www.cnblogs.com/ygj0930/p/6760895.html 一:单向一对一 常用唯一外键的方法来配置单向一对一关系. 1:实体关系 类A中有类B对象 ...
- Hibernate学习笔记三 多表
一对多|多对一 表中的表达 实体中的表达 实体代码: package com.yyb.domain; import java.util.HashSet; import java.util.Set; p ...
- JPA学习笔记(8)——映射双向一对多关联关系
双向一对多关联关系 前面的博客讲的都是单向的,而本问讲的是双向的(双向一对多 = 双向多对一) 什么是双向? 我们来对照一下单向和双向 单向/双向 User实体类中是否有List< Order& ...
- Hibernate学习笔记三
1.1.1 Hibernate的关联关系映射:(多对多) 1.1.1.1 多对多的配置: 步骤一创建实体和映射: Student: public class Student { private Int ...
- JS学习笔记 (三) 对象进阶
1.JS对象 1.1 JS对象特征 1.JS对象是基本数据数据类型之一,是一种复合值,可以看成若干属性的集合. 属性是名值对的形式(key:value) 属性名是字符串,因此可以把对象看成是字符串到值 ...
- Hibernate学习笔记三:常用数据库操作语句
转载请注明原文地址: 一:HQL 1:HQL语句格式:select from POJO类名 where 条件表达式 group by 属性 having 聚集函数 order by 属性 [其中,fr ...
- Hibernate映射--基本类映射和对象关系映射(转)
原文地址:http://blog.csdn.net/lovesummerforever/article/details/20901011 尊重原创,请访问原网址 回想一些我们在没有学习ssh的时候 ...
- Hibernate的核心对象关系映射
Hibernate的核心就是对象关系映射: 加载映射文件的两种方式: 第一种:<mapping resource="com/bie/lesson02/crud/po/employee. ...
随机推荐
- 非负矩阵分解(1):准则函数及KL散度
作者:桂. 时间:2017-04-06 12:29:26 链接:http://www.cnblogs.com/xingshansi/p/6672908.html 声明:欢迎被转载,不过记得注明出处哦 ...
- 第一章 oracle数据库基础
第一章 oracle数据库基础 1.oracle简介-->数据库管理系统 1.1:数据库 1.2:全局数据库名 1.3:数据库实例 1.4:表空间 1.5:数据 ...
- 几个地图(高德、百度、Apple、Google)URL API
移动应用中,如何在自己的App中调起第三方的原生地图App,并显示相关的信息,如显示指定的一个坐标位置,显示一个起点到终点的路线查询,等等. 目前几个主要的地图商都提供了自己的App通过URL调用的形 ...
- 详谈 Unity3D AssetBundle 资源加载,结合实际项目开发实例
第一次搞资源更新方面,这里只说更新,加载,AssetBundle资源加载,谈谈自己的理解,以及自己在项目中遇到的那些神坑,现在回想一下,真的是自己跪着过来的,说多了,都是泪. 我这边是安卓AssetB ...
- 【转】JDBC学习笔记(1)——JDBC概述
转自:http://www.cnblogs.com/ysw-go/ JDBC JDBC API是一个Java API,可以访问任何类型表列数据,特别是存储在关系数据库中的数据.JDBC代表Java数据 ...
- Android启动篇 — init原理(二)
======================================================== ================================== ...
- require.js+bootstrap实现简单的页面登录和页面跳转
小颖的这个demo其实很简单的,大家一起来先来看看页面效果图: 目录: 代码: inde.html <!DOCTYPE html> <html> <he ...
- 单Js 的重力游戏开发
最近在用看cocos的时候萌生的想法,单纯js实现重力原理.然后就做了一个这样的小游戏.姑且命名为<超级玛丽>! 因为之前有人要我做超级玛丽.哈哈哈哈哈哈!这也算完成任务了吧. 先说一下原 ...
- PHP 手册
http://www.php.net/manual/zh/index.php 感谢中文翻译工作者. PHP 手册¶ by:Mehdi Achour Friedhelm Betz Antony Dovg ...
- 用PetaPoco为ASP.NET已有数据库建模
序:最近一直在抓紧重构公司的网站,没有很多时间去写博客,积累了很多的问题,几乎是一天一个,折腾死了,尤其是在模型方面几经周折. 以前,多半从事PHP开发,很少接触到模型(thinkphp中模型),但是 ...