K8S Pod Sidecar 应用场景之一-加入 NGINX Sidecar 做反代和 web 服务器
Kubernetes Pod Sidecar 简介

Sidecar 是一个独立的容器,与 Kubernetes pod 中的应用容器一起运行,是一种辅助性的应用。
Sidecar 的常见辅助性功能有这么几种:
- 服务网格 (service mesh) 代理
- 监控 Exporter(如 redis exporter)
- ConfigMap 或/和 Secret Reloader(如 Prometheus 的 Config Reloader)
- Auth Proxy(如 OAuth Proxy 等)
- 7 层反向代理和 Web 服务器
- 日志整合(审计日志单独发到某个日志渠道。..)
- Demo 或 AllInOne 应用(如 nextcloud 或 Jaeger AllInOne 等示例应用)
- ...
这里选几个场景细说一下,在服务网格的情况下,sidecar 负责从应用程序本身卸载服务网格中所有应用程序所需的功能--SSL/mTLS、流量路由、高可用性等,并实施部署各种高级发布模式,如断路器、金丝雀和蓝绿等。
作为数据平面组件,sidecar 通常由服务网格中的某种类型的控制平面管理。当 sidecar 路由应用流量并提供其他数据平面服务时,控制平面在必要时将 sidecars 注入 pod 并执行管理任务,例如更新 mTLS 证书并在需要时将其推送到适当的 sidecars。
日志整合场景下,Sidecar 被用来将多个应用实例的日志信息汇总并格式化为一个文件。
接下来进入本次的正题:将 NGINX (或 Caddy 等)作为 Sidecar 使用,主要用做反代和 web 服务器

场景假设
假设有这么一个场景:
我在使用原生的 Prometheus AlertManager, 我已经有 Ingress.
我现在想要做 2 件事:
- 提升 AlertManager UI 的并发能力(增加 buffer, cache; 启用 gzip 等)
- AlertManager 的某个 js(假设是
script.js), 我做了一点修改,但不希望侵入式地修改 原生 AlertManager 二进制文件,而是把修改后 js 放到 nginx 的 www 目录,让 nginx 来用不同的 location 进行处理。
这种场景下,显然 Ingress 是无法同时满足的。这时候就可以在 AlertManager Pod 里加个 NGINX 的 sidecar 来实现。
具体如下
NGINX Sidecar 典型使用步骤
- 创建 NGINX Conf 的 configmap; (监听 8080, 反向代理到后端的 9093)
- 创建 alertmanager script.js 的 configmap;
- 修改原 AlertManager 的 StatefulSets, 增加:
- NGINX Sidecar
- 3 个 volumes: 其中 2 个就是用于挂载上面的 ConfigMap, 另外一个 EmptyDir 用于挂载 nginx cache
- 修改 AlertManager Service 的端口,从 9093 改为 8080, name 从
http改为nginx-http - (可选)修改其他部分,如 Ingress 等,调整端口。
NGINX Conf 的 ConfigMap
具体如下:
apiVersion: v1

kind: ConfigMap

metadata:

  name: alertmanager-nginx-proxy-config

  labels:

    app.kubernetes.io/name: alertmanager

data:

  nginx.conf: |-

    worker_processes      auto;

    error_log             /dev/stdout warn;

    pid                   /var/cache/nginx/nginx.pid;

    events {

       worker_connections 1024;

    }

    http {

      include       /etc/nginx/mime.types;

      log_format    main '[$time_local - $status] $remote_addr - $remote_user $request ($http_referer)';

      proxy_connect_timeout       10;

      proxy_read_timeout          180;

      proxy_send_timeout          5;

      proxy_buffering             off;

      proxy_cache_path            /var/cache/nginx/cache levels=1:2 keys_zone=my_zone:100m inactive=1d max_size=10g;

      server {

        listen          8080;

        access_log      off;

        gzip            on;

        gzip_min_length 1k;

        gzip_comp_level 2;

        gzip_types      text/plain application/javascript application/x-javascript text/css application/xml text/javascript image/jpeg image/gif image/png;

        gzip_vary       on;

        gzip_disable    "MSIE [1-6]\.";

        proxy_set_header Host $host;

        location = /script.js {

          root /usr/share/nginx/html;

          expires             90d;

        }

        location / {

          proxy_cache         my_zone;

          proxy_cache_valid   200 302 1d;

          proxy_cache_valid   301 30d;

          proxy_cache_valid   any 5m;

          proxy_cache_bypass  $http_cache_control;

          add_header          X-Proxy-Cache $upstream_cache_status;

          add_header          Cache-Control "public";

          proxy_pass     http://localhost:9093/;

          if ($request_filename ~ .*\.(?:js|css|jpg|jpeg|gif|png|ico|cur|gz|svg|svgz|mp4|ogg|ogv|webm)$) {

            expires             90d;

          }

        }

      }

    }
AlertManager script.js ConfigMap
详细内容略。
先通过浏览器将script.js 下载下来。然后按需修改:
apiVersion: v1

kind: ConfigMap

metadata:

  name: alertmanager-script-js

  labels:

    app.kubernetes.io/name: alertmanager

data:

  script.js: >-

    ...
修改 StatefulSets
修改的部分内容如下:
apiVersion: apps/v1

kind: StatefulSet

metadata:

  name: monitor-alertmanager

spec:

  template:

    spec:

      volumes:

        # 增加 3 个 volumes

        - name: nginx-home

          emptyDir: {}

        - name: html

          configMap:

            name: alertmanager-script-js

            items:

            - key: script.js

              mode: 438

              path: script.js

        - name: alertmanager-nginx

          configMap:

            name: alertmanager-nginx-proxy-config

            items:

            - key: nginx.conf

              mode: 438

              path: nginx.conf

      containers:

        # 增加 NGINX sidecar

        - name: alertmanager-proxy

          args:

          - nginx

          - -g

          - daemon off;

          - -c

          - /nginx/nginx.conf

          image: "nginx:stable"

          ports:

          - containerPort: 8080

            name: nginx-http

            protocol: TCP

          volumeMounts:

          - mountPath: /nginx

            name: alertmanager-nginx

          - mountPath: /var/cache/nginx

            name: nginx-home

          - mountPath: /usr/share/nginx/html

            name: html

          securityContext:

            runAsUser: 101

            runAsGroup: 101
修改 Service 端口
如下:
apiVersion: v1

kind: Service

metadata:

  name: monitor-alertmanager

  labels:

    app.kubernetes.io/name: alertmanager

spec:

  ports:

    - name: nginx-http

      protocol: TCP

      # 修改以下 2 项

      port: 8080

      targetPort: nginx-http
最终效果
以这次的 AlertManager 为例,修改前:
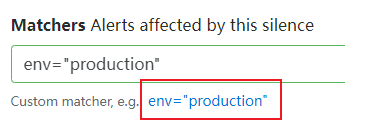
修改后:(matcher 的例子更符合实际场景,并增加了多个示例。确实是很小的改动)

总结
Kubernetes 的 Pod 设计之初就定义为:一个 Pod 可以包含多个 Containers, 这为 Kubernetes 中 Pod 的 Sidecar 使用留下了无尽的想象空间。
Sidecar 一般是用来做辅助功能的,比如:
- 服务网格 (service mesh) 代理
- 监控 Exporter(如 redis exporter)
- ConfigMap 或/和 Secret Reloader(如 Prometheus 的 Config Reloader)
- Auth Proxy(如 OAuth Proxy 等)
- 7 层反向代理和 Web 服务器
- 日志整合(审计日志单独发到某个日志渠道。..)
- Demo 或 AllInOne 应用(如 nextcloud 或 Jaeger AllInOne 等示例应用)
- ...
我们这次通过加入 NGINX 作为 7 层反向代理和 Web 服务器用途的 Sidecar 来进行演示,生动地说明了 Sidecar 的实用之处。
️参考文档
K8S Pod Sidecar 应用场景之一-加入 NGINX Sidecar 做反代和 web 服务器的更多相关文章
- [阿里云部署] Ubuntu+Flask+Nginx+uWSGI+Mysql搭建阿里云Web服务器
部署地址:123.56.7.181 Ubuntu+Flask+Nginx+uWSGI+Mysql搭建阿里云Web服务器 这个标题就比之前的"ECS服务器配置Web环境的全过程及参考资料&qu ...
- nginx+uWSGI+django+virtualenv+supervisor发布web服务器
nginx+uWSGI+django+virtualenv+supervisor发布web服务器 导论 WSGI是Web服务器网关接口.它是一个规范,描述了Web服务器如何与Web应用程序通信,以 ...
- nginx+uwsgi+django+virtualenv+supervisor部署web服务器
wsgi 全称web server gateway interface,wsgi不是服务器,也不是python模块,只是一种协议,描述web server如何和web application通信的规则 ...
- Linux - nginx+uWSGI+django+virtualenv+supervisor发布web服务器
目录 Linux - nginx+uWSGI+django+virtualenv+supervisor发布web服务器 crm django项目部署流程 使用supervisro启动uwsgi,退出虚 ...
- 使用nginx做反代时遇到413 Request Entity Too Large的解决方法
在使用nginx做反向代理的时候,被反代的系统在上传文件的时候遇到413 错误 :Request Entity Too Large 原因是nginx限制了上传文件的大小,在nginx中可以配置最大允许 ...
- 12,nginx+uWSGI+django+virtualenv+supervisor发布web服务器
导论 WSGI是Web服务器网关接口.它是一个规范,描述了Web服务器如何与Web应用程序通信,以及Web应用程序如何链接在一起以处理一个请求,(接收请求,处理请求,响应请求) 基于wsgi运行的框架 ...
- nginx+uWSGI+django+virtualenv+supervisor发布web服务器流程
导论 WSGI是Web服务器网关接口.它是一个规范,描述了Web服务器如何与Web应用程序通信,以及Web应用程序如何链接在一起以处理一个请求,(接收请求,处理请求,响应请求)基于wsgi运行的框架有 ...
- 三 nginx+uWSGI+django+virtualenv+supervisor发布web服务器
https://www.cnblogs.com/pyyu/p/9481344.html?tdsourcetag=s_pcqq_aiomsg 一 uwsgi安装 1.安装uwsgi,进入到一个虚拟机环境 ...
- Nginx和Squid配合搭建的Web服务器前端系统
这个架构是目前我个人觉得比较稳妥并且最方便的架构,易于多数人接受: 前端的lvs和squid,按照安装方法,把epoll打开,配置文件照搬,基本上问题不多. 这个架构和app_squid架构的区别,也 ...
- nginx+uWSGI+django+virtualenv+superviso发布web服务器
1.环境依赖 yum groupinstall "Development tools" -y yum install zlib-devel bzip2-devel pcre-dev ...
随机推荐
- 【每日一题】【将cur的next尾插到pre后面,尾插k-1次】25. K 个一组翻转链表-211115&220120
给你一个链表,每 k 个节点一组进行翻转,请你返回翻转后的链表. k 是一个正整数,它的值小于或等于链表的长度. 如果节点总数不是 k 的整数倍,那么请将最后剩余的节点保持原有顺序. 进阶: 你可以设 ...
- 基于训练和推理场景下的MindStudio高精度对比
摘要:MindStudio提供精度比对功能,支持Vector比对能力. 本文分享自华为云社区<[MindStudio训练营第一季]MindStudio 高精度对比随笔>,作者:Tianyi ...
- JavaFX入门笔记
JavaFX入门笔记 背景 Java选修课第四次实验 所需工具 IDEA JavaFX插件(需要Maven) JavaFX Scene Builder 参考资料 https://www.yiibai. ...
- 高性能 Jsonpath 框架,Snack3 3.2.50 发布
Snack3,一个高性能的 JsonPath 框架 借鉴了 Javascript 所有变量由 var 申明,及 Xml dom 一切都是 Node 的设计.其下一切数据都以ONode表示,ONode也 ...
- 事件 jQuery类库、Bootstrap页面框架
目录 jQuery查找标签 基本选择器 组合选择器 层级选择器 属性选择器 基本筛选器 表单筛选器 筛选器方法 链式的本质(jQuery一行代码走天下) 操作标签 class操作 位置操作 文本操作 ...
- vue elementui弹框内 富文本编辑器的使用,及踩坑
最近vue项目中遇到弹框内使用富文本编辑器,遇到最大的问题是,在打开弹框后才能创建富文本编辑器,并且只能创建一次,多次点击弹框,报错: Error in v-on handler: "Err ...
- Window注册表的学习记录
注册表的结构: 概述:注册表是一种树状结构,在很早之前是系统的其他配置信息存放的文件,通常以.ini结尾的文件,因为数量太多不方便管理,后来就整合在一起形成了注册表.你可以按住键盘win+r,然后输入 ...
- [深度学习] CCPD车牌数据集介绍
CCPD是一个大型的.多样化的.经过仔细标注的中国城市车牌开源数据集.CCPD数据集主要分为CCPD2019数据集和CCPD2020(CCPD-Green)数据集.CCPD2019数据集车牌类型仅有普 ...
- vue 中安装并使用echart
本文为博主原创,转载请注明出处: 1.安装echart 依赖: 安装命令: npm install echarts --save 在vscode 的终端窗口进行执行,如图所示: 执行完之后,查看 项目 ...
- 华为云Stack新版发布:构筑行业云底座,共创行业新价值
摘要:在以"政企深度用云,释放数字生产力"为主题的华为云Stack战略暨新品发布会上,华为云提出深度用云三大关键举措,并发布华为云Stack 8.2版本,以智能进化推动创造行业新价 ...