Mybatis应用手册
重学mybatis框架,汇成应用手册,整理mybatis中用法且附相关实例,方便日常回顾
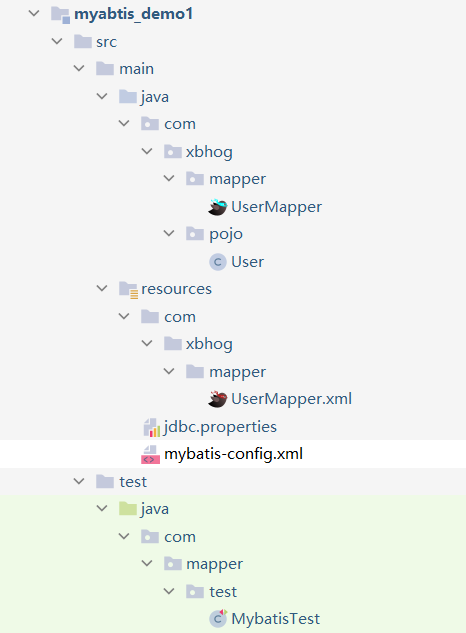
目录结构:
-----------------
Github手册地址:https://github.com/xbhog/MyBatisAppManual
----------------
MyaBtis基本知识点
mybatis初始对应关系需要注意:
- pojo类对应数据库中表中的字段。
- mapper接口对应的xml中的命名空间。
- 接口中的抽象方法对应xml中的id值。
- 最后需要引入映射文件文件:
<mapper resource="mapper/UserMapper.xml"/>
对于增删改来说,返回值都是整形,可以默认,对于查询来说就比较复杂一些。
查询的标签select必须设置属性resultType或resultMap,用于设置实体类和数据库表的映射
关系
当查询的数据为多条时,不能使用实体类作为返回值,只能使用集合,否则会抛出异常
- resultType:自动映射,用于属性名和表中字段名一致的情况
- resultMap:自定义映射,用于一对多或多对一或字段名和属性名不一致的情况
以下使用需要注意顺序
可以使用properties标签引入properties文件。
配置的方式可以有三种:
- 完全在mybatis-config.xml配置中写
- 生成xxx.properties,通过外部xml配置引入
- 一部分在xml中配置,一部分通过外部引入实现
更多的请看MyBatis官网-属性
MyBatis的使用:数据库表--> pojo -->mapperService -->mapper.xml
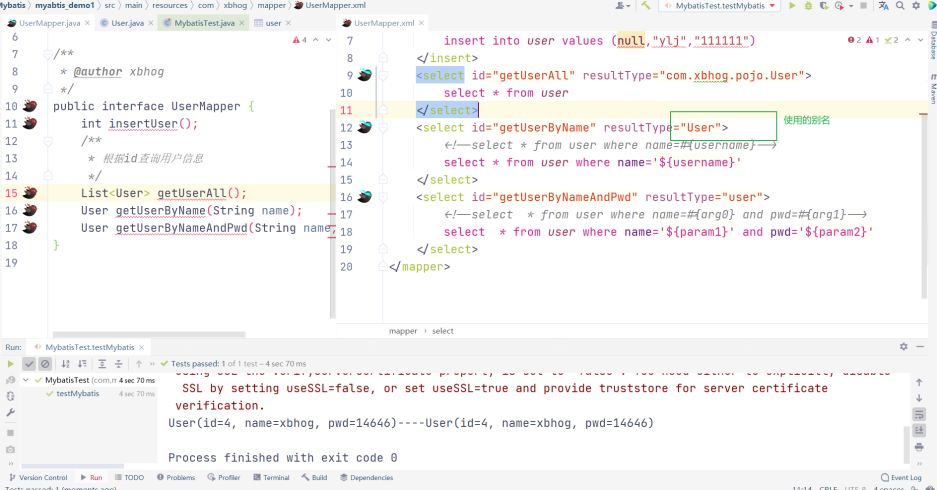
其中在mapper.xml中通过<select></select>返回的值是对象,就需要通过resultType/resultMap返回结果集,如果不使用别名,那么我们需要使用类的全限定名称。
<select id="getUserAll" resultType="com.xbhog.pojo.User">

        select * from user

</select>
别名的使用,用的最多的为<typeAliases> <package/></typeAliases>(以包为单位,设置该包下所有的类型都拥有默认的别名(类名即别名),且类名不区分大小写)。方便,不用使用全类名了。
<typeAliases>

        <package name="com.xbhog.pojo"/>

</typeAliases>

<!--不区分大小写user/User -->

<select id="getUserAll" resultType="User">

        select * from user

</select>
结束
映射器(Mappers):
既然 MyBatis 的行为已经由上述元素配置完了,我们现在就要来定义 SQL 映射语句了。 但首先,我们需要告诉 MyBatis 到哪里去找到这些语句。 在自动查找资源方面,Java 并没有提供一个很好的解决方案,所以最好的办法是直接告诉 MyBatis 到哪里去找映射文件。 你可以使用相对于类路径的资源引用,或完全限定资源定位符(包括 file:/// 形式的 URL),或类名和包名等
有四种实现方式:
我们说最后一个:
resource中的mapper,也可以以包为单位,将包下所有的映射文件引入核心配置文件
注意:此方式必须保证mapper接口和mapper映射文件必须在相同的包下
创建的时候需要在resource不支持像Java一样的使用 ,我们可以使用 xxx/xxx/xxx;
<!--引入映射文件-->

<mappers>

<!--<mapper resource="mapper/UserMapper.xml"/>-->

   <package name="com.xbhog.mapper"/>

</mappers>
MyBatis传参的方式
获取参数值的两种方式(重要) xxx表示传入的参数
${} 本质为字符串拼接:形式:**xxx**,有sql注入的风险,单引号需要手动字符串拼接
#{}本质为占位符赋值:形式:**?** -->**'xxx'**
第一种情况:单个字面量传入
若mapper接口中的方法参数为单个的字面量类型(例:String name) ,此时可以使用${}和#{}以任意的名称(xxx)获取参数的值,注意**${}**-->字符串(传啥就是啥),所以需要手动加单引号.
// java

private void getParams(UserMapper mapper) {

    User aaa = mapper.getUserByParams("aaa");

    System.out.println(aaa);

}

//mapper

User getUserByParams(@Param("username") String username);

//xml

<select id="getUserByParams" resultType="user">

    select * from user where name=#{username};

</select>
第二种情况:多个字面量传入
若mapper接口中的方法参数为多个时,此时MyBatis会自动将这些参数放在一个map集合中,以arg0,arg1...为键,以参数为值;以 param1,param2...为键,以参数为值;因此只需要通过\({}和#{}访问map集合的键就可以获取相对应的值**,注意**`**\){}`需要手动加单引号 ;**
//java
private void moreArgs(UserMapper mapper) {
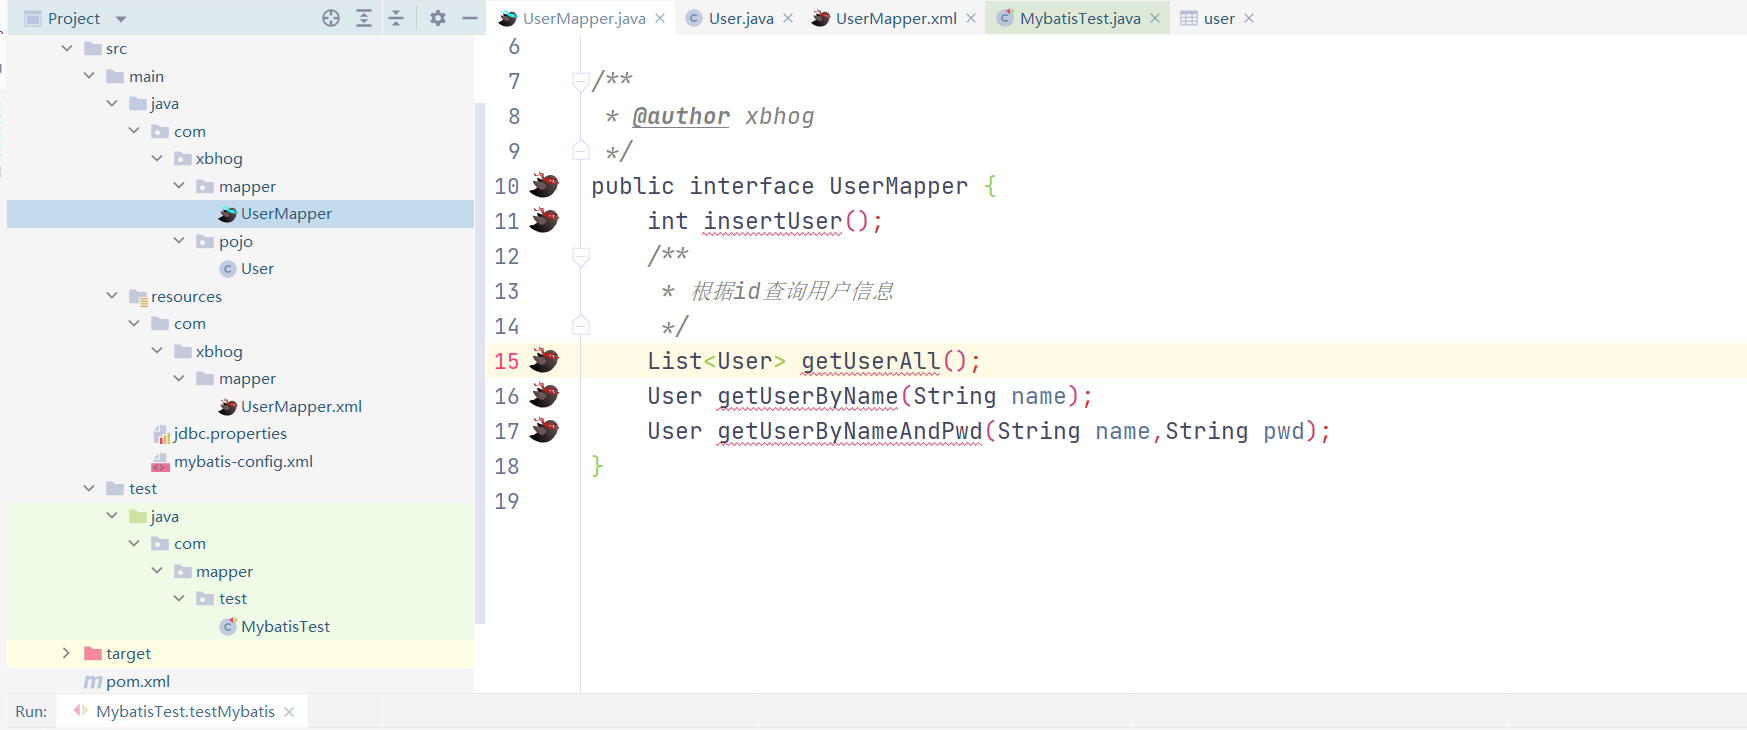
User userByName = mapper.getUserByName("xbhog");
User userByNameAndPwd = mapper.getUserByNameAndPwd("xbhog", "14646");
System.out.println(userByName + "----" + userByNameAndPwd);
}
//mapper
User getUserByName(String name);
User getUserByNameAndPwd(String name,String pwd);
//xml
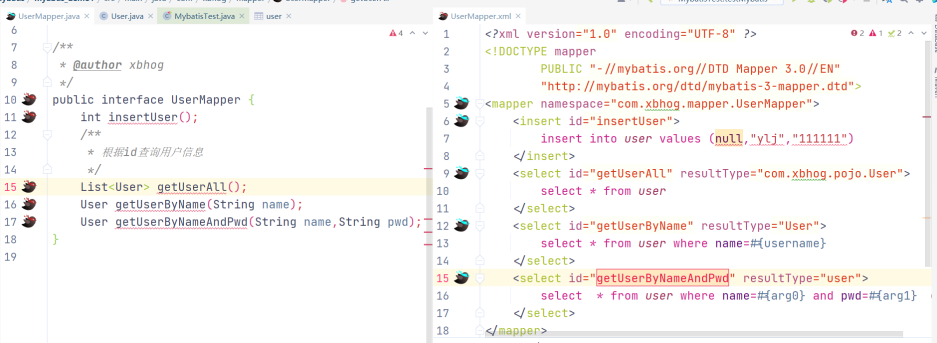
<select id="getUserByName" resultType="User">
<!--select * from user where name=#{username}-->
select * from user where name='${username}'
</select>
<select id="getUserByNameAndPwd" resultType="user">
<!--select * from user where name=#{arg0} and pwd=#{arg1}-->
select * from user where name='${param1}' and pwd='${param2}'
</select>
相关映射:
第三种情况:map传入
若mapper接口中的方法需要的参数为多个时,出来MyBatis自动创建Map,我们也可以手动创建map集合,将这些数据放在map中 ;
只需要通过${}和#{}访问map集合的键就可以获取相对应的值,注意${}需要手动加单引号
//java

private void mapArgs(UserMapper mapper) {

        Map<String, Object> map = Map.of("username","xbhog");

        User user = mapper.checkLogin(map);

        System.out.println(user);

}

//mapper

User checkLogin(Map map);

//xml

<select id="checkLogin" resultType="user">

        select * from user where name=#{username}

</select>
第四种情况:对象传入
若mapper接口中的方法参数为实体类对象时
此时可以使用${}和#{},通过访问实体类对象中的属性名获取属性值,注意${}需要手动加单引号
//java

private void insertObject(UserMapper mapper) {

        int i = mapper.insertUserByUser(new User(null, "aaa", "aaa"));

        System.out.println(i);

}

//mapper

int insertUserByUser(User user);

//xml

<insert id="insertUserByUser" >

        insert into user values (null,#{name},#{pwd});

</insert>
第五种情况:@param()传入
需求:之前传参后接受参数的名字都是不固定的,最好我们自己给它限定名字。
对于单个或多个自变量使用@param()来确定传入的参数名****(这才是重重点)
可以通过@Param注解来标识mapper接口中方法参数名的确定名
此时,会将这些参数放在map集合中,以@Param注解的value属性值为键,以参数为值;以
param1,param2...为键,以参数为值;只需要通过${}和#{}访问map集合的键就可以获取相对应的值,
注意${}需要手动加单引号
//java

User aaa = mapper.getUserByParams("aaa");

            System.out.println(aaa);

/*mapper:mybatis会把param中的username当作key,String后面的作为value*/

User getUserByParams(@Param("username") String username);

//xml

<select id="getUserByParams" resultType="user">

        select * from user where name=#{username};

</select>
MyaBtis各种查询功能
查询一个实体类或者查询一个List集合
/*** 根据用户id查询用户信息 * @param id * @return */

//mapper 查询一个实体类

User getUserById(@Param("id") int id);

/*xml*/

<select id="getUserById" resultType="User">

select * from t_user where id = #{id}

</select>

//-------------------------------------------------------------------

//mapper  查询一个List集合

List<User> getUserAll();

/*xml(如果在核心配置中使用了别名,可以直接使用user,不用使用全类名)*/

<select id="getUserAll" resultType="com.xbhog.pojo.User">

        select * from user

</select>

/*上简化

---核心配置mybatis-config.xml*/

<typeAliases>

        <package name="com.xbhog.pojo"/>

</typeAliases>

/*简化 别名不区分大小写*/

<select id="getUserAll" resultType="User">

        select * from user

</select>
查询一条/多条数据为map集合
//java
private void getUserToMap(UserMapper mapper) {
List<Map<String, Object>> userToMap = mapper.getUserToMap();
System.out.println(userToMap);
}
//mapper 以MapKey设置的字段为key,map中的key不能重复,所以选择id作为key,
List<Map<String,Object>> getUserToMap();
//xml
<select id="getUserToMap" resultType="map">
select * from user where id=#{id};
</select>
//map无序,结果
{name=世杰, id=1, pwd=123456}
//以MapKey设置的字段为key,返回的结果为map且其中key不能重复,所以选择id作为key;
/**查询所有用户信息为map集合
将表中的数据以map集合的方式查询,一条数据对应一个map;若有多条数据,就会产生多个map集合,
并且最终要以一个map的方式返回数据,此时需要通过@MapKey注解设置map集合的键,
值是每条数据所对应的map集合 */
//mapper
@MapKey("id")
Map<String,Object> getUserToMap();
//Usermapper.xml
<select id="getUserToMap" resultType="map">
select * from user;
</select>
//java
Map<String, Object> userToMap = mapper.getUserToMap();
System.out.println(userToMap);
//结果
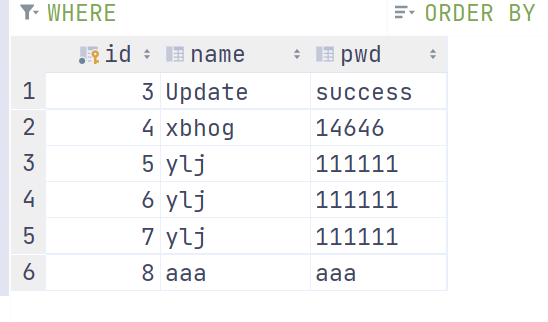
{1={name=世杰, id=1, pwd=123456}, 3={name=Update, id=3, pwd=success},
4={name=xbhog, id=4, pwd=14646}, 5={name=ylj, id=5, pwd=111111},
6={name=ylj, id=6, pwd=111111}, 7={name=ylj, id=7, pwd=111111},
8={name=aaa, id=8, pwd=aaa}}
List版本:
//将表中的数据以map集合的方式查询,一条数据对应一个map;

//若有多条数据,就会产生多个map集合,此时可以将这些map放在一个list集合中获取

List<Map<String,Object>> getUserToMap();

<select id="getUserToMap" resultType="map">

        select * from user;

</select>

//结果

[{name=世杰, id=1, pwd=123456}, {name=Update, id=3, pwd=success},

 {name=xbhog, id=4, pwd=14646}, {name=ylj, id=5, pwd=111111},

 {name=ylj, id=6, pwd=111111}, {name=ylj, id=7, pwd=111111},

 {name=aaa, id=8, pwd=aaa}]
特殊Sql的执行(都需要使用${})
模糊匹配:
//java

private void mohuTest(UserMapper mapper) {

        List<User> xbhog = mapper.testMohu("x");

        System.out.println(xbhog);

}

//mapper

List<User> testMohu(@Param("mohu") String mohu);

//三种方式都能实现

<select id="testMohu" resultType="user">

    select * from user where name like '%${mohu}%'

    //mysql函数拼接

    //select * from user where name like concat('%',#{mohu},'%')

    //select * from user where name like "%"#{mohu}"%"

</select>

//使用#{}

//select * from user where name like '%#{mohu}%'报错

select * from user where name like '%?%'
批量删除:
//java

 private void batchDelete(UserMapper mapper) {

        int i = mapper.deleteAll("1,2,10");

        System.out.println(i);

}

//mapper

int deleteAll(@Param("ids") String ids);

//xml

<delete id="deleteAll">

        delete from user where id in (#{ids});

</delete>

//如果使用#{}--->?

delete from user where id in (?);  //报错,不符合mysql语法格式,所以需要使用${}

//正确方式打开

delete from user where id in (${ids});
动态设置表名:
/**

 * 动态设置表名

*/

List<User> getAllByTableName(@Param("tableName") String tableName);

//xml,使用#{}会造成 'user' 报错,

// ${} --> user

<select id="getAllByTableName" resultType="user">

        select * from ${tableName};

</select>

//test

List<User> user = mapper.getAllByTableName("user");

user.forEach(System.out::println);

//result

User(id=3, name=Update, pwd=success)

...
获取自增的主键
useGeneratedKeys:设置使用自增的主键
keyProperty:因为增删改有统一的返回值是受影响的行数,因此只能将获取的自增的主键放在传输的参
数user对象的某个属性中
//java

TeacherMapper mapper = sqlSession.getMapper(TeacherMapper.class);

Teacher t1 = new Teacher(null, "aaa");

mapper.insertDemo(t1);

System.out.println(t1);

//mapper

int insertDemo(Teacher teacher);

//xml

<insert id="insertDemo" useGeneratedKeys="true" keyProperty="id">

        insert into teacher values (null,#{name});

</insert>
无法获取自增后的id:
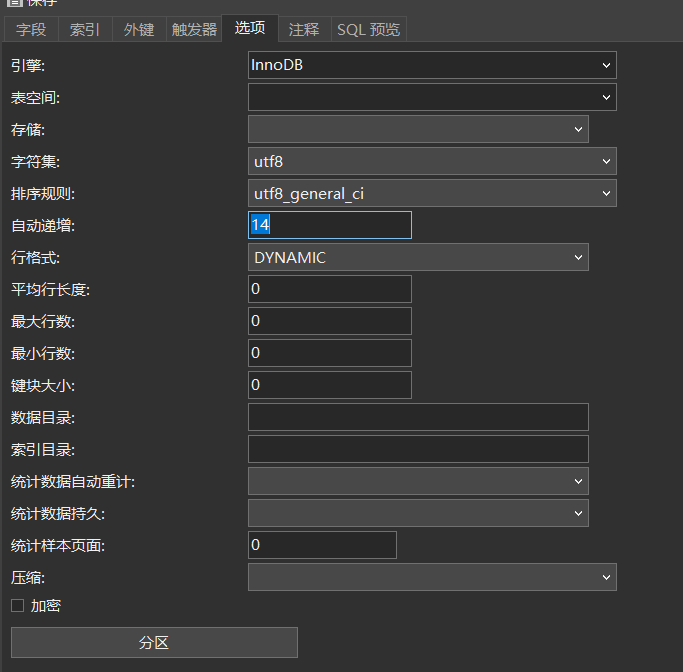
数据库中的id需要设置主键且自增。
数据库中的主键一直没法自增,在设计表的选项中无法修改自增。这应该是表设计的问题。
自定义映射ResultMap
解决的问题:
因为属性中命名规范和数据库中的命名规范不同(empName---emp_name);reslutType只能获取属性和数据库中相同的属性的值,所以这时候需要使用ResultMap.
若字段名和实体类中的属性名不一致,则可以通过resultMap设置自定义映射
多对一:多个员工对应一个部门
一对多:一个部门对应多个员工
所以部门中的员工实体类是List结合,员工实体类中是对象属性;
实体类:
@Data

@AllArgsConstructor

@NoArgsConstructor

public class Dept {

    private Integer did;

    private String deptName;

    private List<Emp> emps;

}

@Data

@AllArgsConstructor

@NoArgsConstructor

public class Emp {

    private Integer eid;

    private String empName;

    private Integer age;

    private Dept dept;

}
多对一:对象
联表查询:
//java

private void selectTableQuery(EmpMapper mapper) {

        //连表查询

        Emp empAllDate = mapper.getEmpAllDate(3);

        System.out.println(empAllDate);

}

/**

 * mapper 联表查询多对一

 */

Emp getEmpAllDate(@Param("eid") Integer eid);

//映射文件 xml

<resultMap id="getEmpAndDept" type="Emp">

    <id property="eid" column="eid"/>

    <result property="empName" column="emp_name"/>

    <result property="age" column="age"/>

    <result property="dept.did" column="did"/>

    <result property="dept.deptName" column="dept_name"/>

</resultMap>

<select id="getEmpAllDate" resultMap="getEmpAndDept">

    select * from t_emp e left join t_dept d on e.did=d.did where

    e.eid=#{eid}

</select>

//结果

Emp(eid=3, empName=王五, age=24, dept=Dept(did=3, deptName=C, emps=null))
注意的几点:dept.xxx会爆红,可忽略
- resutMap id对应的是select中reslutMap;
- resultMap返回的类型对应的是select返回的数据;
- 对于emp实体类中的dept需要单独将属性拿出来对应
association
//java

private void associationQuery(EmpMapper mapper) {

        Emp empAndDept = mapper.getEmpAndDept(3);

        System.out.println(empAndDept);

}

//mapper

Emp getEmpAndDept(@Param("eid") Integer eid);

//xml

 <!--多对一常用association标签-->

    <resultMap id="getEmp" type="Emp">

        <id property="eid" column="eid"/>

        <result property="age" column="age"/>

        <result property="empName" column="emp_name"/>

        <association property="dept" javaType="Dept">

            <id property="did" column="did"/>

            <result property="deptName" column="dept_name"/>

        </association>

    </resultMap>

<select id="getEmpAndDept" resultMap="getEmp">

        select * from t_emp emp left join t_dept dept on emp.eid = dept.did where eid=#{eid};

</select>

//结果

DEBUG 06-03 15:49:36,486 ==>  Preparing: select * from t_emp emp left join t_dept dept on emp.eid = dept.did where eid=?; (BaseJdbcLogger.java:137)

DEBUG 06-03 15:49:36,503 ==> Parameters: 3(Integer) (BaseJdbcLogger.java:137)

DEBUG 06-03 15:49:36,533 <==      Total: 1 (BaseJdbcLogger.java:137)

Emp(eid=3, empName=王五, age=24, dept=Dept(did=3, deptName=C, emps=null))
基于association的分步查询:
先查emp,在查dept,最后综合。
//java

private void splitSept(EmpMapper mapper) {

        //分步查询

        Emp empAndDeptStepOne = mapper.getEmpAndDeptStepOne(3);

        System.out.println(empAndDeptStepOne.getEmpName());

}

/**mapper

 * 分步查询 stepOne

 */

Emp getEmpAndDeptStepOne(@Param("eid") Integer eid);

//xml

<resultMap id="getEmpSetpOne" type="Emp">

        <id property="eid" column="eid"/>

        <result property="age" column="age"/>

        <result property="empName" column="emp_name"/>

    <association property="dept"

    select="com.xbhog.mapper.DeptMapper.getDeptSetupTwo"

    fetchType="eager"

    column="did"/>

</resultMap>

<select id="getEmpAndDeptStepOne" resultMap="getEmpSetpOne">

        select * from t_emp where t_emp.eid=#{eid}

</select>

/**

     * 分步查询:stepTwo,

     */

Dept getDeptSetupTwo(@Param("did") Integer did);

 <select id="getDeptSetupTwo" resultType="dept">

        select * from t_dept where t_dept.did=#{did};

</select>
- select:设置下一步查询点,使用绝对定位,命名空间+id值
- column:字段值是作为下一步的入参
- 在mybatis-config.xml开启懒加载,
<!--开启懒加载-->

<setting name="lazyLoadingEnabled" value="true"/>
- fetchType:控制延迟加载的效果,懒加载开启是前提,eager,(全部执行),lazy表示延迟加载(用到啥执行啥)
DEBUG 06-03 15:54:30,048 ==>  Preparing: select * from t_emp where t_emp.eid=? (BaseJdbcLogger.java:137)

DEBUG 06-03 15:54:30,066 ==> Parameters: 3(Integer) (BaseJdbcLogger.java:137)

DEBUG 06-03 15:54:30,098 ====>  Preparing: select * from t_dept where t_dept.did=?; (BaseJdbcLogger.java:137)

DEBUG 06-03 15:54:30,098 ====> Parameters: 3(Integer) (BaseJdbcLogger.java:137)

DEBUG 06-03 15:54:30,123 <====      Total: 1 (BaseJdbcLogger.java:137)

DEBUG 06-03 15:54:30,123 <==      Total: 1 (BaseJdbcLogger.java:137)

Emp(eid=3, empName=王五, age=24, dept=Dept(did=3, deptName=C, emps=null))

单查:

DEBUG 06-03 15:55:46,779 ==>  Preparing: select * from t_emp where t_emp.eid=? (BaseJdbcLogger.java:137)

DEBUG 06-03 15:55:46,796 ==> Parameters: 3(Integer) (BaseJdbcLogger.java:137)

DEBUG 06-03 15:55:46,899 <==      Total: 1 (BaseJdbcLogger.java:137)

王五
一对多:集合(collection)
//java

public void demoTest2() throws IOException {

        SqlSession sqlSession = getSqlSession();

        EmpMapper mapper = sqlSession.getMapper(EmpMapper.class);

        Dept deptAndEmpByStepOne = mapper.getDeptAndEmpByStepOne(1);

        System.out.println(deptAndEmpByStepOne);

}

/**mapper

 * 通过id查询部门中的员工信息,一对多

 * @param did

 * @return

 */

Dept getDeptAndEmpByStepOne(@Param("did") Integer did);

//xml

<resultMap id="getDeptAndEmp" type="Dept">

        <id property="did" column="did"/>

        <result property="deptName" column="dept_name"/>

        <collection property="emps"

                    select="com.xbhog.mapper.DeptMapper.getDeptAndEmpByStepTwo"

                    column="did"/>

</resultMap>

<select id="getDeptAndEmpByStepOne" resultMap="getDeptAndEmp">

        select * from t_dept dept where dept.did=#{did};

</select>

<select id="getDeptAndEmpByStepTwo" resultType="Emp">

        select * from t_emp emp where did = #{did};

</select>

DEBUG 06-03 16:43:46,330 ==>  Preparing: select * from t_dept dept where dept.did=?; (BaseJdbcLogger.java:137)

DEBUG 06-03 16:43:46,346 ==> Parameters: 1(Integer) (BaseJdbcLogger.java:137)

DEBUG 06-03 16:43:46,402 <==      Total: 1 (BaseJdbcLogger.java:137)

DEBUG 06-03 16:43:46,402 ==>  Preparing: select * from t_emp emp where did = ?; (BaseJdbcLogger.java:137)

DEBUG 06-03 16:43:46,403 ==> Parameters: 1(Integer) (BaseJdbcLogger.java:137)

DEBUG 06-03 16:43:46,422 <==      Total: 2 (BaseJdbcLogger.java:137)

Dept(did=1, deptName=A, emps=[Emp(eid=1, empName=张三, age=22, dept=null), Emp(eid=4, empName=赵六, age=25, dept=null)])
需要注意的是集合采用的用collection标签
动态sql:
标签的作用在我看来是对sql的一步一步的解耦,方便后续的拓展和使用。
常用的标签如下:
**<if> <where>****<trim>**<choose> <when><otherwise>- forEach
- sql片段
if与where标签
if标签可通过test属性的表达式进行判断,若表达式的结果为true,则标签中的内容会执行;反之标签中
的内容不会执行。
- 若where标签中的if条件都不满足,则where标签没有任何功能,即不会添加where关键字
- 若where标签中的if条件满足,则where标签会自动添加where关键字,并将条件最前方多余的and去掉
User getDemo(User user);

 <select id="getDemo" resultType="User">

        select * from user

        <where>

            <if test="name != null and name != ''">

                and name =#{name}

            </if>

            <if test="pwd != null and pwd != ''">

                and pwd=#{pwd};

            </if>

        </where>

    </select>

//测试

User xbhog = mapper.getDemo(new User(null, "xbhog", null));

System.out.println(xbhog);

//结果

DEBUG 06-03 20:58:12,645 ==>  Preparing: select * from user WHERE name =? (BaseJdbcLogger.java:137)

DEBUG 06-03 20:58:12,668 ==> Parameters: xbhog(String) (BaseJdbcLogger.java:137)

DEBUG 06-03 20:58:12,758 <==      Total: 1 (BaseJdbcLogger.java:137)

User(id=2, name=xbhog, pwd=111111)
其中注意点:
- 使用
**<where>**标签只能忽略**<if>**标签中前面的and,不能忽略后面的and
如果不知道什么原因,sql正确,语法正确,对应关系、实体类和数据库都对应但是还无法查出数据,请查看MySQL对应关系和版本信息(大概率是它的锅)
trim标签
<where>去掉<if>标签前面的内容,<trim>去掉<if>标签后面的内容
用于去掉或添加标签中的内容
prefix:在trim标签中的内容的前面添加某些内容
prefixOverrides:在trim标签中的内容的前面去掉某些内容
如果lastName= null,sql: ....where and age = ?(错误)
通过prefixOverrides 可以除去把首个“and”去掉
<trim prefix="where">

  <if test="lastName != null">

    last_name=#{lastName}

  </if>

  <if test="age != null">

    and age=#{age}

  </if>

  <if test="phone != null">

    and phone=#{phone}

  </if>

</trim>
suffix:在trim标签中的内容的后面添加某些内容
suffixOverrides:在trim标签中的内容的后面去掉某些内容
最后一个if条件不成立,去除最后的引号字段:suffixOverrides=“”
choose&when&otherwise标签
相当于if...else if..else
foreach标签
属性:
- collection:设置要循环的数组或集合
- item:表示集合或数组中的每一个数据
- separator:设置循环体之间的分隔符
- open:设置foreach标签中的内容的开始符
- close:设置foreach标签中的内容的结束符
主要用来批处理数据
Integer insertAllUser(@Param("users") List<User> users);

<insert id="insertAllUser">

        insert into user values

        <foreach collection="users" item="user" separator=",">

            (null,#{user.name},#{user.age},#{user.pwd})

    </foreach>

</insert>

UserMapper mapper = sqlSession.getMapper(UserMapper.class);

User user1 = new User(null, "a1", 22, "aaa");

User user2 = new User(null, "a2", 22, "aaa");

User user3 = new User(null, "a3", 22, "aaa");

List<User> users = Arrays.asList(user1, user2, user3);

Integer i = mapper.insertAllUser(users);

System.out.println(i);

DEBUG 06-03 22:04:15,713 ==>  Preparing: insert into user values (null,?,?,?) , (null,?,?,?) , (null,?,?,?) (BaseJdbcLogger.java:137)

DEBUG 06-03 22:04:15,736 ==> Parameters: a1(String), 22(Integer), aaa(String), a2(String), 22(Integer), aaa(String), a3(String), 22(Integer), aaa(String) (BaseJdbcLogger.java:137)

DEBUG 06-03 22:04:15,779 <==    Updates: 3 (BaseJdbcLogger.java:137)

3
需要注意的是,在获取user中的属性的时候,一定要使用xxx.属性名的格式,否则找不到对应。
Integer deleteAllUser(@Param("userIds") List<Integer> userIds);

<delete id="deleteAllUser">

        delete from user where

        <foreach collection="userIds" item="userId" separator="or" open="(" close=")">

            id=#{userId}

        </foreach>

</delete>

//另一种写法

<delete id="deleteAllUser">

        delete from user where id in

        <foreach collection="userIds" item="userId" separator="," open="(" close=")">

            #{userId}

        </foreach>

</delete>

List<Integer> userIds = Arrays.asList(10, 11, 12);

Integer integer = mapper.deleteAllUser(userIds);
sql片段
sql片段,可以记录一段公共sql片段,在使用的地方通过include标签进行引入
 <sql id="userColums">

        name,age,pwd

</sql>

<select id="getAllUser" resultType="user">

        select <include refid="userColums"></include> from user where id=#{id};

</select>
缓存:
mybatis有一级缓存和二级缓存,并且支持使用第三方缓存,
一级缓存规则:SqlSession级别的,就是通过同一个参数使用sqlsession查询出来的数据才会放到一级缓存中。
二级缓存规则:SqlSessionFactory级别,通过同一个SqlSessionFactory创建的SqlSession查询的结果会被缓存;此后若再次执行相同的查询语句,结果就会从缓存中获取。
二级缓存必须在SqlSession关闭或提交之后有效,一级二级缓存在中间出现增删改mybatis都会清除缓存(失效)中的数据。
查询顺序:
- 先查询二级缓存,因为二级缓存中可能会有其他程序已经查出来的数据,可以拿来直接使用。
- 如果二级缓存没有命中,再查询一级缓存
- 如果一级缓存也没有命中,则查询数据库
- SqlSession关闭之后,一级缓存中的数据会写入二级缓存
MyBatis的逆向工程
<?xml version="1.0" encoding="UTF-8"?>

<!DOCTYPE generatorConfiguration

        PUBLIC "-//mybatis.org//DTD MyBatis Generator Configuration 1.0//EN"

        "http://mybatis.org/dtd/mybatis-generator-config_1_0.dtd">

<generatorConfiguration>

    <!--

    targetRuntime: 执行生成的逆向工程的版本

    MyBatis3Simple: 生成基本的CRUD(清新简洁版)

    MyBatis3: 生成带条件的CRUD(奢华尊享版)

    -->

    <context id="DB2Tables" targetRuntime="MyBatis3">

        <!-- 数据库的连接信息 -->

        <jdbcConnection driverClass="com.mysql.cj.jdbc.Driver"

                        connectionURL="jdbc:mysql://81.69.251.xx:3306/mybatis"

                        userId="mybatis"

                        password="xxxxxxx">

        </jdbcConnection>

        <!-- javaBean的生成策略-->

        <javaModelGenerator targetPackage="com.xbhog.mybatis.pojo" targetProject=".\src\main\java">

            <property name="enableSubPackages" value="true" />

            <property name="trimStrings" value="true" />

        </javaModelGenerator>

        <!-- SQL映射文件的生成策略 -->

        <sqlMapGenerator targetPackage="com.xbhog.mybatis.mapper"

                         targetProject=".\src\main\resources">

            <property name="enableSubPackages" value="true" />

        </sqlMapGenerator>

        <!-- Mapper接口的生成策略 -->

        <javaClientGenerator type="XMLMAPPER"

                             targetPackage="com.xbhog.mybatis.mapper" targetProject=".\src\main\java">

            <property name="enableSubPackages" value="true" />

        </javaClientGenerator>

        <!-- 逆向分析的表 -->

        <!-- tableName设置为*号,可以对应所有表,此时不写domainObjectName -->

        <!-- domainObjectName属性指定生成出来的实体类的类名 -->

        <table tableName="t_emp" domainObjectName="Emp"/>

        <table tableName="t_dept" domainObjectName="Dept"/>

    </context>

</generatorConfiguration>
Mybatis应用手册的更多相关文章
- MyBatis 开发手册
这一遍看Mybatis的原因是怀念一下去年的 10月24号我写自己第一个项目时使用全配置文件版本的MyBatis,那时我们三个人刚刚大二,说实话,当时还是觉得MyBatis挺难玩的,但是今年再看最新版 ...
- MyBatis 使用手册
MyBatis 是一款优秀的持久层框架,它支持自定义 SQL.存储过程以及高级映射.MyBatis 免除了几乎所有的 JDBC 代码以及设置参数和获取结果集的工作.MyBatis 可以通过简单的 XM ...
- MyBatis极速入门开发手册(2017-2-6更新)
前言: 本篇文章对我的学习内容做一个归纳梳理,同时也记录一些学习过程中遇上的问题及注意事项等等,可以帮助新入门的朋友们消除一些误区与盲区,希望能帮上一些正在学习的朋友们.在编写时会引用一些mybati ...
- MyBatis的几种批量操作
MyBatis中批量插入 方法一: <insert id="insertbatch" parameterType="java.util.List"> ...
- 161102、MyBatis中批量插入
方法一: <insert id="insertbatch" parameterType="java.util.List"> <selectKe ...
- Mybatis第一天(其他)
Mybatis第一天 框架课程 课程计划 第一天: Mybatis的介绍 Mybatis的入门 使用jdbc操作数据库存在的问题 Mybatis的架构 Mybatis的入门程序 Dao的开发方法 原始 ...
- MyBatis的关于批量数据操作的测试
摘录自:http://www.linuxidc.com/Linux/2012-05/60863.htm MyBatis的前身就是著名的Ibatis,不知何故脱离了Apache改名为MyBatis.My ...
- MyBatis 查询映射自定义枚举
背景 MyBatis查询若想映射枚举类型,则需要从 EnumTypeHandler 或者 EnumOrdinalTypeHandler 中选一个来使用 ...
- JAVAEE——Mybatis第一天:入门、jdbc存在的问题、架构介绍、入门程序、Dao的开发方法、接口的动态代理方式、SqlMapConfig.xml文件说明
1. 学习计划 第一天: 1.Mybatis的介绍 2.Mybatis的入门 a) 使用jdbc操作数据库存在的问题 b) Mybatis的架构 c) Mybatis的入门程序 3.Dao的开发方法 ...
- Mybatis学习笔记之一(环境搭建和入门案例介绍)
一.Mybatis概述 1.1 Mybatis介绍 MyBatis 本是apache的一个开源项目iBatis, 2010年这个项目由apache software foundation 迁移到了go ...
随机推荐
- Pnetlab中锐捷镜像反复重启或telnet无法键入内容
PNETLab 版本: 5.2.7 或 5.3.3等 锐捷镜像版本: V1.03 故障详情: 基于前文的系统环境和锐捷镜像.替换后的yml文件,更新PnetLAB版本到5.3.3后,设备循环重启,无法 ...
- 5.26 学习SSH
1.ssh客户端是一种使用Secure Shell协议 连接到运行了ssh服务端的远程服务器上 ssh是比较可靠的,专为远程登录会话和其他网络服务提供安全性的协议 2.
- React之一个组件的诞生
此处以input组件为例 input.js import React from 'react' class Input extends React.Component { // ps:使用static ...
- 编译安装php-fpm并添加nginx支持
编译安装php-fpm 环境准备 yum -y install gcc automake autoconf libtool make install gcc gcc-c++ glibc bison b ...
- Latex Algorithm 语法错误导致无法编译
遇到了几种情况: 1. for 循环没加{} 2. $\textbf{T_i}$, 想要加粗T,但是把i也扩进去了,latex就不懂了,于是一直recompile不出来说超时什么什么的,把i放到外面就 ...
- Array of products
refer to: https://www.algoexpert.io/questions/Array%20Of%20Products Problem Statement Sample input A ...
- SQL Server 错误:特殊符号“•”导致的sql查询问题
问题描述: 对于一些标题或字符串,例如: 如果导入数据库,就会发现会自动变成?号了: 在进行SQL查询的时候,会出现一个同一条sql语句在mysql直接执行sql可以查询到,但是mssql进行查询的时 ...
- 如何卸载cdr x8?怎么把cdr x8彻底卸载删除干净重新安装的方法【转载】
标题:如何卸载cdr x8?怎么把cdr x8彻底卸载删除干净重新安装的方法.cdr x8显示已安装或者报错出现提示安装未完成某些产品无法安装的问题,怎么完全彻底删除清理干净cdr x8各种残留注册表 ...
- nodejs的框架koa
koa:应用程序是一个包含一组中间件函数的对象,它是按照类似堆栈的方式组织和执行的 应用程序: 1.导入 const Koa = require('koa'); 2.创建koa的app实例 const ...
- cesium 3d tileset 问题总结
Cesium 3d Tileset 中 i3dm 中存储的模型坐标为笛卡尔坐标,占四个字节,因为地球半径比较大,所以只有整数位和小数点后1位有效,因此会损失精度.对于要求精度比较高的模型,会发现位置偏 ...