
Windows 程序安装与更新方案: Clowd.Squirrel
Clowd.Squirrel
Squirrel.Windows 是一组工具和适用于.Net的库,用于管理 Desktop Windows 应用程序的安装和更新。 Squirrel.Windows 对 Windows 应用程序的实现语言没有任何要求,甚至无需服务端即可完成增量更新。
Clowd.Squirrel 是 Squirrel.Windows 的一个优秀分支。2019 年 Squirrel.Windows 宣布不再维护,虽然 2020 年又重新恢复维护,但其不再处于积极开发阶段,依赖库开始陈旧。所以推荐转移到 Clowd.Squirrel,用法也更加简单。
快速使用
下面以 .net 程序 和 vs 2022 为例,介绍如何使用 Clowd.Squirrel
安装 Clowd.Squirrel
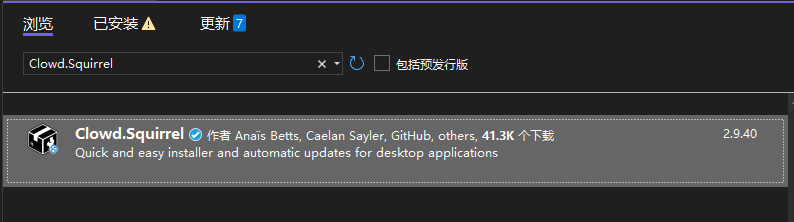
通过 nuget包管理器安装 Clowd.Squirrel,
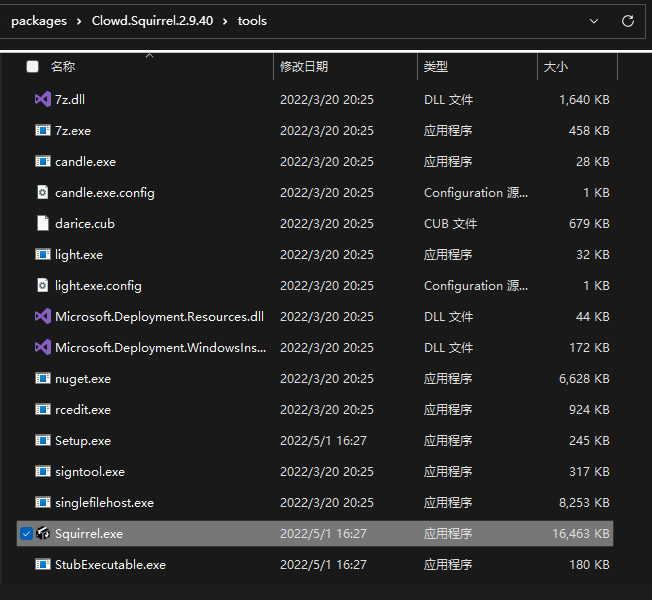
安装后,目录 ..\packages\Clowd.Squirrel.2.9.40\tools 里是用到的工具
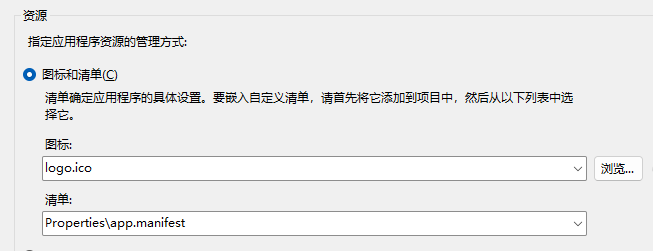
创建文件 Properties\app.manifest,并在项目属性→生成→设置清单设置该文件
这一步是为了指定该项目exe需要创建快捷方式,否则安装时会将所有exe文件都建立一个快捷方式
<?xml version="1.0" encoding="utf-8"?>

<assembly manifestVersion="1.0" xmlns="urn:schemas-microsoft-com:asm.v1">

  <SquirrelAwareVersion xmlns="urn:schema-squirrel-com:asm.v1">1</SquirrelAwareVersion>

</assembly>
在程序启动入口增加检查更新相关代码
public static void Main(string[] args)

{

    // run Squirrel first, as the app may exit after these run

    SquirrelAwareApp.HandleEvents(

        onInitialInstall: OnAppInstall,

        onAppUninstall: OnAppUninstall,

        onEveryRun: OnAppRun);

	//本地文件夹或服务器地址

	using (var mgr = new UpdateManager(@"D:\Desktop\test"))

    {

        var newVersion = await mgr.UpdateApp();

        // optionally restart the app automatically, or ask the user if/when they want to restart

        if (newVersion != null)

        {

            UpdateManager.RestartApp();

        }

    }

    // ... other app init code after ...

}

private static void OnAppInstall(SemanticVersion version, IAppTools tools)

{

    tools.CreateShortcutForThisExe(ShortcutLocation.StartMenu | ShortcutLocation.Desktop);

}

private static void OnAppUninstall(SemanticVersion version, IAppTools tools)

{

    tools.RemoveShortcutForThisExe(ShortcutLocation.StartMenu | ShortcutLocation.Desktop);

}

private static void OnAppRun(SemanticVersion version, IAppTools tools, bool firstRun)

{

    tools.SetProcessAppUserModelId();

    // show a welcome message when the app is first installed

    if (firstRun) MessageBox.Show("Thanks for installing my application!");

	// 启动你的应用

}
版本号改成3段,需要符合SemVer规范
[assembly: AssemblyVersion("1.3.2")]

[assembly: AssemblyFileVersion("1.3.2")]
.csproj 项目文件增加下面的代码,编译 Release 时自动打包
<Target Name="AfterReleaseBuild" AfterTargets="AfterBuild" Condition=" '$(Configuration)' == 'Release'">

    <GetAssemblyIdentity AssemblyFiles="$(TargetPath)">

      <Output TaskParameter="Assemblies" ItemName="myAssemblyInfo" />

    </GetAssemblyIdentity>

    <Exec Command="$(SolutionDir)packages\Clowd.Squirrel.2.9.40\tools\Squirrel.exe pack --packId $(ProjectName) --packVersion $([System.Version]::Parse(%(myAssemblyInfo.Version)).ToString(3)) --packAuthors XXX --packDirectory $(OutDir)" />

</Target>
Squirrel.exe 参数
Squirrel pack`

 --releaseDir .\Release             # 更新输出到该目录

 --framework net6,vcredist143-x86`  # Install .NET 6.0 (x64) and vcredist143 (x86) during setup, if not installed

 --packId "YourApp"`                # Application / package name

 --packTitle "YourApp"`                # Application / package name

 --packVersion "1.0.0"`             # Version to build. Should be supplied by your CI

 --packAuthors "YourCompany"`       # Your name, or your company name

 --packDirectory ".\publish"`       # The directory the application was published to

 --icon "mySetupIcon.ico"`     # Icon for Setup.exe

 --splashImage "install.gif"        # The splash artwork (or animation) to be shown during install
发布更新
首次发布
切换Release模式,编译产生
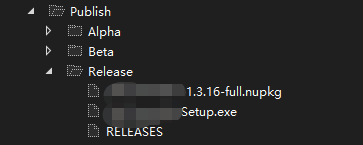
exe 用于首次安装,先将它发到web服务器,供用户下载
后续更新
代码稍作修改后,提高版本号,再次编译多出以下文件
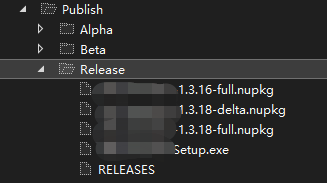
其中delta是相交于1.3.16的增量更新包,将RELEASES delta文件发到web服务器,UpdateManager类从该web服务器地址获取RELEASES,检查是否有更新,
你也可以再将Setup.exe文件发到web服务器覆盖旧的Setup.exe,以便新安装用户都能下载到最新的安装包
撤回更新
如果不小心发布了问题包。修改bug后,提高版本号,编译。
删除RELEASES文件中有问题的包信息,
发布full 和RELEASES,以便后续用户能更新到正常版本
快捷方式
根据下列顺序,第一个不为空的,作为快捷方式名称
[assembly: AssemblyProduct("MyApp")(AssemblyInfo.cs)- Squirrel.exe
packTitle参数 [assembly: AssemblyDescription("MyApp")( AssemblyInfo.cs)- exe 文件名
这里我使用 packTitle ,方便控制Release与Test用不同的名称打包。
改进 .csproj 项目文件 内容
$(SolutionDir)packages\Clowd.Squirrel.2.9.40\tools\Squirrel.exe pack --packTitle 我的APP$(Configuration) --packId $(Configuration).$(ProjectName) --packVersion $([System.Version]::Parse(%(myAssemblyInfo.Version)).ToString(3)) --packAuthors 作者 --packDirectory $(OutDir) --releaseDir .\Publish\$(Configuration) --icon $(ProjectDir)logo.ico
user.config 问题
如果你的应用也使用user.config,会出现”更新版本后设置丢失,变成默认设置“的问题。根本原因是新版 exe 和旧版 exe 目录不同。
user.config 保存在
%LocalAppData%\公司名\MyApp.exe_[Url|StrongName]_Hash码\版本号\user.config
例如
C:\Users\yourname\AppData\Local\yourcompany\MyApp.exe_Url_qdx0no02b2yzg0ddn33isevehzmexfmy\1.3.4.0\user.config
其中Hash码是根据exe所在目录,exe名称等计算所得
而 Squirrel 更新会产生一个新的 app-版本号 文件夹,导致 user.config 目录变化,旧版本的用户设置在新版上不生效

搜索一番解决方法比较复杂,例如重写一个设置适配器SettingsProvider
我的思路
在设置目录里查找,把MyApp.exe_Url_或MyApp.exe_StrongName_开头的文件夹,把低版本的user.config设置复制过来就行了
具体的代码逻辑
wpf
//检查本地配置文件夹

var configPath = GetDefaultExeConfigPath(ConfigurationUserLevel.PerUserRoamingAndLocal);

var configName = "user.config";

var exeName = Assembly.GetExecutingAssembly().GetName().Name + ".exe";

var companyDirectoryName = configPath.Split(new string[1] { exeName }, StringSplitOptions.RemoveEmptyEntries)[0];

var companyDirectory = new DirectoryInfo(companyDirectoryName);

if (companyDirectory.Exists)

{

    configPath = configPath.TrimEnd((@"\" + configName).ToCharArray());

    configPath = configPath.TrimEnd((@"\" + Assembly.GetExecutingAssembly().GetName().Version).ToCharArray());

    var configDirectory = new DirectoryInfo(configPath);

    if (!configDirectory.Exists)

    {

        var urltargetName = exeName + "_Url_";//非强签名Url

        var strongNametargetName = exeName + "_StrongName_";//强签名StrongName

        var drs = companyDirectory.GetDirectories();

        var theDrs = drs.Where(x => x.Name.StartsWith(urltargetName)).Concat(drs.Where(x => x.Name.StartsWith(strongNametargetName)));

        if (theDrs.Count() > 0)

        {

            configDirectory.Create();

            foreach (var theDr in theDrs)

            {

                foreach (var d in theDr.GetDirectories())

                {

                    CopyDirectory(d.FullName, configDirectory.FullName + @"\" + d, true);

                }

            }

        }

    }

}

//最后,把低版本配置升级到最新版。

//新版本号下是否有user.config,如果没有从旧版本升级配置

if (!ConfigurationManager.OpenExeConfiguration(ConfigurationUserLevel.PerUserRoamingAndLocal).HasFile)

{

    Settings.Default.Upgrade();

}
winfrom(exeName 和 Version 获取方式和 wpf 不一样)
//检查本地配置文件夹

var configPath = Config.GetDefaultExeConfigPath(ConfigurationUserLevel.PerUserRoamingAndLocal);

var configName = "user.config";

var exeName = ResourceAssembly.GetName().Name + ".exe";

var companyDirectoryName = configPath.Split(new string[1] { exeName }, StringSplitOptions.RemoveEmptyEntries)[0];

var companyDirectory = new DirectoryInfo(companyDirectoryName);

if (companyDirectory.Exists)

{

    configPath = configPath.TrimEnd((@"\" + configName).ToCharArray());

    configPath = configPath.TrimEnd((@"\" + ResourceAssembly.GetName().Version.ToString()).ToCharArray());

    var configDirectory = new DirectoryInfo(configPath);

    if (!configDirectory.Exists)

    {

        var urltargetName = exeName + "_Url_";//非强签名Url

        var strongNametargetName = exeName + "_StrongName_";//强签名StrongName

        var drs = companyDirectory.GetDirectories();

        var theDrs = drs.Where(x => x.Name.StartsWith(urltargetName)).Concat(drs.Where(x => x.Name.StartsWith(strongNametargetName)));

        if (theDrs.Count() > 0)

        {

            configDirectory.Create();

            foreach (var theDr in theDrs)

            {

                foreach (var d in theDr.GetDirectories())

                {

                    CopyDirectory(d.FullName, configDirectory.FullName + @"\" + d, true);

                }

            }

        }

    }

}

//最后,把低版本配置升级到最新版。

//新版本号下是否有user.config,如果没有从旧版本升级配置

if (!ConfigurationManager.OpenExeConfiguration(ConfigurationUserLevel.PerUserRoamingAndLocal).HasFile)

{

    Print.Properties.Settings.Default.Upgrade();

    Settings.Default.Upgrade();

}
static void CopyDirectory(string sourceDir, string destinationDir, bool recursive)

{

    var dir = new DirectoryInfo(sourceDir);

    if (!dir.Exists)

        return;

    DirectoryInfo[] dirs = dir.GetDirectories();

    Directory.CreateDirectory(destinationDir);

    foreach (FileInfo file in dir.GetFiles())

    {

        string targetFilePath = Path.Combine(destinationDir, file.Name);

        if (!new FileInfo(destinationDir + @"\" + file.Name).Exists)

        {

            file.CopyTo(targetFilePath, true);

        }

    }

    if (recursive)

    {

        foreach (DirectoryInfo subDir in dirs)

        {

            string newDestinationDir = Path.Combine(destinationDir, subDir.Name);

            CopyDirectory(subDir.FullName, newDestinationDir, true);

        }

    }

}

static string GetDefaultExeConfigPath(ConfigurationUserLevel userLevel)

{

    try

    {

        var UserConfig = ConfigurationManager.OpenExeConfiguration(userLevel);

        return UserConfig.FilePath;

    }

    catch (ConfigurationException e)

    {

        return e.Filename;

    }

}
Windows 程序安装与更新方案: Clowd.Squirrel的更多相关文章
- Windows 程序自动更新方案: Squirrel.Windows
Windows 程序自动更新方案: Squirrel.Windows 1. Squirrel Squirrel 是一组工具和适用于.Net的库,用于管理 Desktop Windows 应用程序的安装 ...
- Windows程序通用自动更新模块(C#,.NET4.5以上)
本通用自动更新模块适合所有Windows桌面程序的自动更新,不论语言,无论Winform还是wpf. 一.工作流程:1. 主程序A调起升级程序B2. B从服务器获取更新程序列表,打印更新信息.3. B ...
- mongoDB在windows下安装与配置方案
首先在官网下载mongoDB的安装包: https://www.mongodb.org/downloads 百度云盘下载:http://pan.baidu.com/s/1slUSGYp (安装版 wi ...
- windows server r2 安装vs2017 更新补丁Windows8.1-KB2919355-x6
方法一: 点击vs2017安装包后提示需要更新Windows8.1-KB2919355-x64补丁 点击链接进入全部下载后查看官方安装顺序为 注意 必须按照以下顺序安装更新:clearcompress ...
- 解决xp下无法通过windows installer服务安装此安装程序包。您必须安装带有更新版本Wi
今天装 tortoisegit 的时候发现安装包不能使用.报错无法通过windows installer服务安装此安装程序包.您必须安装带有更新版本Windows Installer服务的Window ...
- 无法通过windows installer服务安装此安装程序包。您必须安装带有更新版本windows Installer服务的Windows
无法通过windows installer服务安装此安装程序包.您必须安装带有更新版本windows installer服务的Windows 出现这个问题不让安装程序,可以到微软网站更新Windows ...
- 安装Office时出现windows installer服务不能更新一个或多个受保护的windows文件错误的解决方法
今天在Windows XP上安装Microsoft Office 2010时,总是遇到“Windows Installer服务不能更新一个或多个受保护的windows文件,安装失败,正在回滚更改”提示 ...
- 解决Windows 7下IE11无法卸载、无法重新安装,提示安装了更新的IE版本
2013年12月14日 iefans 有用户反馈在Windows 7系统上安装IE11时发现安装程序似乎出了问题,等待了很长时间都没有响应之后就断开了电脑的电源.之后IE11浏览器虽然能使用,却无法安 ...
- Scoop - 在Windows命令行上进行程序安装
2019-01-28 22:49:21 资料来源自Scoop官方网站以及github上的帮助文档 如果有疑惑或者觉得文章有错误请留言以帮助改正 补充内容(2019-04-09 21:11:36):不 ...
随机推荐
- 使用Google Closure Compiler高级压缩Javascript代码
背景 前端开发中,特别是移动端,Javascript代码压缩已经成为上线必备条件. 如今主流的Js代码压缩工具主要有: 1)Uglify http://lisperator.net/uglifyjs/ ...
- canvas系列教程03-柱状图项目1
弄了一堆线方块和函数,感觉挺玄乎,然并卵.我们直接写个项目看看. canvas一个比较拽的应用就是图表和游戏,我们从浅入深,先玩图表,图表我们今天说一个最简单柱状图. 柱状图很多人用百度的echars ...
- java中"Static块"是怎么回事,怎么用的,有什么意义
6.Static块 Static块:该类的任何方法被首次触碰到时(马克-to-win: when you touch Test的main方法时),Static块被运行.可以在里面初始化你的stati ...
- nfs客户端的一次处理
为什么要说这个呢,由于节点环境不一致,导致在重建pod时,我们暂且叫该pod为 cxpod,cxpod所在宿主机出现了问题现象如下:一.cxpod始终处于创建中 ContainerCreating [ ...
- 帝国CMS内容页模板过滤清理简介smalltext前后空格的方法!
在内容模板你需要调用的地方使用如下代码输出简介即可过滤简介smalltext前后的空格了: <? $qian=array(" "," ","\t ...
- select下拉框获取下拉项值的问题
新发现: select option如果里面不写value值,默认提交<option></option>中间的值. 切记:真正提交的值写在value属性里面,option之间只 ...
- 高精度减法(C++实现)
高精度减法 简介 用于计算含有超过一般变量存放不下的非负整数 高精度加法这个过程是模拟的小学竖式减法计算 注:在本文中,我们默认输入的第一个数为被减数,且被减数大于减数 原理基本上与高精度加法相同,仅 ...
- DRF JWT认证(一)
为什么要使用JWT认证?构成和原理又是什么?怎么还有Base64的事?我都写了
- 2021.08.05 P1738 洛谷的文件夹(树形结构)
2021.08.05 P1738 洛谷的文件夹(树形结构) P1738 洛谷的文件夹 - 洛谷 | 计算机科学教育新生态 (luogu.com.cn) 重点: 1.树!! 题意: 给出n个网页路径,求 ...
- JVM内存管理面试常见问题全解
目录 一.什么是JVM 1.jvm的三个组成部分 二.类加载系统 1.类的加载过程 2.类加载器 三.双亲委派机制 1.双亲委派机制介绍 2.为什么要双亲委派机制 3.双亲委派机制的核心源码 4.全盘 ...