
FAS2720 配置
FAS 2720配置操作
第1章 初始化
1.1设备物理安装
1.1.1组件介绍
机头FAS 2720 (2U)
前面板

后面

1.1.2准备工作
(1)工具准备
螺丝刀、网线、Console线、轧带
授权文件——Mysupport注册产品下载
(2)客户提供信息
|
类型 |
值 |
备注 |
|
集群IP、名称 |
IP默认169.254.x.x、名称字母开头 |
|
|
集群管理地址、掩码、网关 |
提供集群管理 |
|
|
DNS名称、DNS地址 |
提供解析服务 |
|
|
节点管理地址、掩码、网关 |
提供节点管理 |
|
|
NTP地址 |
时间影响CIFS协议 |
|
|
邮件服务器地址、告警邮箱 |
提供邮件告警 |
|
|
Syslog服务器地址 |
日志记录 |
|
|
Snmp地址 |
监控告警 |
|
|
数据接口IP |
按规划情况 |
1.2系统初始化
1.2.1控制器初始化
(1)控制器连线
为双节点有交换机集群布线,以太网网络配置
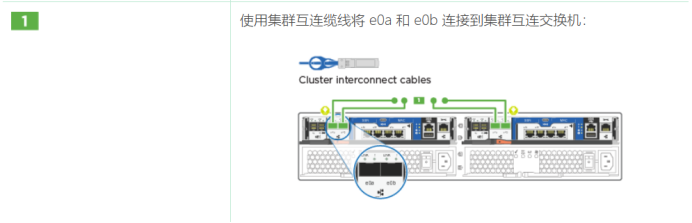
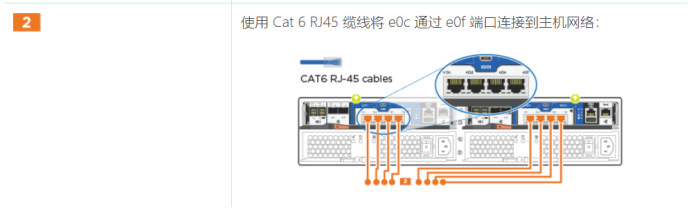
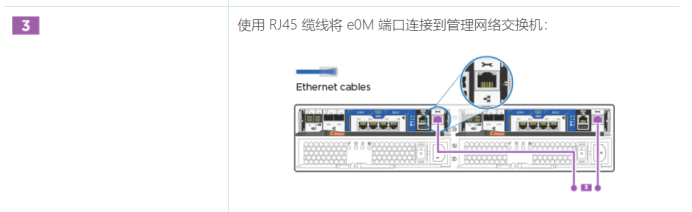
此时请勿插入电源线。
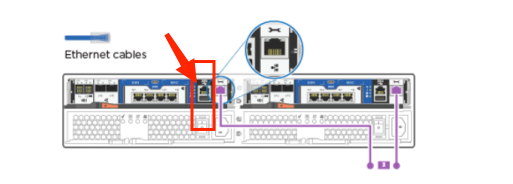
(2)连接node1 Console
(3)系统初始化
(4)打开电源,启动系统,按照初始化向导配置IP

(5)配置集群
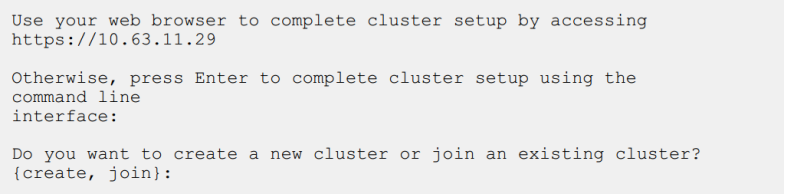
1.2.2模拟器配置向导
按 Ctrl-C 进入启动菜单。
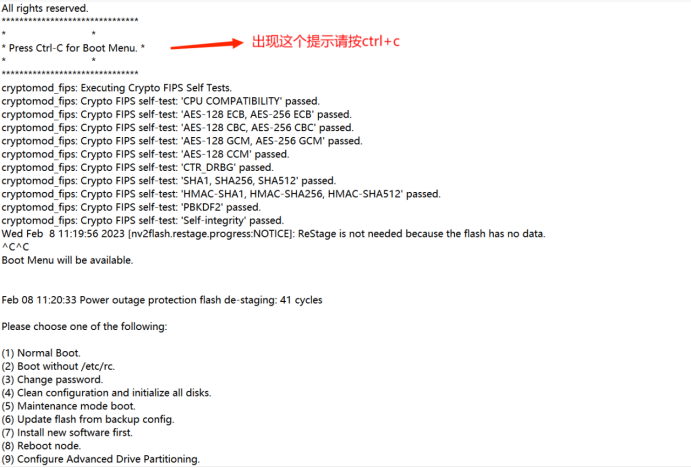
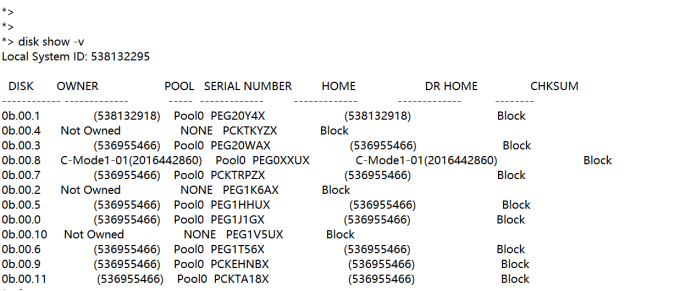
我们先进维护模式看下磁盘情况,出现boot菜单有1-9选项。输入5进入维护模式
输入命令 disk show -v 查看到现在是磁盘有ownership信息。
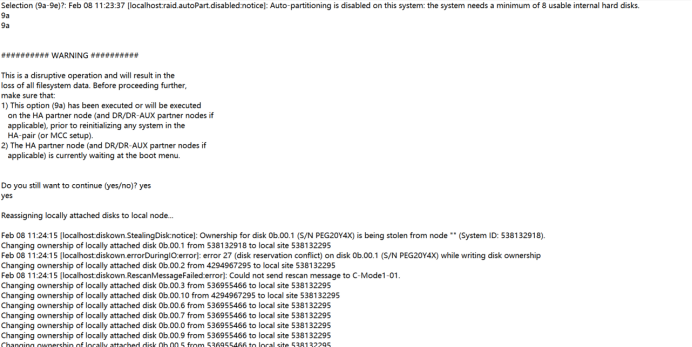
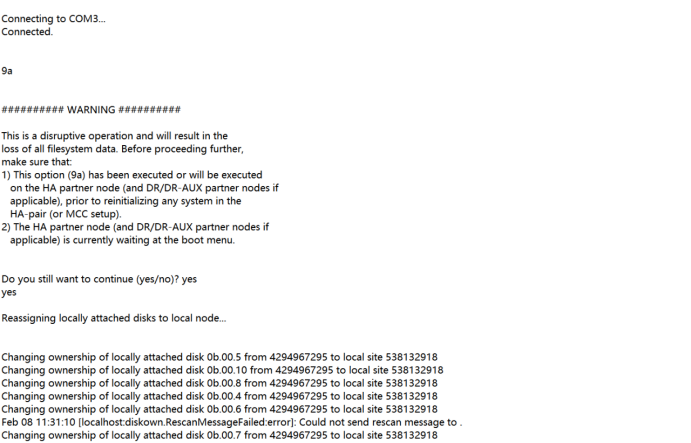
需要先去除磁盘的ownership才能初始化系统。这时我们返回到boot菜单,这里注意两个控制器基本同时进行这个操作:回到boot菜单,输入9,输入,输入9a(去除磁盘的ownership)。去除完ownership后开始初始化操作。回到boot菜单,输入9,9b,开始进行初始化操作。
Console线接在左边控制器上
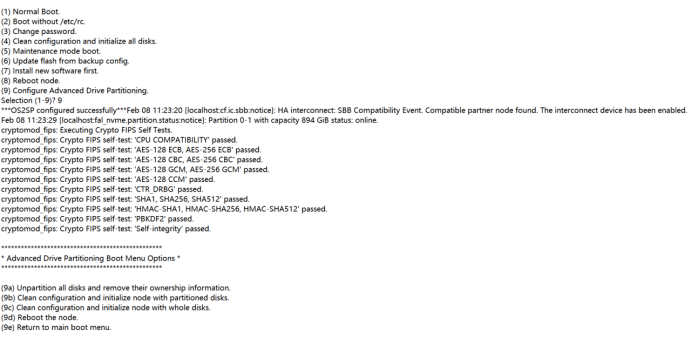
Console线接入右边控制器操作
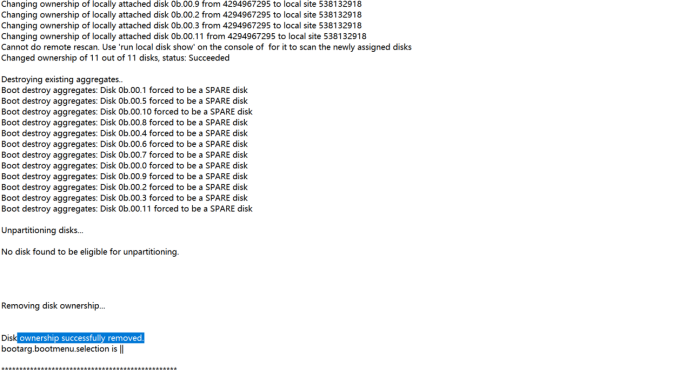
磁盘的ownership成功移除。接下来在左边控制器上输入9b进行初始化
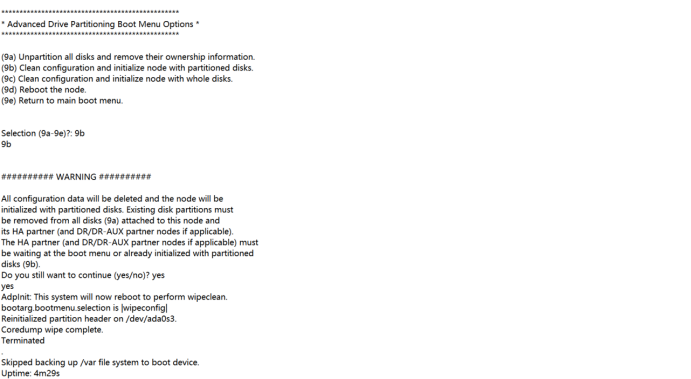
接入右边控制器输入9b
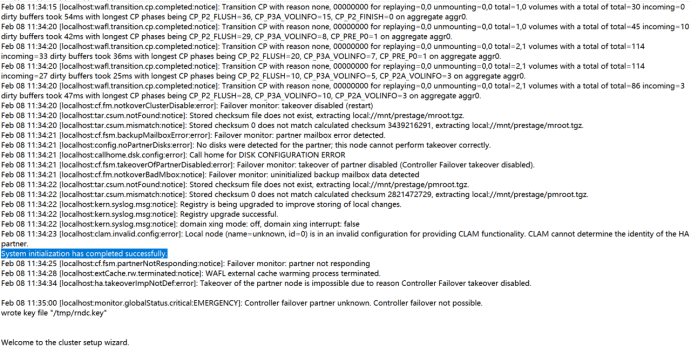
然后接回左边控制器会看到开始进行集群设置
然后
Type yes to confirm and continue {yes}: yes
Enter the node management interface port [e0M]:
Enter the node management interface IP address [192.168.1.205]:
Enter the node management interface netmask [255.255.255.0]:
Enter the node management interface default gateway [192.168.1.1]:
Use your web browser to complete cluster setup by accessing
https://192.168.1.205
Otherwise, press Enter to complete cluster setup using the command line
interface:
Do you want to create a new cluster or join an existing cluster? {create, join}
[create]:
Do you intend for this node to be used as a single node cluster? {yes, no} [no]:
Existing cluster interface configuration found:
Port MTU IP Netmask
e0a 9000 169.254.81.223 255.255.0.0
e0b 9000 169.254.185.125 255.255.0.0
Do you want to use this configuration? {yes, no} [yes]: yes
Step 1 of 5: Create a Cluster
You can type "back", "exit", or "help" at any question.
Enter the cluster name: fas2720-A
Creating cluster fas2720-A
Starting cluster support services ..
Cluster fas2720-A has been created.
Step 2 of 5: Add Feature License Keys
You can type "back", "exit", or "help" at any question.
Enter an additional license key []:
Step 3 of 5: Set Up a Vserver for Cluster Administration
You can type "back", "exit", or "help" at any question.
Enter the cluster management interface port: e0M
Enter the cluster management interface IP address: 192.168.1.210
Enter the cluster management interface netmask: 255.255.255.0
Enter the cluster management interface default gateway [192.168.1.1]:
A cluster management interface on port e0M with IP address 192.168.1.210 has been created. You can use
Enter the DNS domain names:
Step 4 of 5: Configure Storage Failover (SFO)
You can type "back", "exit", or "help" at any question.
SFO will be enabled when the partner joins the cluster.
Step 5 of 5: Set Up the Node
You can type "back", "exit", or "help" at any question.
Where is the controller located []: ShangHai
Cluster "fas2720-A" has been created.
To complete cluster setup, you must join each additional node to the cluster
by running "system node show-discovered" and "cluster add-node" from a node in the cluster.
To complete system configuration, you can use either OnCommand System Manager
or the Data ONTAP command-line interface.
To access OnCommand System Manager, point your web browser to the cluster
management IP address (https://192.168.1.210).
To access the command-line interface, connect to the cluster management
IP address (for example, ssh admin@192.168.1.210).
Mon Feb 13 10:48:45 UTC 2023
login: admin
Password:
******************************************************
* This is a serial console session. Output from this *
* session is mirrored on the SP console session. *
******************************************************
fas2720-A::> disk show -v
DISK OWNER POOL SERIAL NUMBER HOME DR HOME
---------- ------------ ------ ------------- ---------------- ---------------
Info: This cluster has partitioned disks. To get a complete list of spare disk
capacity use "storage aggregate show-spare-disks".
1.0.0 (538132295) Pool0 PEG1J1GX (538132295) -
1.0.1 fas2720-A- Pool0 PEG20Y4X fas2720-A- -
01(538132918) 01(538132918)
1.0.2 (538132295) Pool0 PEG1K6AX (538132295) -
1.0.3 fas2720-A- Pool0 PEG20WAX fas2720-A- -
01(538132918) 01(538132918)
1.0.4 (538132295) Pool0 PCKTKYZX (538132295) -
1.0.5 fas2720-A- Pool0 PEG1HHUX fas2720-A- -
01(538132918) 01(538132918)
1.0.6 (538132295) Pool0 PEG1T56X (538132295) -
1.0.7 fas2720-A- Pool0 PCKTRPZX fas2720-A- -
01(538132918) 01(538132918)
1.0.8 (538132295) Pool0 PEG0XXUX (538132295) -
1.0.9 fas2720-A- Pool0 PCKEHNBX fas2720-A- -
01(538132918) 01(538132918)
1.0.10 (538132295) Pool0 PEG1V5UX (538132295) -
1.0.11 fas2720-A- Pool0 PCKTA18X fas2720-A- -
01(538132918) 01(538132918)
Press <space> to page down, <return> for next line, or 'q' to quit...
Enter the node management interface IP address: q
the value "q" is invalid for type <Host Ip Address>
The user-defined IP address for the node management LIF.
You can type "back", "exit", or "help" at any question.
Enter the node management interface IP address: back
Welcome to the cluster setup wizard.
You can enter the following commands at any time:
"help" or "?" - if you want to have a question clarified,
"back" - if you want to change previously answered questions, and
"exit" or "quit" - if you want to quit the cluster setup wizard.
Any changes you made before quitting will be saved.
You can return to cluster setup at any time by typing "cluster setup".
To accept a default or omit a question, do not enter a value.
This system will send event messages and periodic reports to NetApp Technical
Support. To disable this feature, enter
autosupport modify -support disable
within 24 hours.
Enabling AutoSupport can significantly speed problem determination and
resolution should a problem occur on your system.
For further information on AutoSupport, see:
http://support.netapp.com/autosupport/
Type yes to confirm and continue {yes}: yes
Enter the node management interface port [e0M]:
Enter the node management interface IP address: 192.168.1.206
Enter the node management interface netmask: 255.2555.255.0
the value "255.2555.255.0" is invalid for type <Host Netmask>
The user-defined subnet mask that defines the range of valid IP addresses on
the node management network.
You can type "back", "exit", or "help" at any question.
Enter the node management interface netmask: 255.255.255.0
Enter the node management interface default gateway: 192.168.1.1
A node management interface on port e0M with IP address 192.168.1.206 has been created.
Use your web browser to complete cluster setup by accessing
https://192.168.1.206
Otherwise, press Enter to complete cluster setup using the command line
interface:
This node's storage failover partner is already a member of a cluster.
Storage failover partners must be members of the same cluster.
The cluster setup wizard will default to the cluster join dialog.
Do you want to create a new cluster or join an existing cluster? {join}:
join
Existing cluster interface configuration found:
Port MTU IP Netmask
e0a 9000 169.254.195.170 255.255.0.0
e0b 9000 169.254.29.32 255.255.0.0
Do you want to use this configuration? {yes, no} [yes]: yes
Step 1 of 3: Join an Existing Cluster
You can type "back", "exit", or "help" at any question.
Enter the IP address of an interface on the private cluster network from the
cluster you want to join: 169.254.81.223
Joining cluster at address 169.254.81.223
Starting cluster support services
This node has joined the cluster fas2720-A.
Step 2 of 3: Configure Storage Failover (SFO)
You can type "back", "exit", or "help" at any question.
SFO is enabled.
Step 3 of 3: Set Up the Node
You can type "back", "exit", or "help" at any question.
This node has been joined to cluster "fas2720-A".
To complete cluster setup, you must join each additional node to the cluster
by running "system node show-discovered" and "cluster add-node" from a node in the cluster.
To complete system configuration, you can use either OnCommand System Manager
or the Data ONTAP command-line interface.
To access OnCommand System Manager, point your web browser to the cluster
management IP address (https://192.168.1.210).
To access the command-line interface, connect to the cluster management
IP address (for example, ssh admin@192.168.1.210).
Notice: HA is configured in management.
Mon Feb 13 10:51:55 UTC 2023
login: admin
Password:
******************************************************
* This is a serial console session. Output from this *
* session is mirrored on the SP console session. *
******************************************************
fas2720-A::> disk show -v
DISK OWNER POOL SERIAL NUMBER HOME DR HOME
---------- ------------ ------ ------------- ---------------- ---------------
Info: This cluster has partitioned disks. To get a complete list of spare disk
capacity use "storage aggregate show-spare-disks".
1.0.0 fas2720-A- Pool0 PEG1J1GX fas2720-A- -
02(538132295) 02(538132295)
1.0.1 fas2720-A- Pool0 PEG20Y4X fas2720-A- -
01(538132918) 01(538132918)
1.0.2 fas2720-A- Pool0 PEG1K6AX fas2720-A- -
02(538132295) 02(538132295)
1.0.3 fas2720-A- Pool0 PEG20WAX fas2720-A- -
01(538132918) 01(538132918)
1.0.4 fas2720-A- Pool0 PCKTKYZX fas2720-A- -
02(538132295) 02(538132295)
1.0.5 fas2720-A- Pool0 PEG1HHUX fas2720-A- -
01(538132918) 01(538132918)
1.0.6 fas2720-A- Pool0 PEG1T56X fas2720-A- -
02(538132295) 02(538132295)
1.0.7 fas2720-A- Pool0 PCKTRPZX fas2720-A- -
01(538132918) 01(538132918)
1.0.8 fas2720-A- Pool0 PEG0XXUX fas2720-A- -
02(538132295) 02(538132295)
DISK OWNER POOL SERIAL NUMBER HOME DR HOME
---------- ------------ ------ ------------- ---------------- ---------------
1.0.9 fas2720-A- Pool0 PCKEHNBX fas2720-A- -
01(538132918) 01(538132918)
1.0.10 fas2720-A- Pool0 PEG1V5UX fas2720-A- -
02(538132295) 02(538132295)
1.0.11 fas2720-A- Pool0 PCKTA18X fas2720-A- -
01(538132918) 01(538132918)
12 entries were displayed.
fas2720-A::> aggr show
Aggregate Size Available Used% State #Vols Nodes RAID Status
--------- -------- --------- ----- ------- ------ ---------------- ------------
aggr0_fas2720_A_01
159.9GB 7.75GB 95% online 1 fas2720-A-01 raid_dp,
normal
aggr0_fas2720_A_02
159.9GB 7.75GB 95% online 1 fas2720-A-02 raid_dp,
normal
2 entries were displayed.
初始化完成。其余更改可在web端配置
1.2.3扩展柜初始化
(1)打开扩展柜电源
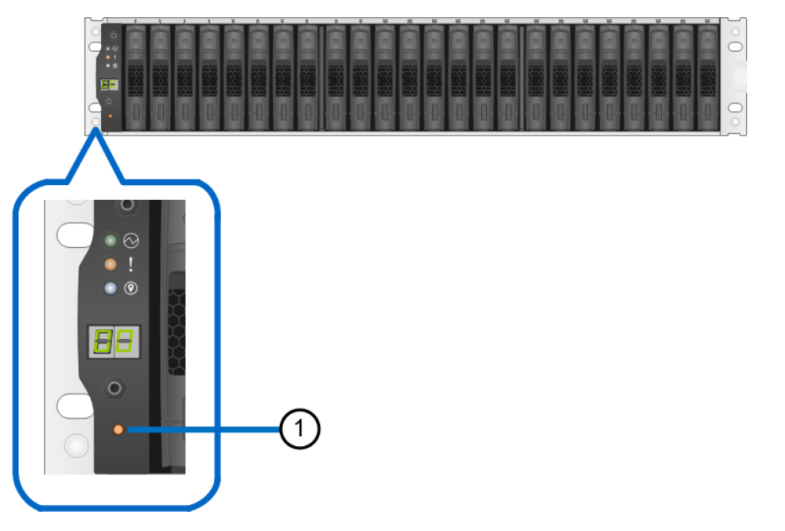
(2)更改扩展柜ID
(3)关闭扩展柜
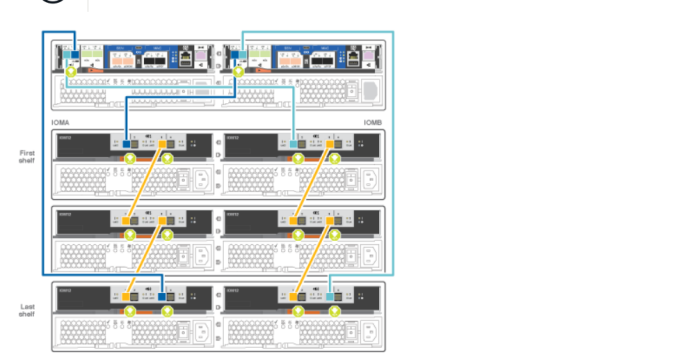
(4)控制器扩展柜连线
第2章 系统配置
2.1确认时间同步问题
查看时间信息
cluster data show
更改时区为GMT
cluster date modify -timezone GMT
2.2查看NTP
cluster time-service ntp server show
设置NTP服务器
cluster time-service ntp server create -server server_name
设置有身份认证的NTP服务器
cluster time-service ntp server create -server server_ip_address -keyid key_id
2.3配置事件邮件告警
event config modify -mail-server mailhost.your_domain -mail-from cluster_admin@your_domain
event notification destination create -name storage-admins - email your_email@your_domain
event notification create -filter-name important-events -destinations storage_admins
2.4配置syslog服务器地址,启用重要事件告警
event notification destination create -name syslog-ems -syslog syslogserver-address
event notification create -filter-name important-events -destinations syslog-ems
2.5配置snmp服务器地址
system snmp traphost add -peer-address snmp_traphost_name
第3章 存储配置
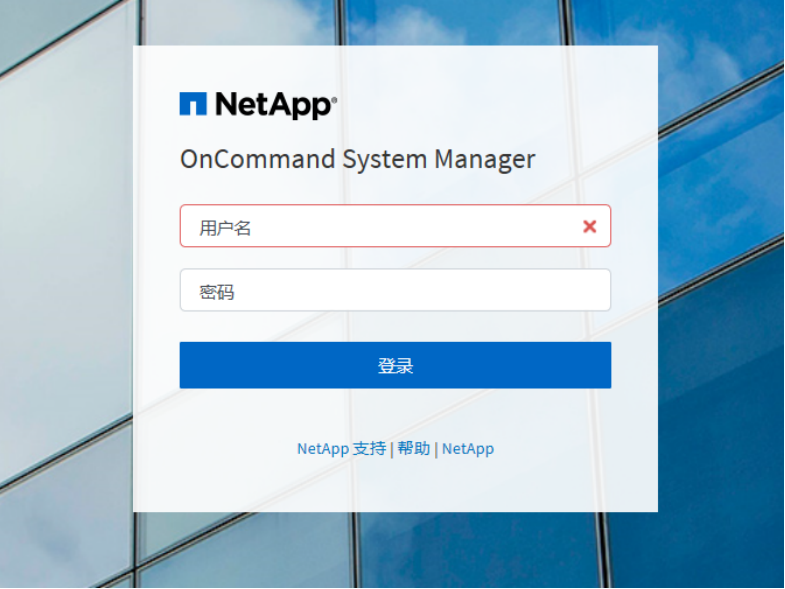
3.1登陆界面
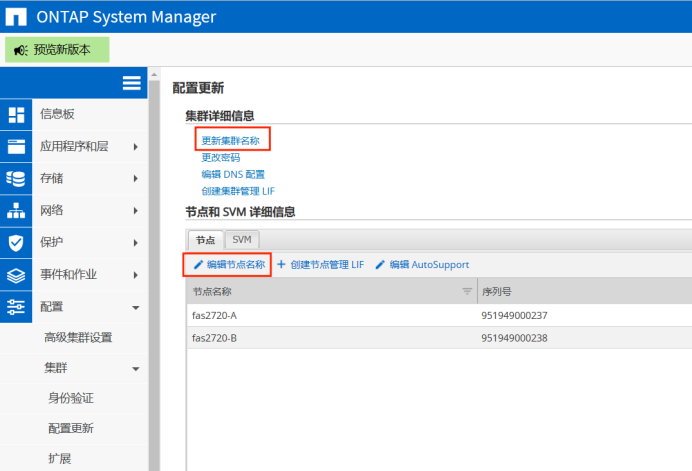
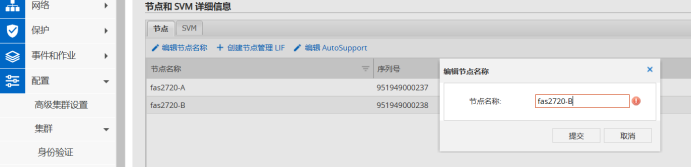
3.2更新集群和节点名称
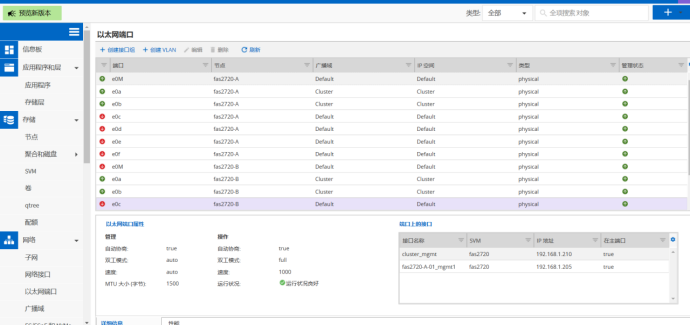
3.3网络配置

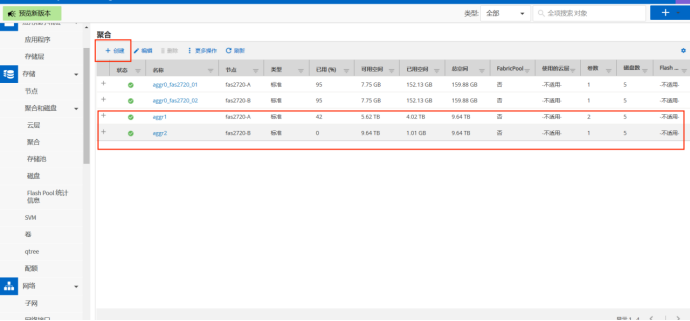
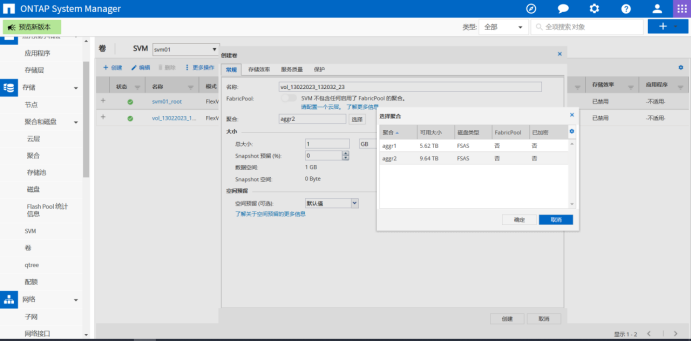
3.4创建聚合
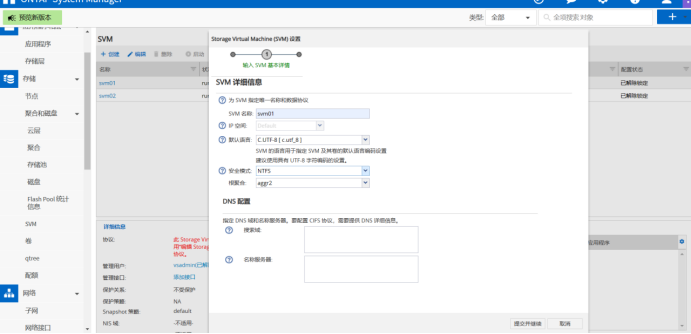
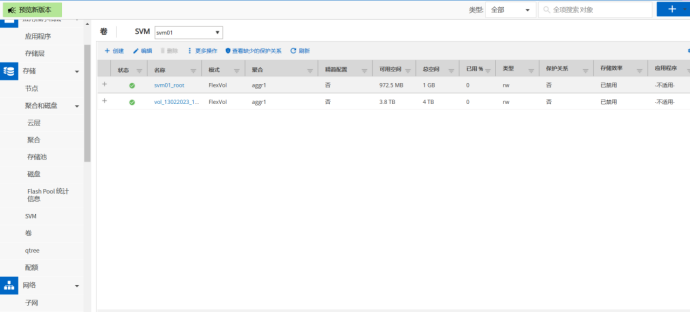
3.5创建SVM
FAS2720 配置的更多相关文章
- 配置android sdk 环境
1:下载adnroid sdk安装包 官方下载地址无法打开,没有vpn,使用下面这个地址下载,地址:http://www.android-studio.org/
- Android Studio配置 AndroidAnnotations——Hi_博客 Android App 开发笔记
以前用Eclicps 用习惯了现在 想学学 用Android Studio 两天的钻研终于 在我电脑上装了一个Android Studio 并完成了AndroidAnnotations 的配置. An ...
- react-router 组件式配置与对象式配置小区别
1. react-router 对象式配置 和 组件式配置 组件式配置(Redirect) ----对应---- 对象式配置(onEnter钩子) IndexRedirect -----对应-- ...
- 总结:Mac前端开发环境的搭建(配置)
新年新气象,在2016年的第一天,我入手了人生中第一台自己的电脑(大一时好友赠送的电脑在一次无意中烧坏了主板,此后便不断借用别人的或者网站的).macbook air,身上已无分文...接下来半年的房 ...
- Android Studio 多个编译环境配置 多渠道打包 APK输出配置
看完这篇你学到什么: 熟悉gradle的构建配置 熟悉代码构建环境的目录结构,你知道的不仅仅是只有src/main 开发.生成环境等等环境可以任意切换打包 多渠道打包 APK输出文件配置 需求 一般我 ...
- Virtual Box配置CentOS7网络(图文教程)
之前很多次安装CentOS7虚拟机,每次配置网络在网上找教程,今天总结一下,全图文配置,方便以后查看. Virtual Box可选的网络接入方式包括: NAT 网络地址转换模式(NAT,Network ...
- [linux]阿里云主机的免登陆安全SSH配置与思考
公司服务器使用的第三方云端服务,即阿里云,而本地需要经常去登录到服务器做相应的配置工作,鉴于此,每次登录都要使用密码是比较烦躁的,本着极速思想,我们需要配置我们的免登陆. 一 理论概述 SSH介绍 S ...
- nginx配置反向代理或跳转出现400问题处理记录
午休完上班后,同事说测试站点访问接口出现400 Bad Request Request Header Or Cookie Too Large提示,心想还好是测试服务器出现问题,影响不大,不过也赶紧上 ...
- Swift3.0服务端开发(一) 完整示例概述及Perfect环境搭建与配置(服务端+iOS端)
本篇博客算是一个开头,接下来会持续更新使用Swift3.0开发服务端相关的博客.当然,我们使用目前使用Swift开发服务端较为成熟的框架Perfect来实现.Perfect框架是加拿大一个创业团队开发 ...
- 在 ML2 中配置 OVS flat network - 每天5分钟玩转 OpenStack(133)
前面讨论了 OVS local network,今天开始学习 flat network. flat network 是不带 tag 的网络,宿主机的物理网卡通过网桥与 flat network 连接, ...
随机推荐
- 【Java Web】项目通用返回模块ServerResponse:枚举code状态码、泛型返回值、序列化注解限制数据
一.枚举类编写ResponseCode package com.boulderaitech.common; /** * 编写枚举类的步骤 * (1)编写所需的变量 * (2)编写枚举类构造方法 * ( ...
- Java语言进阶 day02【Collection、泛型】
主要内容 Collection集合 迭代器 增强for 泛型 教学目标
- Rust 学习之旅(7):Package,Crate,Module
Rust 学习之旅(7):Package,Crate,Module 这是第 7 章的读书笔记,Cargo Workspace 在第 14 章. Packages and Crates As a pro ...
- Django框架:1、手撸web框架、Django框架简介、安装与使用和小白必会三板斧
Django框架 目录 Django框架 一.Django推导流程 1.纯手撸web框架 2.基于wsgire模块 3.代码封装优化 4.动静态网页 5.jinja2模块 6.前端.后端.数据库三者联 ...
- 深度学习GPU加速配置方法
深度学习GPU加速配置方法 一.英伟达官方驱动及工具安装 首先检查自己的电脑驱动版本,未更新至最新建议先将驱动更新至最新,然后点击Nvidia控制面板 2.在如下界面中点击系统信息,点击显示可以看见当 ...
- MySQL存储 pymysql模块
目录 pymysql模块 基本使用 cursor=pymysql.cursors.DictCursor 获取数据 fetchall 移动光标 scroll 增删改二次确认 commit autocom ...
- 可视化编排的数据集成和分发开源框架Nifi轻松入门-上
@ 目录 概述 定义 dataflow面临挑战 特性 核心概念 架构 高级概述 安装 部署 常见处理器 入门示例 概述 定义 Nifi 官网地址 https://nifi.apache.org/ Ni ...
- xshell+Xftp下载
1.XShell免费官方网站下载地址:https://www.netsarang.com/zh/all-downloads/ 但是官网的地址贼慢,用以下方法下载 2.可以用这个下(写着中文官网):ht ...
- 11、ON DUPLICATE KEY UPDATE实现插入更新操作
一.插入与更新操作: MySQL中,采用ON DUPLICATE KEY UPDATE语句对不存在的数据进行INSERT插入操作,对已存在的数据进行UPDATE更新操作: 总结: 1.ON DUPLI ...
- 速记·python 123章
第一.二.三章 初识python 1.1 Python的概述 开发环境:Python 开发工具:IDLE(Python自带) 1.python的特点:代码简单.开发速度快.容易学习:有丰富的库:&qu ...