虚拟机中CentOS 6.5 添加扩展分区
此扩展方法要求支持LVM
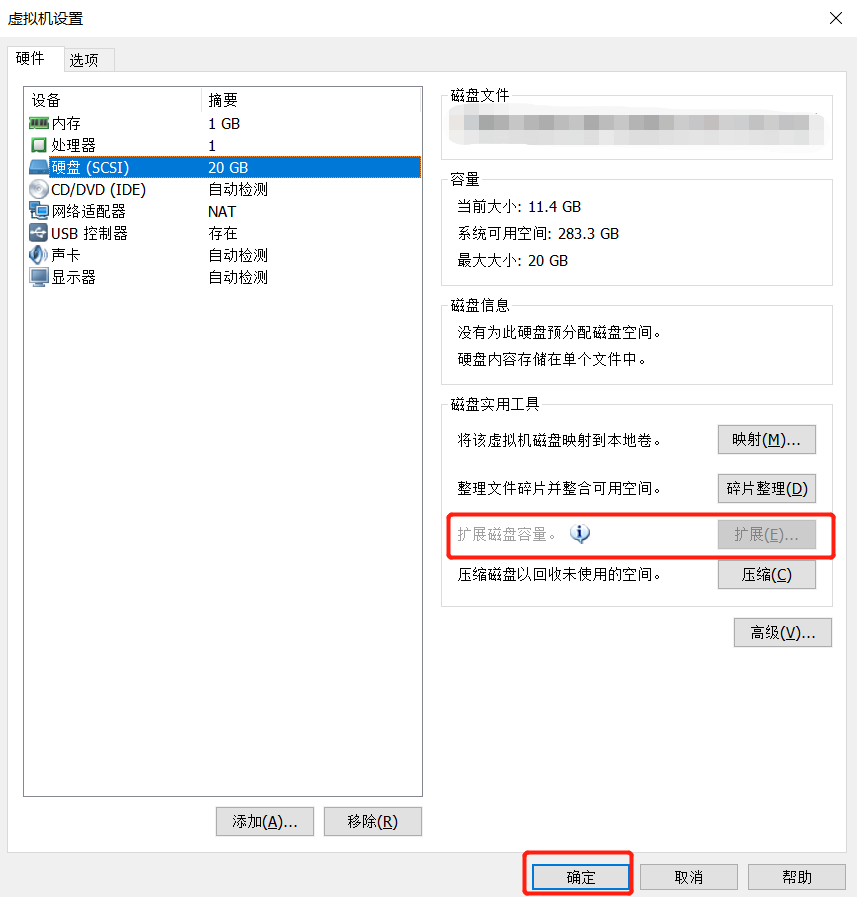
1、更改虚拟机配置
虚拟机->设置->硬盘->扩展磁盘容量
fdisk -l 查看,发现硬盘空间变大了
[root@thj Desktop]# fdisk -l

Disk /dev/sda: 42.9 GB,  bytes

 heads,  sectors/track,  cylinders

Units = cylinders of  *  =  bytes

Sector size (logical/physical):  bytes /  bytes

I/O size (minimum/optimal):  bytes /  bytes

Disk identifier: 0x000812b5

   Device Boot      Start         End      Blocks   Id  System

/dev/sda1   *                                Linux

Partition  does not end on cylinder boundary.

/dev/sda2                             8e  Linux LVM

Disk /dev/mapper/vg_thj-lv_root: 18.9 GB,  bytes

 heads,  sectors/track,  cylinders

Units = cylinders of  *  =  bytes

Sector size (logical/physical):  bytes /  bytes

I/O size (minimum/optimal):  bytes /  bytes

Disk identifier: 0x00000000

Disk /dev/mapper/vg_thj-lv_swap:  MB,  bytes

 heads,  sectors/track,  cylinders

Units = cylinders of  *  =  bytes

Sector size (logical/physical):  bytes /  bytes

I/O size (minimum/optimal):  bytes /  bytes

Disk identifier: 0x00000000
2、创建分区
[root@thj Desktop]# fdisk /dev/sda

WARNING: DOS-compatible mode is deprecated. It's strongly recommended to

         switch off the mode (command 'c') and change display units to

         sectors (command 'u').

Command (m for help): p    #查看分区表信息

Disk /dev/sda: 42.9 GB,  bytes

 heads,  sectors/track,  cylinders

Units = cylinders of  *  =  bytes

Sector size (logical/physical):  bytes /  bytes

I/O size (minimum/optimal):  bytes /  bytes

Disk identifier: 0x000812b5

   Device Boot      Start         End      Blocks   Id  System

/dev/sda1   *                                Linux

Partition  does not end on cylinder boundary.

/dev/sda2                             8e  Linux LVM

Command (m for help): n   #创建新的分区

Command action

   e   extended

   p   primary partition (-)

p        #创建为主分区

Partition number (-):

First cylinder (-, default ):

Using default value                          #默认就好

Last cylinder, +cylinders or +size{K,M,G} (-, default ):

Using default value             #默认就好

Command (m for help): p   #查看分区表

Disk /dev/sda: 42.9 GB,  bytes

 heads,  sectors/track,  cylinders

Units = cylinders of  *  =  bytes

Sector size (logical/physical):  bytes /  bytes

I/O size (minimum/optimal):  bytes /  bytes

Disk identifier: 0x000812b5

   Device Boot      Start         End      Blocks   Id  System

/dev/sda1   *                                Linux

Partition  does not end on cylinder boundary.

/dev/sda2                             8e  Linux LVM

/dev/sda3                        +    Linux

Command (m for help): w  #保存

The partition table has been altered!

Calling ioctl() to re-read partition table.

WARNING: Re-reading the partition table failed with error : Device or resource busy.

The kernel still uses the old table. The new table will be used at

the next reboot or after you run partprobe() or kpartx()

Syncing disks.
设置完后,reboot重启系统
3、格式化分区
[root@thj Desktop]# mkfs.ext3 /dev/sda3

mke2fs 1.41. (-May-)

Filesystem label=

OS type: Linux

Block size= (log=)

Fragment size= (log=)

Stride= blocks, Stripe width= blocks

 inodes,  blocks

 blocks (5.00%) reserved for the super user

First data block=

Maximum filesystem blocks=

 block groups

 blocks per group,  fragments per group

 inodes per group

Superblock backups stored on blocks:

    , , , , , , , , ,

Writing inode tables: done

Creating journal ( blocks): done

Writing superblocks and filesystem accounting information: done

This filesystem will be automatically checked every  mounts or

 days, whichever comes first.  Use tune2fs -c or -i to override.
4、加入LVM,并挂载到根目录下
- vgs 查看卷组情况
[root@thj Desktop]# vgs

  VG     #PV #LV #SN Attr   VSize  VFree

  vg_thj          wz--n- .51g                //有一个vg_thj卷组(此处系统不同会有所不同)
- 创建物理卷(LVM分区),并将物理卷加入vg_thj组里
[root@thj Desktop]# lvm

lvm> pvcreate /dev/sda3      //创建一个LVM硬分区

  Physical volume "/dev/sda3" successfully created

lvm> vgextend vg_thj /dev/sda3    //加入与根目录同一个LVM组

  Volume group "vg_thj" successfully extended
- 查看 lv path
[root@thj Desktop]# lvdisplay

  --- Logical volume ---

  LV Path                /dev/vg_thj/lv_root      //root对应的lv path

  LV Name                lv_root

  VG Name                vg_thj

  LV UUID                FMlzw9-r8dt-2Oa1-mS0W-brnn-YsDm-g3ld5S

  LV Write Access        read/write

  LV Creation host, time thj.localthj, -- :: +

  LV Status              available

  # open

  LV Size                17.57 GiB

  Current LE

  Segments

  Allocation             inherit

  Read ahead sectors     auto

  - currently set to

  Block device           :

  --- Logical volume ---

  LV Path                /dev/vg_thj/lv_swap

  LV Name                lv_swap

  VG Name                vg_thj

  LV UUID                lLgahm-QUMF-XHiN-jZJc-F5ve-YycI-FmEVdr

  LV Write Access        read/write

  LV Creation host, time thj.localthj, -- :: +

  LV Status              available

  # open

  LV Size                1.94 GiB

  Current LE

  Segments

  Allocation             inherit

  Read ahead sectors     auto

  - currently set to

  Block device           :
- 扩展 lv path
[root@thj Desktop]# lvextend -L +.99G /dev/vg_thj/lv_root

  Rounding size to boundary between physical extents: 19.99 GiB.

  Size of logical volume vg_thj/lv_root changed from 17.57 GiB ( extents) to 37.56 GiB ( extents).

  Logical volume lv_root successfully resized.
- 重置主分区大小
[root@thj Desktop]# resize2fs /dev/vg_thj/lv_root

resize2fs 1.41. (-May-)

Filesystem at /dev/vg_thj/lv_root is mounted on /; on-line resizing required

old desc_blocks = , new_desc_blocks =

Performing an on-line resize of /dev/vg_thj/lv_root to  (4k) blocks.

The filesystem on /dev/vg_thj/lv_root is now  blocks long.
有时报错:
[root@thj Desktop]# lvextend -L +19G /dev/vg_thj/lv_root

  Couldn't find device with uuid N0xspW-ZOct-v7pH-GHRN-G1Ck-0CnJ-ghqEKZ.

  Cannot change VG vg_thj while PVs are missing.

  Consider vgreduce --removemissing.

  Cannot process volume group vg_thj
参考 https://blog.51cto.com/yl497103815/1180426
- 查看扩展后的文件系统
[root@thj Desktop]# df -h

Filesystem            Size  Used Avail Use% Mounted on

/dev/mapper/vg_thj-lv_root

                       37G   12G   24G  % /

tmpfs                 491M  228K  491M   % /dev/shm

/dev/sda1             477M   36M  417M   % /boot
虚拟机中CentOS 6.5 添加扩展分区的更多相关文章
- 【liunx】使用xshell连接虚拟机上的CentOS 7,使用xhell连接本地虚拟机上的Ubuntu, 获取本地虚拟机中CentOS 7的IP地址,获取本地虚拟机中Ubuntu 的IP地址,Ubuntu开启22端口
注意,如果想用xshell去连接本地虚拟机中的linux系统,需要本地虚拟机中的系统是启动的才能连接!!!!! ============================================ ...
- 虚拟机中给linux 系统添加硬盘以后,进行分区挂载
当自己虚拟机中的linux 系统硬盘不够用的时候需要添加硬盘给系统使用,所以可以通过以下的步骤实现 1.关闭自己的客户机,然后执行以下步骤 2. 上面的步骤完成以后,重点来了,下面打开客户机,执行以下 ...
- 虚拟机中CentOS 7下PHP环境配置
为了简单起见,虚拟机网卡设置为桥接模式 1.yum install httpd php 2.yum install mariadb 3.启动mariadb systemctl start maria ...
- 虚拟机中CentOS 7 x64图形化界面的安装
VMware的初始设置如下: 图1 待虚拟机读取完iso,出现此界面 图2 我们主要是安装图形化界面的系统,所以在软件选择栏下如图选择: 图3 设置root密码,创建用户,等候安装完成: 图4 安装完 ...
- centos下使用fdisk扩展分区容量大小
硬盘空间为20G,VMware增加磁盘大小,需要再增加10G空间 扩展完后,重启系统,再次使用fdisk -l查看,会发现硬盘空间变大了: 重新创建分区,调整分区信息 本次实验主要对/dev/sda4 ...
- VMware虚拟机中CentOS 7的硬盘空间扩容
查看centos7系统挂载点信息 扩展VMWare-centos7硬盘空间 对新增加的硬盘进行分区.格式化 添加新LVM到已有的LVM组,实现扩容 1.查看centos7系统挂载点信息 df -h查看 ...
- VMware虚拟机中CentOS/redhat设置固定IP
你的笔记本中的VMware中redhat或centOS系统,如果想在上面建站,而又如果你需要在家里和公司都能访问该站(至少希望你自己的笔记本能访问),那么就需要将虚拟机IP设置为固定IP了.以下介绍两 ...
- VM虚拟机安装CentOS 7.0添加jdk环境
虚拟机注册码 5A02H-AU243-TZJ49-GTC7K-3C61N 安装centos系统,网络类型选择桥接网络安装完成后vi /etc/sysconfig/network-scripts/ifc ...
- 解决VMware虚拟机中centos 7无法上网的问题
在WMware中安装centos 7后发现无法安装软件,开始以为是镜像服务器的问题,后来通过ping之后发现根本没办法连接到网络.由于很多设置都是默认的,并且虚拟机也是NAT模式,和电脑主机共享网络, ...
随机推荐
- 浅谈python的第三方库——numpy(二)
前一期博文中,初步探索了numpy中矩阵的几种运算操作,本文将展示numpy矩阵的元素抽取与合并操作. 1 元素抽取 在我们使用矩阵的时候,有时需要提取出矩阵的某些位置上的元素单独研究,这时就需要熟悉 ...
- C#面向对象详解
//封装就是将数据或函数等集合在一个个的单元中,我们称之为类,被封装的对象通常被称为抽象数据类型, //封装的意义在于保护或防止代码被我们无意中破坏, //封装既可以封装成员变量,又可以封装成员方法, ...
- Interger对象不要用==进行比较
为了更好的空间和时间性能,Integer会缓存频繁使用的数值,数值范围为-128到127,在此范围内直接返回缓存值. IntegerCache.low 是-128,IntegerCache.high是
- MySQL 8 服务器日志
错误日志: 启动.运行.停止 mysqld(MySQL Server) 遇到的问题 通用查询日志: 建立客户端连接和从客户端接收的语句 二进制日志: 更改数据的语句(也用于复制) 中继日志: 从复制m ...
- P2048 [NOI2010]超级钢琴 [堆+st表]
考虑只能取长度为 [L,R] 的,然后不难想到用堆搞. 搞个前缀和的st表,里面维护的是一个 最大值的位置 struct rmq { int mx[N][20] ; void qwq(int n) { ...
- Android_关于自定义view的dialog有黑影的问题
跟默认选中的主题有关 在build段代码中加入这行代码 dialog.getWindow().setBackgroundDrawableResource(android.R.color.transpa ...
- 中间件c10k问题
中间件c10k问题 没有使用iocp/epoll/kqueue通讯的中间件,中间件就算部署在拥有多核CPU的强大服务器上,最头痛的问题是C10K问题. 中间件没有办法通过优化程序,提升CPU利用率来处 ...
- py 二级习题(turtle)
用turtle画一个正方形 import turtle turtle.penup() turtle.goto(-100,-100) turtle.pendown() turtle.begin_fill ...
- poj2387- Til the Cows Come Home(最短路板子题)
题目描述 Description Bessie is out in the field and wants to get back to the barn to get as much sleep a ...
- Android_ViewPager+Fragment实现页面滑动和底部导航栏
1.Xml中底部导航栏由一个RadioGroup组成,其上是ViewPager. <?xml version="1.0" encoding="utf-8" ...