【Python】蟒蛇绘制
来画一只你的小蛇吧!
1.

2.


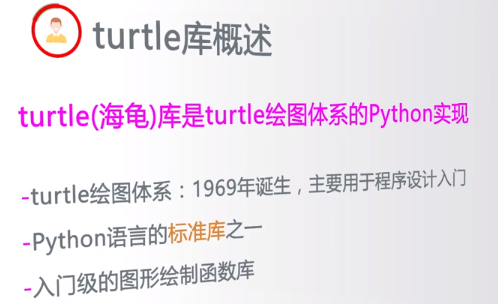
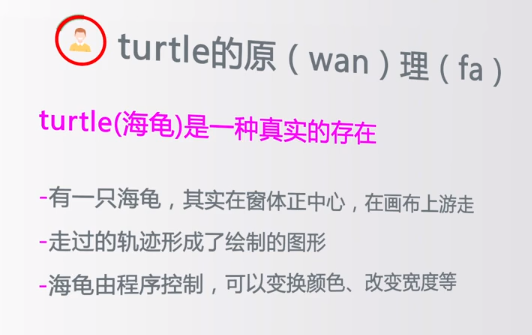
3.了解turtle库
Turtle,也叫海龟渲染器,使用Turtle库画图也叫海龟作图。Turtle库是Python语言中一个很流行的绘制图像的函数库。海龟渲染器,和各种三维软件都有着良好的结合。功能强大,使用方便。该渲染器的特色在于其渲染速度可以优海龟渲染器,
和各种三维软件都有着良好的结合。功能强大,使用方便。化得非常快,相比起mental ray来说,这是他的一大优点。尤其是在全局光与final gather联用的时候效果更是明显。海龟渲染器在渲染大场景时非常有效,其对于光线的处理和色彩的鲜艳程度都要更胜三维软件自带的渲染器。其缺点在于对于三维软件的程序纹理贴图的支持不够,很多情况下并不能对它的材质球使用程序纹理贴图,这不能不说是一个遗憾。


代码:
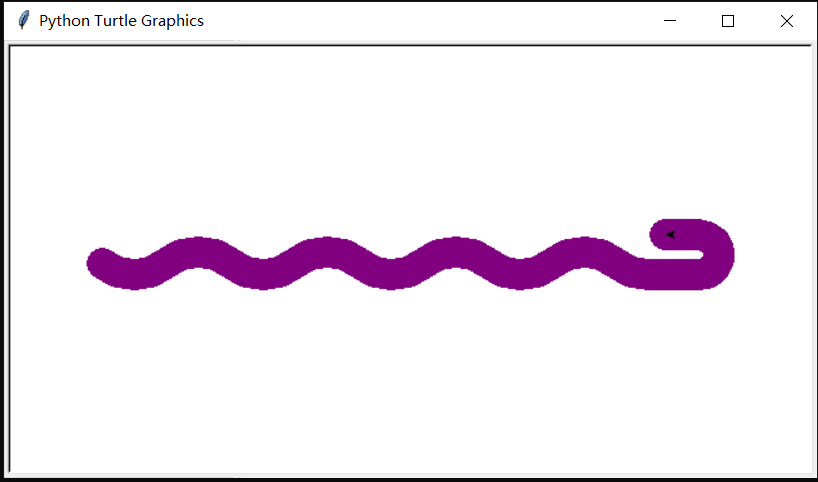
#pythondraw.py
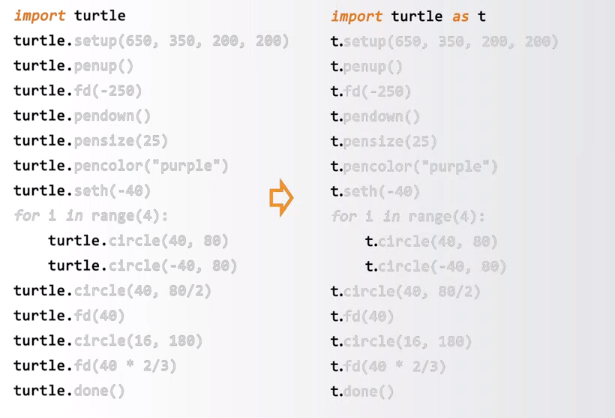
import turtle #引用 绘制(海龟)库
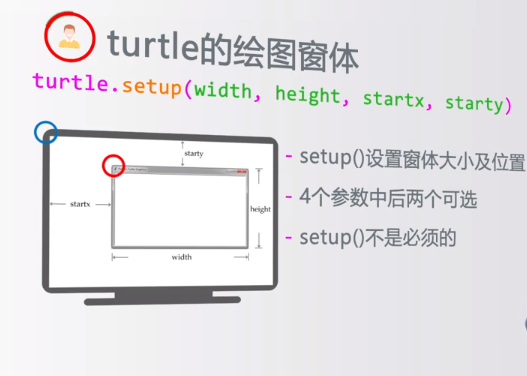
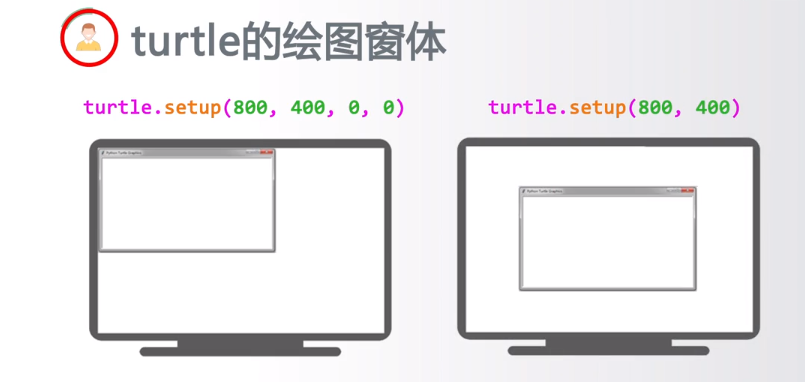
turtle.setup(650,350,200,200) #启动窗体,宽650,高350
turtle.penup() #抬起画笔
turtle.fd(-250) #倒退250像素
turtle.pendown() #落下画笔
turtle.pensize(25) #画笔宽度是25像素
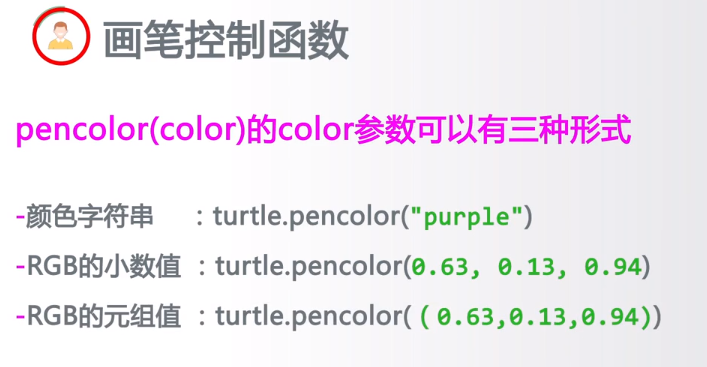
turtle.pencolor('purple') #画笔颜色是紫色
turtle.seth(-40) #调整方向为绝对40度
for i in range(4): #循环4次,走曲线,r为40像素,角度为80
turtle.circle(40,80)
turtle.circle(-40,80)
turtle.circle(40,80/2) #继续走曲线
turtle.fd(40) #向前走40像素
turtle.circle(16,180)
turtle.fd(40 * 2/3)
turtle.done() #结束绘制,不会主动退出;如果想绘图结束就关闭窗口,就去掉这一行
结果:


推荐使用:

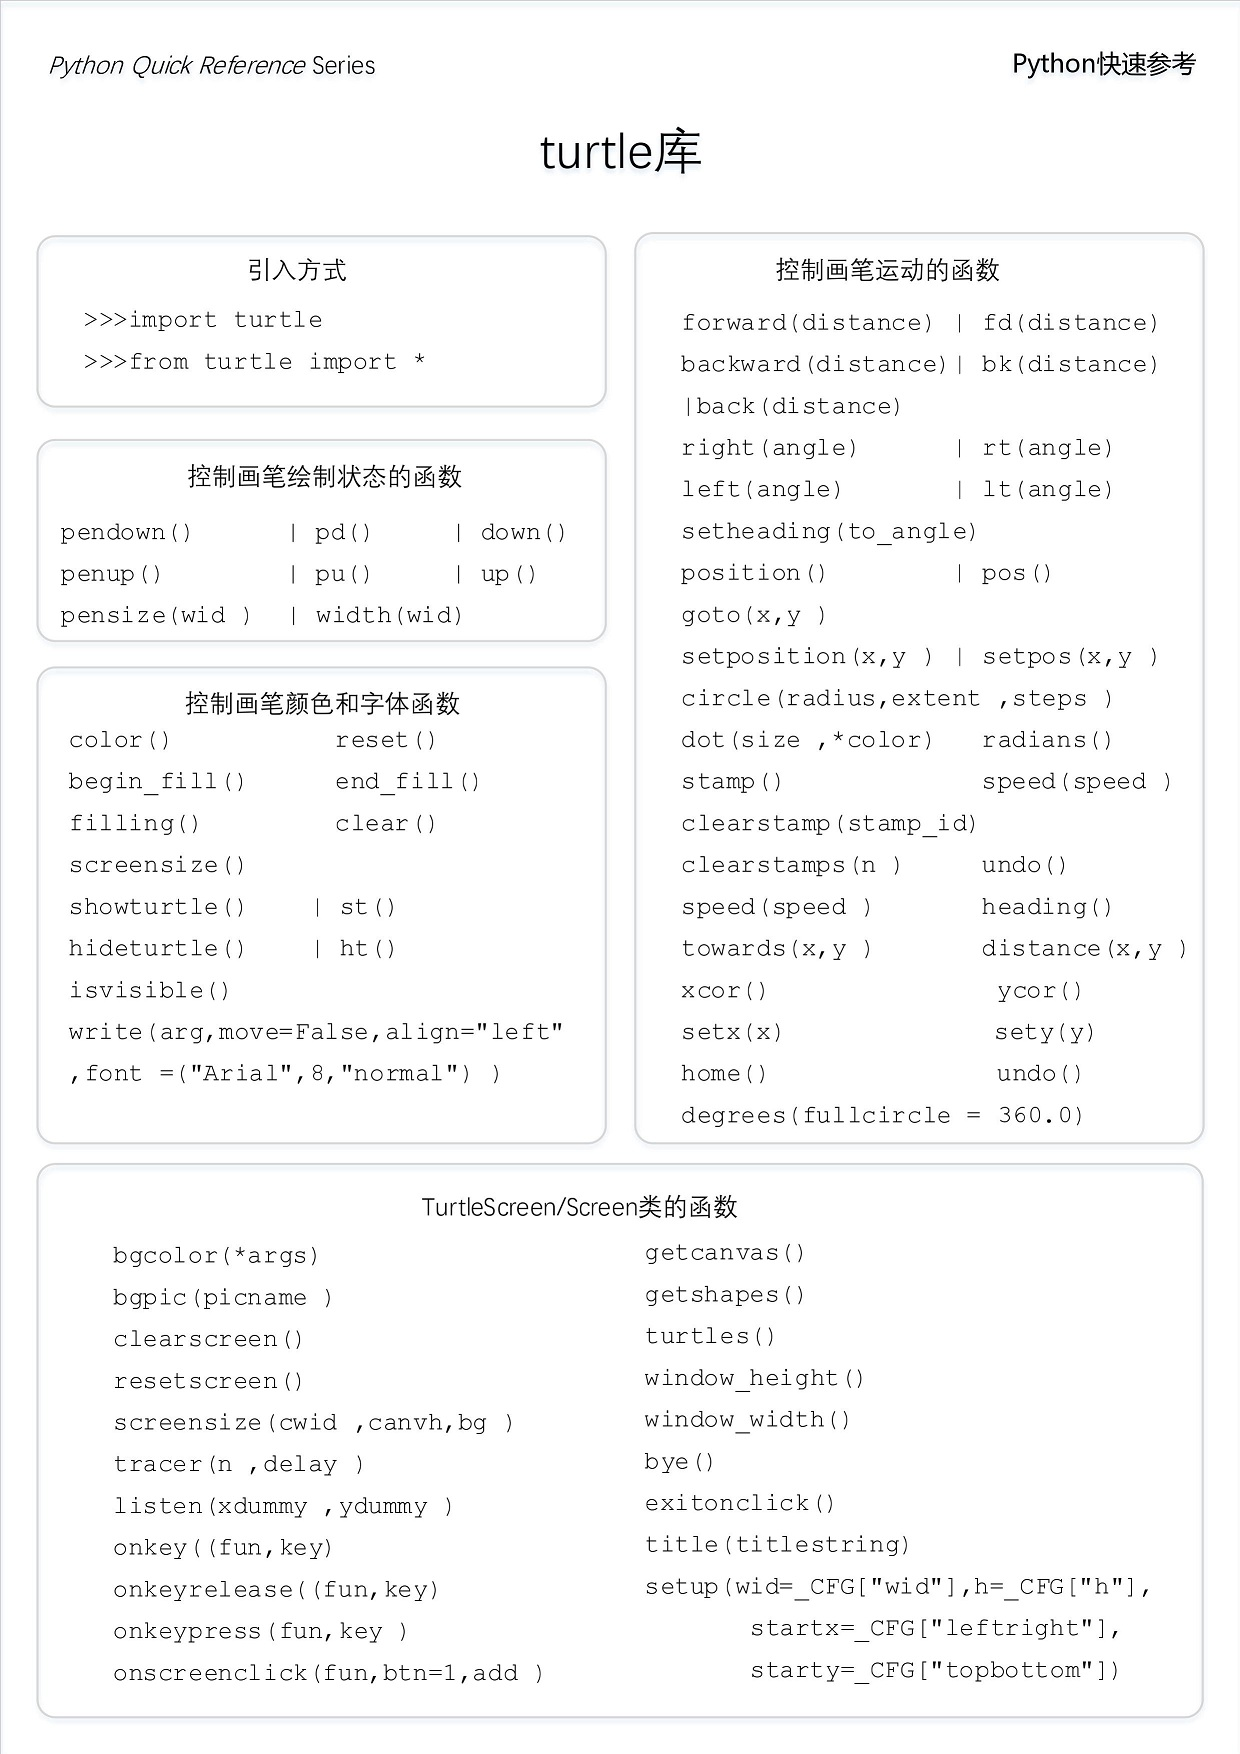
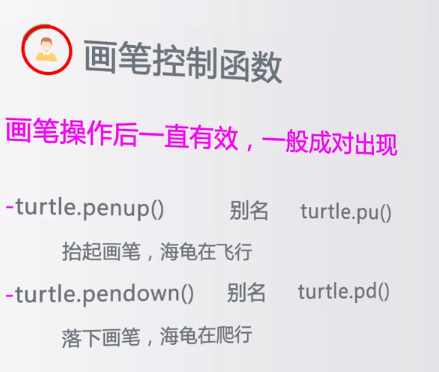
画笔控制函数:

turtle.fillcolor(colorstring):绘制图形的填充颜色
turtle.color(color1, color2):同时设置pencolor=color1, fillcolor=color2
turtle.filling():返回当前是否在填充状态
turtle.begin_fill():准备开始填充图形
turtle.end_fill():填充完成
turtle.hideturtle():隐藏画笔的turtle形状
turtle.showturtle():显示画笔的turtle形状
运动控制函数:
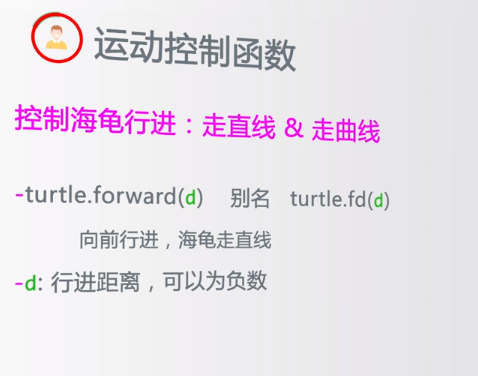
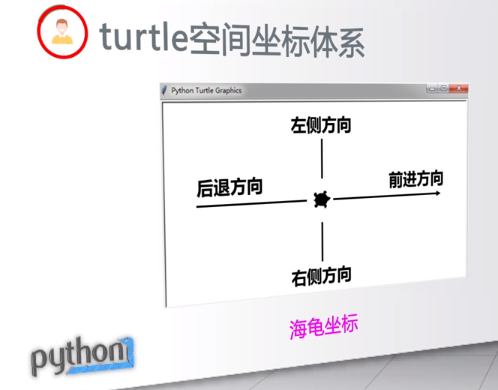
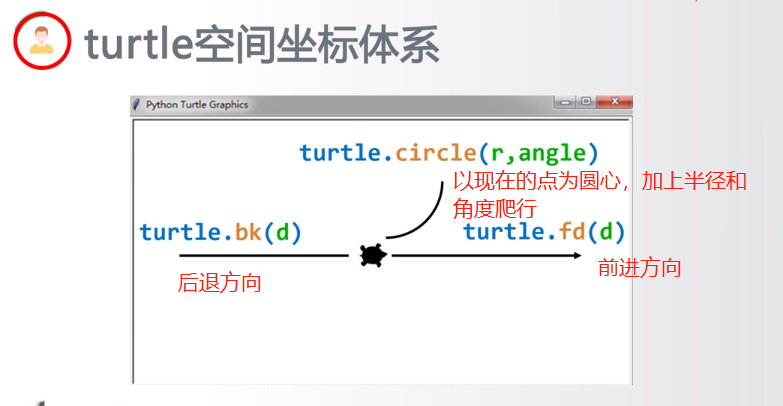
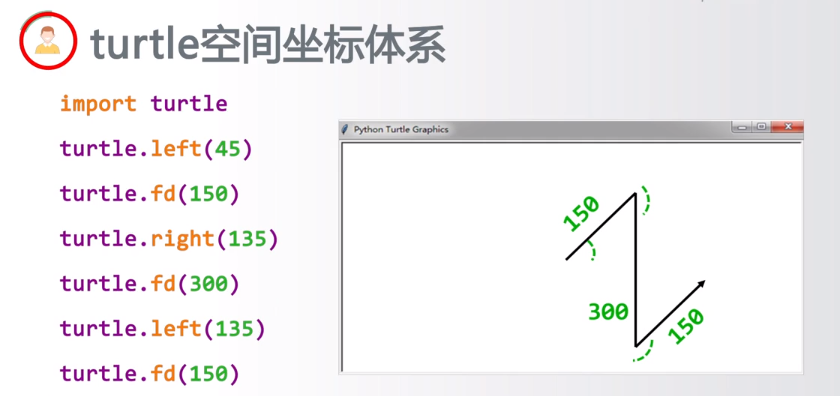
turtle.forward(distance):向当前画笔方向移动distance像素长度
turtle.backward(distance):向当前画笔相反方向移动distance像素长度
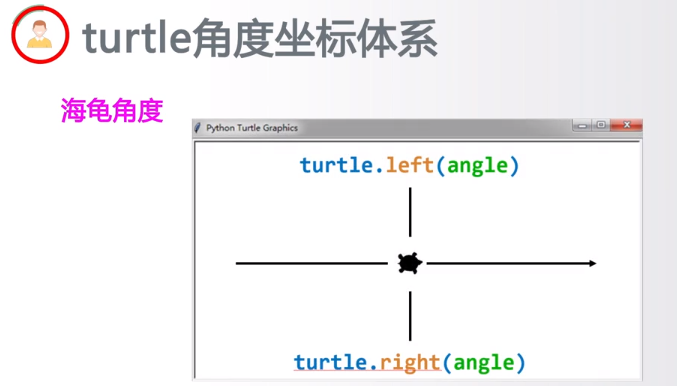
turtle.right(degree):顺时针移动degree°
turtle.left(degree):逆时针移动degree°
turtle.pendown():移动时绘制图形,缺省时也为绘制
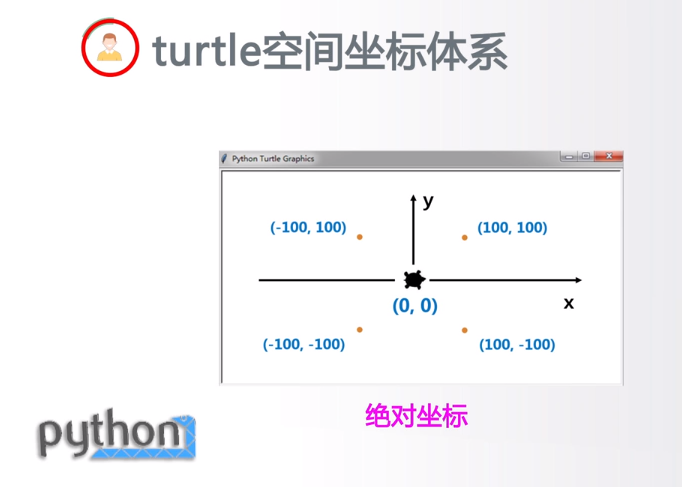
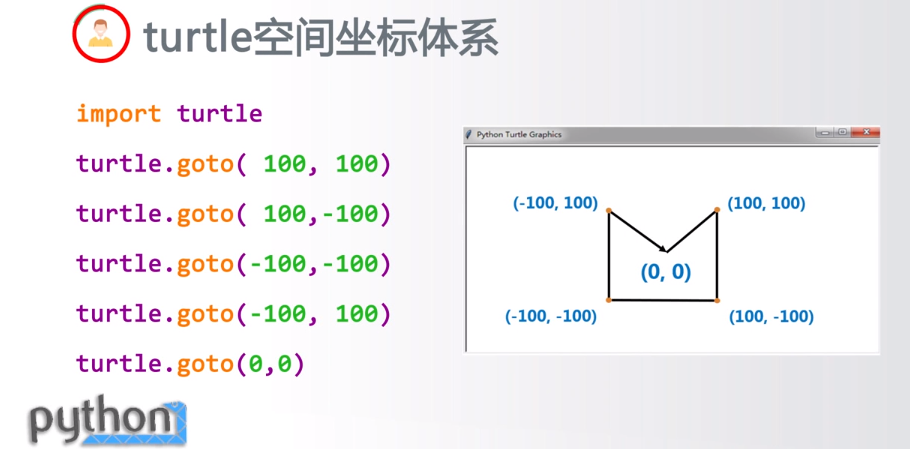
turtle.goto(x,y):将画笔移动到坐标为x,y的位置
turtle.penup():提起笔移动,不绘制图形,用于另起一个地方绘制
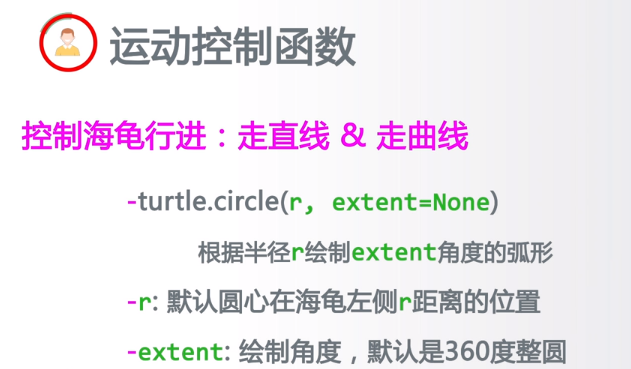
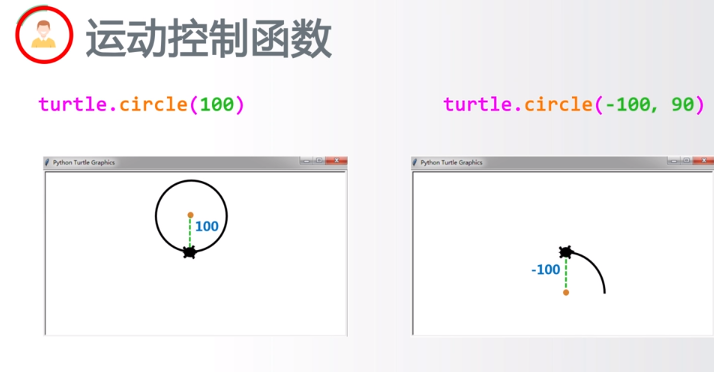
turtle.circle():画圆,半径为正(负),表示圆心在画笔的左边(右边)画圆
setx( ):将当前x轴移动到指定位置
sety( ):将当前y轴移动到指定位置
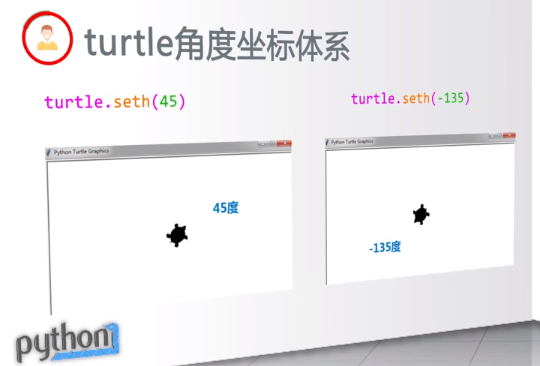
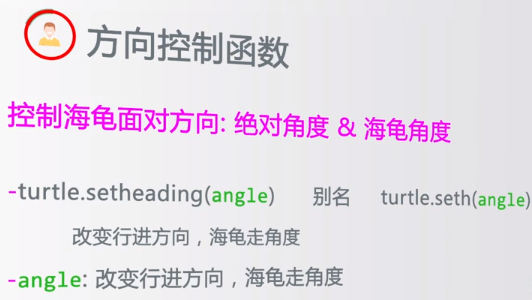
setheading(angle):设置当前朝向为angle角度
home():设置当前画笔位置为原点,朝向东。
dot(r):绘制一个指定直径和颜色的圆点
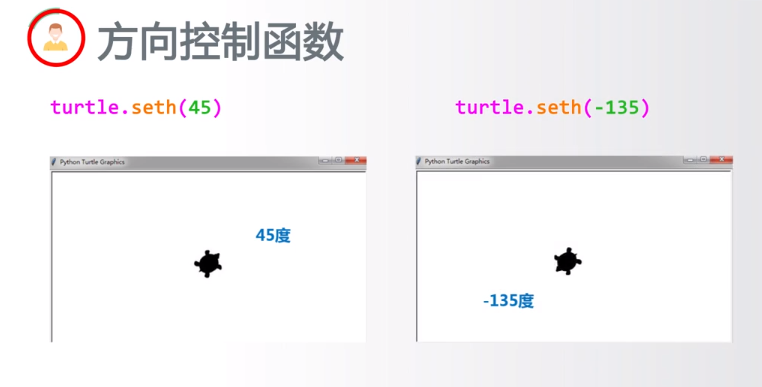
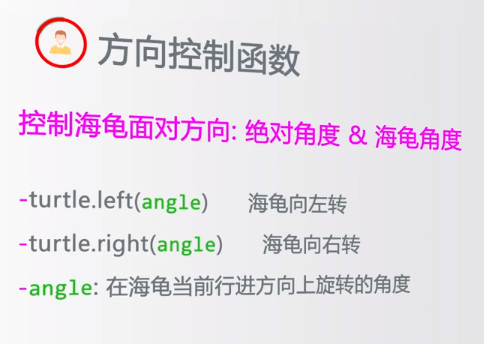
方向控制函数:
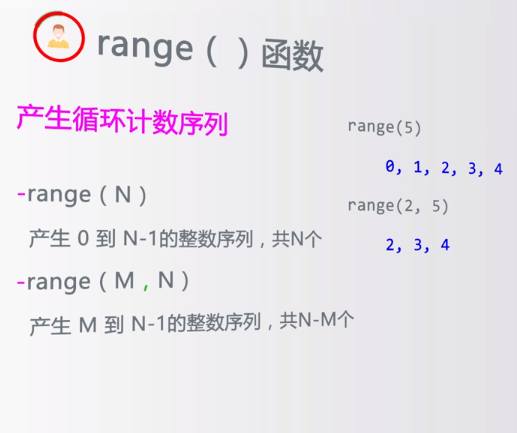
循环与range函数:

 print里加了逗号,输出时文字与参数会加一个空格
全局控制命令:
turtle.clear():清空turtle窗口,但是turtle的位置和状态不会改变
turtle.reset():清空窗口,重置turtle状态为起始状态
turtle.undo():撤销上一个turtle动作
turtle.isvisible():返回当前turtle是否可见
stamp():复制当前图形
turtle.write(s [,font=("font-name",font_size,"font_type")]):写文本,s为文本内容,font是字体的参数,分别为字体名称,大小和类型;font为可选项,font参数也是可选项
其他命令:

实例:
画个时钟:
代码:
# coding=utf-8

import turtle

from datetime import *

# 抬起画笔,向前运动一段距离放下

def Skip(step):

    turtle.penup()

    turtle.forward(step)

    turtle.pendown()

def mkHand(name, length):

    # 注册Turtle形状,建立表针Turtle

    turtle.reset()

    Skip(-length * 0.1)

    # 开始记录多边形的顶点。当前的乌龟位置是多边形的第一个顶点。

    turtle.begin_poly()

    turtle.forward(length * 1.1)

    # 停止记录多边形的顶点。当前的乌龟位置是多边形的最后一个顶点。将与第一个顶点相连。

    turtle.end_poly()

    # 返回最后记录的多边形。

    handForm = turtle.get_poly()

    turtle.register_shape(name, handForm)

def Init():

    global secHand, minHand, hurHand, printer

    # 重置Turtle指向北

    turtle.mode("logo")

    # 建立三个表针Turtle并初始化

    mkHand("secHand", 135)

    mkHand("minHand", 125)

    mkHand("hurHand", 90)

    secHand = turtle.Turtle()

    secHand.shape("secHand")

    minHand = turtle.Turtle()

    minHand.shape("minHand")

    hurHand = turtle.Turtle()

    hurHand.shape("hurHand")

    for hand in secHand, minHand, hurHand:

        hand.shapesize(1, 1, 3)

        hand.speed(0)

        # 建立输出文字Turtle

    printer = turtle.Turtle()

    # 隐藏画笔的turtle形状

    printer.hideturtle()

    printer.penup()

def SetupClock(radius):

    # 建立表的外框

    turtle.reset()

    turtle.pensize(7)

    turtle.pencolor("#ff5500")

    turtle.fillcolor("green")

    for i in range(60):

        Skip(radius)

        if i % 5 == 0:

            turtle.forward(20)

            Skip(-radius - 20)

            Skip(radius + 20)

            if i == 0:

                turtle.write(int(12), align="center", font=("Courier", 14, "bold"))

            elif i == 30:

                Skip(25)

                turtle.write(int(i / 5), align="center", font=("Courier", 14, "bold"))

                Skip(-25)

            elif (i == 25 or i == 35):

                Skip(20)

                turtle.write(int(i / 5), align="center", font=("Courier", 14, "bold"))

                Skip(-20)

            else:

                turtle.write(int(i / 5), align="center", font=("Courier", 14, "bold"))

            Skip(-radius - 20)

        else:

            turtle.dot(5)

            Skip(-radius)

        turtle.right(6)

def Week(t):

    week = ["星期一", "星期二", "星期三",

            "星期四", "星期五", "星期六", "星期日"]

    return week[t.weekday()]

def Date(t):

    y = t.year

    m = t.month

    d = t.day

    return "%s-%d-%d" % (y, m, d)

def Tick():

    # 绘制表针的动态显示

    t = datetime.today()

    second = t.second + t.microsecond * 0.000001

    minute = t.minute + second / 60.0

    hour = t.hour + minute / 60.0

    secHand.setheading(6 * second)

    minHand.setheading(6 * minute)

    hurHand.setheading(30 * hour)

    turtle.tracer(False)

    printer.forward(65)

    printer.write(Week(t), align="center",

                  font=("Courier", 14, "bold"))

    printer.back(130)

    printer.write(Date(t), align="center",

                  font=("Courier", 14, "bold"))

    printer.home()

    turtle.tracer(True)

    # 100ms后继续调用tick

    turtle.ontimer(Tick, 100)

def main():

    # 打开/关闭龟动画,并为更新图纸设置延迟。

    turtle.tracer(False)

    Init()

    SetupClock(160)

    turtle.tracer(True)

    Tick()

    turtle.mainloop()

if __name__ == "__main__":

    main()
结果:

绘制小猪佩奇:
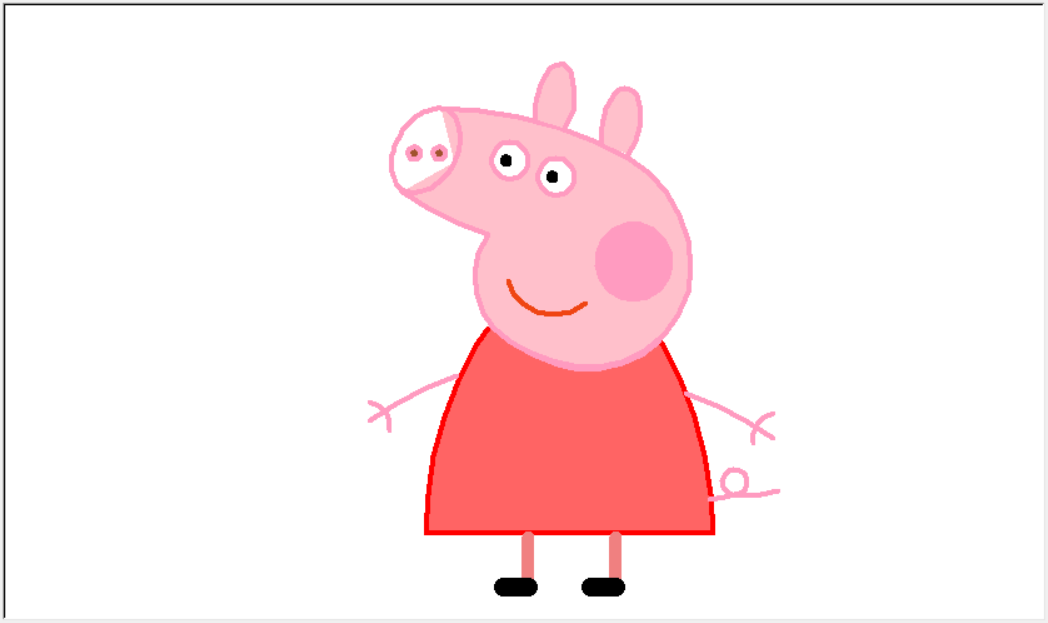
代码:
# coding:utf-8

import turtle as t

# 绘制小猪佩奇

# =======================================

t.pensize(4)

t.hideturtle()

t.colormode(255)

t.color((255, 155, 192), "pink")

t.setup(840, 500)

t.speed(10)

# 鼻子

t.pu()

t.goto(-100,100)

t.pd()

t.seth(-30)

t.begin_fill()

a = 0.4

for i in range(120):

    if 0 <= i < 30 or 60 <= i < 90:

        a = a+0.08

        t.lt(3)  # 向左转3度

        t.fd(a)  # 向前走a的步长

    else:

        a = a-0.08

        t.lt(3)

        t.fd(a)

        t.end_fill()

t.pu()

t.seth(90)

t.fd(25)

t.seth(0)

t.fd(10)

t.pd()

t.pencolor(255, 155, 192)

t.seth(10)

t.begin_fill()

t.circle(5)

t.color(160, 82, 45)

t.end_fill()

t.pu()

t.seth(0)

t.fd(20)

t.pd()

t.pencolor(255, 155, 192)

t.seth(10)

t.begin_fill()

t.circle(5)

t.color(160, 82, 45)

t.end_fill()

# 头

t.color((255, 155, 192), "pink")

t.pu()

t.seth(90)

t.fd(41)

t.seth(0)

t.fd(0)

t.pd()

t.begin_fill()

t.seth(180)

t.circle(300, -30)

t.circle(100, -60)

t.circle(80, -100)

t.circle(150, -20)

t.circle(60, -95)

t.seth(161)

t.circle(-300, 15)

t.pu()

t.goto(-100, 100)

t.pd()

t.seth(-30)

a = 0.4

for i in range(60):

    if 0 <= i < 30 or 60 <= i <90:

        a = a+0.08

        t.lt(3)  # 向左转3度

        t.fd(a)  # 向前走a的步长

    else:

        a = a-0.08

        t.lt(3)

        t.fd(a)

        t.end_fill()

# 耳朵

t.color((255, 155, 192), "pink")

t.pu()

t.seth(90)

t.fd(-7)

t.seth(0)

t.fd(70)

t.pd()

t.begin_fill()

t.seth(100)

t.circle(-50, 50)

t.circle(-10, 120)

t.circle(-50, 54)

t.end_fill()

t.pu()

t.seth(90)

t.fd(-12)

t.seth(0)

t.fd(30)

t.pd()

t.begin_fill()

t.seth(100)

t.circle(-50, 50)

t.circle(-10, 120)

t.circle(-50, 56)

t.end_fill()

#眼睛

t.color((255, 155, 192), "white")

t.pu()

t.seth(90)

t.fd(-20)

t.seth(0)

t.fd(-95)

t.pd()

t.begin_fill()

t.circle(15)

t.end_fill()

t.color("black")

t.pu()

t.seth(90)

t.fd(12)

t.seth(0)

t.fd(-3)

t.pd()

t.begin_fill()

t.circle(3)

t.end_fill()

t.color((255, 155, 192), "white")

t.pu()

t.seth(90)

t.fd(-25)

t.seth(0)

t.fd(40)

t.pd()

t.begin_fill()

t.circle(15)

t.end_fill()

t.color("black")

t.pu()

t.seth(90)

t.fd(12)

t.seth(0)

t.fd(-3)

t.pd()

t.begin_fill()

t.circle(3)

t.end_fill()

# 腮

t.color((255, 155, 192))

t.pu()

t.seth(90)

t.fd(-95)

t.seth(0)

t.fd(65)

t.pd()

t.begin_fill()

t.circle(30)

t.end_fill()

# 嘴

t.color(239, 69, 19)

t.pu()

t.seth(90)

t.fd(15)

t.seth(0)

t.fd(-100)

t.pd()

t.seth(-80)

t.circle(30, 40)

t.circle(40, 80)

# 身体

t.color("red", (255, 99, 71))

t.pu()

t.seth(90)

t.fd(-20)

t.seth(0)

t.fd(-78)

t.pd()

t.begin_fill()

t.seth(-130)

t.circle(100,10)

t.circle(300,30)

t.seth(0)

t.fd(230)

t.seth(90)

t.circle(300,30)

t.circle(100,3)

t.color((255,155,192),(255,100,100))

t.seth(-135)

t.circle(-80,63)

t.circle(-150,24)

t.end_fill()

# 手

t.color((255,155,192))

t.pu()

t.seth(90)

t.fd(-40)

t.seth(0)

t.fd(-27)

t.pd()

t.seth(-160)

t.circle(300,15)

t.pu()

t.seth(90)

t.fd(15)

t.seth(0)

t.fd(0)

t.pd()

t.seth(-10)

t.circle(-20,90)

t.pu()

t.seth(90)

t.fd(30)

t.seth(0)

t.fd(237)

t.pd()

t.seth(-20)

t.circle(-300,15)

t.pu()

t.seth(90)

t.fd(20)

t.seth(0)

t.fd(0)

t.pd()

t.seth(-170)

t.circle(20,90)

# 脚

t.pensize(10)

t.color((240,128,128))

t.pu()

t.seth(90)

t.fd(-75)

t.seth(0)

t.fd(-180)

t.pd()

t.seth(-90)

t.fd(40)

t.seth(-180)

t.color("black")

t.pensize(15)

t.fd(20)

t.pensize(10)

t.color((240, 128, 128))

t.pu()

t.seth(90)

t.fd(40)

t.seth(0)

t.fd(90)

t.pd()

t.seth(-90)

t.fd(40)

t.seth(-180)

t.color("black")

t.pensize(15)

t.fd(20)

# 尾巴

t.pensize(4)

t.color((255, 155, 192))

t.pu()

t.seth(90)

t.fd(70)

t.seth(0)

t.fd(95)

t.pd()

t.seth(0)

t.circle(70, 20)

t.circle(10, 330)

t.circle(70, 30)

t.done()
【Python】蟒蛇绘制的更多相关文章
- python蟒蛇绘制
使用IDLE的文件方式编写代码并保存为PythonDraw.py文件 python蟒蛇绘制 import turtle引入了海龟绘图体系 使用setup函数,设定了一个宽650像素和高350像素的窗体 ...
- python蟒蛇绘制的代码以及目前还不知道怎么用的RGB颜色对照表
#PythonDraw.py import turtle#引入海龟库 turtle.setup(650,350,200,200)#确定窗口大小,长650,高350,确定窗口位置,距离电脑左上角200, ...
- 011 实例2-Python蟒蛇绘制
目录 一."Python蟒蛇绘制"问题分析 1.1 Python蟒蛇绘制 二."Python蟒蛇绘制"实例编写 三.运行效果 3.1 程序关键 四." ...
- Python学习之turtle库和蟒蛇绘制程序
Python的函数库 Python语言与C语言Java类似,可以大量使用外部函数库包含在安装包中的函数库:. 比如math, random, turtle等其他函数库,其他函数库用户根据代码需求自行安 ...
- Python turtle绘制阴阳太极图代码解析
本文详细分析如何使用Python turtle绘制阴阳太极图,先来分解这个图形,图片中有四种颜色,每条曲线上的箭头表示乌龟移动的方向,首先从中心画一个半圆(红线),以红线所示圆的直径作半径画一个校园, ...
- python+matplotlib 绘制等高线
python+matplotlib 绘制等高线 步骤有七: 有一个m*n维的矩阵(data),其元素的值代表高度 构造两个向量:x(1*n)和y(1*m).这两个向量用来构造网格坐标矩阵(网格坐标矩阵 ...
- python学习2:turtle的使用蟒蛇绘制的学习以及自己摸索的等边三角形绘制(跟随mooc学习)
首先先放上蟒蛇的绘制程序 import turtle#引入外部库#def保留字用于 定义函数 def drawSnake(rad,angle,len,neckrad): for i in range( ...
- Python入门习题2.蟒蛇绘制(turtle库)
例2.调用turtle库中的若干函数来绘制蟒蛇,要求:(1)主体窗口宽650像素,高度350像素,窗口左侧与屏幕左侧像素距离200,窗口顶部与屏幕顶部像素距离200:(2)画笔落点在原点反向前进250 ...
- Python语言程序设计(3)--实例2-python蟒蛇绘制-turtle库
1. 2. 3.了解turtle库 Turtle,也叫海龟渲染器,使用Turtle库画图也叫海龟作图.Turtle库是Python语言中一个很流行的绘制图像的函数库.海龟渲染器,和各种三维软件都有着良 ...
随机推荐
- mysql 数据库中存在重复记录,删除保留其中一条
DELETE FROM people WHERE peopleName IN ( SELECT peopleName FROM people GROUP BY peopleName HAVING ) ...
- js数据类型1
1. 分类(2大类) 基本(值)类型--5种 Number: 任意数值 String: 任意文本 Boolean: true/false undefined: undefined null: null ...
- react-绑定this并传参的三种方式
绑定this并传参的三种方式 在事件中绑定this并传参: <input type="button" value="在事件中绑定this并传参" onCl ...
- MySQL的操作数据库SQL语法
MySQL的操作数据库SQL语法 顺序:操作数据库 > 操作数据库中的表 > 操作数据库中的表的数据 MySQL不区分大小写字母 1. 操作数据库 1.创建数据库 2.删除数据库 3.使用 ...
- [Python]BeautifulSoup标签的遍历
1.下行遍历 标签树的下行遍历.content 子节点列表,将tag所有儿子节点存入列表.children 子节点的迭代类型,与.contents类似用于循环遍历儿子节点.descendants 子孙 ...
- eclipse配置tomcat,并部署一个Java web项目到tomcat上
引用链接:https://blog.csdn.net/cincoutcin/article/details/79408484 eclipse配置tomcat 1.windows——preference ...
- centos8 ftp
安装 yum install -y vsftpd 启动 systemctl start vsftpd.service 开机启动 systemctl enable vsftpd.service 查看状态 ...
- MySQL 中like的使用对于索引的影响
今天看了一篇对于like使用对索引的影响的文章,发现自己实践的跟文章得出结论不大一样.所以还是建议自己再看别人文章的时候自己亲自动手实践一下.以免学到不全面的知识. 列子: 先建立一张表: -- 创建 ...
- 154.Ajax处理csrf防御
在普通的form表单中采用post请求提交数据,可以在form表单的method=post的form标签下面,添加一个csrf_token标签{% csrf_token %},或者是直接手动的添加一个 ...
- 让Surface Shader不受光照的明暗影响
直接上码 Shader "Custom/3DVideo" { Properties { _Color (,,,) _MainTex ("Albedo (RGB)" ...