
如何在Spring Boot 中动态设定与执行定时任务
本篇文章的目的是记录并实现在Spring Boot中,动态设定与执行定时任务。
我的开发项目是 Maven 项目,所以首先需要在 pom.xml 文件中加入相关的依赖。依赖代码如下所示:
<dependency>

    <groupId>org.quartz-scheduler</groupId>

    <artifactId>quartz</artifactId>

    <version>RELEASE</version>

</dependency>
下图是定时任务的列表及功能展示。
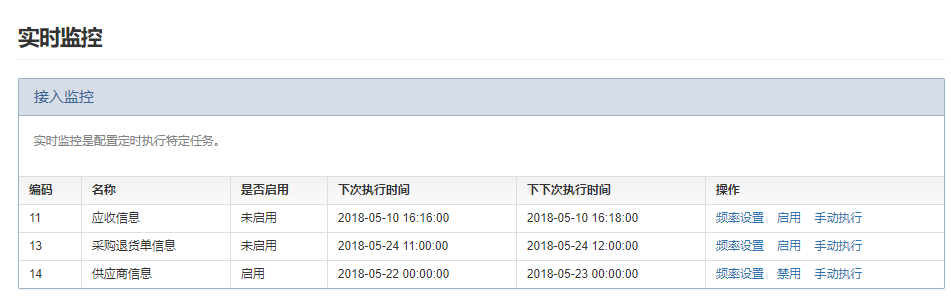
一般情况下,定时任务列表都是初始化生成,所以此处并无定时任务的新增功能。每个定时任务的操作栏中都有三种操作,分别是 频率设置、启用(禁用)、手动执行。
频率设置:设置定时任务的执行频率,设置成功后,可以重新设置定时任务的执行频率,这个功能是动态设定执行频率的保证。
启用(禁用):控制定时任务的执行状态,定时执行或者不执行。启用前,需先设置定时任务的执行频率。
手动执行:手动调用定时任务的执行方法,无需等到下次执行时间。手动执行前,定时任务的状态应该为启用状态。

在执行频率的设定上,我选择了直接使用Cron表达式,为了简单与方便,我在末端小图标上加了一个链接,点击图标后,便会跳转到在线Cron表达式页面。
<div class="row">

    <label class="label col col-3 text-align-right">频率设置<font color="red">*</font>:</label>

    <div class="col col-8">

         <div class="input-group ">

             <input type="text" class="form-control" id="cron" name="cron" th:value="${monitor.cron}" placeholder="点击末端小图标在线获取Cron表达式"/>

             <span onclick="getCron()" class="input-group-addon"><i class="fa fa-calendar"></i></span>

         </div>

    </div>

</div>
//在线获取Cron表达式

function getCron() {

     window.open("http://cron.qqe2.com/");  //打开一个新的网页,不会覆盖当前网页

 }
在新打开的网页上,根据需求设定执行频率,将生成的Cron表达式复制到文本框中,点击 “确定” 按钮。下面的代码是点击 “确定” 按钮后,后台的处理逻辑。
  @RequestMapping(value = "setFrequencyCron", method = RequestMethod.POST)

  @ResponseBody

  @OperationLog(success = "设置频率成功", failure = "设置频率失败")

  public Json setFrequencyCron(Monitor monitor) {

        try {

            Monitor m=monitorService.getMonitorById(monitor.getId());

            m.setCron(monitor.getCron());

            CronSequenceGenerator cronSequenceGenerator = new CronSequenceGenerator(monitor.getCron());

            Date currentTime = new Date();  //当前系统时间

            Date nextTimePoint = cronSequenceGenerator.next(currentTime);   //下次执行时间

            Date nextNextTimePoint = cronSequenceGenerator.next(nextTimePoint);  //下下次执行时间

            SimpleDateFormat sdf = new SimpleDateFormat("yyyy-MM-dd HH:mm:ss");

            String nextTime=sdf.format(nextTimePoint);

            String nextDoubleTme=sdf.format(nextNextTimePoint);

            m.setNextTime(nextTime);

            m.setNextDoubleTime(nextDoubleTme);

            m.setEnable("0");   //设置频率,让其状态变为“禁用”

            monitorService.updateMonitor(m);

            return Json.ok("频率设置成功");

        } catch (Exception e) {

            LOGGER.error("频率设置失败: " + e.getMessage(), e);

            return Json.fail("频率设置失败");

        }

    }
根据Cron表达式,使用 Spring 自带的 CronSequenceGenerator 类可以获得下次执行时间和下下次执行时间。每次设定新的执行频率后,该定时任务的状态都会变为“禁用”,需要重新启用,定时任务才能生效。
下面的代码是点击 “启用”或“禁用” 按钮后,后台的处理逻辑。
    @RequestMapping(value = "setEnable", method = {RequestMethod.GET, RequestMethod.POST})

    @ResponseBody

    @OperationLog(success = "操作成功", failure = "操作失败")

    public Json setEnable(Long id, String enable) {

        Json json=new Json();

        try {

            String msg="";

            Monitor monitor=monitorService.getMonitorById(id);

            monitor.setEnable(enable);

            monitorService.updateMonitor(monitor);

            if (enable.equals("1")){

                msg="启用成功";

            }else if (enable.equals("0")){

                msg="禁用成功";

            }

            //启用或禁用时,清空redis中的监控信息

            redisUtils.remove(KEY);

            json.setMsg(msg);

            json.setSuccess(true);

        } catch (Exception e) {

            LOGGER.error(e.getMessage(), e);

            return Json.fail("操作失败");

        }

        return json;

    }
在定时任务的执行过程中,为了减少与数据库的交互,所以使用了缓存工具类 RedisUtils ,会将最新的定时任务信息保存到 RedisUtils 中。所以在启用与禁用定时任务时,将会清除以前保存在 RedisUtils 中的定时任务信息,加载最新的定时任务信息。
在启动类的上方加上 @EnableScheduling 注解,该注解的作用是开启Spring Boot对定时任务的支持。
@EnableScheduling

public class DueUIApplication extends AbstractStdApplication {public static void main(String[] args) {

        SpringApplication.run(DueUIApplication.class, args);

    }

}
新建一个定时任务执行类 MonitorTask ,在该类中加一个用于扫描定时任务的方法,在该方法上方需要加上 @Scheduled 注解,同时需要带上参数,设定扫描频率。
代码如下所示:
@Component

public class MonitorTask extends AbstractStdAction {

    private static final Logger LOGGER = Logger.getLogger(MonitorTask.class);

    @Autowired

    private MonitorService monitorService;

    private String KEY="pbeechina:due:ui:monitor:action";    //redis的key

    /**

     * 每隔一分钟秒扫描一次监控信息

     */

    @Scheduled(cron = "0 0/1 * * * ? ")

    @Transactional(propagation= Propagation.NOT_SUPPORTED)   //不需要事物管理

    public void scanMonitor(){

        try {

            if (LOGGER.isDebugEnabled()) {

                LOGGER.debug("**********开始扫描监控的定时任务***********");

            }

            List<Monitor> monitorList=null;  //预警监控信息

            boolean isKey=redisUtils.exists(KEY);   //判断key值是否存在

            if (isKey){   //key存在,代表监控信息是最新的

                monitorList=(List<Monitor>)redisUtils.get(KEY);

            }else {

                monitorList=monitorService.getMonitorList();   //查询所有已被启用的监控

                if (monitorList != null && monitorList.size() > 0){

                    redisUtils.set(KEY,monitorList, 1,TimeUnit.DAYS);  //设置过期时间一天

                }

            }

            if (monitorList != null && monitorList.size() > 0){

                for (Monitor monitor:monitorList){

                    if(StringUtils.isNotEmpty(monitor.getCron())){

                        CronExpression expression = new CronExpression(monitor.getCron());

                        if(expression.isSatisfiedBy(new Date(System.currentTimeMillis()))){

                            LOGGER.info("开始执行定时任务...");

                            monitorService.autoExecute(monitor);

                        }

                    }

                }

            }

            if (LOGGER.isDebugEnabled()) {

                LOGGER.debug("*******扫描结束***********");

            }

        } catch (Exception e) {

            LOGGER.error("监控定时任务扫描失败", e);

        }

    }

}
至此,Spring Boot动态执行定时任务的功能就实现了。
如何在Spring Boot 中动态设定与执行定时任务的更多相关文章
- 如何在Spring boot中修改默认端口
文章目录 介绍 使用Property文件 在程序中指定 使用命令行参数 值生效的顺序 如何在Spring boot中修改默认端口 介绍 Spring boot为应用程序提供了很多属性的默认值.但是有时 ...
- 如何在Spring Boot中使用Cookies
一. 导读 本文大纲 读取HTTP Cookie 设置HTTP Cookie 读取所有Cookie[] 为Cookie设置过期时间 Https与Cookie HttpOnly Cookie 删除Coo ...
- 在Spring Boot中动态实现定时任务配置
原文路径:https://zhuanlan.zhihu.com/p/79644891 在日常的项目开发中,往往会涉及到一些需要做到定时执行的代码,例如自动将超过24小时的未付款的单改为取消状态,自动将 ...
- 如何在Spring Boot应用启动之后立刻执行一段逻辑
1. 前言 不知道你有没有接到这种需求,项目启动后立马执行一些逻辑.比如简单的缓存预热,或者上线后的广播之类等等.如果你使用 Spring Boot 框架的话就可以借助其提供的接口CommandLin ...
- 如何在spring boot中从控制器返回一个html页面?
项目截图 解决方法 我之前用的@RestController注解,而@RestController这个控制器返回数据而不是视图,改成@Controller 就好了(以下是修改后的) @Controll ...
- 如何在 Spring Boot 中禁用 Actuator 端点安全性?
默认情况下,所有敏感的 HTTP 端点都是安全的,只有具有 ACTUATOR 角色的用户才能访问它们.安全性是使用标准的 HttpServletRequest.isUserInRole 方法实施的. ...
- (转)Spring Boot 2 (十):Spring Boot 中的响应式编程和 WebFlux 入门
http://www.ityouknow.com/springboot/2019/02/12/spring-boot-webflux.html Spring 5.0 中发布了重量级组件 Webflux ...
- Spring Boot 2 (十):Spring Boot 中的响应式编程和 WebFlux 入门
Spring 5.0 中发布了重量级组件 Webflux,拉起了响应式编程的规模使用序幕. WebFlux 使用的场景是异步非阻塞的,使用 Webflux 作为系统解决方案,在大多数场景下可以提高系统 ...
- Spring Boot中使用AOP统一处理Web请求日志
AOP为Aspect Oriented Programming的缩写,意为:面向切面编程,通过预编译方式和运行期动态代理实现程序功能的统一维护的一种技术.AOP是Spring框架中的一个重要内容,它通 ...
随机推荐
- MFC弹出选择文件和选择文件夹代码
选择文件夹 TCHAR szSelectedDir[]; BROWSEINFO bi; ITEMIDLIST *il; bi.hwndOwner = m_hWnd; bi.pidlRoot = NUL ...
- C++语言编程基础
C++程序设计语言可以看作C语言的改进和升级,不仅完全兼容了C语言的语法和函数库,还引入了面向对象.运算符重载.多态性.数据流和模板等最新的编程思想.极大地保证了源代码的生产率.质量和可重用性.GNU ...
- linux下vim编辑器查找 关键字
在 linux vim 编辑器 下查找 关键字 方法[一] 1?short_open_tag : 它的意思是vim 打开文件的第一行 ? : 它的意思是反向查找 short_open_tag ...
- share memory
header for public argument:shmdata.h #define TEXT_SZ 2048 struct shared_use_st { int written; char t ...
- 3、Cookie与Session之间有哪些区别或者是优缺点?
Cookie与Session之间有哪些区别或者是优缺点? 知道了Cookie与Session,我们来做一些简单的总结: 1.Cookie可以存储在浏览器或者本地,session只能存在服务器 ...
- Linux内核代码布局
上文参考:http://www.cnblogs.com/long123king/p/3545991.html 先分析一下linker script的语法. #ifdef CONFIG_X86_32#d ...
- axios以form-data形式的传递参数遇到的坑
axios默认的Content-type是application/json;charset=UTF-8,如果想要以表单的形式传递参数,只要修改{headers:{'Content-Type':'app ...
- C# Winform DotNetBar控件之StyleManager
这个控件作用改变窗体样式 使用方法 拖拽一个styleManager到窗体 改变它的managerStyle,再把窗体的继承改成Office2007Form 最后一步窗体初始化控件前 改掉的Enabl ...
- hdu6290奢侈的旅行
高玩小Q不仅喜欢玩寻宝游戏,还喜欢一款升级养成类游戏.在这个游戏的世界地图中一共有n个城镇,编号依次为1到n. 这些城镇之间有m条单向道路,第i 条单项道路包含四个参数ui,vi,ai,bi,表示一条 ...
- python接口自动化(post请求)
python接口自动化(post请求) 一.post请求的作用:新增资源 二.data格式的参数请求(data是字典对象) #1.导包 import requests #2.调用post方法 #请求的 ...