关于swagger
转自https://blog.csdn.net/sanyaoxu_2/article/details/80555328
1:认识Swagger
Swagger 是一个规范和完整的框架,用于生成、描述、调用和可视化 RESTful 风格的 Web 服务。总体目标是使客户端和文件系统作为服务器以同样的速度来更新。文件的方法,参数和模型紧密集成到服务器端的代码,允许API来始终保持同步。
作用:
1. 接口的文档在线自动生成。
2. 功能测试。
Swagger是一组开源项目,其中主要要项目如下:
1. Swagger-tools:提供各种与Swagger进行集成和交互的工具。例如模式检验、Swagger 1.2文档转换成Swagger 2.0文档等功能。
2. Swagger-core: 用于Java/Scala的的Swagger实现。与JAX-RS(Jersey、Resteasy、CXF...)、Servlets和Play框架进行集成。
3. Swagger-js: 用于JavaScript的Swagger实现。
4. Swagger-node-express: Swagger模块,用于node.js的Express web应用框架。
5. Swagger-ui:一个无依赖的HTML、JS和CSS集合,可以为Swagger兼容API动态生成优雅文档。
6. Swagger-codegen:一个模板驱动引擎,通过分析用户Swagger资源声明以各种语言生成客户端代码。
2:Maven
版本号请根据实际情况自行更改。
<dependency>
<groupId>io.springfox</groupId>
<artifactId>springfox-swagger2</artifactId>
<version>2.2.2</version>
</dependency>
<dependency>
<groupId>io.springfox</groupId>
<artifactId>springfox-swagger-ui</artifactId>
<version>2.2.2</version>
</dependency>
3:创建Swagger2配置类
在Application.java同级创建Swagger2的配置类Swagger2
- package com.swaggerTest;
- import org.springframework.context.annotation.Bean;
- import org.springframework.context.annotation.Configuration;
- import springfox.documentation.builders.ApiInfoBuilder;
- import springfox.documentation.builders.PathSelectors;
- import springfox.documentation.builders.RequestHandlerSelectors;
- import springfox.documentation.service.ApiInfo;
- import springfox.documentation.spi.DocumentationType;
- import springfox.documentation.spring.web.plugins.Docket;
- import springfox.documentation.swagger2.annotations.EnableSwagger2;
- /**
- * Swagger2配置类
- * 在与spring boot集成时,放在与Application.java同级的目录下。
- * 通过@Configuration注解,让Spring来加载该类配置。
- * 再通过@EnableSwagger2注解来启用Swagger2。
- */
- @Configuration
- @EnableSwagger2
- public class Swagger2 {
- /**
- * 创建API应用
- * apiInfo() 增加API相关信息
- * 通过select()函数返回一个ApiSelectorBuilder实例,用来控制哪些接口暴露给Swagger来展现,
- * 本例采用指定扫描的包路径来定义指定要建立API的目录。
- *
- * @return
- */
- @Bean
- public Docket createRestApi() {
- return new Docket(DocumentationType.SWAGGER_2)
- .apiInfo(apiInfo())
- .select()
- .apis(RequestHandlerSelectors.basePackage("com.swaggerTest.controller"))
- .paths(PathSelectors.any())
- .build();
- }
- /**
- * 创建该API的基本信息(这些基本信息会展现在文档页面中)
- * 访问地址:http://项目实际地址/swagger-ui.html
- * @return
- */
- private ApiInfo apiInfo() {
- return new ApiInfoBuilder()
- .title("Spring Boot中使用Swagger2构建RESTful APIs")
- .description("更多请关注http://www.baidu.com")
- .termsOfServiceUrl("http://www.baidu.com")
- .contact("sunf")
- .version("1.0")
- .build();
- }
- }
如上代码所示,通过createRestApi函数创建Docket的Bean之后,apiInfo()用来创建该Api的基本信息(这些基本信息会展现在文档页面中)。
4:添加文档内容
在完成了上述配置后,其实已经可以生产文档内容,但是这样的文档主要针对请求本身,描述的主要来源是函数的命名,对用户并不友好,我们通常需要自己增加一些说明来丰富文档内容。
Swagger使用的注解及其说明:
@Api:用在类上,说明该类的作用。
@ApiOperation:注解来给API增加方法说明。
@ApiImplicitParams : 用在方法上包含一组参数说明。
@ApiImplicitParam:用来注解来给方法入参增加说明。
@ApiResponses:用于表示一组响应
@ApiResponse:用在@ApiResponses中,一般用于表达一个错误的响应信息
l code:数字,例如400
l message:信息,例如"请求参数没填好"
l response:抛出异常的类
@ApiModel:描述一个Model的信息(一般用在请求参数无法使用@ApiImplicitParam注解进行描述的时候)
l @ApiModelProperty:描述一个model的属性
注意:@ApiImplicitParam的参数说明:
|
paramType:指定参数放在哪个地方 |
header:请求参数放置于Request Header,使用@RequestHeader获取 query:请求参数放置于请求地址,使用@RequestParam获取 path:(用于restful接口)-->请求参数的获取:@PathVariable body:(不常用) form(不常用) |
|
name:参数名 |
|
|
dataType:参数类型 |
|
|
required:参数是否必须传 |
true | false |
|
value:说明参数的意思 |
|
|
defaultValue:参数的默认值 |
例子:
- package com.swaggerTest.controller;
- import org.springframework.stereotype.Controller;
- import org.springframework.util.StringUtils;
- import org.springframework.web.bind.annotation.RequestMapping;
- import org.springframework.web.bind.annotation.RequestMethod;
- import org.springframework.web.bind.annotation.RequestParam;
- import org.springframework.web.bind.annotation.ResponseBody;
- import io.swagger.annotations.Api;
- import io.swagger.annotations.ApiImplicitParam;
- import io.swagger.annotations.ApiImplicitParams;
- import io.swagger.annotations.ApiOperation;
- /**
- * 一个用来测试swagger注解的控制器
- * 注意@ApiImplicitParam的使用会影响程序运行,如果使用不当可能造成控制器收不到消息
- *
- * @author SUNF
- */
- @Controller
- @RequestMapping("/say")
- @Api(value = "SayController|一个用来测试swagger注解的控制器")
- public class SayController {
- @ResponseBody
- @RequestMapping(value ="/getUserName", method= RequestMethod.GET)
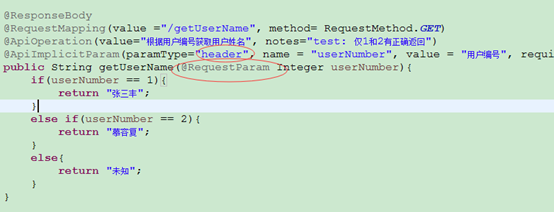
- @ApiOperation(value="根据用户编号获取用户姓名", notes="test: 仅1和2有正确返回")
- @ApiImplicitParam(paramType="query", name = "userNumber", value = "用户编号", required = true, dataType = "Integer")
- public String getUserName(@RequestParam Integer userNumber){
- if(userNumber == 1){
- return "张三丰";
- }
- else if(userNumber == 2){
- return "慕容复";
- }
- else{
- return "未知";
- }
- }
- @ResponseBody
- @RequestMapping("/updatePassword")
- @ApiOperation(value="修改用户密码", notes="根据用户id修改密码")
- @ApiImplicitParams({
- @ApiImplicitParam(paramType="query", name = "userId", value = "用户ID", required = true, dataType = "Integer"),
- @ApiImplicitParam(paramType="query", name = "password", value = "旧密码", required = true, dataType = "String"),
- @ApiImplicitParam(paramType="query", name = "newPassword", value = "新密码", required = true, dataType = "String")
- })
- public String updatePassword(@RequestParam(value="userId") Integer userId, @RequestParam(value="password") String password,
- @RequestParam(value="newPassword") String newPassword){
- if(userId <= 0 || userId > 2){
- return "未知的用户";
- }
- if(StringUtils.isEmpty(password) || StringUtils.isEmpty(newPassword)){
- return "密码不能为空";
- }
- if(password.equals(newPassword)){
- return "新旧密码不能相同";
- }
- return "密码修改成功!";
- }
- }
完成上述代码添加上,启动Spring Boot程序,访问:http://localhost:8080/swagger-ui.html
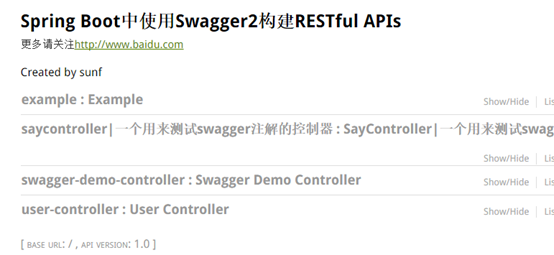
如上图,可以看到暴漏出来的控制器信息,点击进入可以看到详细信息。

两个注意点:
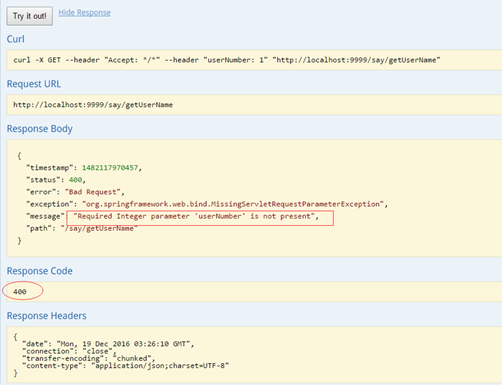
1. paramType会直接影响程序的运行期,如果paramType与方法参数获取使用的注解不一致,会直接影响到参数的接收。
例如:
使用Sawgger UI进行测试,接收不到!
2. 还有一个需要注意的地方:
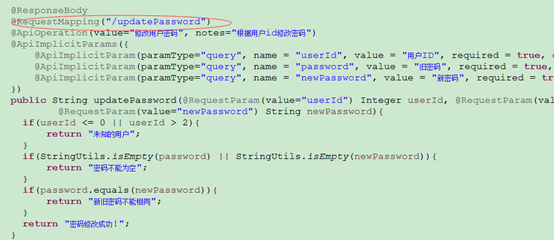
Conntroller中定义的方法必须在@RequestMapper中显示的指定RequestMethod类型,否则SawggerUi会默认为全类型皆可访问, API列表中会生成多条项目。

如上图:updatePassword()未指定requestMethod,结果生成了7条API信息。所以如果没有特殊需求,建议根据实际情况加上requestMethod。
5:Swagger UI面板说明

6:参考
http://blog.didispace.com/springbootswagger2/
http://blog.csdn.net/jia20003/article/details/50700736
Swagger官网 :http://swagger.io/
Spring Boot & Swagger UI : http://fruzenshtein.com/spring-boot-swagger-ui/
Github:https://github.com/swagger-api/swagger-core/wiki/Annotations
---------------------------------------------------------------------------------------
7:接收对象传参的例子
在POJO上增加
package com.zhongying.api.model.base;import io.swagger.annotations.ApiModel;import io.swagger.annotations.ApiModelProperty;/*** 医生对象模型,不要使用该类* @author SUNF**/@ApiModel(value="医生对象模型")public class DemoDoctor{@ApiModelProperty(value="id" ,required=true)private Integer id;@ApiModelProperty(value="医生姓名" ,required=true)private String name;public Integer getId() {return id;}public void setId(Integer id) {this.id = id;}public String getName() {return name;}public void setName(String name) {this.name = name;}@Overridepublic String toString() {return "DemoDoctor [id=" + id + ", name=" + name + "]";}}
注意: 在后台采用对象接收参数时,Swagger自带的工具采用的是JSON传参, 测试时需要在参数上加入@RequestBody,正常运行采用form或URL提交时候请删除。
- package com.zhongying.api.controller.app;
- import java.util.ArrayList;
- import java.util.List;
- import javax.servlet.http.HttpServletRequest;
- import org.springframework.stereotype.Controller;
- import org.springframework.web.bind.annotation.RequestBody;
- import org.springframework.web.bind.annotation.RequestMapping;
- import org.springframework.web.bind.annotation.RequestMethod;
- import org.springframework.web.bind.annotation.RequestParam;
- import org.springframework.web.bind.annotation.ResponseBody;
- import com.github.pagehelper.PageInfo;
- import com.zhongying.api.exception.HttpStatus401Exception;
- import com.zhongying.api.model.base.DemoDoctor;
- import io.swagger.annotations.Api;
- import io.swagger.annotations.ApiImplicitParam;
- import io.swagger.annotations.ApiImplicitParams;
- import io.swagger.annotations.ApiOperation;
- /**
- * 医生类(模拟)
- * @author SUNF
- */
- @RequestMapping("/api/v1")
- @Controller
- @Api(value = "DoctorTestController-医生信息接口模拟")
- public class DoctorTestController {
- /**
- * 添加医生
- *
- * 在使用对象封装参数进行传参时,需要在该对象添加注解,将其注册到swagger中
- * @link com.zhongying.api.model.base.DemoDoctor
- *
- * 注意: 在后台采用对象接收参数时,Swagger自带的工具采用的是JSON传参,
- * 测试时需要在参数上加入@RequestBody,正常运行采用form或URL提交时候请删除。
- *
- * @param doctor 医生类对象
- * @return
- * @throws Exception
- */
- @ResponseBody
- @RequestMapping(value="/doctor", method= RequestMethod.POST )
- @ApiOperation(value="添加医生信息", notes="")
- public String addDoctor(@RequestBody DemoDoctor doctor) throws Exception{
- if(null == doctor || doctor.getId() == null){
- throw new HttpStatus401Exception("添加医生失败","DT3388","未知原因","请联系管理员");
- }
- try {
- System.out.println("成功----------->"+doctor.getName());
- } catch (Exception e) {
- throw new HttpStatus401Exception("添加医生失败","DT3388","未知原因","请联系管理员");
- }
- return doctor.getId().toString();
- }
- /**
- * 删除医生
- * @param doctorId 医生ID
- * @return
- */
- @ResponseBody
- @RequestMapping(value="/doctor/{doctorId}", method= RequestMethod.DELETE )
- @ApiOperation(value="删除医生信息", notes="")
- @ApiImplicitParam(paramType="query", name = "doctorId", value = "医生ID", required = true, dataType = "Integer")
- public String deleteDoctor(@RequestParam Integer doctorId){
- if(doctorId > 2){
- return "删除失败";
- }
- return "删除成功";
- }
- /**
- * 修改医生信息
- * @param doctorId 医生ID
- * @param doctor 医生信息
- * @return
- * @throws HttpStatus401Exception
- */
- @ResponseBody
- @RequestMapping(value="/doctor/{doctorId}", method= RequestMethod.POST )
- @ApiOperation(value="修改医生信息", notes="")
- @ApiImplicitParam(paramType="query", name = "doctorId", value = "医生ID", required = true, dataType = "Integer")
- public String updateDoctor(@RequestParam Integer doctorId, @RequestBody DemoDoctor doctor) throws HttpStatus401Exception{
- if(null == doctorId || null == doctor){
- throw new HttpStatus401Exception("修改医生信息失败","DT3391","id不能为空","请修改");
- }
- if(doctorId > 5 ){
- throw new HttpStatus401Exception("医生不存在","DT3392","错误的ID","请更换ID");
- }
- System.out.println(doctorId);
- System.out.println(doctor);
- return "修改成功";
- }
- /**
- * 获取医生详细信息
- * @param doctorId 医生ID
- * @return
- * @throws HttpStatus401Exception
- */
- @ResponseBody
- @RequestMapping(value="/doctor/{doctorId}", method= RequestMethod.GET )
- @ApiOperation(value="获取医生详细信息", notes="仅返回姓名..")
- @ApiImplicitParam(paramType="query", name = "doctorId", value = "医生ID", required = true, dataType = "Integer")
- public DemoDoctor getDoctorDetail(@RequestParam Integer doctorId) throws HttpStatus401Exception{
- System.out.println(doctorId);
- if(null == doctorId){
- throw new HttpStatus401Exception("查看医生信息失败","DT3390","未知原因","请联系管理员");
- }
- if(doctorId > 3){
- throw new HttpStatus401Exception("医生不存在","DT3392","错误的ID","请更换ID");
- }
- DemoDoctor doctor = new DemoDoctor();
- doctor.setId(1);
- doctor.setName("测试员");
- return doctor;
- }
- /**
- * 获取医生列表
- * @param pageIndex 当前页数
- * @param pageSize 每页记录数
- * @param request
- * @return
- * @throws HttpStatus401Exception
- */
- @ResponseBody
- @RequestMapping(value="/doctor", method= RequestMethod.GET )
- @ApiOperation(value="获取医生列表", notes="目前一次全部取,不分页")
- @ApiImplicitParams({
- @ApiImplicitParam(paramType="header", name = "token", value = "token", required = true, dataType = "String"),
- @ApiImplicitParam(paramType="query", name = "pageIndex", value = "当前页数", required = false, dataType = "String"),
- @ApiImplicitParam(paramType="query", name = "pageSize", value = "每页记录数", required = true, dataType = "String"),
- })
- public PageInfo<DemoDoctor> getDoctorList(@RequestParam(value = "pageIndex", required = false, defaultValue = "1") Integer pageIndex,
- @RequestParam(value = "pageSize", required = false) Integer pageSize,
- HttpServletRequest request) throws HttpStatus401Exception{
- String token = request.getHeader("token");
- if(null == token){
- throw new HttpStatus401Exception("没有权限","SS8888","没有权限","请查看操作文档");
- }
- if(null == pageSize){
- throw new HttpStatus401Exception("每页记录数不粗安在","DT3399","不存在pageSize","请查看操作文档");
- }
- DemoDoctor doctor1 = new DemoDoctor();
- doctor1.setId(1);
- doctor1.setName("测试员1");
- DemoDoctor doctor2 = new DemoDoctor();
- doctor2.setId(2);
- doctor2.setName("测试员2");
- List<DemoDoctor> doctorList = new ArrayList<DemoDoctor>();
- doctorList.add(doctor1);
- doctorList.add(doctor2);
- return new PageInfo<DemoDoctor>(doctorList);
- }
- }
增加header:
现在很多请求需要在header增加额外参数,可以参考getDoctorList()的做法,使用request接收。
关于swagger的更多相关文章
- ABP框架 - Swagger UI 集成
文档目录 本节内容: 简介 Asp.net Core 安装 安装Nuget包 配置 测试 Asp.net 5.x 安装 安装Nuget包 配置 测试 简介 来自它的网页:“...使用一个Swagger ...
- ABP项目中使用Swagger生成动态WebAPI
本文是根据角落的白板报的<使用ABP实现SwaggerUI,生成动态webapi>一文的学习总结,感谢原文作者角落的白板报. 1 安装Swashbuckle.core 1.1 选择WebA ...
- 用Swagger生成接口文档
Swagger简介 在系统设计的时候,各个应用之间往往是通过接口进行交互的.因此接口的定义在整个团队中就变得尤为重要.我们可以把接口的规范用接口描述语言进行描述,然后Swagger可以根据我们定义的接 ...
- 使用 Swagger 自动生成 ASP.NET Core Web API 的文档、在线帮助测试文档(ASP.NET Core Web API 自动生成文档)
对于开发人员来说,构建一个消费应用程序时去了解各种各样的 API 是一个巨大的挑战.在你的 Web API 项目中使用 Swagger 的 .NET Core 封装 Swashbuckle 可以帮助你 ...
- 使用swagger作为restful api的doc文档生成
初衷 记得以前写接口,写完后会整理一份API接口文档,而文档的格式如果没有具体要求的话,最终展示的文档则完全决定于开发者的心情.也许多点,也许少点.甚至,接口总是需要适应新需求的,修改了,增加了,这份 ...
- ASP.NET Core 中文文档 第二章 指南 (09) 使用 Swagger 生成 ASP.NET Web API 在线帮助测试文档
原文:ASP.NET Web API Help Pages using Swagger 作者:Shayne Boyer 翻译:谢炀(kiler) 翻译:许登洋(Seay) 对于开发人员来说,构建一个消 ...
- 在ASP.NET Core Web API上使用Swagger提供API文档
我在开发自己的博客系统(http://daxnet.me)时,给自己的RESTful服务增加了基于Swagger的API文档功能.当设置IISExpress的默认启动路由到Swagger的API文档页 ...
- ASP.NET WebApi 文档Swagger深度优化
本文版权归博客园和作者吴双本人共同所有,转载和爬虫请注明博客园蜗牛原文地址,cnblogs.com/tdws 写在前面 请原谅我这个标题党,写到了第100篇随笔,说是深度优化,其实也并没有什么深度 ...
- ASP.NET WebApi 文档Swagger中度优化
本文版权归博客园和作者吴双本人共同所有,转载和爬虫请注明原文地址:www.cnblogs.com/tdws 写在前面 在后台接口开发中,接口文档是必不可少的.在复杂的业务当中和多人对接的情况下,简 ...
- NSwagStudio for Swagger Api
本案例主要说明如何使用NSwag 工具使用桌面工具快速生成c# 客户端代码.快速的访问Web Api. NSwagStudio 下载地址 比较强大.可以生成TypeScript.WebApi Cont ...
随机推荐
- WIN10家庭版安装ORACLE的问题
第一次安装成功后可启动ORACLE服务,重启计算机后服务监听无法启动,建议替换系统
- 什么是BFC?看这一篇就够了
BFC 定义 BFC(Block formatting context)直译为"块级格式化上下文".它是一个独立的渲染区域,只有Block-level box参与, 它规定了内部的 ...
- python 05 列表 元组 (序列)
循环(loop),指的是在满足条件的情况下,重复执行同一段代码.比如,while语句. [ 循环则技能对应集合,列表,数组等,也能对执行代码进行操作.] 迭代(iterate),指的是按照某种顺序逐个 ...
- 关于MapReduce默认分区策略
MapReduce默认分区策略 mapreduce 默认的分区方式是hashPartition,在这种分区方式下,KV对根据key的hashcode值与reduceTask个数进行取模,决定该键值对该 ...
- Jmeter 常用函数(1)- 详解 __Random
如果你想查看更多 Jmeter 常用函数可以在这篇文章找找哦 https://www.cnblogs.com/poloyy/p/13291704.html 作用 产生一个随机数 语法格式 ${__Ra ...
- cannot find package "cloud.google.com/go/compute/metadata"
问题: cannot find package "cloud.google.com/go/compute/metadata" 解决: mkdir $GOPATH/src/cloud ...
- Spring Security认证流程分析--练气后期
写在前面 在前一篇文章中,我们介绍了如何配置spring security的自定义认证页面,以及前后端分离场景下如何获取spring security的CSRF Token.在这一篇文章中我们将来分析 ...
- 操作系统-存储管理(5)IA-32/Linux的地址转换
IA-32/Linux按字节编址:在保护模式下,IA-32采用段页式虚拟存储管理方式,存储地址采用逻辑地址.线性地址和物理地址来进行描述. 逻辑地址由48位组成,包含16位段选择符(高13位为段表项的 ...
- 【转】Camera 简介
一.摄像头(CAMERA)又称为电脑相机.电脑眼等,它作为一种视频输入设备,在过去被广泛的运用于视频会议.远程医疗及实时监控等方面. 近年以来,随着互联网技术的发展,网络速度的不断提高,再加上感光成像 ...
- [CSP-S2019]树的重心 题解
CSP-S2 2019 D2T3 考场上扔了T2来打这题的部分分,然后没看到数据范围是等号,不知道怎么判完全二叉树然后40分滚粗…… ---- 思路分析 很容易想到$O(n^2)$每次暴力找重心,这个 ...