SpringBoot + Security学习笔记
SpringSecurity学习笔记
本以为是总结,最后写成了笔记,所以还是需要更加的努力啊。
开始的时候看了一遍官方文档,然后只看懂了加密器。
然后又学了一个尚硅谷的视频,虽然这个教程是在讲一个项目,但我没有听懂(应该是我自己的问题)
代码 https://gitee.com/pilearn/learning-spring-security
中文版文档 https://www.springcloud.cc/spring-security.html
尚硅谷视频链接 https://www.bilibili.com/video/BV15a411A7kP
什么是SpringSecurity
Security是Spring全家桶中一个安全框架,他的扩展能力非常的强,底层是一条过滤器链。通过简单的配置就可以使用,但通过自己的DIY,可以把每个权限细化到每个链接上去。
shiro没有学,但只推荐学一个安全框架
这里搭建的学习项目都是使用SpringBoot
获取SpringSecurity
你可以在maven官网获取最新版本
<dependency>

    <groupId>org.springframework.boot</groupId>

    <artifactId>spring-boot-starter-security</artifactId>

    <version>2.4.2</version>

</dependency>
开始一个SpringBoot项目
<?xml version="1.0" encoding="UTF-8"?>

<project xmlns="http://maven.apache.org/POM/4.0.0" xmlns:xsi="http://www.w3.org/2001/XMLSchema-instance"

         xsi:schemaLocation="http://maven.apache.org/POM/4.0.0 https://maven.apache.org/xsd/maven-4.0.0.xsd">

    <modelVersion>4.0.0</modelVersion>

    <parent>

        <groupId>org.springframework.boot</groupId>

        <artifactId>spring-boot-starter-parent</artifactId>

        <version>2.4.2</version>

        <relativePath/> <!-- lookup parent from repository -->

    </parent>

    <groupId>com.pipihao</groupId>

    <artifactId>securitylearn</artifactId>

    <version>0.0.1-SNAPSHOT</version>

    <name>securitylearn</name>

    <description>Demo project for Spring Boot</description>

    <properties>

        <java.version>1.8</java.version>

    </properties>

    <dependencies>

        <dependency>

            <groupId>com.alibaba</groupId>

            <artifactId>druid</artifactId>

            <version>1.1.21</version>

        </dependency>

        <dependency>

            <groupId>org.springframework.boot</groupId>

            <artifactId>spring-boot-starter-thymeleaf</artifactId>

        </dependency>

        <dependency>

            <groupId>org.springframework.boot</groupId>

            <artifactId>spring-boot-starter-security</artifactId>

        </dependency>

        <dependency>

            <groupId>org.springframework.boot</groupId>

            <artifactId>spring-boot-starter-web</artifactId>

        </dependency>

        <dependency>

            <groupId>org.mybatis.spring.boot</groupId>

            <artifactId>mybatis-spring-boot-starter</artifactId>

            <version>2.1.4</version>

        </dependency>

        <dependency>

            <groupId>mysql</groupId>

            <artifactId>mysql-connector-java</artifactId>

            <scope>runtime</scope>

        </dependency>

        <dependency>

            <groupId>org.projectlombok</groupId>

            <artifactId>lombok</artifactId>

            <optional>true</optional>

        </dependency>

        <dependency>

            <groupId>org.springframework.boot</groupId>

            <artifactId>spring-boot-starter-test</artifactId>

            <scope>test</scope>

        </dependency>

        <dependency>

            <groupId>org.springframework.security</groupId>

            <artifactId>spring-security-test</artifactId>

            <scope>test</scope>

        </dependency>

    </dependencies>

    <build>

        <plugins>

            <plugin>

                <groupId>org.springframework.boot</groupId>

                <artifactId>spring-boot-maven-plugin</artifactId>

                <configuration>

                    <excludes>

                        <exclude>

                            <groupId>org.projectlombok</groupId>

                            <artifactId>lombok</artifactId>

                        </exclude>

                    </excludes>

                </configuration>

            </plugin>

        </plugins>

    </build>

</project>
项目配置文件
server:

  port: 8001

spring:

  datasource:

    url: jdbc:mysql://localhost:3306/demo?serverTimezone=Asia/Shanghai

    username: root

    password: root

    driver-class-name: com.mysql.cj.jdbc.Driver

  thymeleaf:

    cache: false

    # 因为Thymeleaf很多有默认配置,所以只关了这个缓存,方便刷新
数据库文件
数据库版本为 8.0
运行项目
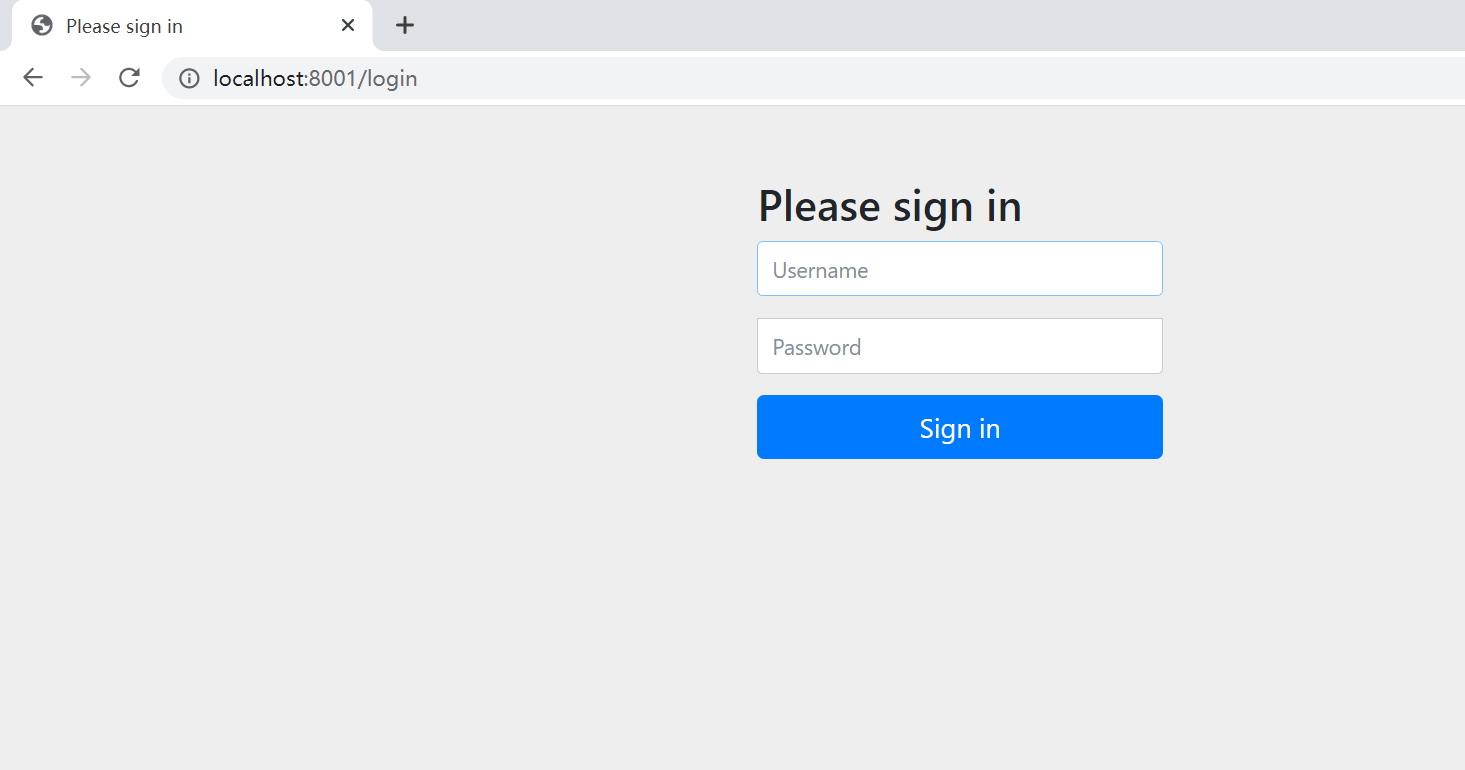

登录
用户名:user
密码:控制台输出的这密码
配置Security
方法一:通过配置文件修改登录账号密码
spring:

  security:

  	user:

  	  name: xx

  	  password: xx
方法二:通过自定义配置SecurityConfig配置类
WebSecurityConfigurerAdapter 类是是Security内置提供了一个默认身份验证的抽象类,继承此抽象类实现configure方法则可以对验证操作实现DIY。[于官方文档 6.3 标题可见]
UserDetailsService接口:查询数据库用户名和密码过程
- 创建类继承UsernamePasswordAuthenticationFilter,重写三个方法
* - 创建类实现UserDetailService,编写查询数据过程,返回User对象,这个User对象是安全框架提供对象。
- PasswordEncoder: 数据加密接口,用于返回User对象里面的密码加密
方法三:自定义配置类UserDetailsService
定义不验证链接
@Override

protected void configure(HttpSecurity http) throws Exception {

    /*

        使用and()方法表示关闭XML标记的Java配置,它允许我们继续配置父标记。如果您阅读代码,它也是有道理的。我想配置授权请求并配置表单登录并配置HTTP基本身份验证。

         */

    http

        .authorizeRequests()

        .antMatchers("/","/no").permitAll() //可以直接访问的路径

        .anyRequest().authenticated()

        .and()

        .formLogin()

        .loginPage("/login.html") //配置登录路径

        .loginProcessingUrl("/doLogin")

        .defaultSuccessUrl("/hallo")

        .permitAll()

        ; //设置 登录的网页

    http.csrf().disable(); //如果注释了这一行,全部要用_csrf的对象来验证了

}
配置访问权限/角色
如果是配置访问角色则使用是hasRole与hasAnyRole
这里非常建议点一下看一下hasRole的源码 使用Role的时候,User的权限列表是需要加ROLE_前缀的
这里直接使用的是hasAnyAuthority,还有一个方法是hasAuthority
前者可以配置多个权限,而后者只能配置一个权限
接口只是显示一个字符串
@GetMapping("test")

public String sayTest(){

    return "Test";

}
SecurityConfig代码
@Override

protected void configure(HttpSecurity http) throws Exception {

    /*

        使用and()方法表示关闭XML标记的Java配置,它允许我们继续配置父标记。如果您阅读代码,它也是有道理的。我想配置授权请求并配置表单登录并配置HTTP基本身份验证。

         */

    http

        .authorizeRequests()

        .antMatchers("/","/no").permitAll() //可以直接访问的路径

        .antMatchers("/test").hasAnyAuthority("admin") // 访问权限

        .anyRequest().authenticated()

        .and()

        .formLogin()

        .loginPage("/login.html") //配置登录路径

        .loginProcessingUrl("/doLogin")

        .defaultSuccessUrl("/hallo")

        .permitAll()

        ; //设置 登录的网页

    http.csrf().disable(); //如果注释了这一行,全部要用_csrf的对象来验证了

}
UserDetailsImpl代码
@Override

public UserDetails loadUserByUsername(String username) throws UsernameNotFoundException {

    if(StringUtils.isEmpty(username)){

        throw new RuntimeException("用户名不能为空");

    }

    IUser iUser= userMapper.getUserByUsername(username);

    if(iUser == null){

        throw new UsernameNotFoundException("无此用户");

    }

    /*此处查询用户角色*/

    List<GrantedAuthority> grantedAuthorityList =

        AuthorityUtils.createAuthorityList("admin"); // 权限的列表

    return new User(iUser.getUsername(),bCryptPasswordEncoder.encode(iUser.getPassword()),grantedAuthorityList);

}
自定义403界面
// 在此方法内加上一行  protected void configure(HttpSecurity http)

http.exceptionHandling().accessDeniedPage("/unauth.html");
权限注解
@Secured
判断是否有角色,这里匹配的角色需要加前缀ROLE_
@GetMapping("update")

@Secured({"ROLE_manager"})

public String update(){

    return "update";

}
使用其功能时需要在application类上开起
@SpringBootApplication

@MapperScan("com.pipihao.securitylearn.mapper")

@EnableGlobalMethodSecurity(securedEnabled = true)

public class SecuritylearnApplication {

    public static void main(String[] args) {

        SpringApplication.run(SecuritylearnApplication.class, args);

    }

}
UserDetailsServiceImpl
List<GrantedAuthority> grantedAuthorityList =

    AuthorityUtils.createAuthorityList("admin","ROLE_manager");
@PreAuthorize & @PostAuthorize
此注解即有权限验证功能,又有角色验证功能
@GetMapping("pre1")

@PreAuthorize("hasAnyRole('ROLE_manager')")

public String prePost1(){

    return "prePost1";

}

@GetMapping("pre2")

@PreAuthorize("hasAnyAuthority('admin')")

public String prePost2(){

    return "prePost2";

}
@SpringBootApplication

@EnableGlobalMethodSecurity(prePostEnabled = true)

public class SecuritylearnApplication {

    public static void main(String[] args) {

        SpringApplication.run(SecuritylearnApplication.class, args);

    }

}
@PostAuthorize 与@PreAuthorize的区别就是,Pre会先拦截后执行,而PostAuthorize是先执行,后拦截
所以我例子中没有过多的讲
@PreFilter & @PostFilter
Pre是过滤上传的数据,Post过滤返回的数据
@GetMapping("list")

@PostFilter("filterObject.username != 'admin' ")

public List<IUser> list(){

    List<IUser> iUsers = new ArrayList<>();

    iUsers.add(new IUser(1,"admin","123"));

    iUsers.add(new IUser(2,"user","123"));

    return iUsers;

}

// Applicationo类上还是要加上下面这个注解,并设置属性值

@EnableGlobalMethodSecurity(prePostEnabled = true)
效果图

上传则是同理,通过注解写好判断,然后测试即可,注:PreFilter过滤的也只是集合和数组
用户注销
/*配置退出登录*/

http.logout().logoutUrl("/logout").logoutSuccessUrl("no").permitAll();
登录后,直接通过浏览器,访问此路径即可(是的,就是如此)
location.href='/logout';
自动登录
下面是尚硅谷老师写的原理图和执行流程
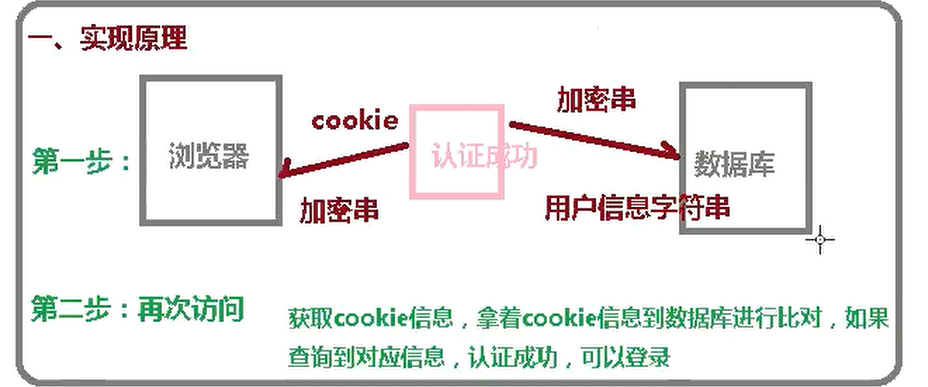
如果是微服务,则把数据库改成redis,把cookie改成jwt生成的token
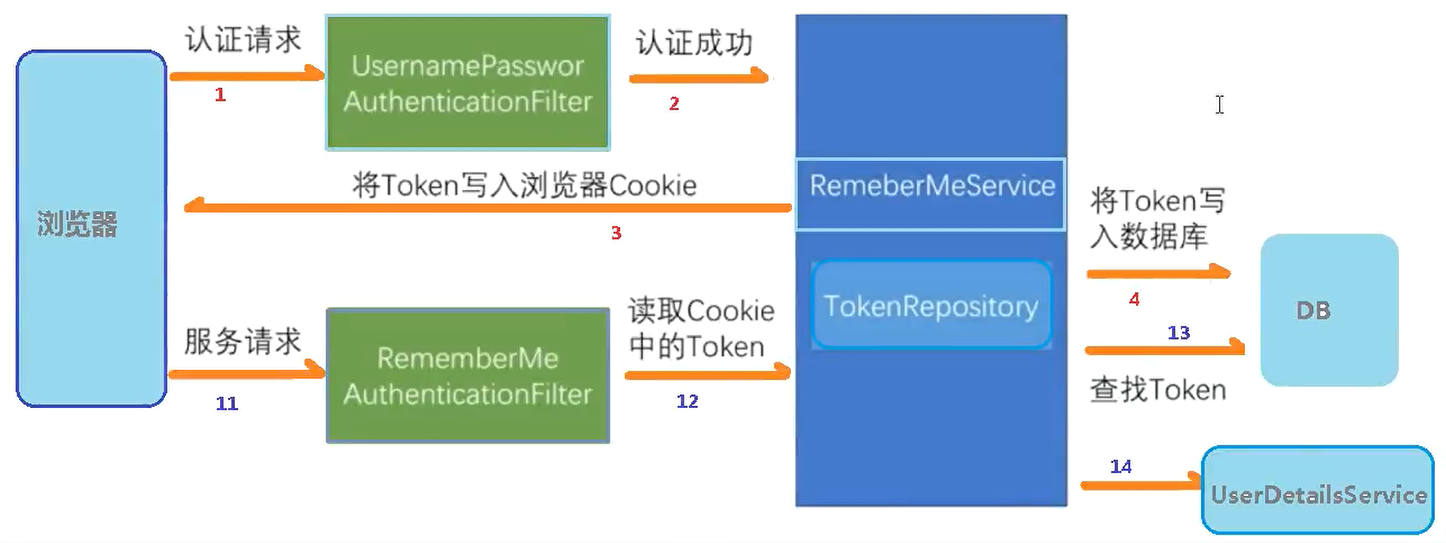
Security 中的一个类内JdbcTokenRepositoryImpl
的常量CREATE_TABLE_SQL
create table persistent_logins (username varchar(64) not null, series varchar(64) primary key, token varchar(64) not null, last_used timestamp not null)
有兴趣的可以看看源码 没兴趣的直接在你使用的数据库内执行上面这行sql创建一个保存登录信息的表

JdbcTokenRepositoryImpl 是PersistentTokenRepository实现类
下面这种写那么应该是多态了
@Autowired

private DataSource dataSource;

@Bean

public PersistentTokenRepository persistentTokenRepository(){

    JdbcTokenRepositoryImpl jdbcTokenRepository = new JdbcTokenRepositoryImpl();

    jdbcTokenRepository.setDataSource(dataSource);

    //jdbcTokenRepository.setCreateTableOnStartup(true); 设置启动时创建自动登录表

    return jdbcTokenRepository;

}
SecurityConfig的方法
@Override

protected void configure(HttpSecurity http) throws Exception {

    /*自定义403链接*/

    http.exceptionHandling().accessDeniedPage("/unauth.html");

    /*配置退出登录*/

    http.logout().logoutUrl("/logout").logoutSuccessUrl("/no").permitAll();

    /*

        使用and()方法表示关闭XML标记的Java配置,它允许我们继续配置父标记。如果您阅读代码,它也是有道理的。我想配置授权请求并配置表单登录并配置HTTP基本身份验证。

         */

    http

        .authorizeRequests()

        .antMatchers("/","/no").permitAll() //可以直接访问的路径

        .antMatchers("/test").hasAnyAuthority("admin")

        .antMatchers("/unauth").hasAnyAuthority("xxx")

        .anyRequest().authenticated()

        .and()

        .formLogin()

        .loginPage("/login.html") //配置登录路径

        .loginProcessingUrl("/doLogin")

        .defaultSuccessUrl("/hallo")

        .permitAll()

        // -------------------就是下面这坨

        .and()

        .rememberMe().tokenRepository(persistentTokenRepository())

        .tokenValiditySeconds(60) // 自动保存的时间,秒为单位

        .userDetailsService(userDetailsService)

        ; //设置 登录的网页

    http.csrf().disable(); //如果注释了这一行,全部要用_csrf的对象来验证了

}
下面是登录界面
<form action="/doLogin" method="POST">

    user:<input type="text" name="username"><br>

    pswd:<input type="text" name="password"><br>

    <!--必须name=remember-me不然,是无法接收到是否自动登录的信息的-->

    自动登录 <input type="checkbox" name="remember-me"><br>

    <input type="submit">

</form>
然后在登录的时候打个勾,就可以自动登录了
在DB中会出现如下的信息

CSRF指令认证
第一步 把下面这一行注释了就开启了,也就是说他其实是默认开启的
如果没有关闭,则会NullPointerException
//http.csrf().disable();
Spring Security CSRF 会针对Patch,Post,Put,Delete方法进行防护。(都是一些要更改数据的方法)
系统默认提供了一个csrfToken对象放在HttpSession中,也就是我们所见到了_csrf对象
此对象可以直接使用
开启CSRF后,则登录的时【POST】,也需要验证CSRF,而使用HttpSession则需要使用模板引擎,这里我们使用的是Thymeleaf而非JSP。(大同小异)
注:使用Thymeleaf的时候,类上的Controller注解不能写成RestController,不然无法生效的
@Controller

public class LoginController {

    @GetMapping("login")

    public String login(){

        return "login";

    }

}
<!doctype html>

<html xmlns:th="http://www.thymeleaf.org">

<head>

    <meta charset="UTF-8">

    <meta name="viewport"

          content="width=device-width, user-scalable=no, initial-scale=1.0, maximum-scale=1.0, minimum-scale=1.0">

    <meta http-equiv="X-UA-Compatible" content="ie=edge">

    <title>登录</title>

</head>

<body>

<!--没加th:则不会有隐藏域自动生成-->

<form th:action="'/doLogin'" method="POST">

    user:<input type="text" name="username"><br>

    pswd:<input type="text" name="password"><br>

    <!--必须name=remember-me不然,是无法接收到是否自动登录的信息的-->

    自动登录 <input type="checkbox" name="remember-me"><br>

    <input type="submit">

</form>

</body>

</html>
切记,默认开了CSRF,则每个表单中应当手动添加一个隐藏域
当Thymeleaf因为你使用了th,则自动给你生成了。
所以 th:action="'/doLogin'" 这样写可以省事
如下图

总结
本是总结,谁知还是变成了学习笔记。总结代表着会,笔记代表着只能用,说不出什么名堂。这是看第二遍,当然,这也会像我用正则一样,每次用正则的时候,都要学一遍正则。
或许SpringSecurity并不难,难的只是步骤有点多。
老师讲的很不错,多听几遍就会了。
关于提高技术,应该看文档,把他提供的API都自己看懂。像用Redist代替DB,这样的微服务中,使用,很有效率。
接下来,我还会继续学习Security,并出些新笔记,这最多算是一个听课笔记。
SpringBoot + Security学习笔记的更多相关文章
- SpringBoot + Spring Security 学习笔记(五)实现短信验证码+登录功能
在 Spring Security 中基于表单的认证模式,默认就是密码帐号登录认证,那么对于短信验证码+登录的方式,Spring Security 没有现成的接口可以使用,所以需要自己的封装一个类似的 ...
- SpringBoot + Spring Security 学习笔记(三)实现图片验证码认证
整体实现逻辑 前端在登录页面时,自动从后台获取最新的验证码图片 服务器接收获取生成验证码请求,生成验证码和对应的图片,图片响应回前端,验证码保存一份到服务器的 session 中 前端用户登录时携带当 ...
- SpringBoot + Spring Security 学习笔记(二)安全认证流程源码详解
用户认证流程 UsernamePasswordAuthenticationFilter 我们直接来看UsernamePasswordAuthenticationFilter类, public clas ...
- SpringBoot 完整学习笔记免费分享
从0到进阶,完全系统性的学习笔记 每次我都会反复拿来观看,因为我们总会有遗漏忘记的地方,但是笔记不会. 希望大家能好好利用它,以下是笔记截图! 以上只是其中的一项部分,这份笔记可以说含金量超高,绝对会 ...
- SpringBoot + Spring Security 学习笔记(四)记住我功能实现
记住我功能的基本原理 当用户登录发起认证请求时,会通过UsernamePasswordAuthenticationFilter进行用户认证,认证成功之后,SpringSecurity 调用前期配置好的 ...
- SpringBoot + Spring Security 学习笔记(一)自定义基本使用及个性化登录配置
官方文档参考,5.1.2 中文参考文档,4.1 中文参考文档,4.1 官方文档中文翻译与源码解读 SpringSecurity 核心功能: 认证(你是谁) 授权(你能干什么) 攻击防护(防止伪造身份) ...
- Windows Security 学习笔记
对于Windows 在 Security 方面的学习. 纯兴趣. UNIX 的另外开一条路线学习. 话说今天查gpedit.msc的资料的时候发现 M$ 官网上怎么连个文档都没有. 后来才点了 gpe ...
- Spring Security学习笔记
Spring Web Security是Java web开发领域的一个认证(Authentication)/授权(Authorisation)框架,基于Servlet技术,更确切的说是基于Servle ...
- Spring Security学习笔记(三)
之前提到过认证后怎么存放用户信息,令牌token是一种方式,session是另一种方式,这里介绍使用spring session data redis存储httpSession. 添加了以上依赖后,我 ...
随机推荐
- JavaWeb——JSP内置对象request,response,重定向与转发 学习总结
什么是JSP内置对象 九大内置对象 requestJSP内置对象 request对象常用方法 request练习 responseJSP内置对象 response练习 response与request ...
- 单体架构、SOA架构、微服务架构
- 详解Java8特性之新的日期时间 API
详解Java8特性之新的日期时间 API http://blog.csdn.net/timheath/article/details/71326329 Java8中时间日期库的20个常用使用示例 ht ...
- mysql int类型 int(11) 和int(2)区别
CREATE TABLE `learn` ( `id` int(11) unsigned NOT NULL, `exp` int(2) DEFAULT 0, PRIMARY KEY (`id`)) E ...
- python模块----optparse模块、argparse模块 (命令行解析模块)
简介 optparse module---自版本3.2以来已弃用:optparse模块已弃用,将不再进一步开发:将继续使用argparse模块进行开发.optparse使用一种更具声明性的命令行解析方 ...
- 19.损坏磁盘阵列及修复&磁盘阵列+备份盘
1.在确认有一块物理硬盘设备出现损坏而不能继续正常使用后,应该使用mdadm 命令将其移除,然后查看RAID 磁盘阵列的状态,可以发现状态已经改变. [root@Centos ~]# mdadm /d ...
- TCP/IP__TCP协议IP协议&IP地址
IP协议(Internet Protocol) 1. 定位:计算机网络间相互连接进行通信而定义的协议.在因特网中,它是能使连接到网上的所有计算机网络实现相互通信的一套规则,规定了计算机在因特网上进 ...
- 如何将下载到本地的JAR包手动添加到Maven仓库,妈妈再也不用担心我下载不下来依赖啦
我们有时候使用maven下载jar包的时候,可能maven配置都正确,但是部分jar包就是不能下载下来,如果maven设置都不正确的,可以查看我的maven系列文章,这里仅针对maven配置正确,但是 ...
- KMP:补齐循环节
首先要明白:如果一个串需要至少添加x(x>=0)个字符才能是有>=2个循环节的串,那么我可以只在串末尾添加,不需要去串头添加.(比如串cabc,循环节是abc,我可以在尾部添加ab即可.) ...
- CF-1328 F. Make k Equal
F. Make k Equal 题目链接 题意 长度为n的序列,每次可以选择一个最大的数字将其减一或者选择一个最小的数字将其加一,问最少操作多少次可以使得序列中至少存在 k 个一样的数字 分析 官方题 ...