
(IOS)数据持久化
Demo界面:

1.属性列表序列化
即从porperty list中直接读写plist对象(NSString, NSData, NSArray, or NSDictionary objects),其中容器对象中的实例亦要为plist对象。
根视图控制器:
 #define kFilename @"data.plist"

 - (void)viewDidLoad

 {

     [super viewDidLoad];

     NSString *path=[self dataFilePath]; //获取document下的指定文件路径

     NSLog(@"%@",path);

     if([[NSFileManager defaultManager] fileExistsAtPath:path])

     {

         NSArray *array=[[NSArray alloc] initWithContentsOfFile:path];

         self.field1.text=[array objectAtIndex:];

         self.field2.text=[array objectAtIndex:];

         self.field3.text=[array objectAtIndex:];

         self.field4.text=[array objectAtIndex:];

     }

     UIApplication *app =[UIApplication sharedApplication];

     [[NSNotificationCenter defaultCenter] addObserver:self selector:@selector(applicationWillResignActive:) name:UIApplicationWillResignActiveNotification object:app];

 }

 -(NSString *)dataFilePath

 {

     NSArray *paths=NSSearchPathForDirectoriesInDomains(NSDocumentDirectory, NSUserDomainMask, YES);

     NSString *documentsDirectory=[paths objectAtIndex:];

     return [documentsDirectory stringByAppendingPathComponent:kFilename];

 }

 -(void)applicationWillResignActive:(NSNotification *)notification;

 {

     NSMutableArray *array=[[NSMutableArray alloc] init];

     [array addObject:field1.text];

     [array addObject:field2.text];

     [array addObject:field3.text];

     [array addObject:field4.text];

     [array writeToFile:[self dataFilePath] atomically:YES]; //没有则自动创建文件,和c中的fopen("","w")一样,先清空内容再写入。

     //所以没有判断是否文件存在。

 }
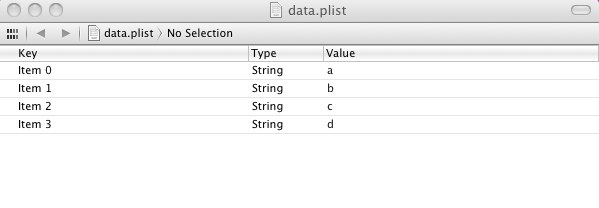
沙盒中的Documents文件夹有生成data.plist,且用xml协议保存了数据。

2.模型对象归档
NSString、NSArray、NSData、NSDictionary都实现了NSCoding协议,可直接通过调用writeToFile归档。
但如果想保持对象类型的数据,则需要到该方法灵活实现。首先可将需归档的对象先实现NSCoding协议,重写encodeWithCode方法和initWithCode方法,然后通过NSKeyedArchiver转换为NSData,然后通过NSData的writeToFile方法写入到文件,或者将转换后的NSData放入到NSArray或NSDictionary中调用writeToFile写入到文件便可实现包装了自定义类型的数据和字典的归档;
通过NSKeyedUnarchiver读取归档文件到对象,或者通过NSArray的arrrayWithContentsOfFile或NSDictionary的dictionaryWithContentsOfFile到数组对象或字典,然后取出序列化过的自定义对象(即自定义对象的NSData形式),然后通过NSKeyedUnarchiver反归档到对象。
#define kFilename @"archive"

#define kDataKey @"Data"

-(NSString *)dataFilePath

 {

    NSArray *paths=NSSearchPathForDirectoriesInDomains(NSDocumentDirectory, NSUserDomainMask, YES);

    NSString *documentsDirectory=[paths objectAtIndex:];         return [documentsDirectory stringByAppendingPathComponent:kFilename];

 }

- (void)viewDidLoad

 {

    [super viewDidLoad];

if ([[NSFileManager defaultManager] fileExistsAtPath:[self dataFilePath]])

{

    NSMutableData *data=[[NSMutableData alloc] initWithContentsOfFile:[self dataFilePath]];

    NSKeyedUnarchiver *unarchiver=[[NSKeyedUnarchiver alloc] initForReadingWithData:data];

    BIDFourLines *fourlines=[unarchiver         decodeObjectForKey:kDataKey];

    [unarchiver finishDecoding];

    field1.text=fourlines.field1;

    field2.text=fourlines.field2;

    field3.text=fourlines.field3;

    field4.text=fourlines.field4;

}

    UIApplication *app =[UIApplication sharedApplication];

    [[NSNotificationCenter defaultCenter] addObserver:self selector:@selector(applicationWillResignActive:) name:UIApplicationWillResignActiveNotification object:app];

}

-(void)applicationWillResignActive:(NSNotification *)notification;

{

    BIDFourLines *fourlines=[[BIDFourLines alloc] init];

    fourlines.field1=field1.text;

    fourlines.field2=field2.text;

    fourlines.field3=field3.text;

    fourlines.field4=field4.text;

    NSMutableData *data=[[NSMutableData alloc] init];

    NSKeyedArchiver *archiver=[[NSKeyedArchiver alloc] initForWritingWithMutableData:data];//将archiver在收到编码后数据自动转为二进制写到data

    [archiver encodeObject:fourlines forKey:kDataKey];//以Data为键编码

    [archiver finishEncoding];

    [data writeToFile:[self dataFilePath] atomically:YES]; //将data写入Documents中的archiver中。

}
/*
writeToFile:
这方法其实是写到plist文件(生成plist文件中的一个档)中的,根据官方文档描述If the array’s contents are all property list objects (NSString, NSData, NSArray, or NSDictionary objects), the file written by this method can be used to initialize a new array with the class method arrayWithContentsOfFile: or the instance method initWithContentsOfFile:. This method recursively validates that all the contained objects are property list objects before writing out the file, and returns NO if all the objects are not property list objects, since the resultant file would not be a valid property list.
*/
 #pragma mark NSCoding

 -(void)encodeWithCoder:(NSCoder *)aCoder

 {

     [aCoder encodeObject:field1 forKey:kField1Key];

     [aCoder encodeObject:field2 forKey:kField2Key];

     [aCoder encodeObject:field3 forKey:kField3Key];

     [aCoder encodeObject:field4 forKey:kField4Key];

 }

 -(id)initWithCoder:(NSCoder *)aDecoder

 {

     if(self=[super init])

     {

         self.field1=[aDecoder decodeObjectForKey:kField1Key];

         self.field2=[aDecoder decodeObjectForKey:kField2Key];

         self.field3=[aDecoder decodeObjectForKey:kField3Key];

         self.field4=[aDecoder decodeObjectForKey:kField4Key];

     }

     return self;

 }

 #pragma mark NSCopying

 -(id)copyWithZone:(NSZone *)zone

 {

     BIDFourLines *copy=[[[self class] allocWithZone:zone] init];

     copy.field1=[self.field1 copyWithZone:zone];

     copy.field2=[self.field2 copyWithZone:zone];

     copy.field3=[self.field3 copyWithZone:zone];

     copy.field4=[self.field4 copyWithZone:zone];

     return copy;

 }
沙盒中的Documents文件夹生成archiver文件(无扩展名,加上.plist扩展名即可查看编码后保存的数据内容)。
3.嵌入式SQLite3
 #define kFilename @"data.sqlite3"

 - (void)viewDidLoad

 {

     [super viewDidLoad];

 sqlite3 *database;

     if(sqlite3_open([[self dataFilePath] UTF8String], &database)!=SQLITE_OK)

      {

          sqlite3_close(database);

          NSAssert(, @"Failed to open database");

      }

     NSString *createSQL=@"CREATE TABLE IF NOT EXISTS FIELDS"

                             "(ROW INTEGER PRIMARY KEY , FIELD_DATA TEXT);";

     char *errorMsg;

     if(sqlite3_exec(database, [createSQL UTF8String], NULL, NULL, &errorMsg)!=SQLITE_OK)

        {

            sqlite3_close(database);

            NSAssert(, @"Error creating table: %s",errorMsg);

        }

     NSString *query=@"SELECT ROW, FIELD_DATA FROM FIELDS ORDER BY ROW";

     sqlite3_stmt *statement;

     if(sqlite3_prepare_v2(database, [query UTF8String], -, &statement, nil)==SQLITE_OK)

     {

         while (sqlite3_step(statement)==SQLITE_ROW)  //移动位置指针

        {

             int row=sqlite3_column_int(statement,);

             char *rowData=(char *)sqlite3_column_text(statement, );

             NSString *fieldName=[[NSString alloc] initWithFormat:@"field%d",row];

             NSString *fieldValue=[[NSString alloc] initWithUTF8String:rowData];

             UITextField *field=[self valueForKey:fieldName];

             field.text=fieldValue;

         }

         sqlite3_finalize(statement);

     }

     sqlite3_close(database);

     UIApplication *app =[UIApplication sharedApplication];

     [[NSNotificationCenter defaultCenter] addObserver:self selector:@selector(applicationWillResignActive:) name:UIApplicationWillResignActiveNotification object:app];

 }

 -(void)applicationWillResignActive:(NSNotification *)notification;

 {

     sqlite3 *database;

     if(sqlite3_open([[self dataFilePath] UTF8String], &database)!=SQLITE_OK)

     {

         sqlite3_close(database);

         NSAssert(, @"Failed to open database");

     }

     for (int i=; i<=; i++) {

         NSString *fieldName=[[NSString alloc] initWithFormat:@"field%d",i];

         UITextField *field=[self valueForKey:fieldName];

         char *updata="INSERT OR REPLACE INTO FIELDS (ROW, FIELD_DATA) VALUES(? , ?);";

         sqlite3_stmt *stmt;

         if (sqlite3_prepare_v2(database, updata, -, &stmt, nil)==SQLITE_OK) {

             sqlite3_bind_int(stmt, , i);

             sqlite3_bind_text(stmt, , [field.text UTF8String],-,NULL);

         }

         if(sqlite3_step(stmt)!=SQLITE_DONE)

         {

             NSAssert(,@"Error updating table.");

         }

         sqlite3_finalize(stmt);

     }

     sqlite3_close(database);

 }
沙盒中的Documents文件夹生成data.sqlite3文件(未知直读方法)。
4.Core Data

 - (void)viewDidLoad

 {

     [super viewDidLoad];

     // Do any additional setup after loading the view from its nib.

     BIDAppDelegate *appDelegate=[[UIApplication sharedApplication] delegate];

     NSManagedObjectContext *context=[appDelegate managedObjectContext];

     NSEntityDescription *entityDecription=[NSEntityDescription entityForName:@"Line" inManagedObjectContext:context];//关联实体与上下文

     NSFetchRequest *request=[[NSFetchRequest alloc] init];

     [request setEntity:entityDecription];//设置抓取实体

     NSError *error;

     /*因为要抓取实体中的所有项,所以没有设置抓取属性*/

     NSArray *objects=[context executeFetchRequest:request error:&error];//从实体中抓取到上下文,且上下文进行跟踪对象

     if(objects==nil)

         NSLog(@"There was an error!");

     for (NSManagedObject *object in objects)

     {

         NSNumber *lineNum=[object valueForKey:@"lineNum"]; //读取抓取出的第n个对象的lineNum属性

         NSString *lineText=[object valueForKey:@"lineText"];

         NSString *fieldname=[[NSString alloc] initWithFormat: @"line%d",[lineNum integerValue]];

         UITextField *field=[self valueForKey:fieldname];

         field.text=lineText;

     }

     UIApplication *app=[UIApplication sharedApplication];

     [[NSNotificationCenter defaultCenter] addObserver:self selector:@selector(applicationWillResignActive:) name:UIApplicationWillResignActiveNotification object:app];

 }

 -(void)applicationWillResignActive:(NSNotification *)notification

 {

     BIDAppDelegate *appDelegate=[[UIApplication sharedApplication] delegate];

     NSManagedObjectContext *context=[appDelegate managedObjectContext];

     NSError *error;

     for (int i=; i<=; i++) {

         NSString *fieldname=[[NSString alloc] initWithFormat:@"line%d",i];

         UITextField *field=[self valueForKey:fieldname];

         NSFetchRequest *request=[[NSFetchRequest alloc] init];

         NSEntityDescription *entityDescritption=[NSEntityDescription entityForName:@"Line" inManagedObjectContext:context];

         [request setEntity:entityDescritption];

         NSPredicate *predicate=[NSPredicate predicateWithFormat:@"(lineNum=%d)",i];

         [request setPredicate:predicate];

         NSArray *objects=[context executeFetchRequest:request error:&error];//抓取上下文中的托管对象集

         NSManagedObject *theLine=nil;

         if(objects==nil)

             NSLog(@"There was an error!");

         if([objects count]>)

         {

             /*因设置了抓取属性,每次按抓取属性在实体抓取的上下文中的托管对象集里都只有一个对应的托管对象(在此例对应抓取属性的只有一个)*/

             theLine=[objects objectAtIndex:];//取托管对象

         }

         else

         {

             /*在实体中插入新的托管对象,且返回该对象和放入上下文中跟踪*/

             theLine=[NSEntityDescription insertNewObjectForEntityForName:@"Line" inManagedObjectContext:context];

         }

         [theLine setValue:[NSNumber numberWithInt:i] forKey:@"lineNum"];

         [theLine setValue:field.text forKey:@"lineText"];

     }

     [context save:&error];//跟踪结束,保存进实体

 }
应用程序委托:
 - (BOOL)application:(UIApplication *)application didFinishLaunchingWithOptions:(NSDictionary *)launchOptions

 {

     self.window = [[UIWindow alloc] initWithFrame:[[UIScreen mainScreen] bounds]];

     // Override point for customization after application launch.

     self.rootcontroller=[[BIDViewController alloc] initWithNibName:@"BIDViewController" bundle:nil];

     UIView *rootView=self.rootcontroller.view;

     CGRect viewFrame=rootView.frame;

     viewFrame.origin.y+=[UIApplication sharedApplication].statusBarFrame.size.height;

     rootView.frame=viewFrame;

     [self.window addSubview:rootView];

     self.window.backgroundColor = [UIColor whiteColor];

     [self.window makeKeyAndVisible];

     return YES;

 }
沙盒中的Documents文件夹生成Core_Data_Persistence.sqlite文件(未知直读方法)。
其它例子
5.应用程序设置(UserDefault)
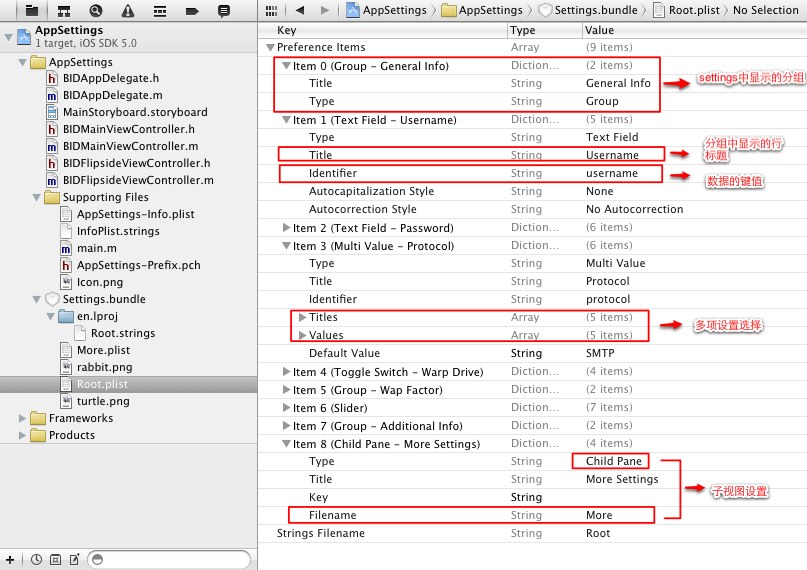
程序使用该方法保持的数据,可在iphone的settings中查看和设置。
添加setting.bundle,在root.plist中配置好要保存的数据项和settings中显示的分组界面。
 - (BOOL)application:(UIApplication *)application didFinishLaunchingWithOptions:(NSDictionary *)launchOptions

 {

     // Override point for customization after application launch.

     NSDictionary *defaults=[NSDictionary dictionaryWithObjectsAndKeys:[NSNumber numberWithBool:YES],kWarpDriveKey,[NSNumber numberWithInt:],kWarpFactorKey,@"Greed",kFavoriteSinKey, nil];

     [[NSUserDefaults standardUserDefaults] registerDefaults:defaults];

     return YES;

 }//第一次运行程序时,对设置束赋默认初值。
视图控制器:
     NSUserDefaults *defaults=[NSUserDefaults standardUserDefaults];

     usernameLabel.text=[defaults objectForKey:kUsernameKey];

     //读取方法,利用NSUserDefaults的单例方法。键值为设置束中的每项的Identifier。

     NSUserDefaults *defaults=[NSUserDefaults standardUserDefaults];

     [defaults setBool:engineSwitch.on forKey:kWarpDriveKey];

     //保存方法
6.UIDocument管理文档存储
 -(id)contentsForType:(NSString *)typeName error:(NSError *__autoreleasing *)outError

 {

     NSLog(@"saving document to URL %@",self.fileURL);//输出保存的路径

     return [bitmap copy];//bitmap为保存的mutabledata数据

 }//保存

 -(BOOL)loadFromContents:(id)contents ofType:(NSString *)typeName error:(NSError *__autoreleasing *)outError

 {

     NSLog(@"loading document from URL %@",self.fileURL);

     self.bitmap =[contents copy];

     return true;

 }//加载
控制器:
 NSArray *paths=NSSearchPathForDirectoriesInDomains(NSDocumentDirectory, NSUserDomainMask, YES);

 NSString *path=[paths objectAtIndex:];

 NSFileManager *fm=[NSFileManager defaultManager];

 NSError *dirError;

 NSArray *files=[fm contentsOfDirectoryAtPath:path error:&dirError];

 //数组内排序

 self.documentFileNames=files;
读取文档URL路径
 -(NSURL *)urlForFilename:(NSString *)filename

 {

     NSArray *paths=NSSearchPathForDirectoriesInDomains(NSDocumentDirectory, NSUserDomainMask, YES);

     NSString *documentDirectory=[paths objectAtIndex:];

     NSString *filePath=[documentDirectory stringByAppendingPathComponent:filename];

     NSURL *url=[NSURL fileURLWithPath:filePath];

     return url;

 }
创建文档,并设置保存
         NSString *filename=[NSString stringWithFormat:@"%@.tinypix",[alertView textFieldAtIndex:].text];

         NSURL *saveUrl=[self urlForFilename:filename];

         self.chooseDocument=[[BIDTinyPixDocument alloc] initWithFileURL:saveUrl];//创建UIDocument子类实例对象

         [chooseDocument saveToURL:saveUrl forSaveOperation:UIDocumentSaveForCreating completionHandler:^(BOOL success) {

             if(success)

             {

                 NSLog(@"save OK");

                 //addition

             }

             else

                 NSLog(@"failed to save!");

          }];
打开文档
         self.chooseDocument=[[BIDTinyPixDocument alloc] initWithFileURL:docUrl];

         [self.chooseDocument openWithCompletionHandler:^(BOOL success) {

             if(success)

             {

                 NSLog(@"load OK");

                 //addition

             }

             else

                 NSLog(@"failed to load!");

         }];
关闭文档(保持编辑数据)
 UIDocument *doc=self.chooseDocument;

 [doc closeWithCompletionHandler:nil];
沙盒中的Documents文件夹生成filename.tinypix文件。
7.iCloud
 -(void)reloadFiles

 {

     NSFileManager *fileManager=[NSFileManager defaultManager];

     NSURL *cloudURL=[fileManager URLForUbiquityContainerIdentifier:nil];

     NSLog(@"got cloudURL %@",cloudURL);

     self.query=[[NSMetadataQuery alloc] init];

     query.predicate=[NSPredicate predicateWithFormat:@"%K like '*.tinypix'",NSMetadataItemFSNameKey];

     query.searchScopes=[NSArray arrayWithObject:NSMetadataQueryUbiquitousDocumentsScope];

     [[NSNotificationCenter defaultCenter] addObserver:self selector:@selector(updateUbiquitousDocuments:) name:NSMetadataQueryDidFinishGatheringNotification object:nil];

     [[NSNotificationCenter defaultCenter] addObserver:self selector:@selector(updateUbiquitousDocuments:) name:NSMetadataQueryDidUpdateNotification object:nil];

     [query startQuery];

 }

 -(void)updateUbiquitousDocuments:(NSNotification *)notification

 {

     self.documentURLs=[NSMutableArray array];

     self.documentFileNames=[NSMutableArray array];

     NSLog(@"updateUbiquitousDocuments, results= %@",self.query.results);

     NSArray *results=[self.query.results sortedArrayUsingComparator:^NSComparisonResult(id obj1, id obj2) {

         NSMetadataItem *item1=obj1;

         NSMetadataItem *item2=obj2;

         return [[item2 valueForAttribute:NSMetadataItemFSCreationDateKey] compare:[item1 valueForAttribute:NSMetadataItemFSCreationDateKey]];

     }];

     for(NSMetadataItem *item in results)

     {

         NSURL *url=[item valueForAttribute:NSMetadataItemURLKey];

         [self.documentURLs addObject:url];

         [(NSMutableArray *)documentFileNames addObject:[url lastPathComponent]];

     }

     [self.tableView reloadData];

 }

 -(NSURL *)urlForFilename:(NSString *)filename

 {

     NSURL *baseURL=[[NSFileManager defaultManager] URLForUbiquityContainerIdentifier:nil];

     NSURL *pathURL=[baseURL URLByAppendingPathComponent:@"Documents"];

     NSURL *destinationURL=[pathURL URLByAppendingPathComponent:filename];

     return destinationURL;

 }
icloud上读写首选项
     NSUbiquitousKeyValueStore *prefs=[NSUbiquitousKeyValueStore defaultStore];

     [prefs setLongLong:selectedColorIndex forKey:@"selectedColorIndex"];

     self.selectedColorIndex=[prefs longLongForKey:@"selectedColorIndex"];
(IOS)数据持久化的更多相关文章
- iOS 数据持久化(扩展知识:模糊背景效果和密码保护功能)
本篇随笔除了介绍 iOS 数据持久化知识之外,还贯穿了以下内容: (1)自定义 TableView,结合 block 从 ViewController 中分离出 View,轻 ViewControll ...
- iOS开发笔记-swift实现iOS数据持久化之归档NSKeyedArchiver
IOS数据持久化的方式分为三种: 属性列表 (plist.NSUserDefaults) 归档 (NSKeyedArchiver) 数据库 (SQLite.Core Data.第三方类库等 归档(又名 ...
- IOS数据持久化之归档NSKeyedArchiver
IOS数据持久化的方式分为三种: 属性列表 (自定义的Property List .NSUserDefaults) 归档 (NSKeyedArchiver) 数据库 (SQLite.Core Data ...
- iOS -数据持久化方式-以真实项目讲解
前面已经讲解了SQLite,FMDB以及CoreData的基本操作和代码讲解(CoreData也在不断学习中,上篇博客也会不断更新中).本篇我们将讲述在实际开发中,所使用的iOS数据持久化的方式以及怎 ...
- iOS数据持久化方式及class_copyIvarList与class_copyPropertyList的区别
iOS数据持久化方式:plist文件(属性列表)preference(偏好设置)NSKeyedArchiver(归档)SQLite3CoreData沙盒:iOS程序默认情况下只能访问自己的程序目录,这 ...
- iOS数据持久化-OC
沙盒详解 1.IOS沙盒机制 IOS应用程序只能在为该改程序创建的文件系统中读取文件,不可以去其它地方访问,此区域被成为沙盒,所以所有的非代码文件都要保存在此,例如图像,图标,声音,映像,属性列表,文 ...
- iOS数据持久化
在iOS中,实现数据持久化一般分为4大种: 1.属性列表 2.对象归档 3.SQLite 4.Core Data 一.属性列表 NSUserDefaults类的使用和NSKeyedArchiver有很 ...
- iOS数据持久化存储:归档
在平时的iOS开发中,我们经常用到的数据持久化存储方式大概主要有:NSUserDefaults(plist),文件,数据库,归档..前三种比较经常用到,第四种归档我个人感觉用的还是比较少的,恰恰因为用 ...
- 转载 -- iOS数据持久化存储
作者:@翁呀伟呀 授权本站转载 概论 所谓的持久化,就是将数据保存到硬盘中,使得在应用程序或机器重启后可以继续访问之前保存的数据.在iOS开发中,有很多数据持久化的方案,接下来我将尝试着介绍一下5种方 ...
- iOS 数据持久化(1):属性列表与对象归档
@import url(http://i.cnblogs.com/Load.ashx?type=style&file=SyntaxHighlighter.css); @import url(/ ...
随机推荐
- Apache OFbiz entity engine源代码解读
简单介绍 近期一直在看Apache OFbiz entity engine的源代码.为了能够更透彻得理解,也由于之前没有看人别人写过分析它的文章,所以决定自己来写一篇. 首先,我提出一个问题,假设你有 ...
- block 解析 - 内存
block结构体相应的也有一个成员引用,这样会增加对局部变量的 _para1引用,在Block销毁的时候引用就释放掉了 我们了解到了用__block修饰的变量,可以在block内部修改,__block ...
- java内存映射文件
内存映射文件能够让我们创建和修改大文件(大到内存无法读入得文件),对于内存映射文件,我们可以认为是文件已经全部被读入到内存当中,然后当成一个大的数字来访问,简化修改文件的代码. 1.directBuf ...
- 浅谈JDBC(二)
JDBC中的事务 简单来说,事务就是要保证一组DAO方法的操作,要么一起成功要么一起失败. 1.事务控制的位置 在Service中的业务方法内进行事务控制. 2.事务控制的代码 a.注意:JDBC会自 ...
- MYSQL—加写锁,加读锁,解锁
链接地址:http://blog.sina.com.cn/s/blog_7fa2bcf50101j1lu.html 表级锁: 加写锁: lock tables table_n ...
- MySQL 事物
BEGIN DECLARE result INTEGER DEFAULT 0; -- 标记是否出错 DECLARE t_error INTEGER DEFAULT 0; -- 如果出现sql异常,则将 ...
- Lucence.Net+添加关键词+分页+排序
1.使用queryparser完成解析搜索请求 2.基本格式如: QueryParser parser=new QueryParser("字段名称","分析器实例&quo ...
- bzoj 1057: [ZJOI2007]棋盘制作 单调栈
题目链接 1057: [ZJOI2007]棋盘制作 Time Limit: 20 Sec Memory Limit: 162 MBSubmit: 2027 Solved: 1019[Submit] ...
- win7下Java环境变量配置及说明
在官网上下载与操作系统对应的JDK(http://www.oracle.com/index.html) 比如我的安装路径是E:\jdk1.7.0_51\JDK 右击计算机---->属性----& ...
- perl5 第十二章 Perl5中的引用/指针
第十二章 Perl5中的引用/指针 by flamephoenix 一.引用简介二.使用引用三.使用反斜线(\)操作符四.引用和数组五.多维数组六.子程序的引用 子程序模板七.数组与子程序八.文件句 ...