
android五种布局模式
Android布局是应用界面开发的重要一环,在Android中,共有五种布局方式,分别是:LinearLayout (线性布局),FrameLayout(框架布
局),AbsoluteLayout(绝对布局),RelativeLayout(相对布局),TableLayout(表格布局)。
在windows下有预览功能,可以在xml中查看布局的样式,在linux中无。
一、LinearLayout
线性布局,这个东西,从外框上可以理解为一个div,他首先是一个一个从上往下罗列在屏幕上。每一个LinearLayout里面又可分为垂直布局
(android:orientation="vertical")和水平布局(android:orientation="horizontal"
)。当垂直布局时,每一行就只有一个元素,多个元素依次垂直往下;水平布局时,只有一行,每一个元素依次向右排列。
linearLayout中有一个重要的属性 android:layout_weight="1",这个weight在垂直布局时,代表行距;水平的时候代表列宽;weight值越大就越大。
线形布局中预览和真机中完全一样。
TextView占一定的空间,没有赋值也有一定的宽高,要特别注意。
二、FrameLayout
FrameLayout是最简单的一个布局对象。它被定制为你屏幕上的一个空白备用区域,之后你可以在其中填充一个单一对象 —
比如,一张你要发布的图片。所有的子元素将会固定在屏幕的左上角;你不能为FrameLayout中的一个子元素指定一个位置。后一个子元素将会直接在前
一个子元素之上进行覆盖填充,把它们部份或全部挡住(除非后一个子元素是透明的)。
三、AbsoluteLayout
AbsoluteLayout 这个布局方式很简单,主要属性就两个 layout_x 和 layout_y 分别定义 这个组件的绝对位置。 即,以屏幕左上角为(0,0)的坐标轴的x,y值,当向下或向右移动时,坐标值将变大。AbsoluteLayout 没有页边框,允许元素之间互相重叠(尽管不推荐)。我们通常不推荐使用 AbsoluteLayout ,除非你有正当理由要使用它,因为它使界面代码太过刚性,以至于在不同的设备上可能不能很好地工作。
四、RelativeLayout
相对布局可以理解为某一个元素为参照物,来定位的布局方式。
android:layout_方向 = id 表示 在这个id对应的控件的方向上(上|下)
android:layout_align方向 = id 表示和这个控件的(上下左右)对齐
android: layout_to方向Of = id 表示在这个控件的 左或者右
eg:
android:layout_below="@id/la1"/>
将当前控件放置于id为la1 的控件下方。
android:layout_alignParentRight="true"
使当前控件的右端和父控件的右端对齐。这里属性值只能为true或false,默认false。
android:layout_marginLeft="10dip"
使当前控件左边空出相应的空间。
android:layout_toLeftOf="@id/true"
使当前控件置于id为true的控件的左边。
android:layout_alignTop="@id/ok"
使当前控件与id为ok的控件上端对齐。
五、TableLayout
表格布局类似Html里面的Table。每一个TableLayout里面有表格行TableRow,TableRow里面可以具体定义每一个元素。每
个TableRow 都会定义一个 row (事实上,你可以定义其它的子对象,这在下面会解释到)。TableLayout 容器不会显示row
、cloumns 或cell 的边框线。每个 row 拥有0个或多个的cell ;每个cell 拥有一个View
对象。表格由列和行组成许多的单元格。表格允许单元格为空。单元格不能跨列,这与HTML 中的不一样。
TabRow只论行,不论列(列自定义)。
每一个布局都有自己适合的方式,另外,这五个布局元素可以相互嵌套应用,做出美观的界面。
例子:
1 线性布局(LinearLayout)
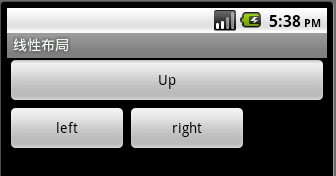
描述:最简单布局方式,依次向下进行排列。
<?xml version="1.0" encoding="utf-8"?>

<LinearLayout xmlns:android="http://schemas.android.com/apk/res/android"

        android:orientation="vertical"

        android:layout_width="fill_parent"

        android:layout_height="fill_parent">

    <Button android:text="Up"

        android:id="@+id/Button03"

        android:layout_width="fill_parent"

        android:layout_height="wrap_content"></Button>


    <LinearLayout xmlns:android="http://schemas.android.com/apk/res/android"

        android:orientation="horizontal"

        android:layout_width="fill_parent"

        android:layout_height="fill_parent">

    <Button android:text="left"

        android:id="@+id/Button01"

        android:width="120px"

        android:layout_width="wrap_content"

        android:layout_height="wrap_content"></Button>

    <Button

        android:text="right"

        android:id="@+id/Button02"

        android:width="120px"

        android:layout_width="wrap_content"

        android:layout_height="wrap_content"></Button>

    </LinearLayout>

</LinearLayout>
2、 表格布局(TableLayout)
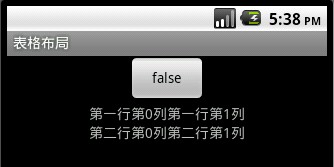
描述:类似于HTML table ,在其中间添加View 或是<TableRow></TableRow>控件。
<?xml version="1.0" encoding="utf-8"?>

<TableLayout

    xmlns:android="http://schemas.android.com/apk/res/android"

    android:id="@+id/TableLayout01"

    android:layout_width="fill_parent" android:layout_height="fill_parent">

    <TableRow android:gravity="center">

      <Button

            android:text="@+id/Button01"

            android:id="@+id/Button01"

            android:layout_width="wrap_content"

            android:layout_height="wrap_content">

       </Button>

    </TableRow>

    <TableRow android:gravity="center">

        <TextView android:text="第一行第0列"

                  android:layout_width="wrap_content"

                  android:layout_height="wrap_content"></TextView>

        <TextView android:text="第一行第1列"

                  android:layout_width="wrap_content"

                  android:layout_height="wrap_content"></TextView>

    </TableRow>

     <TableRow android:gravity="center">

        <TextView android:text="第二行第0列"

                  android:layout_width="wrap_content"

                  android:layout_height="wrap_content"></TextView>

        <TextView android:text="第二行第1列"

                  android:layout_width="wrap_content"

                  android:layout_height="wrap_content"></TextView>

    </TableRow>

</TableLayout>
3、 单帧布局(FrameLayout)
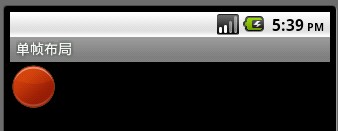
描述:类似于HTML层叠
<?xml version="1.0" encoding="utf-8"?>

<FrameLayout

    xmlns:android="http://schemas.android.com/apk/res/android"

    android:layout_width="wrap_content"

    android:layout_height="wrap_content">

    <ImageView

        android:id="@+id/ImageView01"

        android:src="@drawable/circle_blue"

        android:layout_width="wrap_content"

        android:layout_height="wrap_content">

    </ImageView>

    <ImageView

        android:id="@+id/ImageView02"

        android:src="@drawable/circle_green"

        android:layout_width="wrap_content"

        android:layout_height="wrap_content">

    </ImageView>

    <ImageView

        android:id="@+id/ImageView03"

        android:src="@drawable/circle_red"

        android:layout_width="wrap_content"

        android:layout_height="wrap_content">

    </ImageView>


</FrameLayout>
4、 相对布局(RelativeLayout)
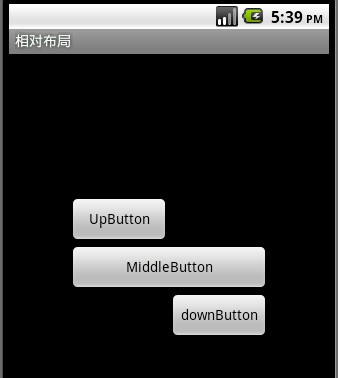
描述:取决于对参照控件进行布局,父控件和子控件均可
常用属性:android:layout_centerInParent=”true/false”
android:layout_above, android:layout_below
android:layout_alignleft, android:layout_alignright.
<?xml version="1.0" encoding="utf-8"?>

<RelativeLayout xmlns:android="http://schemas.android.com/apk/res/android"

    android:layout_width="fill_parent" android:layout_height="fill_parent">

     <Button

          android:id="@+id/btnmiddle"

          android:text="MiddleButton"

          android:layout_width="200px"

          android:layout_height="wrap_content"

          android:layout_centerInParent="true">

     </Button>

      <Button

          android:id="@+id/btnup"

          android:text="UpButton"

          android:layout_width="100px"

          android:layout_height="wrap_content"

          android:layout_above="@id/btnmiddle"

          android:layout_alignLeft="@id/btnmiddle">

     </Button>

      <Button

          android:id="@+id/btndown"

          android:text="downButton"

          android:layout_width="100px"

          android:layout_height="wrap_content"

          android:layout_below="@id/btnmiddle"

          android:layout_alignRight="@id/btnmiddle">

     </Button>

</RelativeLayout>
5、 坐标布局(AbsoluteLayout)
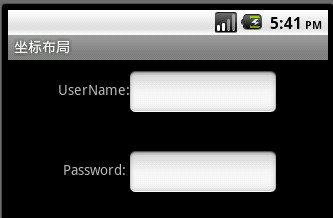
描述:对其控件进行直接定位,增加灵活性。
常用属性:android:layout_x,android:layout_y.
<?xml version="1.0" encoding="utf-8"?>

<AbsoluteLayout

  xmlns:android="http://schemas.android.com/apk/res/android"

  android:layout_width="wrap_content"

  android:layout_height="wrap_content">


  <TextView

       android:layout_width="wrap_content"

       android:text="UserName:"

       android:layout_height="wrap_content"

       android:id="@+id/tvName"

       android:layout_y="20dip"

       android:layout_x="50dip">

       </TextView>

   <TextView

       android:layout_width="wrap_content"

       android:text="Password:"

       android:layout_height="wrap_content"

       android:id="@+id/tvPassword"

       android:layout_y="100dip"

       android:layout_x="55dip">

       </TextView>


   <EditText

       android:layout_width="150px"

       android:layout_height="wrap_content"

       android:id="@+id/tvPassword"

       android:layout_y="10dip"

       android:layout_x="120dip">

       </EditText>

   <EditText

       android:layout_width="150px"

       android:layout_height="wrap_content"

       android:id="@+id/tvPassword"

       android:layout_y="90dip"

       android:layout_x="120dip">

       </EditText>

</AbsoluteLayout>
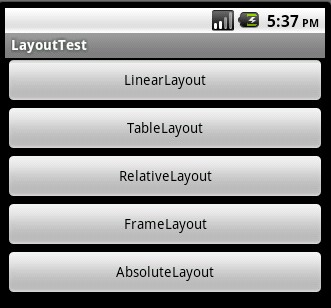
MyLayout.java
package com.jay.Layout;

import android.app.Activity;

import android.os.Bundle;

import android.view.View;

import android.view.View.OnClickListener;

import android.widget.Button;

public class MyLayout extends Activity {

    /** Called when the activity is first created. */

    private Button btnLinearlayout;

    private Button btnTablayout;

    private Button btnRelativelayout;

    private Button btnFramelayout;

    private Button btnAbsolutelayout;

    OnClickListener listener;

    @Override

    public void onCreate(Bundle savedInstanceState) {

        super.onCreate(savedInstanceState);

        setContentView(R.layout.main);

        CreateControl();

        listener = new OnClickListener() {

            @Override

            public void onClick(View v) {

                // TODO Auto-generated method stub

                switch (v.getId()) {

                    case R.id.btnlinearlayout:

                        setTitle("线性布局");

                        setContentView(R.layout.linearlayout);

                        break;

                    case R.id.btntableayout:

                        setTitle("表格布局");

                        setContentView(R.layout.tablelayout);

                        break;

                    case R.id.btnrelativelayout:

                        setTitle("相对布局");

                        setContentView(R.layout.relativelayout);

                        break;

                    case R.id.btnfreamelayout:

                        setTitle("单帧布局");

                        setContentView(R.layout.framelayout);

                        break;

                    case R.id.btnabsolutelayout:

                        setTitle("坐标布局");

                        setContentView(R.layout.absolutelayout);

                        break;

                }

            }

        };

        btnLinearlayout.setOnClickListener(listener);

        btnTablayout.setOnClickListener(listener);

        btnRelativelayout.setOnClickListener(listener);

        btnFramelayout.setOnClickListener(listener);

        btnAbsolutelayout.setOnClickListener(listener);

    }

    private void CreateControl() {

        // TODO Auto-generated method stub

        btnLinearlayout = (Button)findViewById(R.id.btnlinearlayout);

        btnTablayout = (Button)findViewById(R.id.btntableayout);

        btnRelativelayout = (Button)findViewById(R.id.btnrelativelayout);

        btnFramelayout = (Button)findViewById(R.id.btnfreamelayout);

        btnAbsolutelayout = (Button)findViewById(R.id.btnabsolutelayout);

    }

}
摘自:http://www.cnblogs.com/chiao/archive/2011/08/24/2152435.html
android五种布局模式的更多相关文章
- 【Android 复习】:Android五种布局的使用方法
---恢复内容开始--- 在Android布局中,有五种常用的布局,下面我们就来学习一下这几种布局的使用方式 1) 线性布局:LinearLayout 2) 帧布局: FrameLayout 3) ...
- 页面的五种布局以及嵌套『Android系列八』
转自:http://blog.csdn.net/dazlly/article/details/7860125 因为学习比较晚,我用的相关版本为SDK4.1.eclipse4.2,而自己看的教材都是低版 ...
- Android五种数据存储方式
android 五种数据存储 :SharePreferences.SQLite.Contert Provider.File.网络存储 Android系统提供了四种存储数据方式.分别为:SharePre ...
- 转:Windows下的PHP开发环境搭建——PHP线程安全与非线程安全、Apache版本选择,及详解五种运行模式。
原文来自于:http://www.ituring.com.cn/article/128439 Windows下的PHP开发环境搭建——PHP线程安全与非线程安全.Apache版本选择,及详解五种运行模 ...
- rabbitmq的五种工作模式
abbitmq的五种工作模式
- PHP5 的五种常用模式
PHP5 的五种常用模式. 工厂模式 最初在设计模式 一书中,许多设计模式都鼓励使用松散耦合.要理解这个概念,让我们最好谈一下许多开发人员从事大型系统的艰苦历程.在更改一个代码片段时,就会发生问题,系 ...
- S-T-E-A-M Science Technology Engineering Art Mathematics 五种思维模式
S-T-E-A-M五个英文字母分别代表 Science 科学,Technology 技术,Engineering 工程,Art 艺术以及 Mathematics 数学.它们并不是简单地整合原来的分科体 ...
- RabbitMQ 五种工作模式
官网介绍:https://www.rabbitmq.com/getstarted.html 五种工作模式的主要特点 简单模式:一个生产者,一个消费者 work模式:一个生产者,多个消费者,每个消费者获 ...
- java单例五种实现模式梳理
java单例五种实现模式 饿汉式(线程安全,调用效率高,但是不能延时加载) 一上来就把单例对象创建出来了,要用的时候直接返回即可,这种可以说是单例模式中最简单的一种实现方式.但是问题也比较明显.单例在 ...
随机推荐
- bp神经网络及matlab实现
本文主要内容包含: (1) 介绍神经网络基本原理,(2) AForge.NET实现前向神经网络的方法,(3) Matlab实现前向神经网络的方法 . 第0节.引例 本文以Fisher的Iris数据集 ...
- 用ADB(Android Debug Bridge)实时监测Android程序的运行
监控Android设备上程序的运行,需要ADB的配合,具体ADB工具的介绍以及命令选项可见博客: http://blog.csdn.net/mliubing2532/article/details ...
- 显示标题栏中标题左侧的小图icon
如何显示网站logo,定义网站收藏夹图标 代码与解释 <link rel="shortcut icon" href="/path/favicon.ico" ...
- JavaScript引用类型之Array数组的toString()和valueof()方法的区别
一.转换方法 1.在JavaScript中几乎所有对象都具有toLocaleString().toString和valueof()方法,因为,所有的对象都继承自Object,而前面所说的方法都是Obj ...
- 转载:SQL语句Where中使用别名作为判断条件
原文地址:http://www.cnblogs.com/dwfbenben/p/3307941.html 当我们使用某个表达式作为输出的一列时,我们无法再Where条件中直接使用该列作判断条件. ...
- 在 Visio 中录制宏
在“开发工具”选项卡上,单击“录制宏”.(如果您看不到“开发工具”选项卡,请参阅下面的“显示‘开发工具’选项卡”.) 在“宏名”框中,键入宏名称. 在“快捷键”框中,键入与 Ctrl 键一起使用可运行 ...
- leetcode Contains Duplicate python
Given an array of integers, find if the array contains any duplicates. Your function should return t ...
- mysql在查询结果中增加排序字段
ELECT userId , () AS runRank , mostFast1 FROM user_info, ()) b WHERE mostFast1 IS NOT NULL ORDER BY ...
- iOS 开源库
youtube下载神器:https://github.com/rg3/youtube-dl我擦咧 vim插件:https://github.com/Valloric/YouCompleteMevim插 ...
- HTML5速查表
HTML5速查表 标签 描述 版本 属性 <!--...--> 定义注释 4 / 5 none <!DOCTYPE> 定义文档类型 4 / 5 none <a> 定 ...