mac install PyQt5
1. install brew
/usr/bin/ruby -e "$(curl -fsSL https://raw.githubusercontent.com/Homebrew/install/master/install)"
2. install python3
brew install python3
brew info python3
python3 -V
3. install sip & pyqt5
pip3 install sip

pip3 install pyqt5
simple.py
import sys

from PyQt5.QtWidgets import QMainWindow, QTextEdit, QApplication, qApp, QAction

from PyQt5.QtGui import QIcon

class simple(QMainWindow):

    def __init__(self):

        super().__init__()

        self.initUI()

    def initUI(self):

        self.setWindowTitle('hello')

        self.setObjectName("helloWin")

        self.resize(500, 300)

if __name__ == '__main__':

    app = QApplication(sys.argv)

    ex = simple()

    ex.show()

    sys.exit(app.exec_())
simple2.py
# -*- coding: utf-8 -*-

import sys

from PyQt5.QtWidgets import *

from PyQt5.QtCore import *

class FirstWindow(QWidget):

    signal = pyqtSignal(str)

    def __init__(self, parent=None):

        # super这个用法是调用父类的构造函数

        # parent=None表示默认没有父Widget,如果指定父亲Widget,则调用之

        super(FirstWindow, self).__init__(parent)

        self.resize(100, 100)

        self.btn = QToolButton(self)

        self.btn.setText("click")

        self.signal.connect(self.sinCall)

    def sinCall(self, text):

        print("sin emit:", text)

        self.btn.setText(text)

    def closeEvent(self, event):

        result = QMessageBox.question(self,

                      "Confirm Exit...",

                      "Are you sure you want to exit ?",

                      QMessageBox.Yes| QMessageBox.No)

        event.ignore()

        if result == QMessageBox.Yes:

         event.accept()

class SecondWindow(QWidget):

    def __init__(self, parent=None):

        super(SecondWindow, self).__init__(parent)

        self.resize(200, 200)

        self.setStyleSheet("background: black")

    def handle_click(self):

        if not self.isVisible():

            self.show()

    def handle_close(self):

        self.close()

if __name__ == "__main__":

    App = QApplication(sys.argv)

    ex = FirstWindow()

    s = SecondWindow()

    ex.btn.clicked.connect(s.handle_click)

    #ex.btn.clicked.connect(ex.hide)

    ex.signal.emit("signal text")

    ex.show()

    sys.exit(App.exec_())
4. install Qt (可选, 方便做界面,类似winform做界面用: 界面可视化工具,可以很方便的设计UI,所见即所得)
a. install xcode
b. download Qt https://www.qt.io/download/ 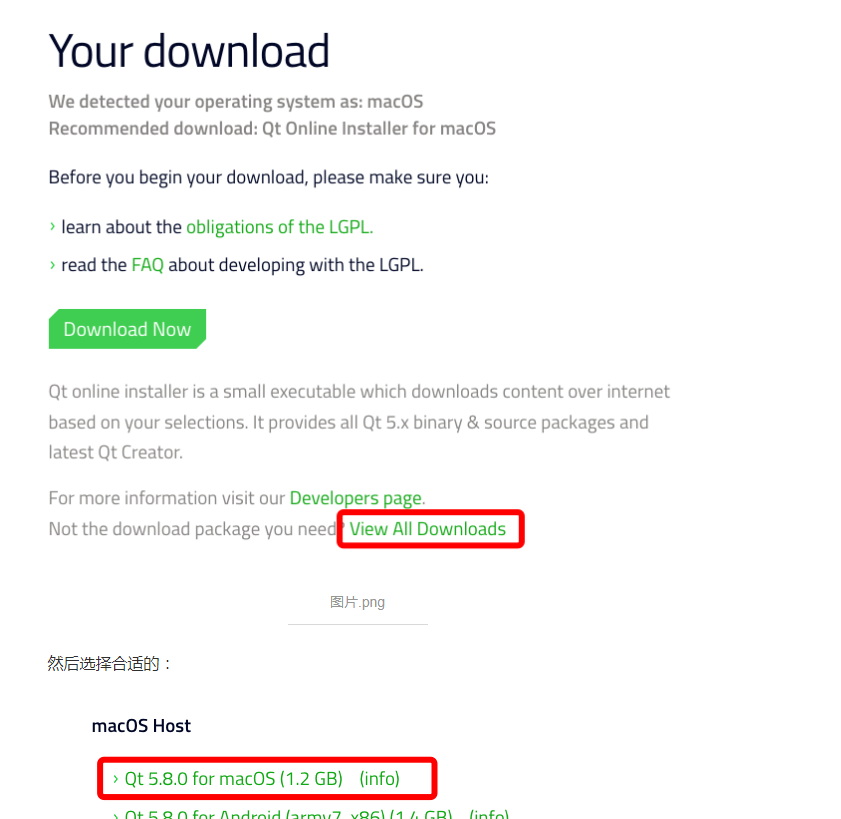
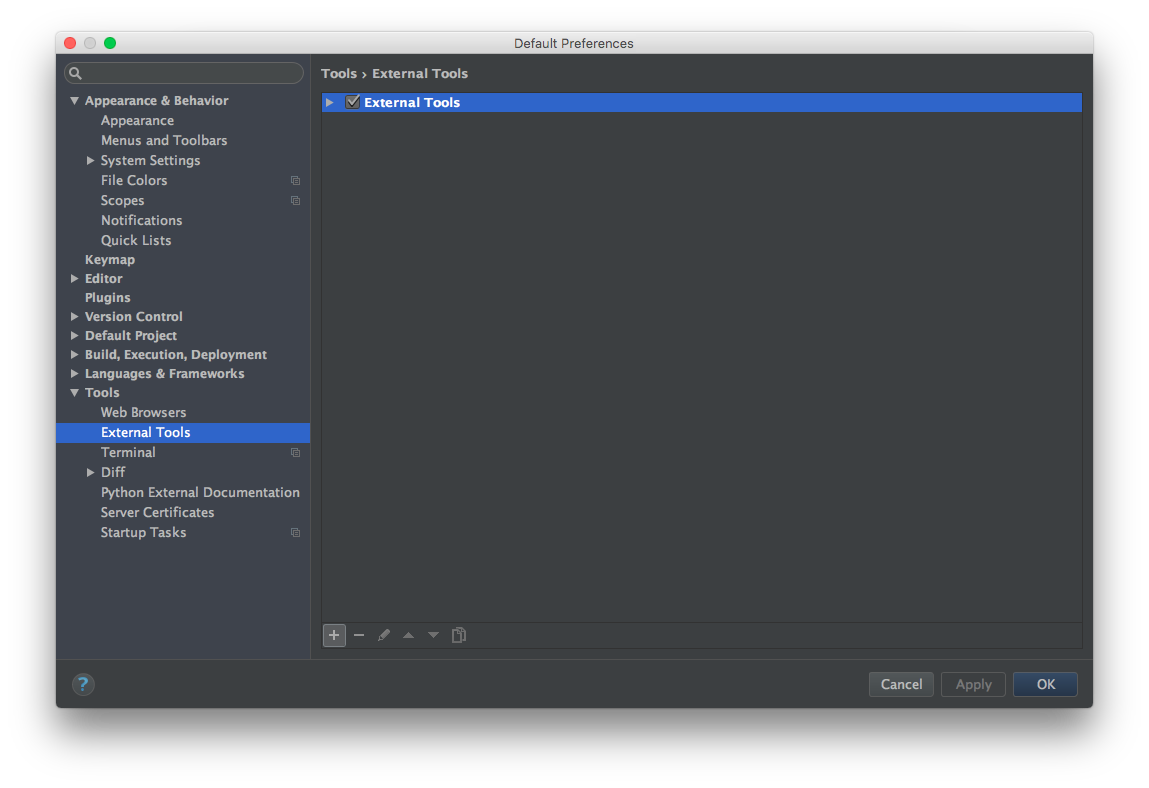
5. install pycharm(可选, IDE, 方便开发: 可集成Qt; Qt的ui文件转py; 直接运行python)
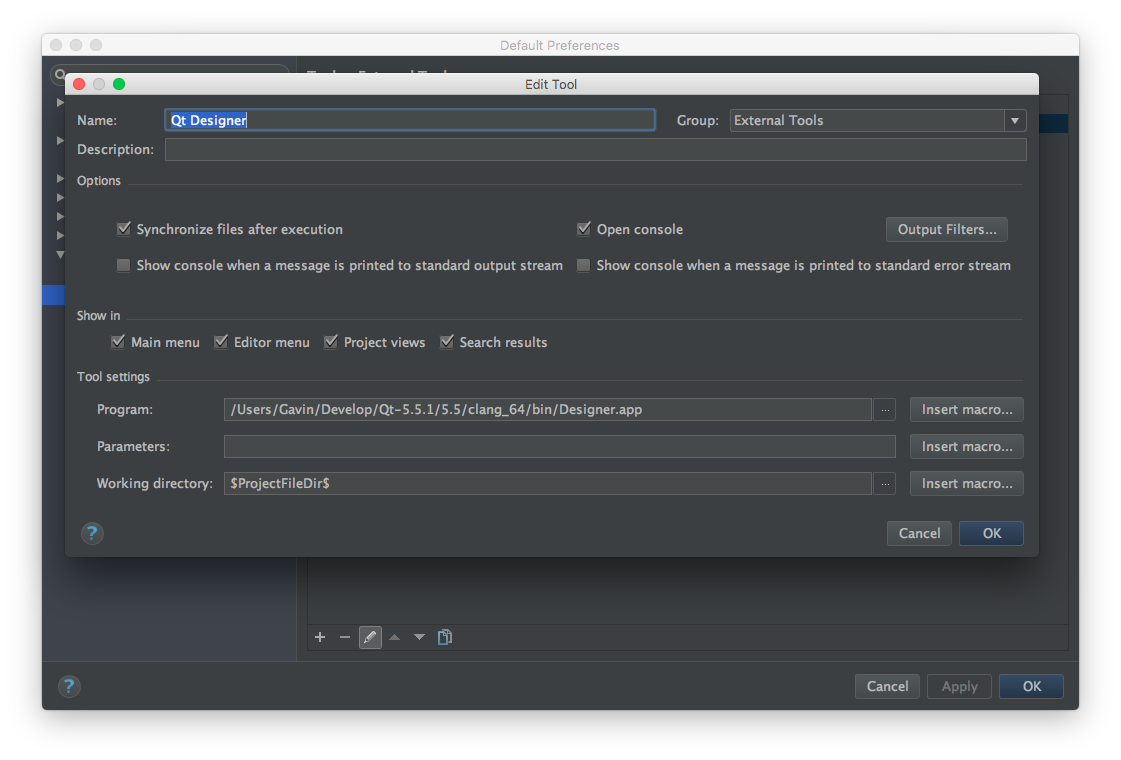
a. 配置Qt Designer: Qt的界面可视化工具,可以很方便的设计UI,所见即所得
- 打开 PyCharm 的设置
- 找到 Tools -> External Tools
- 点击 + -> Create Tool
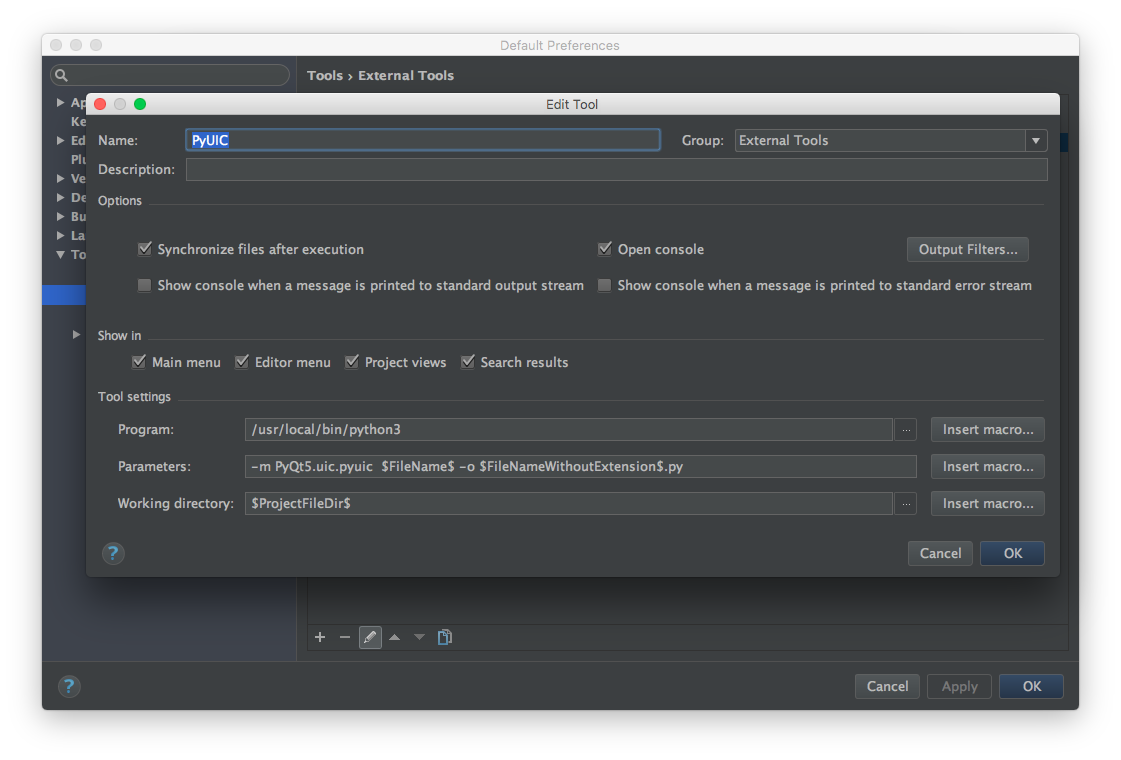
b. 配置PyUIC: 这个工具可以把Qt Designer的UI文件,转换成Py文件python3 -m PyQt5.uic.pyuic $FileName$ -o $FileNameWithoutExtension$.py
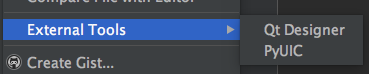
c. 右键菜单中选择 External Tools 即可
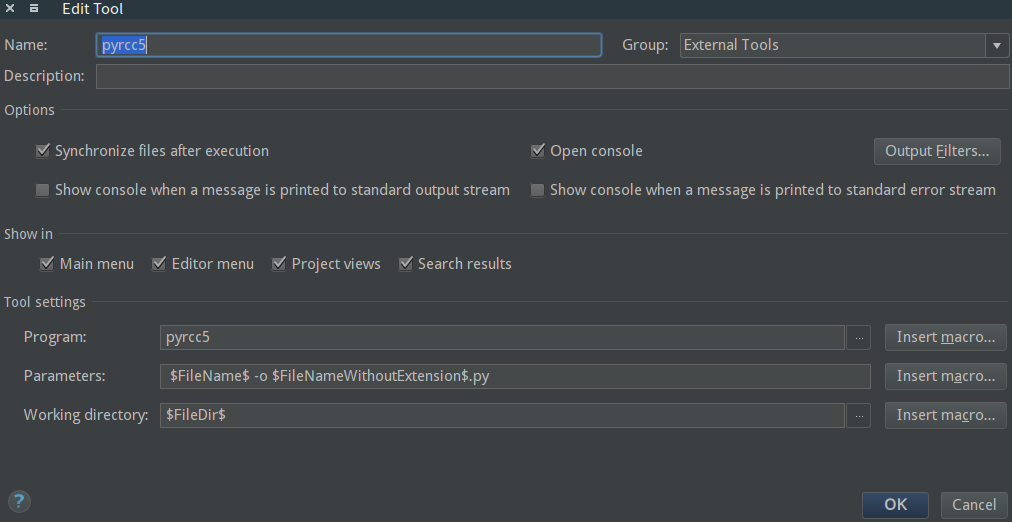
d. 配置 pyrcc (安装完python3以后就有了)pyrcc5 resources.qrc -o resources.py
使用
resource.qrc

<!DOCTYPE RCC>

<RCC version="1.0">

 <qresource prefix="/img">

    <file alias="a.png">./img/a.png</file>

    <file alias="b.png">./img/b.png</file>

  </qresource>

</RCC>

pyrcc5 img_rcc.qrc -o img.py

# 导入这个文件,会自动调用资源初始化函数

from img.py import *

# 使用资源的时候 访问的文件名 即 qrc里的 :prefix+alias ,例如

img = QPixmap(":/img/a.png")
6.install pyinstaller (可选, python转可执行文件:exe, pkg))
pip3 install pyinstaller

pyinstaller -F -w {PyFile}.py
mac install PyQt5的更多相关文章
- Mac Python PyQt5 环境搭建
pip install pyqt5 测试开发环境 在Terminal里敲下以下代码,如果没有报错就说明安装成功了. python -c "import PyQt5" 或是如下图,导 ...
- mac 安装PyQt5
PyQt5官方安装教程指出2种安装方法: Installing from Wheels Building and Installing from Source 网上搜罗的大多是按照第二种方法安装的,本 ...
- react native mac install
Mac上使用react native tips: 1. 安装Homebrew ruby -e "$(curl -fsSL https://raw.githubusercontent.com/ ...
- mac install wget
没有Wget的日子是非常难过的,强大的Mac OS 下安装Wget非常简单 下载一个Wget的源码包,http://www.gnu.org/software/wget/ ftp下载地址:ftp://f ...
- mac install: /usr/bin/unrar: Operation not permitted
按照教程mac下解压缩rar文件工具-rarosx(免费),在mac上安装rar,在执行命令 sudo install -c -o $USER unrar /bin 出现错误:install: /bi ...
- mac install php dev
环境开发配置 mysql 下载mysql压缩包.tar.gz 解压 mv mysql_5.7.10_osx... /usr/local/mysql sudo chown -R root:wheel / ...
- mac install brew
$ ruby -e "$(curl -fsSL https://raw.githubusercontent.com/Homebrew/install/master/install)" ...
- java mac install
http://docs.oracle.com/javase/8/docs/technotes/guides/install/mac_jdk.html#A1096855 This page descri ...
- mac install telnet
问题: -bash: telnet: command not found -bash: brew: command not found 解决: /usr/bin/ruby -e "$(cur ...
随机推荐
- Android模拟器访问本机服务器
Android模拟器访问本机服务器,用127.0.0.1访问不到,因为127.0.0.1已经被映射到模拟器了. 可以用以下两种方式访问 1. 用 10.0.2.2 2. 直接用 本机的IP地址,如:1 ...
- 基于 CentOS 搭建 WordPress 个人博客
欢迎大家前往腾讯云+社区,获取更多腾讯海量技术实践干货哦~ 腾讯云提供了开发者实验室帮助用户搭建 WordPress 个人博客,教程内容如下,用户可以点击开发者实验室快速上机完成实验. 准备 LNMP ...
- 【卷土重来之C#学习笔记】(一)c#文章导航目录
[卷土重来之C#学习笔记](一)c#文章导航目录 [卷土重来之C#学习笔记](二)c#编程概述 [卷土重来之C#学习笔记](三)类型.存储.对象 [卷土重来之C#学习笔记](四)类的基本概念 [卷土重 ...
- Vue1.0基础学习笔记整理
最近一直在使用Vue.js开发项目,现将在学习过程中遇到的一些学习小细节总结如下: 1.只处理单次插值,今后的数据变化就不会再引起插值更新了 <span>This will never c ...
- pwn 题GDB调试技巧和exp模板
GDB分析ELF文件常用的调试技巧 gdb常用命令 首先是gbd+文件名 静态调试 ,gdb attach +文件名 动态调试 为了方便查看堆栈和寄存器 最好是安装peda插件 安装 可以通过pip直 ...
- 折半查找——Java实现
一.查找思想 折半查找 也称为二分查找,是一种效率较高的查找方法,查找时要求表中的节点按关键字的大小排序,并且要求线性表顺序存储. 首先用要查找的关键字值(key)与中间位置结点的关键字值(arr[m ...
- struts2的基本配置
1.package标签下主要的点在namespace和name,extend上 extend 一般继承自struts-default.xml下,继承其拦截器及一些功能,这个已在本人的拦截器一文中有讲到 ...
- 设置cssrem,设置emmet
1.文件->首选项->设置 2.搜索cssrem-> 点击设置:"cssrem.rootFontSize": 16, 4.emmet
- 使用cookie实现只出现一次的广告代码效果
我们上网经常会遇到第一次需要登录而之后不用再登录的网站的情况,其实是运用了Cookie 存储 web 页面的用户信息,Cookie 以名/值对形式存储,当浏览器从服务器上请求 web 页面时, 属于该 ...
- java自动生成jar包工具
jar -cfe Main.jar com.xjq.test.Main com/xjq/test/Main.class jar -cmef manifest.mf com.xjq.test.Main ...