React Native的生命周期解析
在React Native中使用组件来封装界面模块时,整个界面就是一个大的组件,开发过程就是不断优化和拆分界面组件、构造整个组件树的过程。
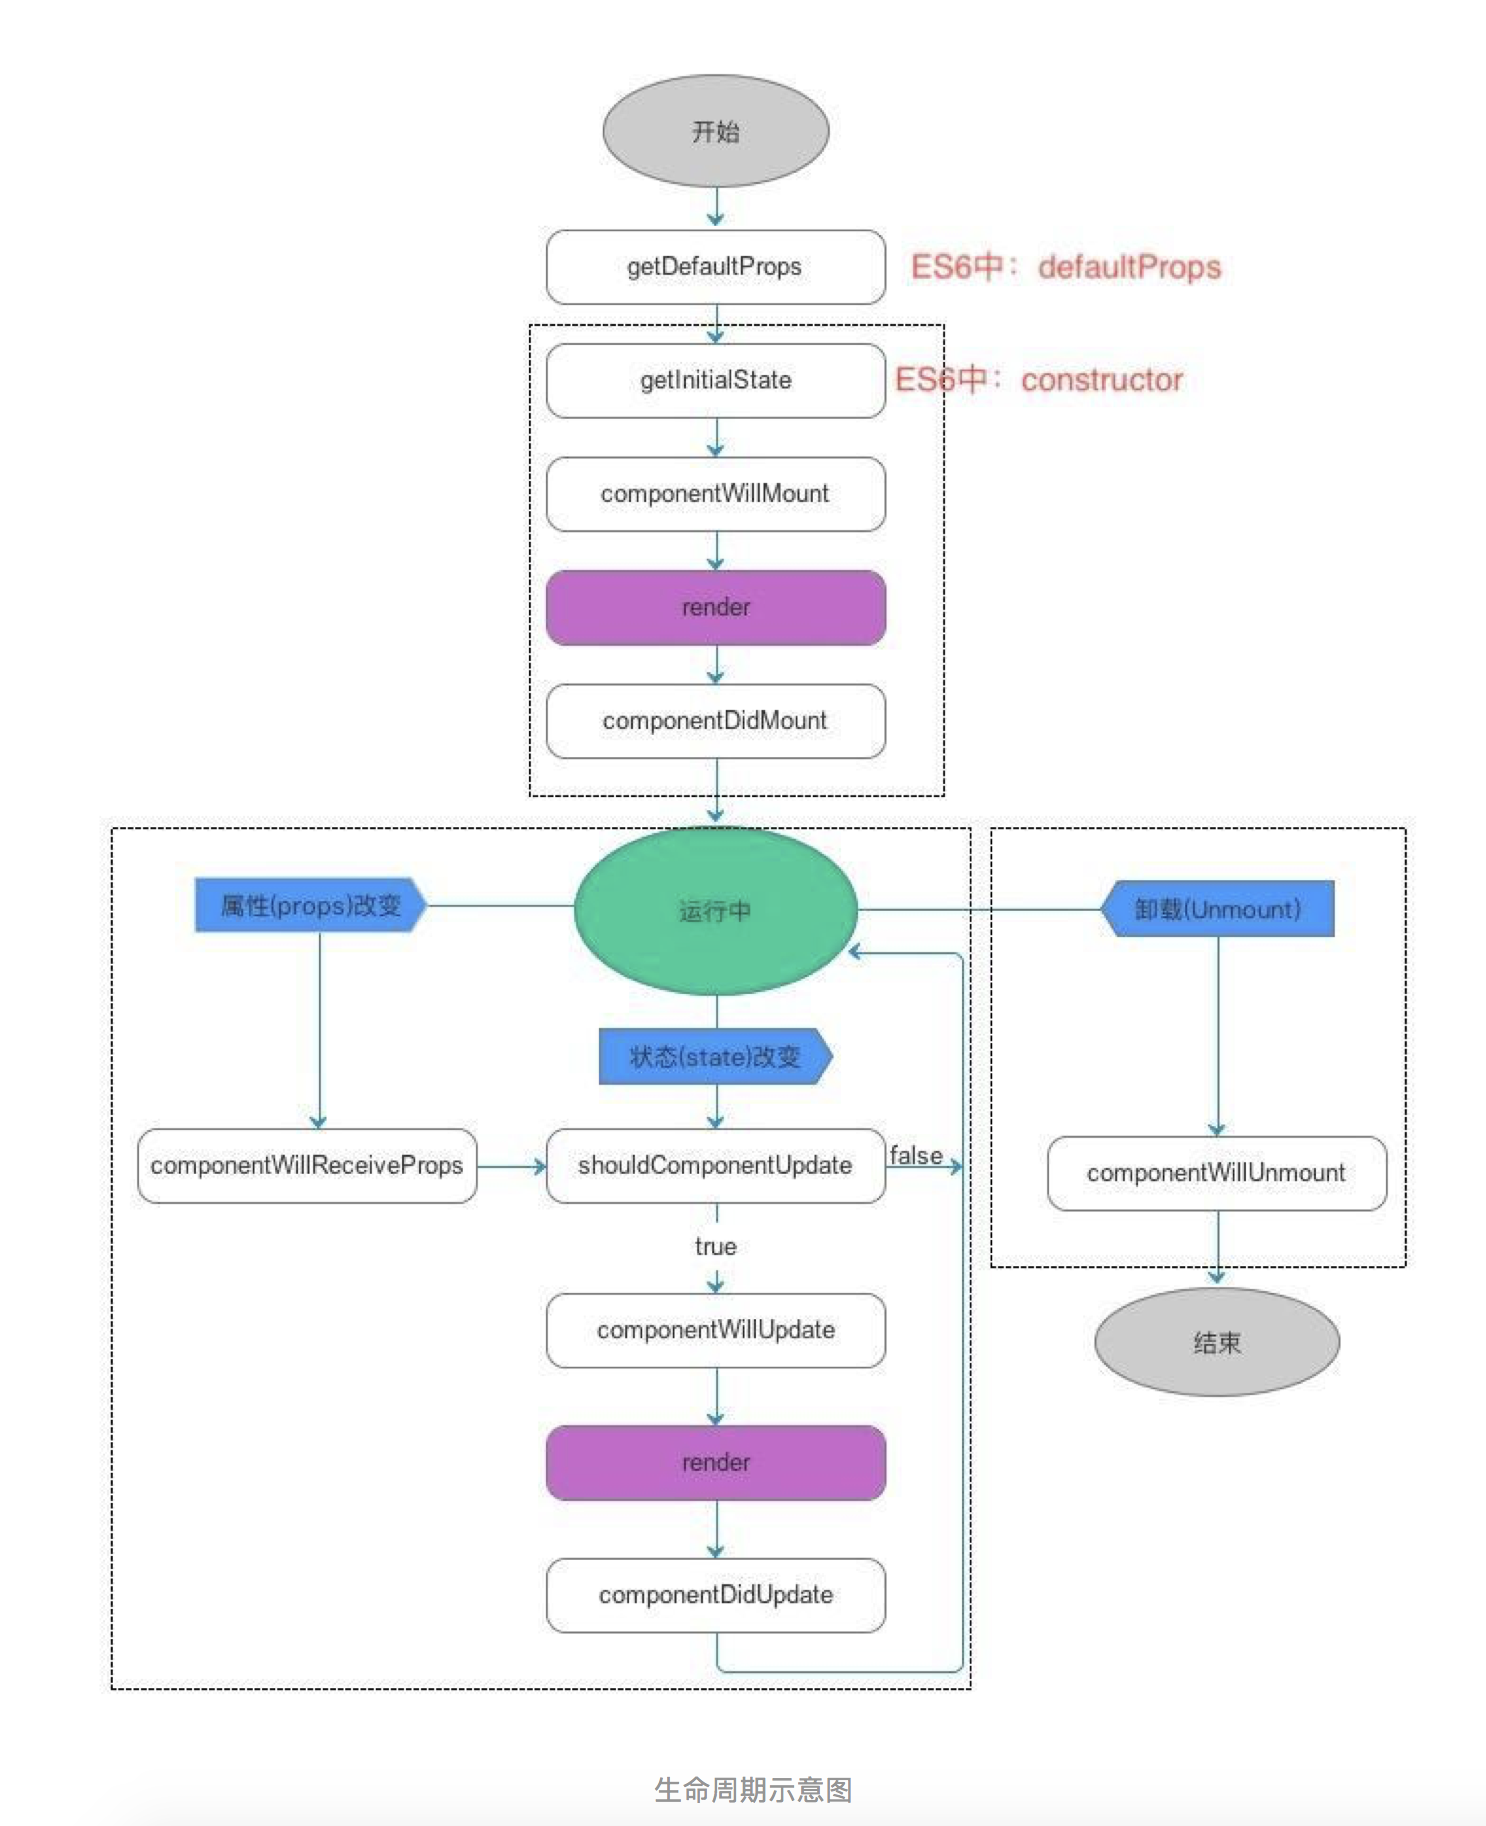

初始化
我们先来看初始化,在初始化的过程中,会按顺序调用下面5个函数。
getDefaultProps:组件实例创建前调用,多个实例间共享引用。注意:如果父组件传递过来的Props和你在该函数中定义的Props的key一样,将会被覆盖。
在组件中,我们可以利用this.props获取在这里初始化它的属性,由于组件初始化后,再次使用该组件不会调用getDefaultProps函数,所以组件自己不可以修改props,只可由其他组件调用它时再外部进行修改。

getInitalState:组件示例创建的时候调用的第一个函数。主要用于初始化state。注意:为了在使用中不出现空值,建议初始化state的时候尽可能给每一个可能用到的值都赋一个初始值。
render:组件渲染函数,会返回一个Virtual DOM,只允许返回一个最外层容器组件。render函数尽量保持纯净,只渲染组件,不修改状态,不执行副操作(比如计时器)。

componentDidMount:在render渲染之后,React会根据Virtual DOM来生成真实DOM,生成完毕后会调用该函数。
在浏览器端(React),我们可以通过this.getDOMNode()来拿到相应的DOM节点。然而我们在RN中并用不到,在RN中主要在该函数中执行网络请求,定时器开启等相关操作
在调用了render方法,组件加载成功并被成功渲染出来之后,所要执行的后续操作,一般都会在这个函数中进行,比如经常要面对的网络请求等加载数据操作
运行中
初始化完成之后,组件将会进入到运行中状态,运行中状态我们将会遇到如下几个函数:
componentWillReceiveProps(nextProps):props改变(父容器来更改或是redux),将会调用该函数。新的props将会作为参数传递进来,老的props可以根据this.props来获取。我们可以在该函数中对state作一些处理。注意:在该函数中更新state不会引起二次渲染。

boolean shouldComponentUpdate(object nextProps, object nextState):该函数传递过来两个参数,新的state和新的props。state和props的改变都会调到该函数。该函数主要对传递过来的nextProps和nextState作判断。如果返回true则重新渲染,如果返回false则不重新渲染。在某些特定条件下,我们可以根据传递过来的props和state来选择更新或者不更新,从而提高效率。

componentWillUpdate(object nextProps, object nextState):与componentWillMount方法类似,组件上会接收到新的props或者state渲染之前,调用该方法。但是不可以在该方法中更新state和props。

render:跟初始化的时候功能一样。

componentDidUpdate(object prevProps,object prevState):和初始化时期的componentDidMount类似,在render之后,真实DOM生成之后调用该函数。传递过来的是当前的props和state。在该函数中同样可以使用this.getDOMNode()来拿到相应的DOM节点。如果你需要在运行中执行某些副操作,请在该函数中完成。
销毁
销毁阶段只有一个函数,很简单
componentWillUnmount:组件DOM中移除的时候调用。在这里进行一些相关的销毁操作,比如定时器,监听等等。
案例代码
import React, {Component} from 'react';

import {

  View,

  Text,

  StyleSheet,

  TouchableOpacity

} from 'react-native';

import {Actions} from 'react-native-router-flux';

import Student from './Student';

export default class Home extends Component {

  constructor(props) {

    super(props);

    this.state = {

      clickText: "开始点击按钮",

      count: 1,

      detailContent: true

    }

  }

  componentWillMount() {

    console.log("componentWillMount1111");

  }

  shouldComponentUpdate(nextProps, nextState){

    console.log(this.state.detailContent,'detailContent');

    if (this.state.count !== nextState.count) {

      console.log("shouldComponentUpdate1111---组件需要更新");

      return true;

    }

    return false;

  }

  componentWillUpdate(){

    console.log("componentWillUpdate1111---组件将要更新");

  }

  componentDidUpdate(){

    console.log("componentDidUpdate1111---组件更新完毕");

  }

  componentDidMount() {

    console.log("componentDidMount1111");

  }

  componentWillUnmount() {

    console.log("componentWillUnmount1111");

  }

  clickButton(){

    const { count } = this.state;

    this.setState({

      clickText: "我点击了按钮",

      count: count + 1,

      detailContent: false

    })

  }

  render() {

    console.log("render1111");

    return (

      <View style={styles.container}>

        <Text>欢迎来到首页</Text>

        <TouchableOpacity

          onPress={() => Actions.notice()}

        >

          <Text>跳转到公告页</Text>

        </TouchableOpacity>

        <Text style={{color: 'blue', fontSize: 40}}>{this.state.count}</Text>

        <TouchableOpacity

          style={styles.button}

          onPress={() => this.clickButton()}

        >

          <Text>{this.state.clickText}</Text>

        </TouchableOpacity>

        <Student detailContent={this.state.detailContent}/>

      </View>

    )

  }

}

const styles = StyleSheet.create({

  container: {

    flex: 1,

    alignItems: "center",

    justifyContent: "center"

  },

  button: {

    width: 250,

    height: 60,

    backgroundColor: 'red',

    borderRadius: 10,

    alignItems: 'center',

    justifyContent: 'center'

  }

});
import React, {Component} from 'react';

import {

  View,

  Text,

  StyleSheet

} from 'react-native';

export default class Student extends Component {

  constructor(props) {

    super(props);

    this.state = {}

  }

  componentWillMount() {

  }

  componentWillReceiveProps(nextProps){

    console.log(this.props.detailContent,'this--->>componentWillReceiveProps');

    console.log(nextProps.detailContent,'next--->>componentWillReceiveProps')

  }

  componentDidMount() {

  }

  componentWillUnmount() {

  }

  render() {

    return (

      <View style={styles.container}>

        <Text>欢迎HomeDetails</Text>

      </View>

    )

  }

}

const styles = StyleSheet.create({

  container: {

    flex: 1,

    alignItems: "center",

    justifyContent: "center"

  }

});
React Native的生命周期解析的更多相关文章
- React Native 之生命周期
前言 学习本系列内容需要具备一定 HTML 开发基础,没有基础的朋友可以先转至 HTML快速入门(一) 学习 本人接触 React Native 时间并不是特别长,所以对其中的内容和性质了解可能会有所 ...
- React Native之生命周期
React Native生命周期主要分为三大阶段:实例化阶段(图中上框部分),存在阶段(图中左框部分),销毁阶段(图中右框部分). 如图: 下面简单讲解一下三大阶段中各自的函数: 实例化阶段: 在日常 ...
- React Native的生命周期
就像 iOS开发中 一样,React Native(RN) 中的组件也有生命周期(Lifecycle).所谓生命周期,就是一个对象从开始生成到最后消亡所经历的状态,理解生命周期,是合理开发的关键.RN ...
- react native 初识生命周期
关于生命周期这块,我是看到慕课堂的一个视频,觉得将的很好,引入很容易理解,地址是:https://www.imooc.com/video/14288 如果你们想了解一下,也可以去看看 RN 组件的生 ...
- react学习小结(生命周期- 实例化时期 - 存在期- 销毁时期)
react学习小结 本文是我学习react的阶段性小结,如果看官你是react资深玩家,那么还请就此打住移步他处,如果你想给一些建议和指导,那么还请轻拍~ 目前团队内对react的使用非常普遍,之 ...
- React组件和生命周期简介
React 简介----React 是 Facebook 出品的一套颠覆式的前端开发类库.为什么说它是颠覆式的呢? 内存维护虚拟 DOM 对于传统的 DOM 维护,我们的步骤可能是:1.初始化 ...
- 2. React组件的生命周期
2. React组件的生命周期 使用React开发时候用到最多的就是React的组件了,通过继承React.Component,加入constructor构造函数,实现Render方法即可.这当中Re ...
- Vue与React的异同 -生命周期
vue的生命周期 创建前 beforeCreate 创建 create 挂载前 beforeMount 挂载 mounted 更新前 beforeUpdate 更新 updated 销毁前 bef ...
- React 组件的生命周期方法
React 组件的生命周期方法 按渲染顺序: 1: componentWillMount() – 在渲染之前执行,在客户端和服务器端都会执行. 2: componentDidMount() – 仅在第 ...
随机推荐
- python 爬虫实战1 爬取糗事百科段子
首先,糗事百科大家都听说过吧?糗友们发的搞笑的段子一抓一大把,这次我们尝试一下用爬虫把他们抓取下来. 本篇目标 抓取糗事百科热门段子 过滤带有图片的段子 实现每按一次回车显示一个段子的发布时间,发布人 ...
- boot2docker里报"no space left on device" error的解决方法
docker中pull远程image时:报 no space left on device virtualbox中调大虚拟内存即可.. 之前调的硬盘大小...
- Python Socket套接字
socket通常也称作"套接字",用于描述IP地址和端口,是一个通信链的句柄,应用程序通常通过"套接字"向网络发出请求或者应答网络请求. socket起源于Un ...
- Reverse and Compare(DP)
Reverse and Compare Time limit : 2sec / Memory limit : 256MB Score : 500 points Problem Statement Yo ...
- Git is fundamentally a content-addressable filesystem with a VCS user interface written on top of it
w “加一层去解决问题”:计算机解决问题的思路.怎样将其应用到代码中呢?比如亚马逊接口的开发. git加一UI层去实现易用性和降低用户的迁移成本. https://git-scm.com/book/e ...
- php自定义函数: 改进升级版curl
<?php function dcurl($url, $method = 'GET', $postFields = null, $header = null) { $ch = curl_init ...
- What are DESC and ASC Keywords?
What are DESC and ASC Keywords? ASC is the short form for ascending DESC is the short form for desce ...
- 1、hive安装详细步骤
一.环境准备 hadoop-2.7.2 java 1.7.0 apache-hive-1.2.1 mysql Hive配置文件介绍 •hive-site.xml hive的配置文件 •hiv ...
- hive 安装警告 WARN conf.HiveConf: HiveConf of name hive.metastore.local does not exist
解决方法: 在0.10 0.11或者之后的HIVE版本 hive.metastore.local 属性不再使用. 在配置文件里面: <property> <name>hi ...
- Windows Server 2003 R2 With Sp2 序列号
下载地址 ed2k://|file|cn_win_srv_2003_r2_enterprise_x64_with_sp2_vl_cd1_X13-47314.iso|647686144|107F10D2 ...