【转载】用Scikit-Learn构建K-近邻算法,分类MNIST数据集
原帖地址:https://www.jiqizhixin.com/articles/2018-04-03-5
K 近邻算法,简称 K-NN。在如今深度学习盛行的时代,这个经典的机器学习算法经常被轻视。本篇教程将带你使用 Scikit-Learn 构建 K 近邻算法,并应用于 MNIST 数据集。然后,作者将带你构建自己的 K-NN 算法,开发出比 Scikit-Learn K-NN 更准更快的算法。
1. K 近邻分类模型
K 近邻算法是一种容易实现的监督机器学习算法,并且其分类性能的鲁棒性还不错。K-NN 最大的优点之一就是它是一个惰性算法,即该模型无须训练就可以对数据进行分类,而不像其他需要训练的 ML 算法,如 SVM、回归和多层感知机。
2. K-NN 如何工作
为了对给定的数据点 p 进行分类,K-NN 模型首先使用某个距离度量将 p 与其数据库中其它点进行比较。
距离度量就是类似欧几里得距离之类的标准,以两个点为输入并返回这两个点之间距离的简单函数。
因此,可以假设距离较小的两个点比距离较大的两个点相似度更高。这是 K-NN 的核心思想。
该过程将返回一个无序数组,其中数组中的每一项都表示 p 与模型数据库中 n 个数据点之间的距离。所以返回数组的大小为 n。
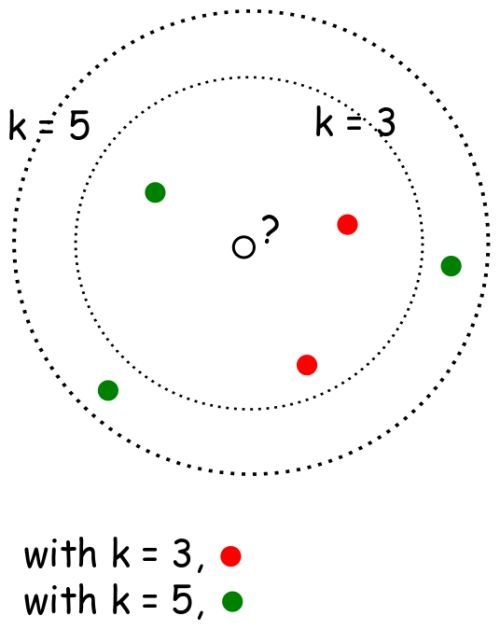
K 近邻的 K 的含义是:k 是一个任意值(通常在 3-11 之间),表示模型在对 p 分类时应该考虑多少个最相似的点。然后模型将记录这 k 个最相似的值,并使用投票算法来决定 p 属于哪一类,如下图所示。
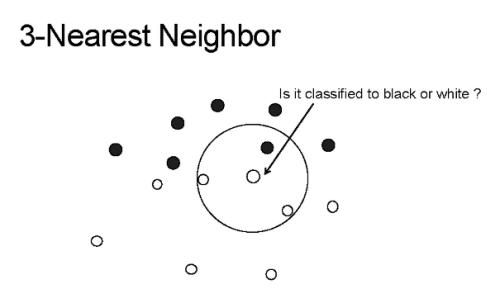
上图中的 K-NN 模型的 k 值为 3,箭头指向的中心点为 p,算法将对这个点进行分类。
如你所见,圆圈中的三个点是与 p 最接近或最相似的三个点。因此,使用简单的投票算法,p 将被归为「白色」,因为白色在 k 个最相似值中占大多数。
酷炫!但令人惊讶的是,这个简单的算法可以在某些情况下实现不俗的结果,并且可以应用于各种各样的问题,我们将在下面介绍。
3. 在 Scikit-Learn 中实现 K-NN 算法用来分类 MNIST 图像
数据:
对于这个例子,我们将使用常见的 MNIST 数据集。MNIST 数据集是机器学习中最常用的数据集之一,因为它很容易实现,而且是验证我们模型的可靠方法。
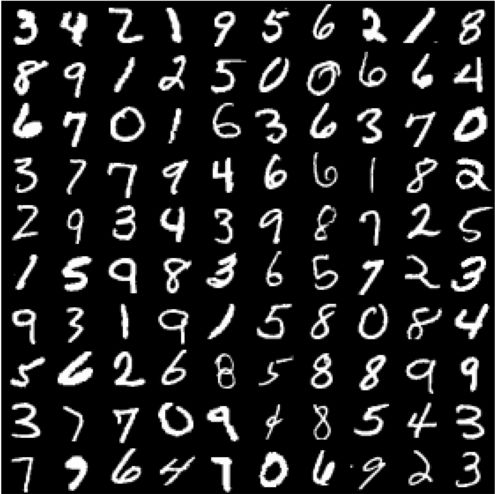
MNIST 是一组包含 70,000 个手写数字 0-9 的数据集。任意两个手写数字都不相同,有些可能很难正确分类。
算法:
我们从 Scikit-Learn 的 Python 库的 KNeighborsClassifier() 函数入手。这个函数有很多参数,但在这个例子中我们只需用少量几个参数。具体来说,我们只会传递 n_neighbors 参数的值(就是 k 值啦)。
weights 参数给出了模型使用的投票算法的类型,其中默认值是 uniform。这意味着在对 p 进行分类时,k 个点中的每一个的权重都一样。algorithm 参数也将使用默认值 auto,因为我们希望 Scikit-Learn 自动找到对 MNIST 数据进行分类的最佳算法。
以下是一个用 Scikit-Learn 构建 K-NN 分类器的 Jupyter Notebook:
Scikit-Learn 实现的用于 MNIST 的 K 近邻算法
Notebook 地址:https://gist.github.com/samgrassi01/82d0e5f89daac3e65531a6ef497cc129#file-skl-knn-ipynb
我们通过导入所需的库直接开始。
In [1]:

import numpy as np

from sklearn import datasets, model_selection

from sklearn.neighbors import KNeighborsClassifier

from sklearn.metrics import classification_report

mnist = datasets.fetch_mldata('MNIST original')

data, target = mnist.data, mnist.target

# make sure everything was correctly imported

data.shape, target.shape

Out[1]:

((70000, 784), (70000,))
构建数据集
我们通过制作不同的数据集来构建 K-NN 模型。我们将创建一个可以获取特定大小数据集、返回数据集大小的函数。
In [2]:

# make an array of indices the size of MNIST to use for making the data sets.

# This array is in random order, so we can use it to scramble up the MNIST data

indx = np.random.choice(len(target), 70000, replace=False)

# method for building datasets to test with

def mk_dataset(size):

    """makes a dataset of size "size", and returns that datasets images and targets

    This is used to make the dataset that will be stored by a model and used in

    experimenting with different stored dataset sizes

    """

    train_img = [data[i] for i in indx[:size]]

    train_img = np.array(train_img)

    train_target = [target[i] for i in indx[:size]]

    train_target = np.array(train_target)
不错。现在我们将使用这个函数来构建两个不同大小的数据集,来看看模型在不同数据量上的分类性能怎么样。
提示:制作较小的数据集时,你仍然可以进行分类,但模型毕竟少了一些数据,这可能会导致分类错误。
In [3]:

# lets make a dataset of size 50,000, meaning the model will have 50,000 data points to compare each

# new point it is to classify to

fifty_x, fifty_y = mk_dataset(50000)

fifty_x.shape, fifty_y.shape

Out[3]:

((50000, 784), (50000,))

In [4]:

# lets make one more of size 20,000 and see how classification accuracy decreases when we use that one

twenty_x, twenty_y = mk_dataset(20000)

twenty_x.shape, twenty_y.shape

Out[4]:

((20000, 784), (20000,))
注意这些数据是如何为模型匹配标签的。模型需要这些标签来理解每一个点代表什么,因此可以把我们要分类的点放在一个特定的类中,而不是说「这是与待分类点最相似的类」。
现在我们将构建一个大小为 10000 的测试集。
In [5]:

# build model testing dataset

test_img = [data[i] for i in indx[60000:70000]]

test_img1 = np.array(test_img)

test_target = [target[i] for i in indx[60000:70000]]

test_target1 = np.array(test_target)

test_img1.shape, test_target1.shape

Out[5]:

((10000, 784), (10000,))
不错!现在我们已经完成了所有的数据处理,可以开始搭建 K-NN 模型了!
构建模型
我们首先将 Scikit-Learn K-NN 模型放在函数中,以便可以轻松调用它并对其进行调整。
In [6]:

def skl_knn(k, test_data, test_target, stored_data, stored_target):

    """k: number of neighbors to use in classication

    test_data: the data/targets used to test the classifier

    stored_data: the data/targets used to classify the test_data

    """

    classifier = KNeighborsClassifier(n_neighbors=k)

    classifier.fit(stored_data, stored_target)

    y_pred = classifier.predict(test_data)

    print(classification_report(test_target, y_pred))
测试
现在我们看看这个模型在两个不同的测试集上的运行效果。
In [7]:
%%time
# stored data set size of 50,000
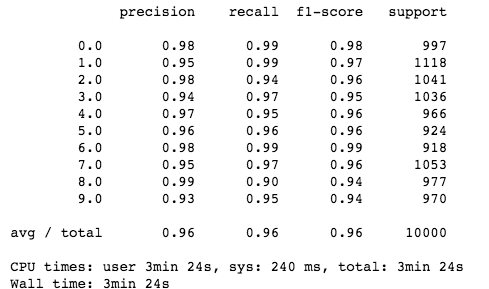
skl_knn(5, test_img1, test_target1, fifty_x, fifty_y)
In [8]:

%%time

# stored data set size of 20,000

skl_knn(5, test_img1, test_target1, twenty_x, twenty_y)
可以的!我们的模型与人眼识别差不多!如你所见,当模型有更多的数据可以使用时(50,000 而不是 20,000 个点),它的性能会更好。更加引人注目的是,它非常简单,并且能以人类水平来获取不同图像之间的复杂关系。更多的细节分析请访问这个 GitHub repo:https://github.com/samgrassi01/Cosine-Similarity-Classifier。
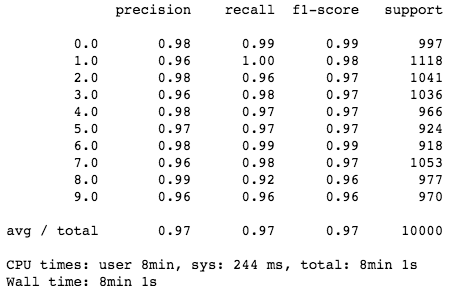


厉害了!我们使用 Scikit-Learn 构建了一个非常简单的 K 近邻模型,该模型在 MNIST 数据集上表现非凡。
不足之处?分类这些点需要很长时间(两个数据集分别耗时 8 分钟和 4 分钟),讽刺的是,K-NN 仍然是最快的分类方法之一。我们必须有一个更快的方法。
构建一个更快的模型
大多数 K-NN 模型使用欧几里德距离或曼哈顿距离作为 go-to 距离度量。这些指标非常简单,而且在各种各样的情况中都表现不错。
还有一个很少用到的距离标准度量是余弦相似度。余弦相似度通常不是 go-to 距离度量标准,这是因为它违反了三角不等式,而且对负数无效。但是,余弦相似度对于 MNIST 来说很完美。它速度快、算法简单,而且比 MNIST 中应用其他距离度量的准确率稍高一些。
但是,为了得到最佳性能,我们需要自己编写 K-NN 模型。然后,我们应该能得到比 Scikit-Learn 模型更高的性能,甚至能得到更高的准确度。让我们看看以下建立的 K-NN 模型的 Notebook 吧:
构建一个更快的 KNN 分类器
Notebook 地址:https://gist.github.com/samgrassi01/15a1fe53dcde8813eed9367b103676b2#file-cos-knn-ipynb
在这个 notebook 中,我们将构建一个简单的 K-NN 模型,该模型使用余弦相似度作为距离度量对 MNIST 图像进行分类,试图找到更快或更加准确的模型。
首先,需要导入所需的库,然后构建与 Scikit-Learn K-NN notebook 相同的数据集。
In [1]:

import numpy as np

import heapq

from collections import Counter

from sklearn.metrics.pairwise import cosine_similarity

from sklearn import datasets, model_selection

from sklearn.metrics import classification_report

mnist = datasets.fetch_mldata('MNIST original')

data, target = mnist.data, mnist.target

# make sure everything was correctly imported

data.shape, target.shape

Out[1]:

((70000, 784), (70000,))
使用与 Scikit-Learn K-NN notebook 相同的方法,设置完全相同的数据集。
In [2]:

# make an array of indices the size of MNIST to use for making the data sets.

# This array is in random order, so we can use it to scramble up the MNIST data

indx = np.random.choice(len(target), 70000, replace=False)

# method for building datasets to test with

def mk_dataset(size):

    """makes a dataset of size "size", and returns that datasets images and targets

    This is used to make the dataset that will be stored by a model and used in

    experimenting with different stored dataset sizes

    """

    train_img = [data[i] for i in indx[:size]]

    train_img = np.array(train_img)

    train_target = [target[i] for i in indx[:size]]

    train_target = np.array(train_target)

    return train_img, train_target

In [3]:

# lets make a dataset of size 50,000, meaning the model will have 50,000 data points to compare each

# new point it is to classify to

fifty_x, fifty_y = mk_dataset(50000)

fifty_x.shape, fifty_y.shape

Out[3]:

((50000, 784), (50000,))

In [4]:

# lets make one more of size 20,000 and see how classification accuracy decreases when we use that one

twenty_x, twenty_y = mk_dataset(20000)

twenty_x.shape, twenty_y.shape

Out[4]:

((20000, 784), (20000,))

In [5]:

# build model testing dataset

test_img = [data[i] for i in indx[60000:70000]]

test_img1 = np.array(test_img)

test_target = [target[i] for i in indx[60000:70000]]

test_target1 = np.array(test_target)

test_img1.shape, test_target1.shape

Out[5]:

((10000, 784), (10000,))
构建模型
下面,我们创建函数 cos_knn(),作为用于 MNIST 数据集的分类器。你可以利用函数的注释了解其工作原理。
In [6]:

def cos_knn(k, test_data, test_target, stored_data, stored_target):

    """k: number of neighbors to use for voting

    test_data: a set of unobserved images to classify

    test_target: the labels for the test_data (for calculating accuracy)

    stored_data: the images already observed and available to the model

    stored_target: labels for stored_data

    """

    # find cosine similarity for every point in test_data between every other point in stored_data

    cosim = cosine_similarity(test_data, stored_data)

    # get top k indices of images in stored_data that are most similar to any given test_data point

    top = [(heapq.nlargest((k), range(len(i)), i.take)) for i in cosim]

    # convert indices to numbers using stored target values

    top = [[stored_target[j] for j in i[:k]] for i in top]

    # vote, and return prediction for every image in test_data

    pred = [max(set(i), key=i.count) for i in top]

    pred = np.array(pred)

    # print table giving classifier accuracy using test_target

    print(classification_report(test_target, pred))
测试模型
现在,就像 Scikit-Learn K-NN 模型一样,我们对 cos_knn() 模型在两个数据集上分别测试,并看看它的性能如何。
In [7]:

%%time

# stored data set size of 50,000

cos_knn(5, test_img1, test_target1, fifty_x, fifty_y)
In [8]:
%%time
# stored data set size of 20,000
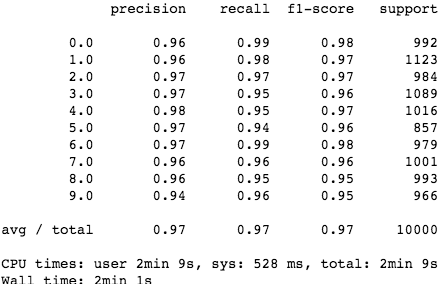
cos_knn(5, test_img1, test_target1, twenty_x, twenty_y)
太棒了!余弦相似度模型性能超过了 Scikit-Learn K-NN!值得一提的是,该模型的分类速度和准确率都优于 Scikit-Learn K-NN(其中速度获得了很大提升),而模型却非常简单!
为了进一步分析模型的工作原理,同时了解该模型为何在许多不同情况下比 Scikit-Learn K-NN 模型要性能更优,请参阅这个 GitHub repo:https://github.com/samgrassi01/Cosine-Similarity-Classifier。
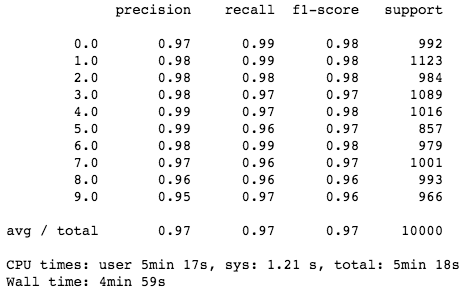


正如 notebook 所示,该 K-NN 模型在分类速度和准确率方面都胜过了 Scikit-Learn K-NN,其中速度获得了大幅提升,而在一个数据集上的准确率提高了 1%。既然如此,我们可以在实践中继续使用这个模型了。
结论
首先,我们知道了 K-NN 的工作机制,以及如何轻松地实现它。但最重要的是,我们发现,始终考虑需要解决的问题以及解决问题的工具非常重要。有时候,在解决问题的过程中,最好花一些时间来实践——当然,也需要建立自己的模型。正如 notebook 中所展示的那样,它可以带来极大的益处:我们第二个专有模型获得了 1.5 - 2 倍的加速,节省了很多时间。
【转载】用Scikit-Learn构建K-近邻算法,分类MNIST数据集的更多相关文章
- 基于sk_learn的k近邻算法实现-mnist手写数字识别且要求97%以上精确率
1. 导入需要的库 from sklearn.datasets import fetch_openml import numpy as np from sklearn.neighbors import ...
- 用Python从零开始实现K近邻算法
KNN算法的定义: KNN通过测量不同样本的特征值之间的距离进行分类.它的思路是:如果一个样本在特征空间中的k个最相似(即特征空间中最邻近)的样本中的大多数属于某一个类别,则该样本也属于这个类别.K通 ...
- 从K近邻算法、距离度量谈到KD树、SIFT+BBF算法
转载自:http://blog.csdn.net/v_july_v/article/details/8203674/ 从K近邻算法.距离度量谈到KD树.SIFT+BBF算法 前言 前两日,在微博上说: ...
- 从K近邻算法谈到KD树、SIFT+BBF算法
转自 http://blog.csdn.net/v_july_v/article/details/8203674 ,感谢july的辛勤劳动 前言 前两日,在微博上说:“到今天为止,我至少亏欠了3篇文章 ...
- 机器学习03:K近邻算法
本文来自同步博客. P.S. 不知道怎么显示数学公式以及排版文章.所以如果觉得文章下面格式乱的话请自行跳转到上述链接.后续我将不再对数学公式进行截图,毕竟行内公式截图的话排版会很乱.看原博客地址会有更 ...
- [机器学习] k近邻算法
算是机器学习中最简单的算法了,顾名思义是看k个近邻的类别,测试点的类别判断为k近邻里某一类点最多的,少数服从多数,要点摘录: 1. 关键参数:k值 && 距离计算方式 &&am ...
- <转>从K近邻算法、距离度量谈到KD树、SIFT+BBF算法
转自 http://blog.csdn.net/likika2012/article/details/39619687 前两日,在微博上说:“到今天为止,我至少亏欠了3篇文章待写:1.KD树:2.神经 ...
- 机器学习实战 - python3 学习笔记(一) - k近邻算法
一. 使用k近邻算法改进约会网站的配对效果 k-近邻算法的一般流程: 收集数据:可以使用爬虫进行数据的收集,也可以使用第三方提供的免费或收费的数据.一般来讲,数据放在txt文本文件中,按照一定的格式进 ...
- 1. K近邻算法(KNN)
1. K近邻算法(KNN) 2. KNN和KdTree算法实现 1. 前言 K近邻法(k-nearest neighbors,KNN)是一种很基本的机器学习方法了,在我们平常的生活中也会不自主的应用, ...
随机推荐
- HBuilder 连接 夜神安卓模拟器
由于HBuilder的自动扫描机制无法直接连上夜神模拟器,需要通过cmd命令窗口手动处理,才能将两者建立连接. 首先,启动HBuilder和夜神模拟器 然后,打开cmd命令提示符 cd进入夜神模拟器b ...
- Laravel5.1 模型--查询作用域
所谓的查询作用域就是允许你自定义一个查询语句 把它封装成一个方法. 1 定义一个查询作用域 定义查询作用域就是在模型中声明一个scope开头的方法: public function scopeHotA ...
- laravel Lumen邮箱发送配置
Lumen 中配置邮件 https://blog.csdn.net/glovenone/article/details/54344013 Lareval 比 Lumen 多了一个步骤 https:// ...
- 当公有云Azure拥抱Docker容器技术
本文转载至 http://3387405.blog.51cto.com/3377405/1598977 预见未来看似是一件不太可能的事情,然而现在企业科技高速发展的态势完全超乎想象. 就在几周前Inf ...
- c++包含头文件好还是重新定义好
A.h struct A { int a; int b; }; B.cpp 在B.cpp里面用到这个结构体 有两种方法 .自己定义一个一模一样的结构体 struct A { }; .包含A.h头文件 ...
- hdu5646(数学)
小学数学,脑补 一开始看到这题,猜了个规律想写但是我是拒绝的. 因为我无法证明. 好吧,主要还是小学数学没学好吧. 要理解这题,首先得搞懂一个重要问题.假设C=A+B,怎样选择两个正整数使得A*B最大 ...
- 防sql注入之参数绑定 SQL Injection Attacks and Defense
http://php.net/manual/zh/pdo.prepared-statements.php 预处理语句与存储过程 很多更成熟的数据库都支持预处理语句的概念.什么是预处理语句?可以把它看作 ...
- JavaScript中对事件简单的理解
事件(event) 1.什么是JavaScript事件? 事件是文档或浏览器中发生的特定交互瞬间. 2.事件流 事件流描述的是从页面中接受事件的顺序,包含IE提出的事件冒泡流与Netscape提出的事 ...
- 【python】-- Ajax
Ajax AJAX,Asynchronous JavaScript and XML (异步的JavaScript和XML),一种创建交互式网页应用的网页开发技术方案. 异步的JavaScript:使用 ...
- Quartz实现定时功能
---------------------------------博主讲废话 在自己实现爬取某个网站的信息后,发现,如果要自己每次把程序跑一遍不太现实(麻烦),所以有没有什么可以实现 定时的功能,只要 ...