Zipkin客户端链路追踪源码解析
我们知道,Zipkin这个工具可以帮助我们收集分布式系统中各个系统之间的调用连关系,而且除了Servlet之外还能收集:MQ、线程池、WebSocket、Feign、Hystrix、RxJava、WebFlux等等组件之间的调用关系。本篇文章就来分析一下Zipkin是如何完成这些功能的
我们先以最常用的Servlet接受请求为例来分析
在spring-cloud-sleuth的spring.factories文件中注入的很多类中包含了一个类:TraceWebServletAutoConfiguration,一看就知道,这是为Servlet环境量身定制的一个自动装配类
在这个类中,创建了一个Filter,这个Filter就是拦截web请求,完成Servlet请求链路的收集的利器
	@Bean

	@ConditionalOnMissingBean

	public TracingFilter tracingFilter(HttpTracing tracing) {

		return (TracingFilter) TracingFilter.create(tracing);

	}
我们直接来看这个拦截器都是做了一些什么东西吧
public void doFilter(ServletRequest request, ServletResponse response, FilterChain chain) throws IOException, ServletException {

        HttpServletRequest httpRequest = (HttpServletRequest)request;

        HttpServletResponse httpResponse = this.servlet.httpResponse(response);

        TraceContext context = (TraceContext)request.getAttribute(TraceContext.class.getName());

        if (context != null) {

            Scope scope = this.currentTraceContext.maybeScope(context);

            try {

                chain.doFilter(request, response);

            } finally {

                scope.close();

            }

        } else {

            Span span = this.handler.handleReceive(this.extractor, httpRequest);

            request.setAttribute(SpanCustomizer.class.getName(), span.customizer());

            request.setAttribute(TraceContext.class.getName(), span.context());

            Throwable error = null;

            Scope scope = this.currentTraceContext.newScope(span.context());

            try {

                chain.doFilter(httpRequest, httpResponse);

            } catch (ServletException | RuntimeException | Error | IOException var19) {

                error = var19;

                throw var19;

            } finally {

                scope.close();

                if (this.servlet.isAsync(httpRequest)) {

                    this.servlet.handleAsync(this.handler, httpRequest, span);

                } else {

                    this.handler.handleSend(ADAPTER.adaptResponse(httpRequest, httpResponse), error, span);

                }

            }

        }

    }
Span的创建
第一步,尝试从request中获取TraceContext,TraceContext包含了本次请求的链路信息,假如这个请求是从上游系统过来的话,那么这里就会存在这个信息。
我们先重点看不存在上游系统时的分支,这个时候,第一步就应该去创建一个span。关于span和trace的概念上篇文章已经提到过了,这里就不再展开了。
  public <C> Span handleReceive(TraceContext.Extractor<C> extractor, C carrier, Req request) {

    Span span = nextSpan(extractor.extract(carrier), request);

    span.kind(Span.Kind.SERVER);

    return handleStart(request, span);

  }

  Span nextSpan(TraceContextOrSamplingFlags extracted, Req request) {

    if (extracted.sampled() == null) { // Otherwise, try to make a new decision

      extracted = extracted.sampled(sampler.trySample(adapter, request));

    }

    return extracted.context() != null

        ? tracer.joinSpan(extracted.context())

        : tracer.nextSpan(extracted);

  }
这个三目表达式的意思是看当前环境中是否存在span,如果存在则加入当前环境的span,否则继续进入创建span的逻辑
  public Span nextSpan(TraceContextOrSamplingFlags extracted) {

    TraceContext parent = extracted.context();

    if (extracted.samplingFlags() != null) {

      TraceContext implicitParent = currentTraceContext.get();

      if (implicitParent == null) {

        return toSpan(newContextBuilder(null, extracted.samplingFlags())

            .extra(extracted.extra()).build());

      }

      // fall through, with an implicit parent, not an extracted one

      parent = appendExtra(implicitParent, extracted.extra());

    }

    if (parent != null) {

      TraceContext.Builder builder;

      if (extracted.samplingFlags() != null) {

        builder = newContextBuilder(parent, extracted.samplingFlags());

      } else {

        builder = newContextBuilder(parent, sampler);

      }

      return toSpan(builder.build());

    }

    TraceIdContext traceIdContext = extracted.traceIdContext();

    if (extracted.traceIdContext() != null) {

      Boolean sampled = traceIdContext.sampled();

      if (sampled == null) sampled = sampler.isSampled(traceIdContext.traceId());

      return toSpan(TraceContext.newBuilder()

          .sampled(sampled)

          .debug(traceIdContext.debug())

          .traceIdHigh(traceIdContext.traceIdHigh()).traceId(traceIdContext.traceId())

          .spanId(nextId())

          .extra(extracted.extra()).build());

    }

    // TraceContextOrSamplingFlags is a union of 3 types, we've checked all three

    throw new AssertionError("should not reach here");

  }
首先会尝试获取trace,因为是第一次请求,所以这个时候trace也不存在所以会进入到toSpan方法
 public Span toSpan(TraceContext context) {

    if (context == null) throw new NullPointerException("context == null");

    TraceContext decorated = propagationFactory.decorate(context);

    if (!noop.get() && Boolean.TRUE.equals(decorated.sampled())) {

      return RealSpan.create(decorated, recorder, errorParser);

    }

    return NoopSpan.create(decorated);

  }
这里如果我们没有特殊指定的话会使用RealSpan来创建span,这个span的最终实现类是AutoValue_RealSpan
接着返回最开始的handleReceive方法
  public <C> Span handleReceive(TraceContext.Extractor<C> extractor, C carrier, Req request) {

    Span span = nextSpan(extractor.extract(carrier), request);

    span.kind(Span.Kind.SERVER);

    return handleStart(request, span);

  }
span创建完毕后就会设置kind,这个kand代表了服务类型,这里就是设置了服务类型为服务端。
接下来就是去开启记录链路信息
 Span handleStart(Req request, Span span) {

    if (span.isNoop()) return span;

    Scope ws = currentTraceContext.maybeScope(span.context());

    try {

      parser.request(adapter, request, span.customizer());

      Endpoint.Builder remoteEndpoint = Endpoint.newBuilder();

      if (parseRemoteEndpoint(request, remoteEndpoint)) {

        span.remoteEndpoint(remoteEndpoint.build());

      }

    } finally {

      ws.close();

    }

    return span.start();

  }
开启过程中记录了几个信息
  public <Req> void request(HttpAdapter<Req, ?> adapter, Req req, SpanCustomizer customizer) {

    customizer.name(spanName(adapter, req));

    String method = adapter.method(req);

    if (method != null) customizer.tag("http.method", method);

    String path = adapter.path(req);

    if (path != null) customizer.tag("http.path", path);

  }

  public Span start() {

      return start(clock.currentTimeMicroseconds());

  }

  synchronized MutableSpan start(long timestamp) {

    span.timestamp(this.timestamp = timestamp);

    return this;

  }
接着在回到文章最开始提到的Filter方法中
在span和trace创建完成后,会把它们添加到request中
Scope的创建
然后是一个scope的创建,这个scope和日志组件说息息相关的。简单来说,它会把traceId、parentId、spanId打印到当前系统打印的每一行日志中
public Scope newScope(@Nullable TraceContext currentSpan) {

		final String previousTraceId = MDC.get("traceId");

		final String previousParentId = MDC.get("parentId");

		final String previousSpanId = MDC.get("spanId");

		final String spanExportable = MDC.get("spanExportable");

		final String legacyPreviousTraceId = MDC.get(LEGACY_TRACE_ID_NAME);

		final String legacyPreviousParentId = MDC.get(LEGACY_PARENT_ID_NAME);

		final String legacyPreviousSpanId = MDC.get(LEGACY_SPAN_ID_NAME);

		final String legacySpanExportable = MDC.get(LEGACY_EXPORTABLE_NAME);

		if (currentSpan != null) {

			String traceIdString = currentSpan.traceIdString();

			MDC.put("traceId", traceIdString);

			MDC.put(LEGACY_TRACE_ID_NAME, traceIdString);

			String parentId = currentSpan.parentId() != null ?

					HexCodec.toLowerHex(currentSpan.parentId()) :

					null;

			replace("parentId", parentId);

			replace(LEGACY_PARENT_ID_NAME, parentId);

			String spanId = HexCodec.toLowerHex(currentSpan.spanId());

			MDC.put("spanId", spanId);

			MDC.put(LEGACY_SPAN_ID_NAME, spanId);

			String sampled = String.valueOf(currentSpan.sampled());

			MDC.put("spanExportable", sampled);

			MDC.put(LEGACY_EXPORTABLE_NAME, sampled);

			log("Starting scope for span: {}", currentSpan);

			if (currentSpan.parentId() != null) {

				if (log.isTraceEnabled()) {

					log.trace("With parent: {}", currentSpan.parentId());

				}

			}

		}

		else {

			MDC.remove("traceId");

			MDC.remove("parentId");

			MDC.remove("spanId");

			MDC.remove("spanExportable");

			MDC.remove(LEGACY_TRACE_ID_NAME);

			MDC.remove(LEGACY_PARENT_ID_NAME);

			MDC.remove(LEGACY_SPAN_ID_NAME);

			MDC.remove(LEGACY_EXPORTABLE_NAME);

		}

		Scope scope = this.delegate.newScope(currentSpan);

		class ThreadContextCurrentTraceContextScope implements Scope {

			@Override public void close() {

				log("Closing scope for span: {}", currentSpan);

				scope.close();

				replace("traceId", previousTraceId);

				replace("parentId", previousParentId);

				replace("spanId", previousSpanId);

				replace("spanExportable", spanExportable);

				replace(LEGACY_TRACE_ID_NAME, legacyPreviousTraceId);

				replace(LEGACY_PARENT_ID_NAME, legacyPreviousParentId);

				replace(LEGACY_SPAN_ID_NAME, legacyPreviousSpanId);

				replace(LEGACY_EXPORTABLE_NAME, legacySpanExportable);

			}

		}

		return new ThreadContextCurrentTraceContextScope();

	}
Span的上送
接下来当剩下的执行链执行完毕后,本次请求也就该结束了。在请求结束时,span就会被上送到Zipkin服务端中
  public void handleSend(@Nullable Resp response, @Nullable Throwable error, Span span) {

    handleFinish(response, error, span);

  }

    void handleFinish(@Nullable Resp response, @Nullable Throwable error, Span span) {

    if (span.isNoop()) return;

    try {

      Scope ws = currentTraceContext.maybeScope(span.context());

      try {

        parser.response(adapter, response, error, span.customizer());

      } finally {

        ws.close(); // close the scope before finishing the span

      }

    } finally {

      finishInNullScope(span);

    }

  }
首先在span中记录本次调用的相应信息
  public <Resp> void response(HttpAdapter<?, Resp> adapter, @Nullable Resp res,

      @Nullable Throwable error, SpanCustomizer customizer) {

    int statusCode = 0;

    if (res != null) {

      statusCode = adapter.statusCodeAsInt(res);

      String nameFromRoute = spanNameFromRoute(adapter, res, statusCode);

      if (nameFromRoute != null) customizer.name(nameFromRoute);

      String maybeStatus = maybeStatusAsString(statusCode, 299);

      if (maybeStatus != null) customizer.tag("http.status_code", maybeStatus);

    }

    error(statusCode, error, customizer);

  }
接着清空Scope
  void finishInNullScope(Span span) {

    Scope ws = currentTraceContext.maybeScope(null);

    try {

      span.finish();

    } finally {

      ws.close();

    }

  }
之后说span的上传
  public void finish(TraceContext context) {

    MutableSpan span = spanMap.remove(context);

    if (span == null || noop.get()) return;

    synchronized (span) {

      span.finish(span.clock.currentTimeMicroseconds());

      reporter.report(span.toSpan());

    }

  }
具体上传的实现是由Sender接口的实现类实现的,它的实现类默认情况下是这三个
屏幕快照 2019-11-18 下午10.31.01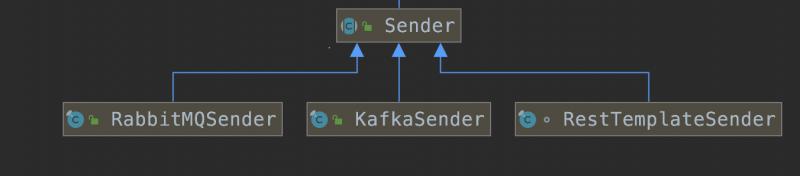
而一个span内容则是这样的
屏幕快照 2019-11-13 下午9.45.27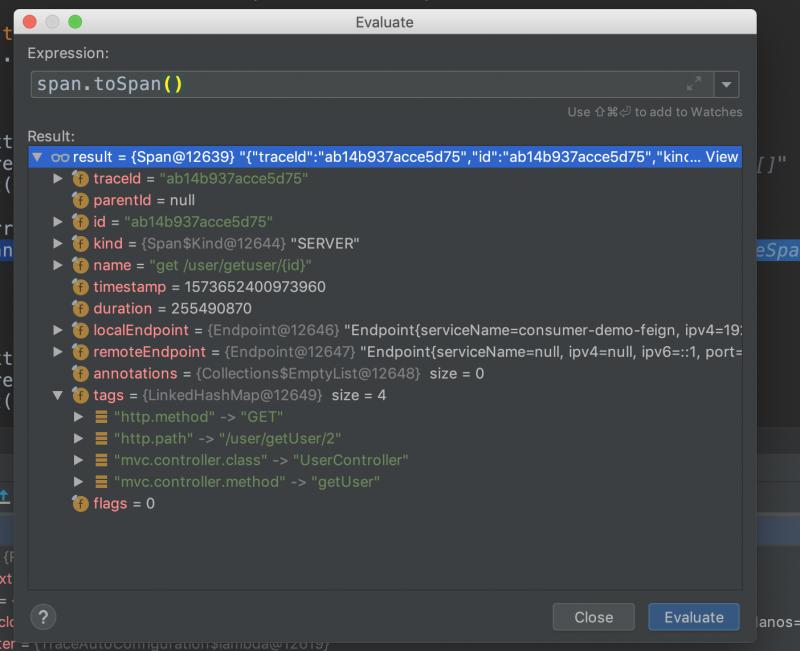
RabbitMQ链路追踪
当看完SpringMVC链路追踪的实现方式之后,再去看其他的方式,我想肯定是非常简单的。这里我们以RabbitMQ为例:
首先查找spring-cloud-sleuth的spring.factories文件,看到关于消息中间件的追踪配置类是这个TraceMessagingAutoConfiguration
看这个类关于RabbitMQ的东西
	@Configuration

	@ConditionalOnProperty(value = "spring.sleuth.messaging.rabbit.enabled", matchIfMissing = true)

	@ConditionalOnClass(RabbitTemplate.class)

	protected static class SleuthRabbitConfiguration {

		@Bean

		@ConditionalOnMissingBean

		SpringRabbitTracing springRabbitTracing(Tracing tracing,

				SleuthMessagingProperties properties) {

			return SpringRabbitTracing.newBuilder(tracing)

					.remoteServiceName(properties.getMessaging().getRabbit().getRemoteServiceName())

					.build();

		}

		@Bean

		@ConditionalOnMissingBean

		static SleuthRabbitBeanPostProcessor sleuthRabbitBeanPostProcessor(BeanFactory beanFactory) {

			return new SleuthRabbitBeanPostProcessor(beanFactory);

		}

	}
这里其实大致就可以猜测出来了,肯定是使用了SleuthRabbitBeanPostProcessor在构造RabbitTemplate的使用做了一些改造,比如说加个拦截器啥的,然后当使用RabbitTemplate发送消息时自动添加Header等东西就完成了整个流程了
Zipkin客户端链路追踪源码解析的更多相关文章
- Netty5客户端源码解析
Netty5客户端源码解析 今天来分析下netty5的客户端源码,示例代码如下: import io.netty.bootstrap.Bootstrap; import io.netty.channe ...
- FileZilla客户端源码解析
FileZilla客户端源码解析 FTP是TCP/IP协议组的协议,有指令通路和数据通路两条通道.一般来说,FTP标准命令TCP端口号是21,Port方式数据传输端口是20. FileZilla作为p ...
- Fabric1.4源码解析:客户端安装链码
看了看客户端安装链码的部分,感觉还是比较简单的,所以在这里记录一下. 还是先给出安装链码所使用的命令好了,这里就使用官方的安装链码的一个例子: #-n 指定mycc是由用户定义 ...
- Netty源码解析—客户端启动
Netty源码解析-客户端启动 Bootstrap示例 public final class EchoClient { static final boolean SSL = System.getPro ...
- Spring Cloud系列(四):Eureka源码解析之客户端
一.自动装配 1.根据自动装配原理(详见:Spring Boot系列(二):Spring Boot自动装配原理解析),找到spring-cloud-netflix-eureka-client.jar的 ...
- HDFS源码解析:教你用HDFS客户端写数据
摘要:终于开始了这个很感兴趣但是一直觉得困难重重的源码解析工作,也算是一个好的开端. 本文分享自华为云社区<hdfs源码解析之客户端写数据>,作者: dayu_dls. 在我们客户端写数据 ...
- OKHttp源码解析
http://frodoking.github.io/2015/03/12/android-okhttp/ Android为我们提供了两种HTTP交互的方式:HttpURLConnection 和 A ...
- spring cloud 系列第7篇 —— sleuth+zipkin 服务链路追踪 (F版本)
源码Gitub地址:https://github.com/heibaiying/spring-samples-for-all 一.简介 在微服务架构中,几乎每一个前端的请求都会经过多个服务单元协调来提 ...
- 源码解析.Net中Host主机的构建过程
前言 本篇文章着重讲一下在.Net中Host主机的构建过程,依旧延续之前文章的思路,着重讲解其源码,如果有不知道有哪些用法的同学可以点击这里,废话不多说,咱们直接进入正题 Host构建过程 下图是我自 ...
随机推荐
- Java学习笔记之面向对象、static关键字
一周Java学习总结 今天就总结理清一下关于面向对象和面向过程的程序设计的一些不同特点,以及讲下static关键字. 面向对象 现在接触的Java是面向对象的,现在的程序开发几乎都是以面向对象为基础的 ...
- ubuntu18.04 安装 QQ
参照大佬文章https://www.lulinux.com/archives/1319 我将安装过程需要的命令行总结出来,便于直接快速安装. # 安装 wine git clone https://g ...
- .net Core 使用AutoMapper
在我们的项目中慢慢的要把数据库的实体模型和视图模型进行分离,防止被人拿到我们表字段.在学校的时候自己只是有将很多数据库模型,写成一个视图模型返回到前台. 首先我们把这两个包引入项目中去. 然后我们创建 ...
- Z从壹开始前后端分离【 .NET Core2.0/3.0 +Vue2.0 】框架之二 || 后端项目搭建
本文梯子 前言 1..net core 框架性能测试 2..net core 执行过程 3.中间件执行过程 4.AOP切面 5.整体框架结构与数据库表UML 一.创建第一个Core 1.SDK 安装 ...
- (转)vscode实现markdown流程图
原文:https://blog.csdn.net/LaySwift/article/details/79458947 1,vscode原生支持markdown,导出需要插件,基于node.js,需要n ...
- 高强度学习训练第十四天总结:HashMap
HashMap 简介 HashMap 主要用来存放键值对,它基于哈希表的Map接口实现,是常用的Java集合之一. JDK1.8 之前 HashMap 由 数组+链表 组成的,数组是 HashMap ...
- 2. 移动安全渗透测试-(Android安全基础)
2.1 Android系统架构 1.应用程序层 平时所见的一些java为主编写的App 2.应用程序框架层 应用框架层为应用开发者提供了用以访问核心功能的API框架 android.app:提供高层的 ...
- Dynamics CRM邮件附件,你真的了解吗?
关注本人微信和易信公众号: 微软动态CRM专家罗勇 ,回复160或者20151014可方便获取本文,同时可以在第一时间得到我发布的最新的博文信息,follow me! 听人问起怎么读取到一封邮件所有的 ...
- 关于Java的多线程Runnable的个人理解(基础,不讲概念)
背景说明: 在学了Java的多线程(继承Thread,Runnable)以后,我出于好奇,就想知道java到底是不是多线程的,不能它说自己是多线程就是多线程,自己想验证一下,于是我就想测试一下,但继承 ...
- IaaS、PaaS、SaaS介绍(非原创)
文章大纲 一.IaaS.PaaS.SaaS介绍与比较二.参考文章 一.IaaS.PaaS.SaaS介绍与比较 随着云计算.大数据.人工智能等一批新技术的涌入,企业信息化建设速度加快,基于云计算的Iaa ...