
Nginx在Window上简单的使用
先上Nginx在Window上的基本常用指令:
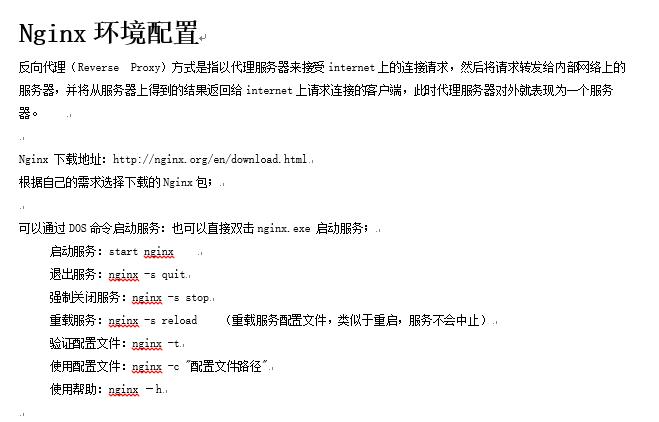
IP_hase也可以解决Session共享的问题:不过不推荐这样使用,建议使用 Memcache/redis来处理 session共享的问题

轮询还是权重?(权重就是在后面加上 weight=2 ,这个主要是根据服务器实际的性能来考虑,数据越大命中的机会就越多):
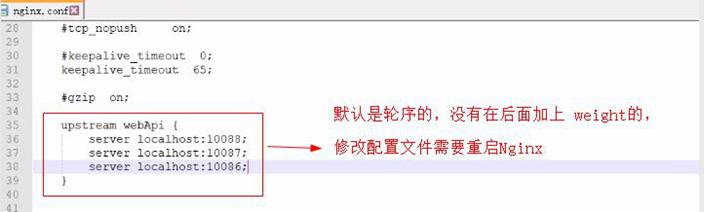
配置截图:
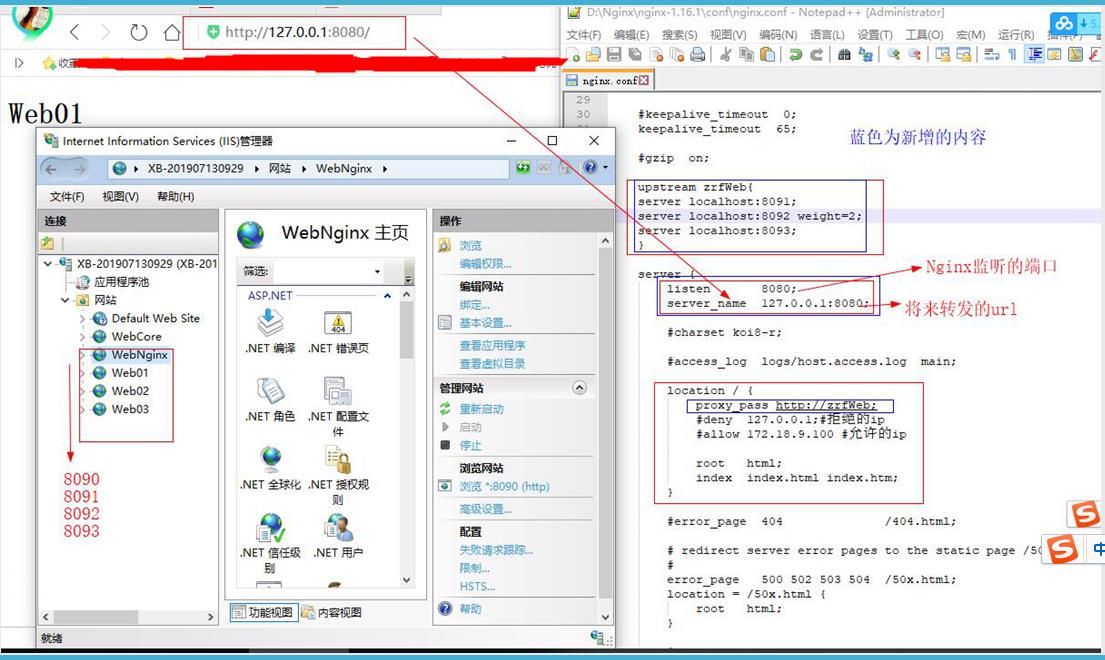
附上完整的配置内容 nginx.conf文件内容如下:
#user  nobody;

worker_processes  ;

#error_log  logs/error.log;

#error_log  logs/error.log  notice;

#error_log  logs/error.log  info;

#pid        logs/nginx.pid;

events {

    worker_connections  ;

}

http {

    include       mime.types;

    default_type  application/octet-stream;

    #log_format  main  '$remote_addr - $remote_user [$time_local] "$request" '

    #                  '$status $body_bytes_sent "$http_referer" '

    #                  '"$http_user_agent" "$http_x_forwarded_for"';

    #access_log  logs/access.log  main;

    sendfile        on;

    #tcp_nopush     on;

    #keepalive_timeout  ;

    keepalive_timeout  ;

    #gzip  on;

    upstream zrfWeb{

    server localhost:;

    server localhost: weight=;

    server localhost:;

    }

    server {

        listen       ;

        server_name  127.0.0.1:;

        #charset koi8-r;

        #access_log  logs/host.access.log  main;

        location / {

            proxy_pass http://zrfWeb;

            #deny  127.0.0.1;#拒绝的ip

            #allow 172.18.9.100 #允许的ip

            root   html;

            index  index.html index.htm;

        }

        #error_page                /.html;

        # redirect server error pages to the static page /50x.html

        #

        error_page        /50x.html;

        location = /50x.html {

            root   html;

        }

        # proxy the PHP scripts to Apache listening on 127.0.0.1:

        #

        #location ~ \.php$ {

        #    proxy_pass   http://127.0.0.1;

        #}

        # pass the PHP scripts to FastCGI server listening on 127.0.0.1:

        #

        #location ~ \.php$ {

        #    root           html;

        #    fastcgi_pass   127.0.0.1:;

        #    fastcgi_index  index.php;

        #    fastcgi_param  SCRIPT_FILENAME  /scripts$fastcgi_script_name;

        #    include        fastcgi_params;

        #}

        # deny access to .htaccess files, if Apache's document root

        # concurs with nginx's one

        #

        #location ~ /\.ht {

        #    deny  all;

        #}

    }

    # another virtual host using mix of IP-, name-, and port-based configuration

    #

    #server {

    #    listen       ;

    #    listen       localhost:;

    #    server_name  somename  alias  another.alias;

    #    location / {

    #        root   html;

    #        index  index.html index.htm;

    #    }

    #}

    # HTTPS server

    #

    #server {

    #    listen        ssl;

    #    server_name  localhost;

    #    ssl_certificate      cert.pem;

    #    ssl_certificate_key  cert.key;

    #    ssl_session_cache    shared:SSL:1m;

    #    ssl_session_timeout  5m;

    #    ssl_ciphers  HIGH:!aNULL:!MD5;

    #    ssl_prefer_server_ciphers  on;

    #    location / {

    #        root   html;

    #        index  index.html index.htm;

    #    }

    #}

}
Nginx在Window上简单的使用的更多相关文章
- nginx在window上无法启动的问题
内容列表: 简要介绍 下载安装 配置测试 一.简要介绍 Nginx ("engine x") 是一个高性能的 HTTP 和 反向代理 服务器,也是一个 IMAP/POP3/SMTP ...
- 关于Windows高DPI的一些简单总结(Window上一般默认是96 dpi 作为100% 的缩放比率)
我们知道,关于高DPI的支持, Windows XP时代就开始有了, 那时关于高DPI的支持比较简单, 但是从Vista/Win7 到现在Win8 /Win8.1, Windows关于高DPI的支持已 ...
- nginx的简单使用和使用nginx在windows上搭建tomcat集群
nginx是一款轻量级的web服务器,常用的作用为服务器/反向代理服务器以及电子邮件(IMAP/POP3)代理服务器 1.为什么我们要使用Nginx? 反向代理: 反向代理(Reverse Proxy ...
- 使用 Nginx 在 Linux 上托管 ASP.NET Core 应用程序
本文于2019年04月10日将标题「CentOS7 部署 ASP.NET Core应用程序」修改为「使用 Nginx 在 Linux 上托管 ASP.NET Core 应用程序」. 环境准备 VMwa ...
- nginx Win下实现简单的负载均衡(1)nginx搭建部署
快速目录: 一.nginx Win下实现简单的负载均衡(1)nginx搭建部署 二.nginx Win下实现简单的负载均衡(2)站点共享Session 三.nginx Win下实现简单的负载均衡(3) ...
- window上利用pip安装pandas
官网推荐的是直接使用Anoconda,它集成了pandas,可以直接使用.安装挺简单的,有windows下的安装包.如果不想安装庞大的Anoconda,那就一步一步用pip来安装pandas.下面我主 ...
- nginx配合IIS实现简单负载均衡
1.IIS 部署两个站点端口分别为8081和8082 8081站点和8082站点如下[随便写了个没有样式的很丑的页面],我特意加了111和222区分 2.设置nginx配置文件,实现简单的负载 ...
- Nginx负载均衡配置简单配置方法
http://www.jb51.net/article/121235.htm Nginx作为负载均衡服务器,用户请求先到达nginx,再由nginx根据负载配置将请求转发至不同的Web服务器.下面通过 ...
- window上安装 MongoDB 及其 PHP扩展
window上安装 MongoDB 及其 PHP扩展 工具/原料 window MongoDB MongoDB 方法/步骤 MongoDB 下载 MongoDB提供了可用于32位和64 ...
随机推荐
- 学习WEBAPI第一天
目录 WebApi: 通过操作对象来实现操作标签的目的 一.DOM 中常用的操作 二.doucument对象 三.获取元素 四.注册事件 五.操作元素的属性 六.当页面加载完时,script代码已经执 ...
- SpringCloudEureka入门
说明 SpringBoot版本 2.1.7.RELEASE SpringCloud版本 Greenwich.SR2 创建eureka server工程 加入pom依赖 <dependencies ...
- layui内部定义的function,外部调用时候,提示某函数未定义现象解决方案
1.引入layui.all.js文件 <script type="text/javascript" src="${pageContext.request.conte ...
- You can't specify target table 'sys_user_function' for update in FROM clause
mysql数据库在执行同时查询本表数据并删除本表数据时候,报错! 报错原因: DELETE from sys_user_function where User_Id = 19 and Function ...
- springboot启动后自动退出
有时新建的springboot启动后自动退出运行,如图所示: 此种情况大都数是因为pom文件加入了tomcat的依赖,与springboot内嵌的tomcat冲突导致,所以只需将pom文件中的tomc ...
- 我的mongoDb之旅(一)
开发环境 php版本:7.0.10 mongodb版本:1.5 开发框架:tp5 数据库工具:navicat12formongodb 可以参考的外部文件链接 tp5中mongodb的扩展说明:http ...
- mongodb完整安装
在线下载安装依赖包 yum -y install gcc gcc-c++ yum -y install gcc gcc-c++ ncurses ncurses-devel cmake bison yu ...
- 总结下var、let 和 const 的区别
一.var变量 <!DOCTYPE html> <html lang="en"> <head> <meta charset="U ...
- net core WebApi——使用NPOI导入导出操作
目录 前言 NPOI 测试 小结 @ 前言 时间过得好快,在之前升级到3.0之后,就感觉好久没再动过啥东西了,之前有问到Swagger的中文汉化,虽说我觉得这种操作的意义不是太大,也是多少鼓捣了下,其 ...
- django根据已有数据库表生成model类
django根据已有数据库表生成model类 创建一个Django项目 django-admin startproject 'xxxx' 修改setting文件,在setting里面设置你要连接的数据 ...