Angular2快速入门-2.创建一个新闻列表
第一、创建新闻Component(视图组件)
export class News{

    id:number;

    title:string;

    create_date:string;

    click:number;

}
接着我们创建一个模拟新闻列表的类
2)mock-news.ts
import {News} from './news';

export const NewList: News[] =

[

    { id: 1, title: '十九大最新報道', create_date: '2017-11-10', click: 10 },

    { id: 2, title: '西二旗地铁空车', create_date: '2017-10-10', click: 11 },

    { id: 3, title: '日本有开始找事了', create_date: '2017-11-12', click: 12 }

]
准备好上面的工作,我们真正需要创建component了,
3)创建newslist.component.ts
import { Component } from '@angular/core';

import { News } from './news';

import { NewList } from './mock-news';

@Component({

    selector:'news',

    templateUrl:'./newslist.component.html',

    styleUrls:['./newslist.component.css']

})

export class NewsListComponent{

    newlist = NewList;

}
4)创建 newslist.component.html
<h2>新闻列表</h2>

<ul class="ul_news">

    <li *ngFor="let n of newlist"  >

        {{n.id}}.{{n.title}} <span>{{n.create_date}}</span>

    </li>

</ul>
5)创建newslist.component.css
*{margin: 0px; padding: 0;}

.ul_news{list-style: none; margin-bottom: 10px; }

.ul_news li { width: 300px; height: 30px; line-height: 30px; text-align: left; padding:5px;

    border-bottom: 1px dashed #ccc;

cursor:pointer;}

.ul_news li:hover{background:blanchedalmond;}

.ul_news li span{float:right;}
至此,我们已经创建完成,目录结果如下图,此时运行npm start 并不能看到我们的新闻列表
第二、集成到app.module上
想在运行时预览需要把我们的NewListComponent 装载到 app.module.ts中,因为他是根模块,启动从这里开始
具体调整入下
app.component.ts
import { BrowserModule } from '@angular/platform-browser';

import { NgModule } from '@angular/core';

import { FormsModule } from '@angular/forms';

import { NewsListComponent } from './news/newslist.component';

import { AppComponent } from './app.component';

@NgModule({

  declarations: [

    AppComponent,

    NewsListComponent

  ],

  imports: [

    BrowserModule,

    FormsModule

  ],

  providers: [],

  bootstrap: [AppComponent]

})

export class AppModule { }
可以看到,我们增加了NewsListComponent ,同时在NgModule的declarations中加入NewsListComponent
另外在app.component.html增加上我们的新视图标签 news
 <h1>

    Welcome to {{title}}!

  </h1>

  <news>

  </news>
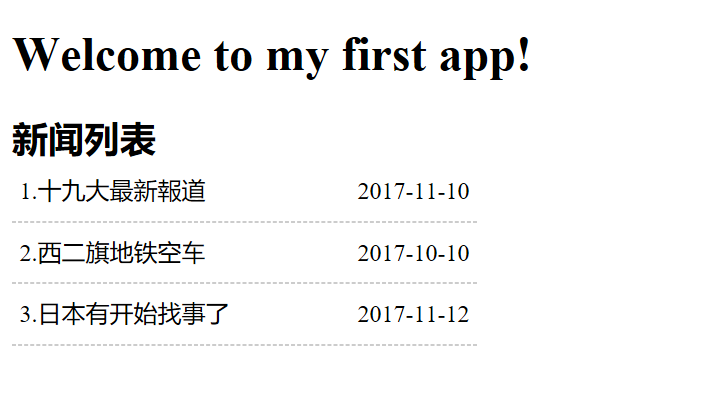
在命令行中 运行npm start ,运行结果如下
第三、增加新闻明细
我们想在用户点击新闻列表的时候下面展示新闻的详细信息,该如何操作那
1)修改 newslist.component.ts
import { Component } from '@angular/core';

import { News } from './news';

import { NewList } from './mock-news';

@Component({

    selector:'news',

    templateUrl:'./newslist.component.html',

    styleUrls:['./newslist.component.css']

})

export class NewsListComponent{

    newlist = NewList;

    selectedNew:News;

    onSelected(n:News):void{

        this.selectedNew=n;

    }

}
增加属性selectedNew 和事件 onSelected 方法。
同时记得在newlist.component.html 的新闻项上增加
2)修改newlist.component.html
在后面追加代码
<div *ngIf="selectedNew">

    <h3>新闻详细</h3>

    <table>

        <tr>

            <td>id:</td>

            <td> {{selectedNew.id}}</td>

        </tr>

        <tr>

            <td>title:</td>

            <td>

                <input [(ngModel)]="selectedNew.title" placeholder="title" />

            </td>

        </tr>

    </table>

</div>
此时要注意,[(ngModel)] 是Angular的双向绑定(先会用,以后再慢慢了解其中的原理),需要在app.module.ts中引入FormsModule ,否则页面会报错。
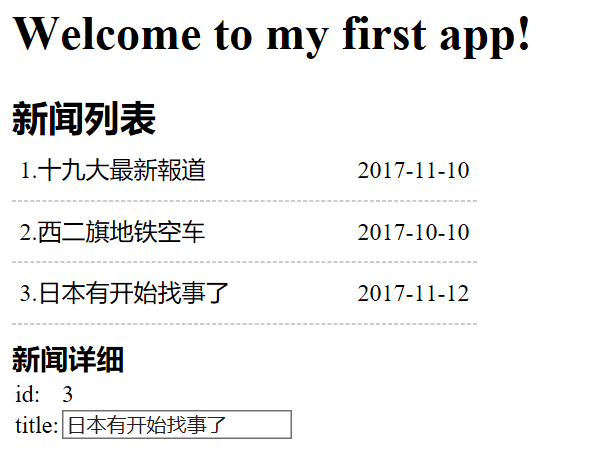
3)再次运行 npm start 可以看到如下结果
第四、总结
1.熟悉Component的创建,注意装饰器的写法@Component 中的标签,另外templateUrl,可以自己使用 template:,通常简单的时候可以直接使用
2.熟悉指令*ngFor,*ngIF,(click)的绑定,双向绑定[(ngModle)] 的用法
3.了解NgModule 和Component的关系,一个app的根模块通常都是app.module.ts
Angular2快速入门-2.创建一个新闻列表的更多相关文章
- Angular2快速入门-4.创建一个服务(创建NewsService提供数据)
上篇我们使用的数据是通过mock-news.ts中的const News[] 数组直接赋给Component 组件的,这篇我们把提供数据的部分单独封装成服务 第一.创建news.service.ts ...
- Angular2快速入门-1.创建第一个app
一.环境搭建 Angular2 运行在nodejs 环境下,需要我们先创建好nodejs环境,具体操作 1.下载安装Nodejs,参考网址,https://nodejs.org/en/ 选择64位 ...
- Angular2快速入门-3.多个组件(分离新闻列表页和详细页)
上篇(Angular2快速入门-2.创建一个新闻列表)已经完成新闻列表的展示,并且点击新闻列表的时候,下面可以展示出新闻的详细信息,这节我们把新闻详细和新闻列表页面分离出来 新闻详细单独一个compo ...
- CXF 入门:创建一个基于WS-Security标准的安全验证(CXF回调函数使用,)
http://jyao.iteye.com/blog/1346547 注意:以下客户端调用代码中获取服务端ws实例,都是通过CXF 入门: 远程接口调用方式实现 直入正题! 以下是服务端配置 ==== ...
- SpringMVC基础入门,创建一个HelloWorld程序
ref:http://www.admin10000.com/document/6436.html 一.SpringMVC基础入门,创建一个HelloWorld程序 1.首先,导入SpringMVC需要 ...
- Angular2快速入门-5.使用http(新闻数据来自http请求)
Angular2官网通过http请求模拟API 来请求hero 数据,感觉有点繁琐,很让人理解不了,我们不采用它的办法,直接展示怎么使用http请求来获取我们的数据 ,直截了当. 第一.准备工作,创建 ...
- JAVA WEB快速入门之通过一个简单的Spring项目了解Spring的核心(AOP、IOC)
接上篇<JAVA WEB快速入门之从编写一个JSP WEB网站了解JSP WEB网站的基本结构.调试.部署>,通过一个简单的JSP WEB网站了解了JAVA WEB相关的知识,比如:Ser ...
- Servlet快速入门:第一个Servlet程序
Servlet是整个JavaWeb开发的核心,同时也是一套规范,即公共接口.用于处理客户端发来的请求并作出响应.通常情况下我们会发送不同的请求并交由不同的处理程序来处理,例如处理用户信息和处理订单信息 ...
- 【翻译】Sencha Touch 2入门:创建一个实用的天气应用程序之三
原文:Getting Started with Sencha Touch 2: Build a Weather Utility App (Part 3) 作者:Lee BoonstraLee is a ...
随机推荐
- unity 使用MVC模式
这两天看了下老大的项目,他基本都是用MVC模式,写的很好,在此把我理解的记录下来 Model:实体对象(对应数据库记录的类) View:视图 presenter(controller):业务处理 vi ...
- Node.js小白开路(一)-- 全局变量篇
全局内容是有点类似于我们在浏览器编程的时候的window对象的,当时在node之中虽然我们编写的变量会自动的给出上下文环境(模块),但是全局变量的存在还是大大的帮助了我们编程时候的便捷性.我们可以在任 ...
- Solr快速入门
1. 什么是Solr Solr是基于lucene的全文检索服务器.不同于lucene工具包,solr是一个web应用,运行在servlet容器,屏蔽了底层细节,并对外提供服务. 点我lucene快速入 ...
- python基础之多线程与多进程(二)
上课笔记整理: 守护线程的作用,起到监听的作用 一个函数连接数据库 一个做守护线程,监听日志 两个线程同时取一个数据 线程---->线程安全---->线程同时进行操作数据. IO操作--- ...
- 模拟form提交数据
最近在做一个项目,发现ajax不能enctype=”multipart/form-data” 属性的表单,没办法,只能使用form表单直接提交的方法了,但是form表单直接提交会跳转页面,这样很不友好 ...
- Audio/Movie/Image
Audio 1. 引入AVFoundation 库,此库用于处理音频的播放. > 使用AVAudioPlayer 播放音频,此类只能播放本地音频文件.对于流媒体(边下边播)的播放使用第三方框架实 ...
- 【tensorflow:Google】二、Tensorflow环境搭建
2.1 Tensorflow 主要依赖包 2.1.1 Protocol Buffer 结构化数据序列化的过程,另外的工具:XML, JSON, 区别:二进制(不可读):先定义数据格式,还原的时候将需要 ...
- 软工15个人作业4——alpha阶段
一.个人总结 1.在alpha 结束之后, 每位同学写一篇个人博客, 总结自己的alpha 过程: 2.请用自我评价表:http://www.cnblogs.com/xinz/p/3852177.ht ...
- iOS开发之谓词Predicate和对象数组的排序
我们在开发中经常使用的Predicate谓词,主要是正则表达式的使用,今天给大家简单的讲讲怎样去使用谓词. 因为内容比较简单,所以直接上代码展示: NSMutableArray *people_arr ...
- 神奇的TextField(2)
var text_content:TextField=new TextField(); text_content.autoSize="left"; // text_content. ...