SpringBoot的自动装配原理
Spring Boot 的自动装配(Auto-Configuration)是其核心特性之一,它极大地简化了Spring应用的配置过程。
import org.springframework.boot.SpringApplication;

import org.springframework.boot.autoconfigure.SpringBootApplication;

@SpringBootApplication

public class SpringBootLearnApplication {

    public static void main(String[] args) {

        SpringApplication.run(SpringBootLearnApplication.class, args);

    }

}
1. 核心入口:@SpringBootApplication
@Target(ElementType.TYPE)

@Retention(RetentionPolicy.RUNTIME)

@Documented

@Inherited

@SpringBootConfiguration

@EnableAutoConfiguration

@ComponentScan(excludeFilters = { @Filter(type = FilterType.CUSTOM, classes = TypeExcludeFilter.class),

  @Filter(type = FilterType.CUSTOM, classes = AutoConfigurationExcludeFilter.class) })

public @interface SpringBootApplication
- 这是一个复合注解,包含:
- @SpringBootConfiguration:标识这是一个配置类
- @EnableAutoConfiguration:启用自动配置
- @ComponentScan:启用组件扫描
2. @EnableAutoConfiguration注解
@Target(ElementType.TYPE)

@Retention(RetentionPolicy.RUNTIME)

@Documented

@Inherited

@AutoConfigurationPackage

@Import(AutoConfigurationImportSelector.class)

public @interface EnableAutoConfiguration {

 /**

  * Environment property that can be used to override when auto-configuration is

  * enabled.

  */

 String ENABLED_OVERRIDE_PROPERTY = "spring.boot.enableautoconfiguration";

 /**

  * Exclude specific auto-configuration classes such that they will never be applied.

  * @return the classes to exclude

  */

 Class<?>[] exclude() default {};

 /**

  * Exclude specific auto-configuration class names such that they will never be

  * applied.

  * @return the class names to exclude

  * @since 1.3.0

  */

 String[] excludeName() default {};

}
这个注解通过@Import引入了AutoConfigurationImportSelector类
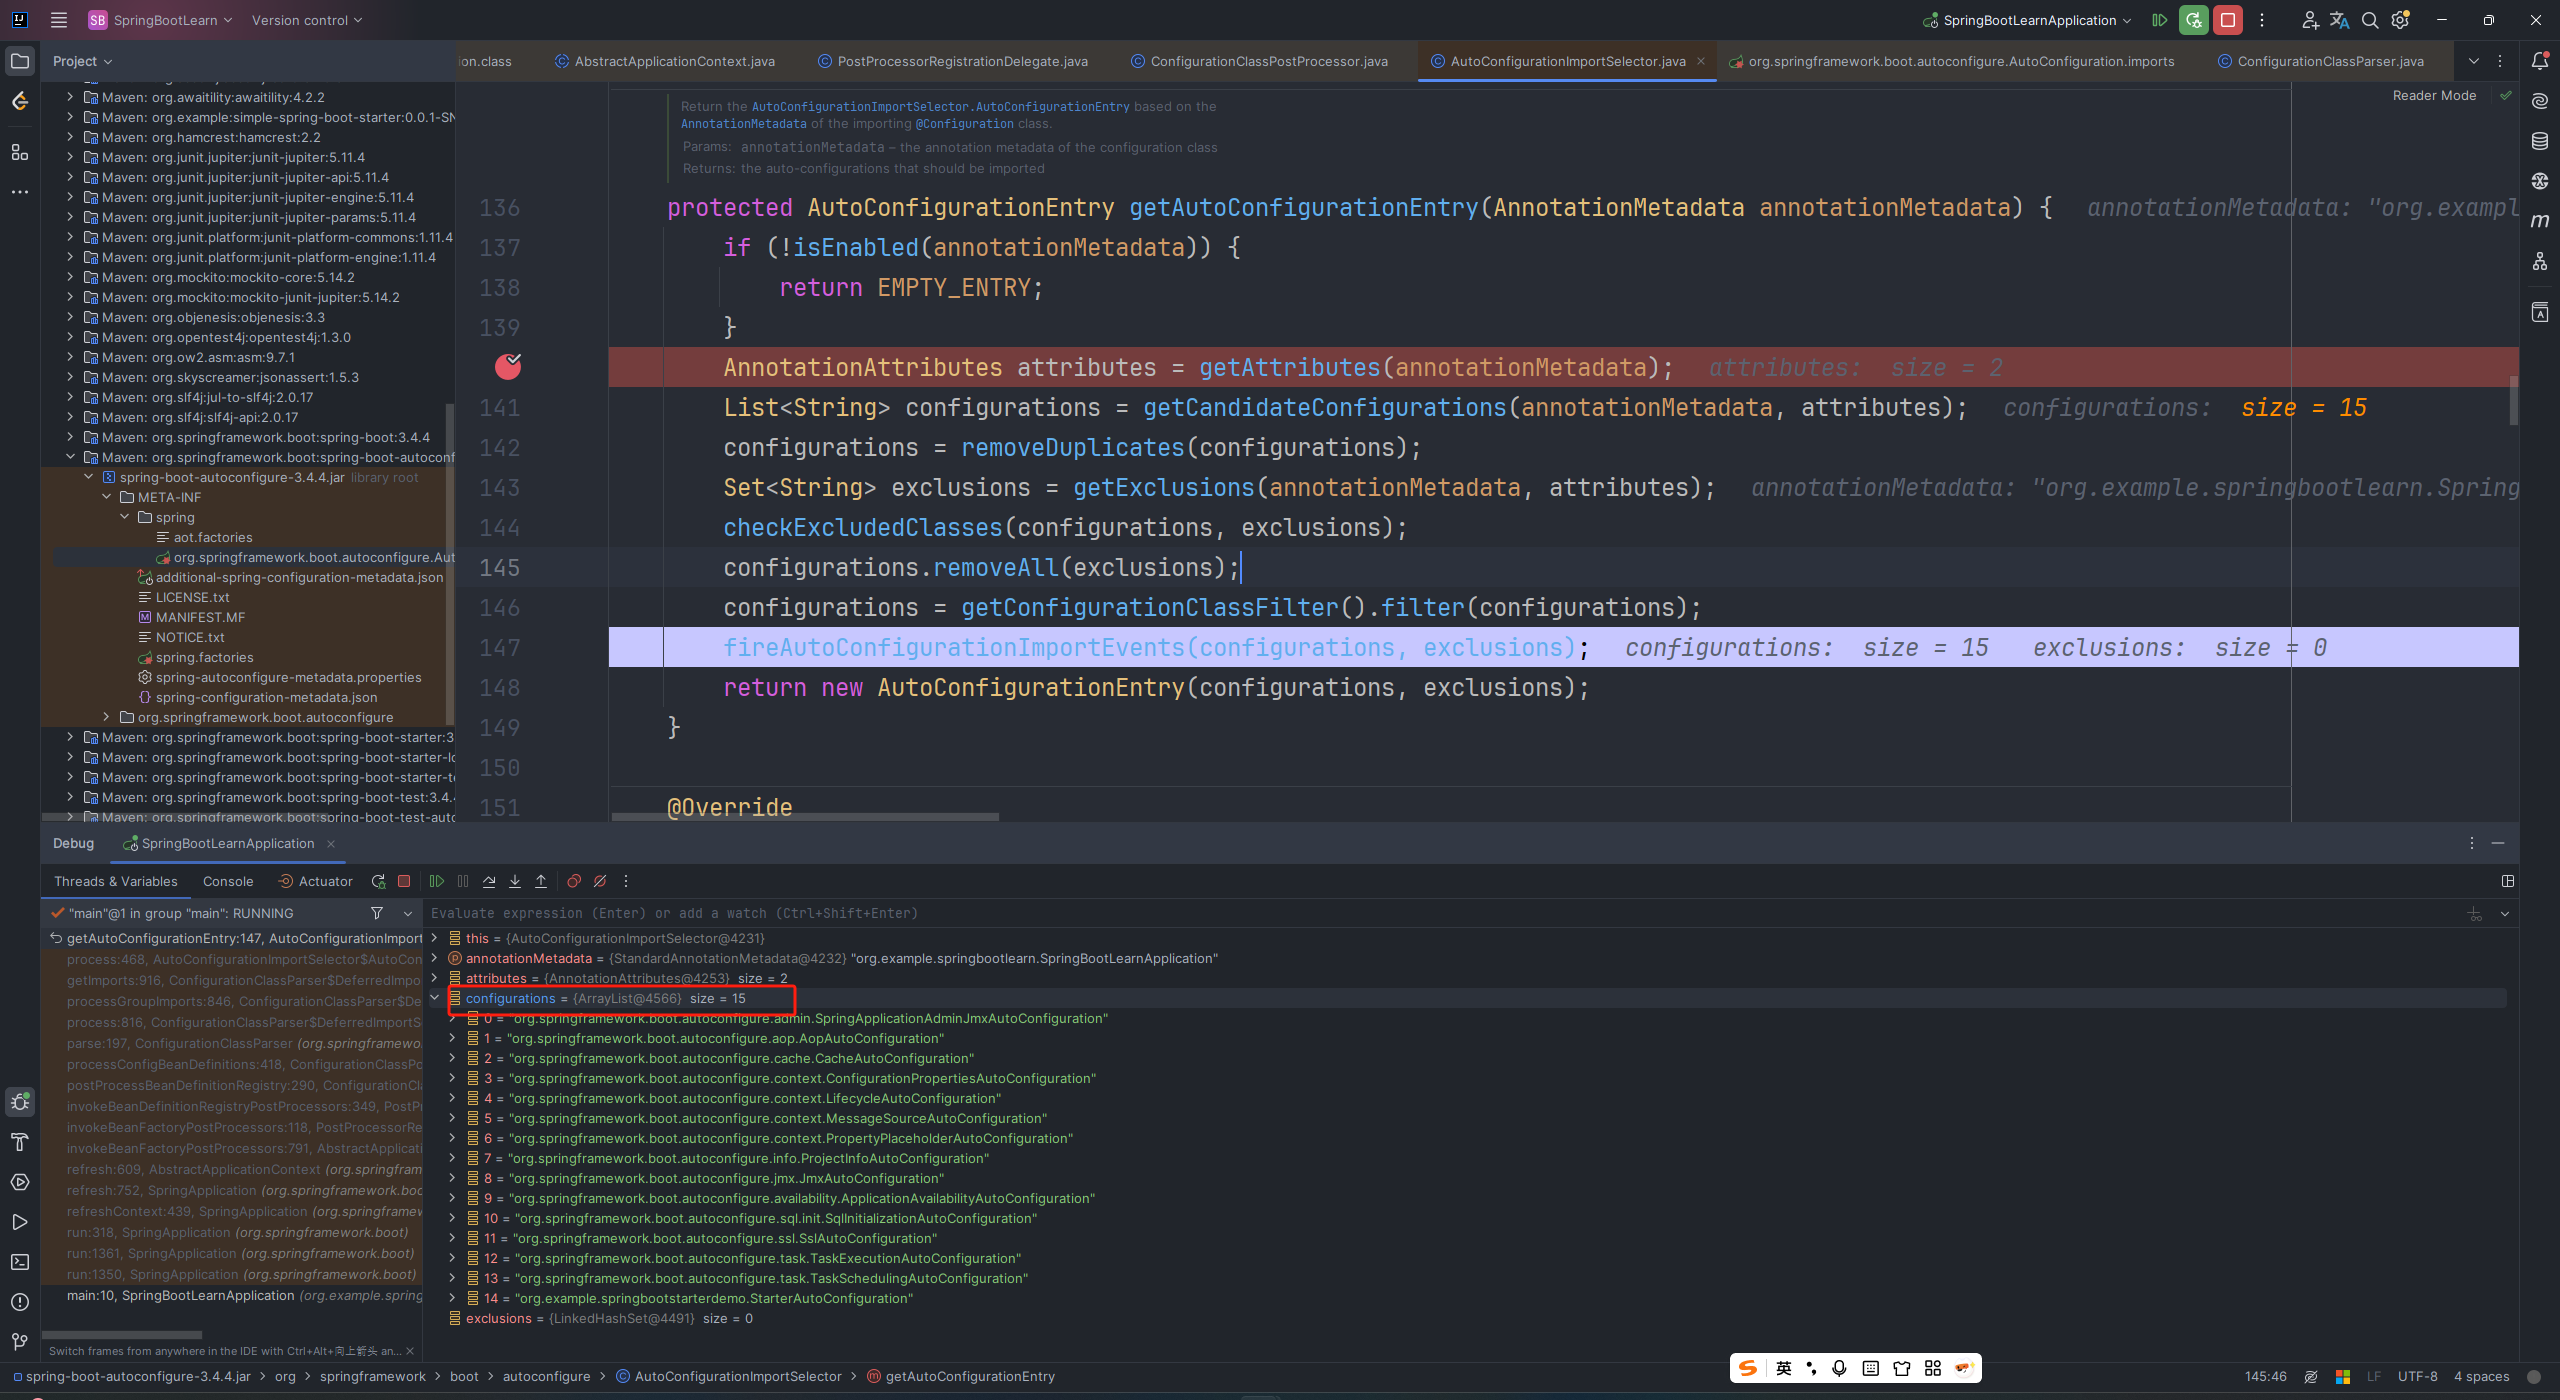
- AutoConfigurationImportSelector 是核心类,负责加载自动配置类:
public class AutoConfigurationImportSelector implements DeferredImportSelector, BeanClassLoaderAware,

        ResourceLoaderAware, BeanFactoryAware, EnvironmentAware, Ordered {\

    protected AutoConfigurationEntry getAutoConfigurationEntry(AnnotationMetadata annotationMetadata) {

        if (!isEnabled(annotationMetadata)) {

            return EMPTY_ENTRY;

        }

        AnnotationAttributes attributes = getAttributes(annotationMetadata);

        List<String> configurations = getCandidateConfigurations(annotationMetadata, attributes);

        configurations = removeDuplicates(configurations);

        Set<String> exclusions = getExclusions(annotationMetadata, attributes);

        checkExcludedClasses(configurations, exclusions);

        configurations.removeAll(exclusions);

        configurations = getConfigurationClassFilter().filter(configurations);

        fireAutoConfigurationImportEvents(configurations, exclusions);

        return new AutoConfigurationEntry(configurations, exclusions);

    }

}


3. 自动配置类加载流程
3.1 加载候选配置类
从 META-INF/spring/org.springframework.boot.autoconfigure.AutoConfiguration.imports 文件加载候选配置类(Spring Boot 2.7+ 后替代 spring.factories)
protected List<String> getCandidateConfigurations(AnnotationMetadata metadata, AnnotationAttributes attributes) {

    ImportCandidates importCandidates = ImportCandidates.load(this.autoConfigurationAnnotation,

            getBeanClassLoader());

    List<String> configurations = importCandidates.getCandidates();

    Assert.notEmpty(configurations,

            "No auto configuration classes found in " + "META-INF/spring/"

                    + this.autoConfigurationAnnotation.getName() + ".imports. If you "

                    + "are using a custom packaging, make sure that file is correct.");

    return configurations;

}
在 Spring Boot 3.x 中,自动配置类的加载方式从 spring.factories 过渡到 AutoConfiguration.imports,并引入了 ImportCandidates 类来处理这一变化。
3.2 通过条件注解过滤有效配置类


关键条件注解:
- @ConditionalOnClass:类路径存在指定类时生效
- @ConditionalOnMissingBean:容器中不存在指定 Bean 时生效
- @ConditionalOnProperty:配置属性匹配时生效
4. 实现一个自定义的Starter
4.1 新建一个maven项目
项目结构:

package org.example.springbootstarterdemo;

public class HelloWorldService {

    private String message = "Hello from Starter!";

    public void printMessage() {

        System.out.println(message);

    }

    public String getMessage() {

        return message;

    }

    public void setMessage(String message) {

        this.message = message;

    }

}
package org.example.springbootstarterdemo;

import org.springframework.boot.autoconfigure.condition.ConditionalOnMissingBean;

import org.springframework.context.annotation.Bean;

import org.springframework.context.annotation.Configuration;

@Configuration

public class StarterAutoConfiguration {

    @Bean

    @ConditionalOnMissingBean

    public HelloWorldService helloWorldService() {

        return new HelloWorldService();

    }

}
org.springframework.boot.autoconfigure.AutoConfiguration.imports:
org.example.springbootstarterdemo.StarterAutoConfiguration
pom.xml
<?xml version="1.0" encoding="UTF-8"?>

<project xmlns="http://maven.apache.org/POM/4.0.0" xmlns:xsi="http://www.w3.org/2001/XMLSchema-instance"

         xsi:schemaLocation="http://maven.apache.org/POM/4.0.0 https://maven.apache.org/xsd/maven-4.0.0.xsd">

    <modelVersion>4.0.0</modelVersion>

    <parent>

        <groupId>org.springframework.boot</groupId>

        <artifactId>spring-boot-starter-parent</artifactId>

        <version>3.4.4</version>

        <relativePath/> <!-- lookup parent from repository -->

    </parent>

    <groupId>org.example</groupId>

    <artifactId>simple-spring-boot-starter</artifactId>

    <version>0.0.1-SNAPSHOT</version>

    <properties>

        <java.version>17</java.version>

    </properties>

    <dependencies>

        <dependency>

            <groupId>org.springframework.boot</groupId>

            <artifactId>spring-boot-starter</artifactId>

        </dependency>

        <dependency>

            <groupId>org.springframework.boot</groupId>

            <artifactId>spring-boot-autoconfigure</artifactId>

        </dependency>

    </dependencies>

    <build>

        <plugins>

            <plugin>

                <groupId>org.apache.maven.plugins</groupId>

                <artifactId>maven-compiler-plugin</artifactId>

            </plugin>

        </plugins>

    </build>

</project>
# 在项目根目录执行

mvn clean install

4.2 SpringBoot 项目引入
在pom.xml添加
        <dependency>

            <groupId>org.example</groupId>

            <artifactId>simple-spring-boot-starter</artifactId>

            <version>0.0.1-SNAPSHOT</version>

        </dependency>
package org.example.springbootlearn;

import org.example.springbootstarterdemo.HelloWorldService;

import org.springframework.boot.SpringApplication;

import org.springframework.boot.autoconfigure.SpringBootApplication;

import org.springframework.context.ConfigurableApplicationContext;

@SpringBootApplication

public class SpringBootLearnApplication {

    public static void main(String[] args) {

        ConfigurableApplicationContext context = SpringApplication.run(SpringBootLearnApplication.class, args);

        HelloWorldService bean = context.getBean(HelloWorldService.class);

        System.out.println(bean.getMessage());

    }

}
启动时添加 --debug 参数:
StarterAutoConfiguration#helloWorldService matched:

      - @ConditionalOnMissingBean (types: org.example.springbootstarterdemo.HelloWorldService; SearchStrategy: all) did not find any beans (OnBeanCondition)

总结
Spring Boot 的自动装配通过以下步骤实现:
触发入口:@EnableAutoConfiguration 注解激活自动配置机制
加载候选:通过 AutoConfiguration.imports 文件加载所有候选配置类
条件过滤:利用 @Conditional 系列注解筛选有效配置
Bean注册:符合条件的配置类通过 @Bean 方法注册组件
动态适配:根据类路径、配置属性等环境因素动态调整最终配置
通过这种机制,Spring Boot 实现了 "约定大于配置" 的设计理念,显著减少了手动配置的工作量。
SpringBoot的自动装配原理的更多相关文章
- 【springboot】自动装配原理
摘自:https://mp.weixin.qq.com/s/ZxY_AiJ1m3z1kH6juh2XHw 前言 Spring翻译为中文是"春天",的确,在某段时间内,它给Java开 ...
- SpringBoot启动流程分析(五):SpringBoot自动装配原理实现
SpringBoot系列文章简介 SpringBoot源码阅读辅助篇: Spring IoC容器与应用上下文的设计与实现 SpringBoot启动流程源码分析: SpringBoot启动流程分析(一) ...
- SpringBoot自动装配原理解析
本文包含:SpringBoot的自动配置原理及如何自定义SpringBootStar等 我们知道,在使用SpringBoot的时候,我们只需要如下方式即可直接启动一个Web程序: @SpringBoo ...
- springboot自动装配原理
最近开始学习spring源码,看各种文章的时候看到了springboot自动装配实现原理.用自己的话简单概括下. 首先打开一个基本的springboot项目,点进去@SpringBootApplica ...
- springboot自动装配原理,写一个自己的start
springboot自动装配原理 第一次使用springboot的时候,都感觉很神奇.只要加入一个maven的依赖,写几行配置,就能注入redisTemple,rabbitmqTemple等对象. 这 ...
- SpringBoot | 2.1 SpringBoot自动装配原理
@ 目录 前言 1. 引入配置文件与配置绑定 @ImportResource @ConfigurationProperties 1.1 @ConfigurationProperties + @Enab ...
- 【Springboot】Springboot自动装配原理
1.核心注解就是 EnableAutoConfiguration 该注解会激活SpringBoot的自动装配功能: 代码如下: @Target(ElementType.TYPE) @Retentio ...
- 深入理解SpringBoot之自动装配
SpringBoot的自动装配是拆箱即用的基础,也是微服务化的前提.其实它并不那么神秘,我在这之前已经写过最基本的实现了,大家可以参考这篇文章.这次主要的议题是,来看看它是怎么样实现的,我们透过源代码 ...
- Eureka 系列(03)Spring Cloud 自动装配原理
Eureka 系列(03)Spring Cloud 自动装配原理 [TOC] 0. Spring Cloud 系列目录 - Eureka 篇 本文主要是分析 Spring Cloud 是如何整合 Eu ...
- Spring Boot系列(二):Spring Boot自动装配原理解析
一.Spring Boot整合第三方组件(Redis为例) 1.加依赖 <!--redis--> <dependency> <groupId>org.springf ...
随机推荐
- 个人数据保全计划:从印象笔记迁移到joplin
前言 最近在探索各种现代化的笔记工具时,刚好用上了Joplin这款应用,尽管界面没那么好看,但开源.支持markdown.功能完善,而且还支持很多导入方法(事实上很多开源笔记都支持). 其中的导入功能 ...
- 第4章 C#的高级特性
第4章 C#的高级特性 4.1 委托 4.1.2 多播委托 对值为 null 的委托变量进行 + 或 += 操作,等价于为变量指定一个新值: SomeDelegate d = null; d += ...
- [记录点滴] 小心 Hadoop Speculative 调度策略
[记录点滴] 小心 Hadoop Speculative 调度策略 目录 [记录点滴] 小心 Hadoop Speculative 调度策略 [0x00] 摘要 [0x01] 缘由 [0x02] 代码 ...
- Nginx~启动!!
前言 Nginx (engine x) 是一个高性能的HTTP和反向代理web服务器,同时也提供了IMAP/POP3/SMTP服务.Nginx是由伊戈尔·赛索耶夫为俄罗斯访问量第二的Rambler.r ...
- 百万架构师第四十一课:RabbitMq:可靠性投递和实践经验|JavaGuide
来源:https://javaguide.net RabbitMQ 2-可靠性投递与生产实践 可靠性投递 首先需要明确,效率与可靠性是无法兼得的,如果要保证每一个环节都成功,势必会对消息的收发效率 ...
- LINUX 服务器安装nginx redis jdk等步聚
1.安装指令步聚 sudo yum update 更新linux系统 yum install -y nginx 安装nginx systemctl enable nginx 设置开机启动nginx s ...
- Spark core 总结
Spark RDD五大特性 1.RDD由一组partition组成 2.每一个分区由一个task来处理 3.RDD之间有一些列依赖关系 4.分区类算子必须作用在kv格式得RDD上 5.spark为ta ...
- IDEA 常见设置
一.字体设置 二.自动导入java包和自动清除无用的引用 清除无用的import包手动快捷键:Ctrl + Alt + O 添加引用在代码中光标指向需要添加引用的上,然后使用快捷键:Alt+Enter ...
- CF2029C New Rating
思路(二分 + 数据结构优化DP) 大致题意为:一个值 \(x\) 初始为 \(0\),然后有一个数组 \(a\),遍历一次数组. 如果 \(a_i > x\),则 \(x + 1\). 如果 ...
- C#短链接生成方法
public class Program { static void Main() { Random rd = new Random(); for (int i = 0; i < 10; i++ ...
