
How To Install Tinc and Set Up a Basic VPN on Ubuntu 14.04
Introduction
In this tutorial, we will go over how to use Tinc, an open source Virtual Private Network (VPN) daemon, to create a secure VPN that your servers can communicate on as if they were on a local network. We will also demonstrate how to use Tinc to set up a secure tunnel into a private network. We will be using Ubuntu 14.04 servers, but the configurations can be adapted for use with any other OS.
A few of the features that Tinc has that makes it useful include encryption, optional compression, automatic mesh routing (VPN traffic is routed directly between the communicating servers, if possible), and easy expansion. These features differentiate Tinc from other VPN solutions such as OpenVPN, and make it a good solution for creating a VPN out of many small networks that are geographically distributed. Tinc is supported on many operating systems, including Linux, Windows, and Mac OS X.
Prerequisites
To complete this tutorial, you will require root access on at least three Ubuntu 14.04 servers. Instructions to set up root access can be found here (steps 3 and 4): Initial Server Setup with Ubuntu 14.04.
If you are planning on using this in your own environment, you will have to plan out how your servers need to access each other, and adapt the examples presented in this tutorial to your own needs. If you are adapting this to your own setup, be sure to substitute the highlighted values in the examples with your own values.
If you would like to follow this tutorial exactly, create two VPSs in the same datacenter, with private networking, and create another VPS in a separate datacenter. We will create two VPSs in the NYC2 datacenter and one in AMS2 datacenter with the following names:
- externalnyc: All of the VPN nodes will connect to this server, and the connection must be maintained for proper VPN functionality. Additional servers can be configured in a similarly to this one to provide redundancy, if desired.
- internalnyc: Connects to externalnyc VPN node using its private network interface
- ams1: Connects to externalnyc VPN node over the public Internet
Our Goal
Here is a diagram of the VPN that we want to set up (described in Prerequisites):
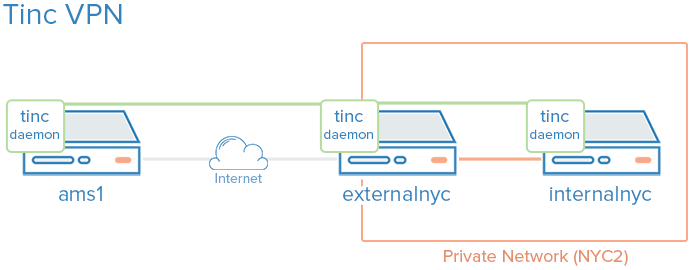
The green represents our VPN, the gray represents the public Internet, and the orange represents the private network. All three servers can communicate on the VPN, even though the private network is inaccessible to ams1.
Let's get started by installing Tinc!
Install Tinc
On each VPS that you want to join the private network, install Tinc. Let's start by updating apt:
sudo apt-get update
Then install Tinc via apt:
sudo apt-get install tinc
Now that Tinc is installed, let's look at the Tinc configuration.
Tinc Configuration
Tinc uses a "netname" to distinguish one Tinc VPN from another (in case of multiple VPNs), and it is recommended to use a netname even if you are only planning on configuring one VPN. We will call our VPN "netname" for simplicity.
Every server that will be part of our VPN requires the following three configuration components:
- Configuration files: tinc.conf, tinc-up, and tinc-down, for example
- Public/private key pairs: For encryption and node authentication
- Host configuration files: Which contain public keys and other VPN configuration
Let's start by configuring our externalnyc node.
Configure externalnyc
On externalnyc, create the configuration directory structure for our VPN called "netname":
sudo mkdir -p /etc/tinc/netname/hosts
Now open tinc.conf for editing:
sudo vi /etc/tinc/netname/tinc.conf
Now add the following lines:
Name = externalnyc
AddressFamily = ipv4
Interface = tun0
This simply configures a node called externalnyc, with a network interface that will use IPv4 called "tun0". Save and quit.
Next, let's create an externalnyc hosts configuration file:
sudo vi /etc/tinc/netname/hosts/externalnyc
Add the following lines to it (substitute the public IP address of your VPS here):
Address = externalnyc_public_IP
Subnet = 10.0.0.1/32
Ultimately, this file will be used on other servers to communicate with this server. The address specifies how other nodes will connect to this server, and the subnet specifies which subnet this daemon will serve. Save and quit.
Now generate the public/private keypair for this host with the following command:
sudo tincd -n netname -K4096
This creates the private key (/etc/tinc/netname/rsa_key.priv) and appends the public key to the externalnyc hosts configuration file that we recently created (/etc/tinc/netname/hosts/externalnyc).
Now we must create tinc-up, the script that will run whenever our netname VPN is started. Open the file for editing now:
sudo vi /etc/tinc/netname/tinc-up
Add the following lines:
#!/bin/sh
ifconfig $INTERFACE 10.0.0.1 netmask 255.255.255.0
When we start our VPN, this script will run to create the network interface that our VPN will use. On the VPN, this server will have an IP address of 10.0.0.1.
Let's also create a script to remove network interface when our VPN is stopped:
sudo vi /etc/tinc/netname/tinc-down
Add the following lines:
#!/bin/sh
ifconfig $INTERFACE down
Save and quit.
Lastly, make tinc network scripts executable:
sudo chmod 755 /etc/tinc/netname/tinc-*
Save and quit.
Let's move on to our other nodes.
Configure internalnyc and ams1
These steps are required on both internalnyc and ams1, with slight variations that will be noted.
On internalnyc and ams1, create the configuration directory structure for our VPN called "netname" and edit the Tinc configuration file:
sudo mkdir -p /etc/tinc/netname/hosts
sudo vi /etc/tinc/netname/tinc.conf
Add the following lines (substitute the name with the node name):
Name = node_name
AddressFamily = ipv4
Interface = tun0
ConnectTo = externalnyc
These nodes are configured to attempt to connect to "externalnyc" (the node we created prior to this). Save and quit.
Next, let's create the hosts configuration file:
sudo vi /etc/tinc/netname/hosts/node_name
For internalnyc, add this line:
Subnet = 10.0.0.2/32
For ams1, add this line:
Subnet = 10.0.0.3/32
Note that the numbers differ. Save and quit.
Next, generate the keypairs:
sudo tincd -n netname -K4096
And create the network interface start script:
sudo vi /etc/tinc/netname/tinc-up
For internalnyc, add this line:
ifconfig $INTERFACE 10.0.0.2 netmask 255.255.255.0
For ams1, add this line:
ifconfig $INTERFACE 10.0.0.3 netmask 255.255.255.0
These IP addresses are how these nodes will be accessed on the VPN. Save and quit.
Now create the network interface stop script:
sudo vi /etc/tinc/netname/tinc-down
And add this line:
ifconfig $INTERFACE down
Save and quit.
Lastly, make tinc network scripts executable:
sudo chmod 755 /etc/tinc/netname/tinc-*
Save and quit.
Now we must distribute the hosts configuration files to each node.
Distribute the Keys
If you happen to use a configuration management system, here is a good application. Minimally, each node that wants communicate directly with another node must have exchanged public keys, which are inside of the hosts configuration files. In our case, for example, only externalnyc needs to exchange public keys with the other nodes. It is easier to manage if you just copy each public key to all members of the node. Note that you will want to change the "Address" value in externalnyc's hosts configuration file to its private IP address when it is copied to internalnyc, so that connection is established over the private network.
Because our VPN is called "netname", here is the location of the hosts configuration files:/etc/tinc/netname/hosts
Exchange Keys Between externalnyc and internalnyc
On internalnyc, copy its hosts configuration file to externalnyc:
scp /etc/tinc/netname/hosts/internalnyc user@externalnyc_private_IP:/tmp
Then on externalnyc, copy the internalnyc's file into the appropriate location:
cd /etc/tinc/netname/hosts; sudo cp /tmp/internalnyc .
Then on externalnyc again, copy its hosts configuration file to internalnyc:
scp /etc/tinc/netname/hosts/externalnyc user@internalnyc_private_IP:/tmp
On internalnyc, copy externalnyc's file to the appropriate location:
cd /etc/tinc/netname/hosts; sudo cp /tmp/externalnyc .
On internalnyc, let's edit externalnyc's hosts configuration file so the "Address" field is set to externalnyc's private IP address (so internalnyc will connect to the VPN via the private network). Edit externalnyc's hosts configuration file:
sudo vi /etc/tinc/netname/hosts/externalnyc
Change the "Address" value to externalnyc's private IP address:
Address = externalnyc_private_IP
Save and quit. Now let's move on to our remaining node, ams1.
Exchange Keys Between externalnyc and ams1
On ams1, copy its hosts configuration file to externalnyc:
scp /etc/tinc/netname/hosts/ams1 user@externalnyc_public_IP:/tmp
Then on externalnyc, copy the ams1's file into the appropriate location:
cd /etc/tinc/netname/hosts; sudo cp /tmp/ams1 .
Then on externalnyc again, copy its hosts configuration file to ams1:
scp /etc/tinc/netname/hosts/externalnyc user@ams1_public_IP:/tmp
On ams1, copy externalnyc's file to the appropriate location:
cd /etc/tinc/netname/hosts; sudo cp /tmp/externalnyc .
Exchange Keys Between Additional Nodes
If you are creating a larger VPN, now is a good time to exchange the keys between those other nodes. Remember that if you want two nodes to directly communicate with each other (without a forwarding server between), they need to have exchanged their keys/hosts configuration files, and they need to be able to access each other's real network interfaces. Also, it is fine to just copy each hosts configuration to every node in the VPN.
Test Our Configuration
On each node, starting with externalnyc, start Tinc in debug mode like so (netname is the name of our VPN):
sudo tincd -n netname -D -d3
After starting the daemon on each node, you should see output with the names of each node as they connect to externalnyc. Now let's test the connection over the VPN.
In a separate window, on ams1, ping internalnyc's VPN IP address (which we assigned to 10.0.0.2, earlier):
ping 10.0.0.2
The ping should work fine, and you should see some debug output in the other windows about the connection on the VPN. This indicates that ams1 is able to communicate over the VPN through externalnyc to internalnyc. Press CTRL-C to quit pinging.
You may also use the VPN interfaces to do any other network communication, like application connections, copying files, and SSH.
On each Tinc daemon debug window, quit the daemon by pressing CTRL-\.
Note: If the connections aren't working, ensure that your firewall is not blocking the connections or forwarding.
Configure Tinc To Startup on Boot
Before the Tinc init script will function properly, we have to put our VPN's name into thenets.boot configuration file.
On each node, edit nets.boot:
sudo vi /etc/tinc/nets.boot
Add the name of your VPN(s) into this file. Ours is "netname":
# This file contains all names of the networks to be started on system startup.
netname
Save and quit. Tinc is now configured to start on boot, and it can be controlled via theservice command. If you would like to start it now run the following command on each of your nodes:
sudo service tinc start
Congrats! Your Tinc VPN is set up.
Conclusion
Now that you have gone through this tutorial, you should have a good foundation to build out your VPN to meet your needs. Tinc is very flexible, and any node can be configured to connect to any other node (that it can access over the network) so it can act as a mesh VPN, not relying on a single node.
Good luck!
How To Install Tinc and Set Up a Basic VPN on Ubuntu 14.04的更多相关文章
- 【转】How to build and install PHP 5.6.9 from source on Ubuntu 14.04 VPS
原文 https://vpsineu.com/blog/how-to-build-and-install-php-5-6-9-from-source-on-ubuntu-14-04-vps/ In t ...
- How To Install and Configure Elasticsearch on Ubuntu 14.04
Reference: https://www.digitalocean.com/community/tutorials/how-to-install-and-configure-elasticsear ...
- Install Google Pinyin on Ubuntu 14.04
Install Google Pinyin on Ubuntu 14.04 I've been spending more and more time on Ubuntu and I'm not us ...
- Ubuntu 14.04 – How to install xrdp in Ubuntu 14.04
http://c-nergy.be/blog/?p=5305 Hello World, Ubuntu 14.04 has been released on April 17th 2014 and we ...
- Install Cocos2d-x v3.3 on Ubuntu 14.04 & Ubuntu 14.10(转)
Install Cocos2d-x v3.3 on Ubuntu 14.04 & Ubuntu 14.10 1 get the source code sudo apt-get install ...
- 【转】install intel wireless 3165 driver for ubuntu 14.04.3
[转]install intel wireless 3165 driver for ubuntu 14.04.3 Ubuntu 14.04.3 with 3.19 kernel can’t drive ...
- How To Install Apache Kafka on Ubuntu 14.04
打算学习kafka ,接触一些新的知识.加油!!! 参考:https://www.digitalocean.com/community/tutorials/how-to-install-apache- ...
- Ubuntu 14.04 install emacs 24.5
1.前期准备工作 2.安装基础构件工具 3.下载emacs编译需要的依赖库 4.下载emacs24.5编译安装 5.下载并安装我的emacs配置文件 6.配置tmux和zsh 1. 前期准备工作 在阿 ...
- install cinnamon on ubuntu 14.04
emotion: I feel not comfortable with ubuntu 14.04 default desktop unity,i still look for a alternati ...
随机推荐
- BZOJ3024 : [Balkan2012]balls
问题1: ans=max(sum[n]-(sum[i]-sum[j-1])+a[i]*(i-j+1)) =max(sum[n]-sum[i]+sum[j-1]+a[i]*(i+1)-a[i]*j) = ...
- 详细讲解css单位px,em和rem的含义以及它们之间的区别
一.首先介绍一下px px就是css中最基本的长度单位了,用px做单位基本上没什么问题,可以做到让页面按套路精确的展现! 可但是!但可是!如果全篇用px布局会暗藏一个蛋疼的问题,就是当用户和Ctrl滚 ...
- HDU 2653 (记忆化BFS搜索+优先队列)
题目链接: http://acm.hdu.edu.cn/showproblem.php?pid=2653 题目大意:迷宫中有普通点和陷阱.其中普通点可以走可以飞,但是陷阱只能飞.走耗时1,飞耗时2.但 ...
- HDU 1312 (BFS搜索模板题)
题目链接: http://acm.hdu.edu.cn/showproblem.php?pid=1312 题目大意:问迷宫中有多少个点被访问. 解题思路: DFS肯定能水过去的.这里就拍了一下BFS. ...
- Underscore.js 中 _.throttle 和 _.debounce 的差异
两个方法都是用来控制事件的频率的,在mousemove,resize等这种高频率触发事件中,控制其响应频率可以明显提高程序的流畅性,减少资源的占用. 通过分析其源代码: _.throttle方法源码 ...
- 【BZOJ】3709: [PA2014]Bohater(贪心)
http://www.lydsy.com/JudgeOnline/problem.php?id=3709 很水的题...但是由于脑洞小..漏想了一种情况.. 首先显然能补血的先杀.. 然后杀完后从补血 ...
- libtiff 生成48位色tif图片
BOOL CTifImage_48Bits::BitmapConvertTo48BitsTif(CString strImagePath, int nWidth, int nHeight, int n ...
- requirejs模块化框架用法分享
我采用的是一个非常流行的库require.js. 一.为什么要用require.js? 最早的时候,所有Javascript代码都写在一个文件里面,只要加载这一个文件就够了.后来,代码越来越多,一 ...
- Easyui的datagrid结合hibernate实现数据分页
最近在学习easyui的使用,在学到datagrid的时候遇到了一些问题,终于抽点时间整理了一下,分享出来,请各位前辈高手多多指教! 1.先来看看效果,二话不说,上图直观! 2.easyui的data ...
- 数据库SQL及相关
//1.生成随机数 ROUND(((89 - 71 -1) * RAND() + 71), 0) DECLARE @Result INT DECLARE @Upper INT DECLARE @Low ...