
Flask —— 信号(5)
Flask框架中的信号基于blinker,其主要就是让开发者可是在flask请求过程中定制一些用户行为。
pip3 install blinker
1. 内置信号
request_started = _signals.signal('request-started')                # 请求到来前执行

request_finished = _signals.signal('request-finished')              # 请求结束后执行

before_render_template = _signals.signal('before-render-template')  # 模板渲染前执行

template_rendered = _signals.signal('template-rendered')            # 模板渲染后执行

got_request_exception = _signals.signal('got-request-exception')    # 请求执行出现异常时执行

request_tearing_down = _signals.signal('request-tearing-down')      # 请求执行完毕后自动执行(无论成功与否)

appcontext_tearing_down = _signals.signal('appcontext-tearing-down')# 请求上下文执行完毕后自动执行(无论成功与否)

appcontext_pushed = _signals.signal('appcontext-pushed')            # 请求上下文push时执行

appcontext_popped = _signals.signal('appcontext-popped')            # 请求上下文pop时执行

message_flashed = _signals.signal('message-flashed')                # 调用flask在其中添加数据时,自动触发
源码示例
class Flask(_PackageBoundObject):

    def full_dispatch_request(self):

        self.try_trigger_before_first_request_functions()

        try:

            # ############### 触发request_started 信号 ###############

            request_started.send(self)

            rv = self.preprocess_request()

            if rv is None:

                rv = self.dispatch_request()

        except Exception as e:

            rv = self.handle_user_exception(e)

        response = self.make_response(rv)

        response = self.process_response(response)

        # ############### request_finished 信号 ###############

        request_finished.send(self, response=response)

        return response

    def wsgi_app(self, environ, start_response):

        ctx = self.request_context(environ)

        ctx.push()

        error = None

        try:

            try:

                response = self.full_dispatch_request()

            except Exception as e:

                error = e

                response = self.make_response(self.handle_exception(e))

            return response(environ, start_response)

        finally:

            if self.should_ignore_error(error):

                error = None

            ctx.auto_pop(error)

request_started
request_started
同上
request_finished
def render_template(template_name_or_list, **context):

    """Renders a template from the template folder with the given

    context.

    :param template_name_or_list: the name of the template to be

                                  rendered, or an iterable with template names

                                  the first one existing will be rendered

    :param context: the variables that should be available in the

                    context of the template.

    """

    ctx = _app_ctx_stack.top

    ctx.app.update_template_context(context)

    return _render(ctx.app.jinja_env.get_or_select_template(template_name_or_list),

                   context, ctx.app)

def _render(template, context, app):

    """Renders the template and fires the signal"""

    # ############### before_render_template 信号 ###############

    before_render_template.send(app, template=template, context=context)

    rv = template.render(context)

    # ############### template_rendered 信号 ###############

    template_rendered.send(app, template=template, context=context)

    return rv
before_render_template
同上
template_rendered
class Flask(_PackageBoundObject):

    def handle_exception(self, e):

        exc_type, exc_value, tb = sys.exc_info()

        # ############### got_request_exception 信号 ###############

        got_request_exception.send(self, exception=e)

        handler = self._find_error_handler(InternalServerError())

        if self.propagate_exceptions:

            # if we want to repropagate the exception, we can attempt to

            # raise it with the whole traceback in case we can do that

            # (the function was actually called from the except part)

            # otherwise, we just raise the error again

            if exc_value is e:

                reraise(exc_type, exc_value, tb)

            else:

                raise e

        self.log_exception((exc_type, exc_value, tb))

        if handler is None:

            return InternalServerError()

        return handler(e)

    def wsgi_app(self, environ, start_response):

        ctx = self.request_context(environ)

        ctx.push()

        error = None

        try:

            try:

                response = self.full_dispatch_request()

            except Exception as e:

                error = e

                # 这里这里这里这里这里这里这里这里这里这里这里这里 #

                response = self.make_response(self.handle_exception(e))

            return response(environ, start_response)

        finally:

            if self.should_ignore_error(error):

                error = None

            ctx.auto_pop(error)
got_request_exception
class AppContext(object):

    def push(self):

        """Binds the app context to the current context."""

        self._refcnt += 1

        if hasattr(sys, 'exc_clear'):

            sys.exc_clear()

        _app_ctx_stack.push(self)

        # ############## 触发 appcontext_pushed 信号 ##############

        appcontext_pushed.send(self.app)

    def pop(self, exc=_sentinel):

        """Pops the app context."""

        try:

            self._refcnt -= 1

            if self._refcnt <= 0:

                if exc is _sentinel:

                    exc = sys.exc_info()[1]

                # ############## 触发 appcontext_tearing_down 信号 ##############

                self.app.do_teardown_appcontext(exc)

        finally:

            rv = _app_ctx_stack.pop()

        assert rv is self, 'Popped wrong app context.  (%r instead of %r)' \

            % (rv, self)

        # ############## 触发 appcontext_popped 信号 ##############

        appcontext_popped.send(self.app)

class RequestContext(object):

    def push(self):

        top = _request_ctx_stack.top

        if top is not None and top.preserved:

            top.pop(top._preserved_exc)

        app_ctx = _app_ctx_stack.top

        if app_ctx is None or app_ctx.app != self.app:

            # ####################################################

            app_ctx = self.app.app_context()

            app_ctx.push()

            self._implicit_app_ctx_stack.append(app_ctx)

        else:

            self._implicit_app_ctx_stack.append(None)

        if hasattr(sys, 'exc_clear'):

            sys.exc_clear()

        _request_ctx_stack.push(self)

        # Open the session at the moment that the request context is

        # available. This allows a custom open_session method to use the

        # request context (e.g. code that access database information

        # stored on `g` instead of the appcontext).

        self.session = self.app.open_session(self.request)

        if self.session is None:

            self.session = self.app.make_null_session()

class Flask(_PackageBoundObject):

    def wsgi_app(self, environ, start_response):

        ctx = self.request_context(environ)

        ctx.push()

        error = None

        try:

            try:

                response = self.full_dispatch_request()

            except Exception as e:

                error = e

                response = self.make_response(self.handle_exception(e))

            return response(environ, start_response)

        finally:

            if self.should_ignore_error(error):

                error = None

            ctx.auto_pop(error)

    def pop(self, exc=_sentinel):

        app_ctx = self._implicit_app_ctx_stack.pop()

        try:

            clear_request = False

            if not self._implicit_app_ctx_stack:

                self.preserved = False

                self._preserved_exc = None

                if exc is _sentinel:

                    exc = sys.exc_info()[1]

                # ################## 触发 request_tearing_down 信号 ##################

                self.app.do_teardown_request(exc)

                # If this interpreter supports clearing the exception information

                # we do that now.  This will only go into effect on Python 2.x,

                # on 3.x it disappears automatically at the end of the exception

                # stack.

                if hasattr(sys, 'exc_clear'):

                    sys.exc_clear()

                request_close = getattr(self.request, 'close', None)

                if request_close is not None:

                    request_close()

                clear_request = True

        finally:

            rv = _request_ctx_stack.pop()

            # get rid of circular dependencies at the end of the request

            # so that we don't require the GC to be active.

            if clear_request:

                rv.request.environ['werkzeug.request'] = None

            # Get rid of the app as well if necessary.

            if app_ctx is not None:

                # ####################################################

                app_ctx.pop(exc)

            assert rv is self, 'Popped wrong request context.  ' \

                '(%r instead of %r)' % (rv, self)

    def auto_pop(self, exc):

        if self.request.environ.get('flask._preserve_context') or \

           (exc is not None and self.app.preserve_context_on_exception):

            self.preserved = True

            self._preserved_exc = exc

        else:

            self.pop(exc)
request_tearing_down
同上
appcontext_tearing_down
同上
appcontext_pushed
同上
appcontext_popped
def flash(message, category='message'):

    """Flashes a message to the next request.  In order to remove the

    flashed message from the session and to display it to the user,

    the template has to call :func:`get_flashed_messages`.

    .. versionchanged:: 0.3

       `category` parameter added.

    :param message: the message to be flashed.

    :param category: the category for the message.  The following values

                     are recommended: ``'message'`` for any kind of message,

                     ``'error'`` for errors, ``'info'`` for information

                     messages and ``'warning'`` for warnings.  However any

                     kind of string can be used as category.

    """

    # Original implementation:

    #

    #     session.setdefault('_flashes', []).append((category, message))

    #

    # This assumed that changes made to mutable structures in the session are

    # are always in sync with the session object, which is not true for session

    # implementations that use external storage for keeping their keys/values.

    flashes = session.get('_flashes', [])

    flashes.append((category, message))

    session['_flashes'] = flashes

    # ############### 触发 message_flashed 信号 ###############

    message_flashed.send(current_app._get_current_object(),

                         message=message, category=category)

message_flashed
message_flashed
执行的流程
        a. before_first_request

        b. 触发 request_started 信号

        c. before_request

        d. 模板渲染

            渲染前的信号 before_render_template.send(app, template=template, context=context)

                rv = template.render(context) # 模板渲染

            渲染后的信号 template_rendered.send(app, template=template, context=context)

        e. after_request

        f. session.save_session()

        g. 触发 request_finished信号

        如果上述过程出错:

            触发错误处理信号 got_request_exception.send(self, exception=e)

        h. 触发信号 request_tearing_down

        由信号引发的源码流程:找扩展点
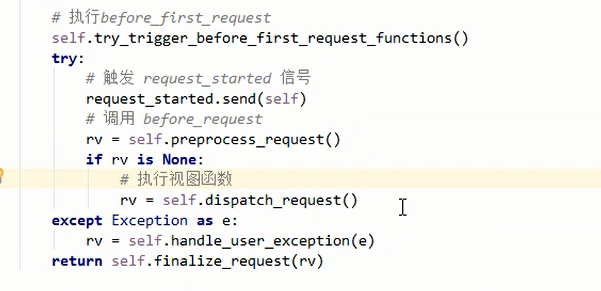
在请求到来的时候执行信号
from flask import Flask,signals,render_template

app = Flask(__name__)

# 往信号中注册函数

def func(*args,**kwargs):

    print('触发型号',args,kwargs)

signals.request_started.connect(func)

# 触发信号: signals.request_started.send()

@app.before_first_request

def before_first1(*args,**kwargs):

    pass

@app.before_first_request

def before_first2(*args,**kwargs):

    pass

@app.before_request

def before_first3(*args,**kwargs):

    pass

@app.route('/',methods=['GET',"POST"])

def index():

    print('视图')

    return render_template('index.html')

if __name__ == '__main__':

    app.wsgi_app

    app.run()
2. 自定义信号
#!/usr/bin/env python

# -*- coding:utf-8 -*-

from flask import Flask, current_app, flash, render_template

from flask.signals import _signals

app = Flask(import_name=__name__)

# 自定义信号

xxxxx = _signals.signal('xxxxx')

def func(sender, *args, **kwargs):

    print(sender)

# 自定义信号中注册函数

xxxxx.connect(func)

@app.route("/x")

def index():

    # 触发信号

    xxxxx.send('123123', k1='v1')

    return 'Index'

if __name__ == '__main__':

    app.run()
Flask —— 信号(5)的更多相关文章
- flask信号使用
flask信号: 安装: flask中的信号使用的是一个第三方插件,叫做blinker.通过pip list看一下,如果没有安装,通过以下命令即可安装blinker: pip install blin ...
- 信号(Django信号、Flask信号、Scrapy信号)
简介 Django.Flask.scrapy都包含了一个“信号分配器”,使得当一些动作在框架的其他地方发生的时候,解耦的应用可以得到提醒. 通俗来讲,就是一些动作发生的时候,信号允许特定的发送者去提醒 ...
- 了解Flask 信号机制
Flask框架中的信号基于blinker,其主要就是让开发者可是在flask请求过程中定制一些用户行为. pip3 install blinker 1. 内置信号 request_started = ...
- flask—信号(blinker)
Flask框架中的信号基于blinker,主要是让开发者在flask请求过程中定制一些用户行为. 安装blinker pip3 install blinker 1.内置信号 request_start ...
- 22、Flask实战第22天:Flask信号
Flask中的信号使用的是一个第三方插件blinker.通过pip list看一下是否安装,如果没有,则使用如下命令安装 pip install blinker 自定义信号 自定义信号分为3步: ①定 ...
- flask信号
骚师博客:信号 信号你就可以这么理解,请求比喻成赛车,请求走的流程就是赛车道,而信号坐落在赛车道上的加油站和维修站,信号注册的函数好比维修站的人,每经过维修站并且维修站里有人就进行维修 信号这里理解: ...
- Flask信号流程
首先先我们来看看Flask里面的信号是什么样的,我们可以找到一个叫signals.py的文件 这里面是所有定义了的后面请求流程中会用到的信号 二.哪些地方用到了信号 1.请求app上下文时执行的,在执 ...
- 七十四:flask信号之flask的内置信号
flask所有的内置信号 1.template_rendered:模板渲染完成后的信号2.before_render_template:模板渲染之前的信号3.request_started:模板开始渲 ...
- 七十三:flask信号之信号机制和使用场景
若安装flask是未默认安装blinker,则pip install blinker 使用信号分为3步,第一是定义一个信号,第二是监听一个信号,第三是发送一个信号 1.定义信号:定义信号需要使用到bl ...
随机推荐
- c#连接oracle数据库底层方法
using Oracle.ManagedDataAccess.Client;using System;using System.Collections;using System.Collections ...
- 第一讲 新手如何学习HTTP协议之实践项目多开微信机器人
上一篇做了一个smart qq机器人. 前几天,因为突然上不了 smart qq,以为TX 要抛弃了..所以就没有接着完善smart 机器人.应朋友要求,做一个多开微信. 做了几天已经做好了,理论上 ...
- Spring中BeanFactory的对象注册与依赖绑定方式
概念 BeanFactory是spring的基础类型IOC容器,提供完整的IOC服务支持 默认采用延迟初始化策略,当客户端对象访问受管对象时,才对其进行初始化和依赖注入 理解 BeanFactory将 ...
- Asp.Net MVC WebAPI的创建与前台Jquery ajax后台HttpClient调用详解
1.什么是WebApi,它有什么用途? Web API是一个比较宽泛的概念.这里我们提到Web API特指ASP.NET MVC Web API.在新出的MVC中,增加了WebAPI,用于提供REST ...
- HTML5移动端拖动惯性
下面代码只是实现了上下滑动惯性,没有写水平滑动惯性.(临时代码笔记,可能会在以后的过程中不断更新优化代码) /** * 惯性原理: * 产生的速度 = 移动距离 / 移动时间 * 距离 = 松开的坐标 ...
- JVM内存管理 《深入分析java web 技术内幕》第八章
8.1 物理内存与虚拟内存 物理内存RAM(随机存储器),寄存单元为寄存器,用于存储计算单元执行指令的中间结果. 连接处理器和RAM或者处理器和寄存器的是地址总线,这个地址的宽度影响了物理地址的索引范 ...
- sql左外连接和右外连接的区别例子转摘
sql左外连接和右外连接的区别 两个表:A(id,name)数据:(1,张三)(2,李四)(3,王五)B(id,name)数据:(1,学生)(2,老师)(4,校长) 左连接结果:select A. ...
- 使用 Dashboard - 每天5分钟玩转 Docker 容器技术(174)
上一节我们完成了 Kubernetes Dashboard 的安装,本节就来实践一下. Dashboard 界面结构 Dashboard 的界面很简洁,分为三个大的区域. 顶部操作区在这里用户可以搜索 ...
- Linux查看分区文件系统类型总结
在Linux 中如何查看分区的文件系统类型,下面总结几种查看分区文件系统类型的方法. 1: df -T 命令查看 这个是最简单的命令,文件系统类型在Type列输出.只可以查看已经挂载的分区和文件系统类 ...
- Keepalived脑裂
问题描述:开启防火墙后,Keepalived出现脑裂. 背景架构:两台centos7通过Keepalived实现高可用 问题具体表现形式:两台主机通过ip addr (ip a)查看,发现两台主机都 ...