SpringMVC从认识到细化了解
首发日期:2018-11-01
SpringMVC的介绍
介绍:
- SpringMVC是一个Web层的MVC框架
- SpringMVC是基于servlet来处理web请求的,所有的请求都是先经过核心servlet再转交给对应的控制器。
- 它与spring同属一家产品,可以很好地进行整合。
执行流程
- 请求处理:
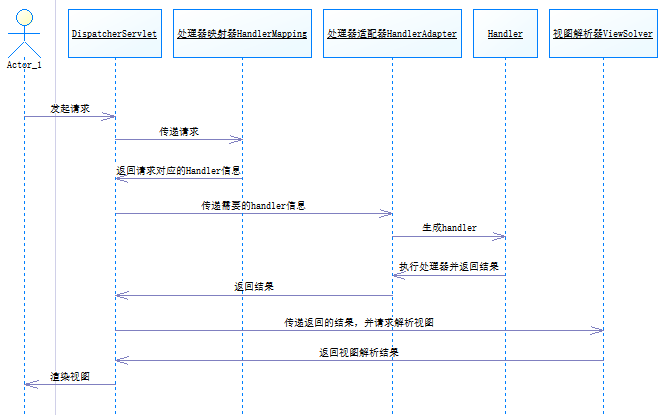
- 当请求过来时,先要经过核心的servlet--DispatcherServlet,DispatcherServlet把请求交给处理器映射器(HandlerMapping)解析,HandlerMapping查找与请求对应的处理器信息(Handler),处理器需要处理器适配器(HandlerAdapter)作为运行环境,处理器适配器创建出需要的处理器,处理器处理完业务后,返回模型和视图给处理器适配器,处理器适配器再传递给DispatcherServlet。DispatcherServlet将视图信息传递给视图解析器(ViewResolver),如果是逻辑视图,视图解析器会进行解析,然后把模型渲染到视图中,然后跳转视图。如果不是逻辑视图,则不会进行处理,而是直接通过视图渲染数据模型。
与strut2的对比
- SpringMVC是基于servlet的;struts2是基于filter的。
- springMVC拦截针对方法,它的每一个请求都与方法对应;struts2拦截针对控制器,每一个请求先对应到控制器,再对应到方法。
- springMVC参数通过方法传入;参数通过类成员变量传入。
【SpringMVC的配置有注解式配置的,也有XML配置的,由于现在普遍使用注解式的开发,所以这篇博文也主要讲解注解式。】
基本运行环境搭建
1.建立web工程,导入依赖包:
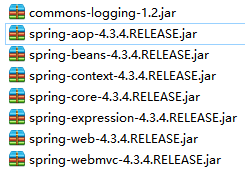
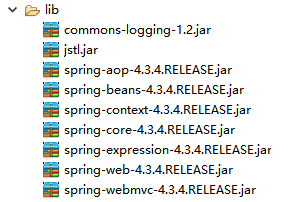
- 非Spring的包:
- jstl标签:jstl-1.2.jar,standard.jar【如果你的页面需要jstl标签库,就加上它,不然就省去,使用它主要是用来获取SpringMVC传递给页面的数据】
- 日志接口:commons-logging-1.2.jar
- Spring的包:
- 由于涉及核心容器,所以需要核心容器包
- spring-beans-4.3.4.RELEASE.jar
- spring-context-4.3.4.RELEASE.jar
- spring-core-4.3.4.RELEASE.jar
- spring-expression-4.3.4.RELEASE.jar
- 需要一些AOP基础特性:spring-aop-4.3.4.RELEASE.jar
- 需要ContextLoaderListener:spring-web-4.3.4.RELEASE.jar
- 需要mvc:spring-webmvc-4.3.4.RELEASE.jar
- 由于涉及核心容器,所以需要核心容器包
- 【如果你会maven,也可以尝试使用maven搭建环境。】
【这里只是一个基础的包,仅仅实现简单的springmvc功能,支持什么切面编程之类的包都没有。为什么说是最基础的包,有个老哥测试过了:https://blog.csdn.net/frankcheng5143/article/details/50512340】
2.配置web.xml,声明springmvc核心servlet。
  <servlet>

      	<servlet-name>springmvc</servlet-name>

      	<servlet-class>org.springframework.web.servlet.DispatcherServlet</servlet-class>

      	<init-param>

          <param-name>contextConfigLocation</param-name>

          <!--springmvc.xml是我们创建的springmvc核心配置文件 -->

          <param-value>classpath:springmvc.xml</param-value>

      	</init-param>

  </servlet>

  <servlet-mapping>

  	    <servlet-name>springmvc</servlet-name>

  	    <url-pattern>*.action</url-pattern>

  </servlet-mapping>
基础示例
【有注解式配置的,也有XML配置的,由于现在普遍使用注解式的开发,所以这篇博文也主要讲解注解式。】
1.下载spring
2.创建web工程导入依赖包:
3.在web.xml中配置前端控制器,同时要指定springmvc配置文件的位置
<!-- 配置前端控制器 -->

  <servlet>

    <servlet-name>springmvc</servlet-name>

    <servlet-class>org.springframework.web.servlet.DispatcherServlet</servlet-class>

    <!-- 设置springmvc的配置文件名称 -->

    <init-param>

      <param-name>contextConfigLocation</param-name>

      <param-value>classpath:springmvc.xml</param-value>

    </init-param>

  </servlet>

  <!-- Spring依赖核心servlet来分发请求,需要配置拦截路径来将请求先交给servlet -->

<servlet-mapping>

    <servlet-name>springmvc</servlet-name>

    <url-pattern>*.action</url-pattern>

</servlet-mapping>
【这里要提一下:SpringMVC也需要Spring IOC容器,但如果Spring没有初始化IOC容器,SpringMVC也会尝试去初始化IOC;如果你的功能不涉及Spring,那么你可以不初始化IOC,如果你的功能涉及到Spring,那么你应该在web.xml中加上下面的代码来提前初始化】
<!-- 利用监听器来初始化Spring工厂 -->

<listener>

        <listener-class>org.springframework.web.context.ContextLoaderListener</listener-class>

</listener>

  <!-- 配置参数,告诉核心过滤器读取哪个文件来创建工厂 -->

  <context-param>

        <param-name>contextConfigLocation</param-name>

        <param-value>classpath:applicationContext.xml</param-value>

  </context-param>
4.创建HelloController:HelloController用于处理请求
package work.controller;

import org.springframework.stereotype.Controller;

import org.springframework.web.bind.annotation.RequestMapping;

import org.springframework.web.servlet.ModelAndView;

//先用注解的方式声明是一个bean,方便springmvc管理。

@Controller

public class HelloController{

	//使用注解把/MySpringMVC01/hello.action请求与下面的方法对应起来

  @RequestMapping("hello")

	public ModelAndView hello() {

		System.out.println("假装在处理业务");

		//返回结果,由视图解析器解析成视图

		return new ModelAndView("/WEB-INF/jsp/index.jsp");

	}

}
5.在springmvc配置文件中配置组件扫描,这样才能够把控制器上使用注解标明的请求与控制器的映射关系告诉springmvc【这个包扫描需要context的xsd】【注意,配置文件的讲解将会在很后面讲,但事实上内容不多,在还没有讲之前,你都可以使用下面的配置文件来做练习】:
<?xml version="1.0" encoding="UTF-8"?>

<beans xmlns="http://www.springframework.org/schema/beans"

    xmlns:xsi="http://www.w3.org/2001/XMLSchema-instance"

    xmlns:context="http://www.springframework.org/schema/context"

    xmlns:mvc="http://www.springframework.org/schema/mvc"

    xsi:schemaLocation="

        http://www.springframework.org/schema/beans

        http://www.springframework.org/schema/beans/spring-beans.xsd

        http://www.springframework.org/schema/context

        http://www.springframework.org/schema/context/spring-context.xsd

        http://www.springframework.org/schema/mvc

        http://www.springframework.org/schema/mvc/spring-mvc.xsd">

     <!--扫描控制器所在的包,这样才能够识别注解 -->

	<context:component-scan base-package="work.controller" />

	<mvc:annotation-driven />

</beans>
6.测试访问:http://localhost:8080/MySpringMVC01/hello.action
上面的示例演示了请求是如何交给SpringMVC处理以及如何返回视图的。这已经演示了“请求发起-请求处理-请求返回”的步骤了。
控制器的编写
控制器创建方式:
- 使用@Controller来注解类
- 在配置文件中开启包扫描
1.使用@Controller来注解类:
package work.controller;

import org.springframework.stereotype.Controller;

import org.springframework.web.bind.annotation.RequestMapping;

import org.springframework.web.servlet.ModelAndView;

@Controller

public class HelloController{

	//RequestMapping负责将请求与处理方法对应起来

	@RequestMapping("/hello.action")

	public ModelAndView hello() {

		System.out.println("假装在处理业务");

		//返回结果,由视图解析器解析成视图

		return new ModelAndView("/WEB-INF/jsp/index.jsp");

	}

}
2.在配置文件中开启包扫描:
<?xml version="1.0" encoding="UTF-8"?>

<beans xmlns="http://www.springframework.org/schema/beans"

    xmlns:xsi="http://www.w3.org/2001/XMLSchema-instance"

    xmlns:context="http://www.springframework.org/schema/context"

    xsi:schemaLocation="

        http://www.springframework.org/schema/beans

        http://www.springframework.org/schema/beans/spring-beans.xsd

        http://www.springframework.org/schema/context

        http://www.springframework.org/schema/context/spring-context.xsd">

    <!-- 开启组件扫描,使得spring能够识别出注解  -->

	<context:component-scan base-package="work.controller" />

</beans>
请求映射问题:
spring要知道请求与控制器的映射才能够把提交的请求交给对应的控制器处理
- 使用注解@RequestMapping(请求路径)来指定处理请求的方法【要求开启了包扫描,使得springmvc能够识别注解】
- 给注解的value属性赋值时不需要指定参数名,请求路径默认就是value的值。除了value还有一些其他参数,这会单独列成一个知识点来讲。
- 三种请求路径填写方式的区别:
- @RequestMapping("/hello.action")代表仅匹配
/hello.action - @RequestMapping("hello")代表可匹配
/hello.action或者/hello.*.action或者/hello/*.action - @RequestMapping("/hello")代表可匹配
/hello.action或者/hello.*.action或者/hello/*.action
- @RequestMapping("/hello.action")代表仅匹配
- 使用注解@RequestMapping(请求路径)来指定处理请求的方法【要求开启了包扫描,使得springmvc能够识别注解】
      @Controller

      public class HelloController{

      	//以下三种方式都会把/MySpringMVC01/hello.action请求与下面的方法对应起来

      //	@RequestMapping("/hello")

      //	@RequestMapping("hello")

      	@RequestMapping("/hello.action")

      	public ModelAndView hello() {

      		System.out.println("假装在处理业务");

      		//返回结果,由视图解析器解析成视图

      		return new ModelAndView("/WEB-INF/jsp/index.jsp");

      	}

      }
获取请求提交的参数
通过域对象(request,response,session)获取:
- 在方法中添加数据域形参,通过数据域形参来获取参数。例如:
public ModelAndView save(HttpServletRequest request,HttpServletResponse response,HttpSession session),然后利用数据域对象来获取数据:String id = request.getParameter("id");【在形参中包含的数据域对象,springmvc会帮我们封装到形参中】
    @RequestMapping("login1")

    	public ModelAndView login1(HttpServletRequest request) {

    		System.out.println(request.getParameter("id"));

    		return new ModelAndView("/WEB-INF/jsp/index.jsp");

    	}
同名参数自动封装:
在方法上增加参数同名形参。比如,页面中有一个name="id"的输入框提交了数据,那么可以在方法中定义一个与这个输入框提交的数值数据类型相同的、形参名与name的属性一致的形参。
public ModelAndView save(Integer id)【注意,定义了同名形参,但页面没有提交对应的表单项,这时候封装的值为null,所以如果形参的类型无法存储null则会报错】页面表单的编写:
<form action="login2.action" method="post">

	<input type="text" name="id" >

	<input type="submit">

</form>
控制器方法的编写:
	@RequestMapping("login2")

	public ModelAndView login2(Integer id) {//页面表单项名称为id

		System.out.println(id);

		return new ModelAndView("/WEB-INF/jsp/index.jsp");

	}
同名参数自动封装也支持POJO类中同名属性,如果把一个POJO类对象作为形参,当提交的表单项与POJO类对象的属性同名时,也会把数据封装到POJO类对象中,但要注意表单提交的name属性必需与pojo的属性名称一致。表单的name要是
pojo的属性名,如果属性是一个对象,那么使用pojo的内嵌对象变量名.内嵌对象的属性名页面表单的编写:
<form action="login3.action" method="post">

	<!-- 普通属性直接使用属性名 -->

	<input type="text" name="id" >

	<input type="text" name="name" >

	<!-- 内嵌对象的属性,用内嵌对象变量名.内嵌对象的属性名 -->

	<input type="text" name="account.money" >

	<input type="submit">

</form>
控制器方法的编写:
	@RequestMapping("login3")

	public ModelAndView login3(User user) {

        System.out.println(user.getId()+"..."+user.getName()+"..."+

        user.getAccount().getMoney());

		return new ModelAndView("/WEB-INF/jsp/index.jsp");

	}
手动映射封装:
- 如果形参名字与表单项名字不同,可以利用注解@RequestParam来强制把表单项提交的值赋值给形参。
@RequestParam:定义参数绑定规则,解决参数名与形参名不一致问题。这时候参数默认不能为空(由@RequestParam的required属性限制,required默认为true)。
//	public ModelAndView login4(@RequestParam("id") Integer uid) {//这时候必须要提交上来

	public ModelAndView login4(@RequestParam(value="id",required=false) Integer uid) {

	//把提交的表单项名为id的值存储到形参uid中

		System.out.println(uid);

		return new ModelAndView("/WEB-INF/jsp/index.jsp");

	}
数组、集合类型参数绑定
数组类型绑定:对于多选框类型的表单项提交,由于表单项名都一样,通常都会使用数组来存储,只要形参名与表单项名一致,而且类型是数组类型的,那么提交的多个同名表单数据就会存储到数组中。
页面的编写:
<form action="login5.action" method="post">

	<input type="checkbox" name="courses" value="Chinese" >语文

	<input type="checkbox" name="courses" value="English" >英语

	<input type="checkbox" name="courses" value="Math" >数学

	<input type="submit">

</form>
控制器方法的编写:
	@RequestMapping("login5")

	public ModelAndView login5(String[] courses) {

		for (String course : courses) {

			System.out.println(course);

		}

		return new ModelAndView("/WEB-INF/jsp/index.jsp");

	}
数组类型的数据封装也是可以封装到POJO类对象中的,只要遵循形参命名规则即可。
List:
而对于非同名的多选框,但又需要出现多次时(类似批量修改多个表单项的情况),通常使用List搭配POJO类来存储。【注意这里List封装需要把List放到一个POJO类中(或者使用json方式来传递),它不能够直接在形参中使用同名形参封装】
页面的编写:
<form action="login6.action" method="post">

	1:<input type="text" name="accounts[0].money">

	2:<input type="text" name="accounts[1].money">

	3:<input type="text" name="accounts[2].money">

	<input type="submit">

</form>
控制器方法的编写:
	@RequestMapping("login6")

	public ModelAndView login6(MContainer mcontainer) {

		//MContainer类没什么特别意义,它里面有List<Account> accounts。仅作演示

		for (Account account : mcontainer.getAccounts()) {

			System.out.println(account);

		}

		return new ModelAndView("/WEB-INF/jsp/index.jsp");

	}
使用URL传递参数:
- 还可以从URL中获取参数,这是一种Restful风格的获取参数方式。
- 在@RequestMapping的value中使用
{}来包裹参数,然后在方法的形参中使用@PathVariable来指定形参获取的是URL中的参数。
    @RequestMapping("shop/{product}/{id}")

    	public ModelAndView shopOperation(@PathVariable("product") String product,@PathVariable("id")Integer id) {

    		System.out.println("product:"+product+"  id:"+id);

    		return new ModelAndView("/WEB-INF/jsp/index.jsp");

    	}

    //<然后访问`http://localhost:8080/项目名/shop/food/1000.action`,就可以得出product为food和id的值为1000。
传递参数给视图
利用request传递数据:在方法中添加形参HttpServletRequest request,然后在方法中调用request的API即可。
@RequestMapping("paramreturn1")

	public ModelAndView paramreturn1(HttpServletRequest request) {

		//把数据存到request域中

		request.setAttribute("name", "huluwa");

		return new ModelAndView("/WEB-INF/jsp/showparam.jsp");

	}
通过ModelAndView传递数据:在代码中new ModelAndView()然后调用addObject方法把参数添加进去(数据会存储到request域中,在视图中可以用EL表达式
${参数名}获取)。ModelAndView还可以作为视图返回结果,调用setName方法来设置返回的视图。@RequestMapping("paramreturn2")
public ModelAndView paramreturn2() {
ModelAndView mav = new ModelAndView();
String name=new String("Robert");
mav.addObject("name", name);
mav.setViewName("/WEB-INF/jsp/showparam.jsp");
return mav;
}
通过Model 传递数据:在方法中定义一个Model类对象的形参,利用Model类对象的addAttribute方法把参数传递给视图。(数据会存储到request域中)。
@RequestMapping("paramreturn3")

	public String paramreturn3(Model model) {

		String name=new String("Robert");

		model.addAttribute("name", name);

		return "/WEB-INF/jsp/showparam.jsp";

	}
通过ModelMap传递数据:在方法中定义一个ModelMap类对象的形参,利用ModelMap类对象的addAttribute方法把参数传递给视图。【ModelMap是Model的实现类】
@RequestMapping("paramreturn4")

	public String paramreturn3(ModelMap modelmap) {

		String name=new String("Robert");

		modelmap.addAttribute("name", name);

		return "/WEB-INF/jsp/showparam.jsp";

	}
那么,视图怎么获取返回的参数呢?
可以通过jsp标签、jstl标签、el表达式来获取。数据都存储在request域中,可以使用如下的代码来获取。
<c:forEach items="${itemList }" var="item">

    <tr>

        	<td>${item.name }</td>

        	<td>${item.price }</td>

        	<td>${item.detail }</td>

    </tr>

</c:forEach>
@RequestMapping注解
在前面介绍了使用@RequestMapping注解来定义请求与方法的映射关系,下面具体讲一下@RequestMapping注解的使用。
@RequestMapping的value的值还可以是一个数组,代表控制器的方法映射给多个请求,使得多个请求路径都交给同一个方法来处理。
@RequestMapping(value= {"mapping1","mapping2"})

	public ModelAndView mapping1() {

		System.out.println("你访问了mapping1");

		return new ModelAndView("/WEB-INF/jsp/index.jsp");//随意跳个页面,关键是上面的打印结果

	}
@RequestMapping注解除了可以修饰方法,也可以修饰类,修饰类的时候,相当于给方法下的@RequestMapping配置的请求路径都加了一个父级目录。
@Controller

@RequestMapping("map")

public class MappingTest {

	@RequestMapping(value= {"mapping1","mapping2"})

	public ModelAndView mapping1() {

		System.out.println("你访问了mapping1");

		return new ModelAndView("/WEB-INF/jsp/index.jsp");//随意跳个页面,关键是上面的打印结果

	}

	//现在调用方法要访问http://localhost:8080/MySpringMVC01/map/mapping1.action

}
@RequestMapping还可以限定请求的方式,某些方法可能仅仅想限定POST方法来请求,那么可以使用method参数来设置。如果有多种允许的请求方法,使用数组括起来。
//只允许post方式请求

	@RequestMapping(value="mapping3",method=RequestMethod.POST)

	public ModelAndView mapping3() {

		System.out.println("你访问了mapping3");

		return new ModelAndView("/WEB-INF/jsp/index.jsp");//随意跳个页面,关键是上面的打印结果

	}
返回视图
可以通过返回一个ModelAndView对象来返回视图:
手动设置视图名称:
mav.setViewName("/WEB-INF/jsp/itemList.jsp");构造函数传入视图名称:
ModelAndView mav=new ModelAndView("/WEB-INF/jsp/index.jsp");@Controller
public class ViewTest {
@RequestMapping(value="mapping3")
public ModelAndView view1() {
System.out.println("你访问了mapping3");
/*方式一,手动设置视图名称
ModelAndView mav=new ModelAndView();
mav.setViewName("/WEB-INF/jsp/index.jsp");
return mav;
*/
/*方式二,构造函数传入视图名称
ModelAndView mav=new ModelAndView("/WEB-INF/jsp/index.jsp");
return mav;
*/
return new ModelAndView("/WEB-INF/jsp/index.jsp");
}
}
通过返回一个字符串来返回视图,字符串要求是视图名称字符串。
@RequestMapping(value="view2")

	public String view2() {

		System.out.println("你访问了view2");

		return "/WEB-INF/jsp/index.jsp";

	}
返回void,利用request和response来进行跳转视图:【request和response跳转视图是不经过视图解析器的】
通过request转发:
@RequestMapping(value="view3")

	public void view3(HttpServletRequest request,HttpServletResponse response) throws ServletException, IOException {

		System.out.println("你访问了view3");

		request.getRequestDispatcher("/WEB-INF/jsp/index.jsp").forward(request, response);

		return;

	}
通过response重定向:
@RequestMapping(value="view4")

	public void view4(HttpServletResponse response) throws ServletException, IOException {

		System.out.println("你访问了view4");

		response.sendRedirect("/MySpringMVC01/login.jsp");//要注意路径区别

		return;

	}
返回以forward或redirect带头的字符串:
redirect:后面跟着的路径可以省去项目名,其他都和
response.sendRedirect()差不多;forward:后面跟着的路径与在request.getRequestDispatcher()中填的差不多。【redirect:和forward:也可以用在ModelAndView的返回视图中】@RequestMapping(value="view5")
public String view5() {
System.out.println("你访问了view5");
// return "forward:/WEB-INF/jsp/index.jsp";
return "redirect:/login.jsp";//这里可以省去项目名
}
- 跳转到控制器:【上面的示例中返回的视图都是普通资源文件,有时候我们会需要跳到某个控制器上】
- 事实上,上面的几种方式都可以用来跳转到控制器上
return "forward:hello.action";return "redirect:hello.action";return "hello.action";request.getRequestDispatcher("hello.action").forward(request, response);response.sendRedirect("hello.action")return new ModelAndView("hello.action");
- 事实上,上面的几种方式都可以用来跳转到控制器上
题外话:重定向时的数据存储问题
按以前的来说,当我们使用重定向时,像request数据域中的数据,在新的视图中是获取不了的。
我们既想实现跳转,又想保留数据,可以利用redirect:和ModelAndView,我们在ModelAndView中绑定数据,并在视图名称前加上
redirect:即可,这样ModelAndView中的数据仍然能够获取。
字符编码问题
- 字符编码影响了数据传递,所以这里提一下。
- 在servlet中,我们通常都需要处理请求数据和返回结果的字符编码问题,我们需要确保post和get方式提交的数据的能够被请求方法正确识别。而在springMVC中,它自带了编码处理手段。
get提交乱码问题:
- 由于get提交的数据会拼接在url中,这时候解决方案主要有两种:
- 解决方案:编写过滤器,把get方式提交的数据解码成服务端能识别的数据。【如果你学过servlet,相信这个你会的】
post提交乱码问题:
- 在servlet中,post提交数据乱码问题通常会使用过滤器来处理。而SpringMVC内置了一个用于处理post数据编码问题的过滤器。这个过滤器的名字是CharacterEncodingFilter,我们可以在web.xml中配置它.
<filter>

		<filter-name>encoding-filter</filter-name>

		<filter-class>org.springframework.web.filter.CharacterEncodingFilter</filter-class>

		<!-- 下面的参数是编码成什么格式,请求的数据默认是ISO-8859-1,下面的是目标字符集 -->

		<!-- 效果是request.setCharacterEncoding(this.encoding); -->

		<init-param>

			<param-name>encoding</param-name>

			<param-value>UTF-8</param-value>

		</init-param>

	</filter>

	<filter-mapping>

		<filter-name>encoding-filter</filter-name>

		<url-pattern>/*</url-pattern>

	</filter-mapping>
向页面返回数据乱码问题:
- 向页面返回数据时有时候会发生乱码问题,如果你使用response来返回数据,你可能需要在获取getWriter之前,先执行下面的代码。
response.setHeader("Content-type", "text/html;charset=UTF-8");

response.setCharacterEncoding("utf-8");
题外话:返回视图的时候,有些jsp文件的编码不是utf-8,而且也没有在代码中显式地设置字符编码,为什么还是能正确编码?
因为Spring MVC的视图解析器帮我们解析了jsp文件的编码格式,并帮我们在http响应信息中自动设置了响应的字符编码格式。
springMVC.xml的配置
与applicationContext.xml的区别:springMVC.xml主要是针对SpringMVC,所以它的配置通常都是关于SpringMVC的配置,而一些例如属性注入、事务的配置都交给Spring。
开启注解扫描
只有开启了注解扫描,SpringMVC才能识别@Controller和@RequestMapping这些注解。
<context:component-scan base-package="work.controller" />
配置注解驱动
<mvc:annotation-driven />
上面这个操作会自动注册RequestMappingHandlerMapping与RequestMappingHandlerAdapter两个Bean,这两个Bean是处理器映射器和处理器适配器,如果不配置,默认情况下的使用的是旧版的处理器映射器和处理器适配器。新版的Bean增加了不少功能,包含数据绑定支持,@NumberFormatannotation支持,@DateTimeFormat支持,@Valid支持读写XML的支持(JAXB)和读写JSON的支持(默认Jackson)等功能
配置视图解析器
控制器返回结果给核心servlet,核心servlet把结果交给视图解析器来进行解析。
配置视图属性
视图解析器负责解析视图,我们可以给视图解析器配置一些属性,例如前缀和后缀,如果加了后缀.jsp,那么控制器返回的结果就会加上.jsp再进行解析。【比如加了后缀.jsp,如果返回success,那么解析结果应该是success.jsp】
<!-- 配置视图解析器 -->

	<bean class="org.springframework.web.servlet.view.InternalResourceViewResolver">

		<!-- 配置视图响应的前缀 -->

		<property name="prefix" value="/WEB-INF/jsp/" />

		<!-- 配置视图响应的后缀 -->

		<property name="suffix" value=".jsp" />

	</bean>
配置了之后:以返回字符串方式的视图跳转为例,return "success"解析出的视图结果将是
/WEB-INF/jsp/success.jsp
补充
- springMVC.xml中还可以配置文件上传,不过这个内容涉及控制器,所以单独作为一个知识点在后面讲。
- springMVC.xml中还可以配置全局异常处理器,这涉及异常处理,所以单独作为一个知识点在后面讲。
- springMVC.xml可以配置的内容很多,有兴趣的可以自查。
拦截器
- 拦截器是用来拦截请求到处理器的,例如像用户权限验证就需要拦截器。
- 拦截器可以设置几个方法:preHandle、postHandle、afterCompletion
使用:
自定义拦截器
1.定义一个拦截器类实现HandlerInterceptor接口中的三个方法。
- preHandle:发生在进入业务逻辑前,可以进行登录拦截,权限验证。
- postHandle: 触发在处理器的逻辑完成后,返回视图之前,可以用来设置页面共有参数。
- afterCompletion:发生在处理器执行完成之后,可以用来处理异常、释放资源、记录日志。
- 【有多个拦截器的情况下,后续的拦截器就算不放行,前面已经放行的拦截器的after还是会执行】
public class LoginInterceptor implements HandlerInterceptor {

	@Override

	public void afterCompletion(HttpServletRequest arg0, HttpServletResponse arg1, Object arg2, Exception arg3)

			throws Exception {

			//注意这个方法有Exception形参

		System.out.println("afterCompletion执行了");

	}

	@Override

	public void postHandle(HttpServletRequest arg0, HttpServletResponse arg1, Object arg2, ModelAndView arg3)

			throws Exception {

			//注意这个方法有ModelAndView形参

		System.out.println("postHandle执行了");

	}

	@Override

	public boolean preHandle(HttpServletRequest request, HttpServletResponse response, Object arg2) throws Exception {

		if(request.getSession().getAttribute("loginUser")!=null) {

			//返回true放行,返回false不放行

			return true;

		}

		response.setHeader("Content-type", "text/html;charset=UTF-8");

		response.setCharacterEncoding("utf-8");

		response.getWriter().println("你没有权限,请登录");

		return false;

	}

}
2.配置拦截器
定义了拦截器之后,我们还需要把我们定义的拦截器告诉springmvc。可以在springmvc.xml中配置拦截器(需要注意需要引入mvc的xsd)
<!-- 开始拦截器定义,interceptors下可以定义多个拦截器 -->

	<mvc:interceptors>

		<!-- 定义一个拦截器 -->

		<mvc:interceptor>

			<!-- path是要拦截的请求,/**代表拦截所有请求(包括二级以上目录),/*代表拦截所有一级目录请求 -->

			<mvc:mapping path="/**"/>

			<!-- bean的class里面填拦截器的全限定名 -->

			<bean class="work.interceptor.LoginInterceptor"></bean>

		</mvc:interceptor>

	</mvc:interceptors>
有多个拦截器时,拦截器的执行按照配置顺序。
拦截排除
用于配置不进行拦截的请求。例如用户有多个操作,不希望他在没有登录的情况进行操作,但应该允许他发起登录与注册请求,那么登录和注册就不应该被拦截器拦截,这时候就应该使用拦截排除。
<!-- 登录拦截器 -->

	<mvc:interceptors>

		<mvc:interceptor>

			<mvc:mapping path="/**"/>

			<!-- 配置不拦截请求的地址,path里面是不拦截的请求 -->

			<mvc:exclude-mapping path="/user/*"/>

			<bean class="work.interceptor.LoginInterceptor"></bean>

		</mvc:interceptor>

	</mvc:interceptors>
json数据交互
- springmvc还支持转换json数据。
- 如果你在springmvc.xml中配置了
<mvc:annotation-driven />,那么你可以使用@ResponseBody和@RequestBody注解来与视图进行JSON数据交互。
依赖包
【下面的依赖包是从SpringMVC4才开始的,旧版本的话就不是下面三个】
- jackson-annotations-2.5.0.jar
- jackson-core-2.5.0.jar
- jackson-databind-2.5.0.jar
使用
- 注解@ResponseBody可以把向视图返回的结果对象转成json格式的字符串响应给用户(通过HttpMessageConverter接口转换为指定格式的数据),键名是对象的属性名;
- @RequestBody可以用于接收用户传入json格式的字符串并转成对象(通过HttpMessageConverter接口转换为指定格式的数据),如果json格式的字符串中键名与对象的属性名一致,那么就能封装上数据。
  	@RequestMapping("/getCategory.action")

  	@ResponseBody

  	public Category getCategory(@RequestBody Category category) {

  		System.out.println(category);

  		return category;

  	}
使用postman测试的结果:

全局异常处理
在控制器中有时候可能也会发生异常,发生异常的时候,如果不进行处理,异常会显示到页面上。所以我们通常都需要在控制器中进行异常处理,但下面讲到的SpringMVC支持的全局异常处理器可以拦截控制器抛出的所有异常,也就是说可以在全局异常处理器中统一处理异常。
定义全局异常处理器:
如果控制器没有处理异常,那么可以由全局异常处理器处理异常。
1.实现接口HandlerExceptionResolver并实现resolveException方法,resolveException是用来处理异常的,返回结果是一个ModelAndView,这代表了处理完异常了可以跳转到一个视图中显示异常。
public class CategoryException implements HandlerExceptionResolver {

	@Override

	public ModelAndView resolveException(HttpServletRequest request, HttpServletResponse response, Object hanlder,

 			Exception e) {

		System.out.println(e.getStackTrace());

		String message="抱歉,系统发生了错误";

		ModelAndView mav = new ModelAndView();

		mav.addObject("message", message);

		mav.setViewName("/error.jsp");

		return mav;

	}

}
2.配置异常处理器
只需要把全局异常处理器配置成一个bean即可,由于继承了andlerExceptionResolver,SpringMVC很清楚它是什么东西。
<bean class="work.exception.CategoryException"></bean>
自定义异常
- 有了一个全局的异常处理器,有时候控制器内部的异常处理机制的作用就没那么大了(为什么这么说,对于那些不可处理的异常,我们很多时候都是选择返回指定的异常信息给用户,而现在有了全局异常处理器,我们可以让全局异常处理器返回指定的异常信息给用户。)
- 那么,控制器怎么给全局异常处理器指定异常信息呢?可以通过抛出携带异常信息的自定义异常给全局异常处理器。
1.首先,创建自定义异常类,继承Exception,要求要有带错误信息的构造方法(这样就能构造自定义的异常信息了。)另外,最好有异常信息的getter和setter方法,这样全局异常处理器就可以通过getter来获取异常信息了,不然采用默认的异常构造方式的话还要利用e.getMessage()来获取异常。
public class MyException extends Exception {

	private String msg;//这是自定义的异常信息

	public MyException() {

  		super();

  	}

  	public MyException(String msg) {

  		super();

  		this.msg = msg;

  	}

  	public String getMsg() {

  		return msg;

  	}

  	public void setMsg(String msg) {

  		this.msg = msg;

  	}

}
2.在控制器中抛出自定义异常。
	@RequestMapping("/save.action")

	public ModelAndView save(Category category) throws MyException {

		System.out.println(category);

		categoryService.save(category);

		if(true) {//这里假设发生了异常

			throw new MyException("保存商品失败!");

		}

		return new ModelAndView("findAll.action");

	}
3.修改全局处理器代码,使得能够获取自定义异常信息。
public class CategoryException implements HandlerExceptionResolver {

	@Override

	public ModelAndView resolveException(HttpServletRequest request, HttpServletResponse response, Object hanlder,

 			Exception e) {

		String message="抱歉,系统发生了错误";

		//获取抛出的自定义异常信息

		if(e instanceof MyException) {

			message=((MyException)e).getMsg();;

		}

		ModelAndView mav = new ModelAndView();

		mav.addObject("message", message);

		mav.setViewName("/error.jsp");

		return mav;

	}

}
上传文件
在开发中,或许需要上传文件,SpringMVC也提供了很方便的上传文件功能。
使用
1.首先导入依赖包:
- commons.fileupload-1.2.2.jar
- commons-io-2.4.jar
2.在springmvc.xml中配置多媒体解析器
<!-- 配置多媒体处理器 -->

	<!-- 下面的id必须是multipartResolver -->

	<bean id="multipartResolver" class="org.springframework.web.multipart.commons.CommonsMultipartResolver">

		<!-- 里面可以配置一系列的值,用于配置上传文件的限制 -->

	</bean>
3.编写测试页面:
【要加上enctype="multipart/form-data",但注意这并不会影响其他数据的封装,因为有了多媒体处理器。】
<form class="form-inline" action="save.action" method="post" enctype="multipart/form-data">

            <!-- 省去其他内容 -->

              	<div class="form-group">

              	      <label for="pimage">商品图片</label>

                	    <input type="file" class="form-control" id="pimage" placeholder="商品图片" name="uploadFile">

              	</div>

              	<div class="form-group">

  					        <button type="submit" class="btn btn-default">提交</button>

				        </div>

</form>
4.编写文件上传代码:在形参中添加一个参数:MultipartFile uploadfile【如果是MultipartFile类的,那么上传的数据会自动封装到对象中】【要求MultipartFile形参的名字与上传项的name相同,不然需要@RequestParam强制对应】
- 常见方法:
- uploadfile.transferTo(File类对象):把上传的文件写入本地磁盘
- uploadfile.getOriginalFilename():获取上传的文件名
	@RequestMapping("save.action")

	public ModelAndView save(Product product,MultipartFile uploadFile) throws Exception {

		System.out.println(product);

		String name = UUID.randomUUID().toString(); //随机获取文件名,避免重复

		String oldName = uploadFile.getOriginalFilename();//获取原文件名

		System.out.println(oldName);

		String extName = oldName.substring(oldName.lastIndexOf("."));//获取扩展名

		File file=new File("D:\\upload\\"+name+extName);//文件存储的路径

		uploadFile.transferTo(file);//存储文件到指定位置

		product.setPimage(name+extName);

		productService.save(product);

		ModelAndView mav= new ModelAndView();

		mav.setViewName("findAll.action");

		return mav;

	}
写在最后:
这里没写,准备后期有空写的内容:
- 表单验证
- 类型转换与格式化
- JConfig式配置。
- Restful
SpringMVC从认识到细化了解的更多相关文章
- 【JavaWeb】Spring+SpringMVC+MyBatis+SpringSecurity+EhCache+JCaptcha 完整Web基础框架(四)
SpringSecurity(1) 其实啊,这部分我是最不想写的,因为最麻烦的也是这部分,真的是非常非常的麻烦.关于SpringSecurity的配置,让我折腾了好半天,网上的配置方式一大把,但总有一 ...
- springmvc学习笔记--ueditor和springmvc的集成
前言: 在web开发中, 富文本的编辑器真心很重要. 有电商店铺的打理, 新闻稿/博客文章/论坛帖子的编辑等等, 这种所见即所的编辑方式, 大大方便了非技术人员从事互利网相关的工作. 因为手头有个小项 ...
- springMVC的注解详解
springmvc常用注解标签详解 1.@Controller 在SpringMVC 中,控制器Controller 负责处理由DispatcherServlet 分发的请求,它把用户请求的数据经过业 ...
- Java过滤器,SpringMVC拦截器之间的一顺序点关系
由于最近做的项目中有一部分是接口远程调用,用到了接入权限和业务权限的鉴定,需要采用SpringMVC的拦截器,以前用Struts2的时候用过拦截器,而SpringMVC的拦截器功能之前没研究过,所以这 ...
- springmvc常用注解标签详解
1.@Controller 在SpringMVC 中,控制器Controller 负责处理由DispatcherServlet 分发的请求,它把用户请求的数据经过业务处理层处理之后封装成一个Model ...
- SpringMVC 源码深度解析<context:component-scan>(扫描和注冊的注解Bean)
我们在SpringMVC开发项目中,有的用注解和XML配置Bean,这两种都各有自己的优势,数据源配置比較经经常使用XML配置.控制层依赖的service比較经经常使用注解等(在部署时比較不会改变的) ...
- springMVC 注解版
http://blog.csdn.net/liuxiit/article/details/5756115 http://blog.csdn.net/hantiannan/article/categor ...
- springmvc+mongodb+maven 项目搭建配置
操作步骤我就不再细化了 项目能运行,测试过了,先上配置,另一篇文章上代码,点击下载源码 项目结构 pom.xml <project xmlns="http://maven.apache ...
- SpringMVC源码解析- HandlerAdapter - ModelFactory(转)
ModelFactory主要是两个职责: 1. 初始化model 2. 处理器执行后将modle中相应参数设置到SessionAttributes中 我们来看看具体的处理逻辑(直接充当分析目录): 1 ...
随机推荐
- 事件派发dispatchEvent
1.什么是dispatchEvent? dispatch意为"调度"."派遣",event为"事件".所以dispatchEvent即向指定 ...
- HBase之Table.put客户端流程
首先,让我们从HTable.put方法开始.由于这一节有很多方法只是简单的参数传递,我就简单略过,但是,关键的方法我还是会截图讲解,所以希望大家尽可能对照源码进行流程分析.另外,在这一节,我单单介绍p ...
- python之读取配置文件模块configparser(一)基本操作
configparser模块是读取类ini文件使用,其有固定的读取格式如下: [section1] option11 = value11 option12 = value12 .... [sectio ...
- SpringCloud(4)---Ribbon服务调用,源码分析
SpringCloud(4)---Ribbon 本篇模拟订单服务调用商品服务,同时商品服务采用集群部署. 注册中心服务端口号7001,订单服务端口号9001,商品集群端口号:8001.8002.800 ...
- Java导出CSV文件
以前导出总是用POI导出为Excel文件,后来当我了解到CSV以后,我发现速度飞快. 如果导出的数据不要求格式.样式.公式等等,建议最好导成CSV文件,因为真的很快. 虽然我们可以用Java再带的文件 ...
- IntelliJ IDEA中创建Web聚合项目(Maven多模块项目)
Eclipse用多了,IntelliJ中创建Maven聚合项目可能有小伙伴还不太熟悉,我们今天就来看看. IntelliJ中创建普通的Java聚合项目相对来说比较容易,不会涉及到web操作,涉及到we ...
- python操作符笔记
1.**两个乘号就是乘方,比如2**4,结果就是2的4次方,结果是16 2.//就是做浮点除法,并舍弃小数部分(注意不是四舍五入) 3.@是python中的修饰符,具体功能我没弄懂.
- 初探Java设计模式2:结构型模式(代理模式,适配器模式等)
行为型模式 行为型模式关注的是各个类之间的相互作用,将职责划分清楚,使得我们的代码更加地清晰. 策略模式 策略模式太常用了,所以把它放到最前面进行介绍.它比较简单,我就不废话,直接用代码说事吧. 下面 ...
- java~@Async异步功能
@Async注解,可以实现异步处理的功能,它可以有返回值,或者直接在新线程时并行执行一个任务,对于异步来说,它的执行是有条件的,你需要把异步代码块放在单独的类里,当spring在注入时,才不会相互影响 ...
- 【Java基础】【25多线程(下)&GUI】
25.01_多线程(单例设计模式)(掌握) 单例设计模式:保证类在内存中只有一个对象. 如何保证类在内存中只有一个对象呢? (1)控制类的创建,不让其他类来创建本类的对象.private (2)在本类 ...