JavaWeb开发SSM框架搭建详解
1.需要用到的jar包:由于很多的jar包不好下载,我直接上传到百度网盘:
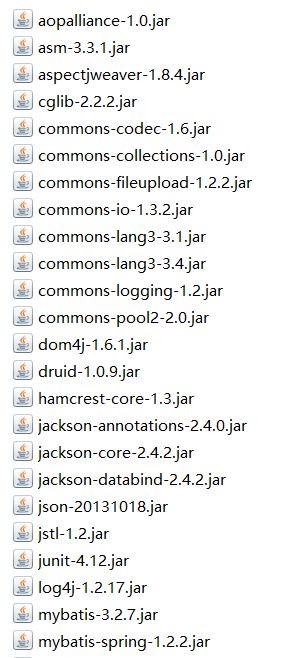
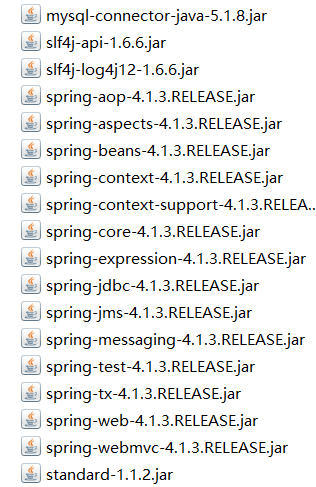
很多,而且不好下载,我已经整理好好了:
链接:https://pan.baidu.com/s/1iIFprmstp86uKz8OgHDMWg 密码:oewl
关于SSM框架:以前的博客有介绍过
Spring框架:https://www.cnblogs.com/xuyiqing/category/1164340.html
SpringMVC框架:https://www.cnblogs.com/xuyiqing/category/1269718.html
MyBatis框架:https://www.cnblogs.com/xuyiqing/category/1181308.html
第一步:创建Dynamic Web Project
首先是整合之后的目录结构:
需要我们关注的只是我红线画出的:
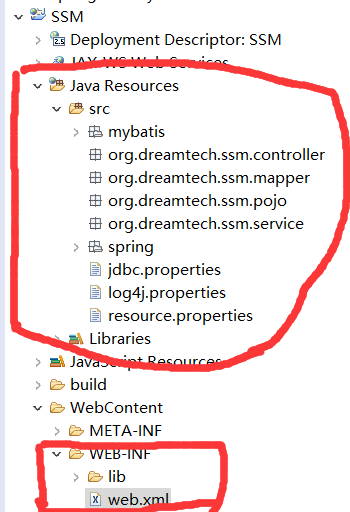
先把所有的jar包复制入lib文件夹:不同于传统java项目,这里会自动build path,总之复制进去就完事了
关于mybatis和spring的配置文件,分别在两个文件夹中:
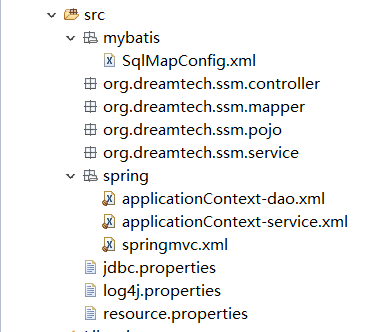
首先来配置mybatis:SqlMapConfig.xml:
<?xml version="1.0" encoding="UTF-8" ?>

<!DOCTYPE configuration PUBLIC "-//mybatis.org//DTD Config 3.0//EN"

"http://mybatis.org/dtd/mybatis-3-config.dtd">

<configuration>

    <!-- 别名 -->

    <typeAliases>

        <package name="org.dreamtech.ssm.pojo"/>

    </typeAliases>

</configuration>
配置Spring:
Dao层:applicationContext-dao.xml
<?xml version="1.0" encoding="UTF-8"?>

<beans xmlns="http://www.springframework.org/schema/beans"

    xmlns:context="http://www.springframework.org/schema/context" xmlns:p="http://www.springframework.org/schema/p"

    xmlns:aop="http://www.springframework.org/schema/aop" xmlns:tx="http://www.springframework.org/schema/tx"

    xmlns:xsi="http://www.w3.org/2001/XMLSchema-instance"

    xsi:schemaLocation="http://www.springframework.org/schema/beans http://www.springframework.org/schema/beans/spring-beans-4.0.xsd

    http://www.springframework.org/schema/context http://www.springframework.org/schema/context/spring-context-4.0.xsd

    http://www.springframework.org/schema/aop http://www.springframework.org/schema/aop/spring-aop-4.0.xsd http://www.springframework.org/schema/tx http://www.springframework.org/schema/tx/spring-tx-4.0.xsd

    http://www.springframework.org/schema/util http://www.springframework.org/schema/util/spring-util-4.0.xsd">

    <!-- 配置 读取properties文件 jdbc.properties -->

    <context:property-placeholder location="classpath:jdbc.properties" />

    <!-- 配置 数据源 -->

    <bean id="dataSource" class="com.alibaba.druid.pool.DruidDataSource">

        <property name="driverClassName" value="${jdbc.driver}" />

        <property name="url" value="${jdbc.url}" />

        <property name="username" value="${jdbc.username}" />

        <property name="password" value="${jdbc.password}" />

    </bean>

    <!-- 配置SqlSessionFactory -->

    <bean class="org.mybatis.spring.SqlSessionFactoryBean">

        <!-- 设置MyBatis核心配置文件 -->

        <property name="configLocation" value="classpath:mybatis/SqlMapConfig.xml" />

        <!-- 设置数据源 -->

        <property name="dataSource" ref="dataSource" />

    </bean>

    <!-- 配置Mapper扫描 -->

    <bean class="org.mybatis.spring.mapper.MapperScannerConfigurer">

        <!-- 设置Mapper扫描包 -->

        <property name="basePackage" value="org.dreamtech.ssm.mapper" />

    </bean>

</beans>
Service层:applicationContext-service.xml:
<?xml version="1.0" encoding="UTF-8"?>

<beans xmlns="http://www.springframework.org/schema/beans"

    xmlns:context="http://www.springframework.org/schema/context" xmlns:p="http://www.springframework.org/schema/p"

    xmlns:aop="http://www.springframework.org/schema/aop" xmlns:tx="http://www.springframework.org/schema/tx"

    xmlns:xsi="http://www.w3.org/2001/XMLSchema-instance"

    xsi:schemaLocation="http://www.springframework.org/schema/beans http://www.springframework.org/schema/beans/spring-beans-4.0.xsd

    http://www.springframework.org/schema/context http://www.springframework.org/schema/context/spring-context-4.0.xsd

    http://www.springframework.org/schema/aop http://www.springframework.org/schema/aop/spring-aop-4.0.xsd http://www.springframework.org/schema/tx http://www.springframework.org/schema/tx/spring-tx-4.0.xsd

    http://www.springframework.org/schema/util http://www.springframework.org/schema/util/spring-util-4.0.xsd">

    <!-- 配置Service扫描 -->

    <context:component-scan base-package="org.dreamtech.ssm.service" />

</beans>
配置SpringMVC:springmvc.xml
<?xml version="1.0" encoding="UTF-8"?>

<beans xmlns="http://www.springframework.org/schema/beans"

    xmlns:xsi="http://www.w3.org/2001/XMLSchema-instance" xmlns:p="http://www.springframework.org/schema/p"

    xmlns:context="http://www.springframework.org/schema/context"

    xmlns:mvc="http://www.springframework.org/schema/mvc"

    xsi:schemaLocation="http://www.springframework.org/schema/beans http://www.springframework.org/schema/beans/spring-beans-4.0.xsd

        http://www.springframework.org/schema/mvc http://www.springframework.org/schema/mvc/spring-mvc-4.0.xsd

        http://www.springframework.org/schema/context http://www.springframework.org/schema/context/spring-context-4.0.xsd">

    <!-- 配置Controller扫描 -->

    <context:component-scan base-package="org.dreamtech.ssm.controller" />

        <context:property-placeholder location="classpath:resource.properties" />

    <!-- 配置注解驱动 -->

    <mvc:annotation-driven />

    <!-- 对静态资源放行  -->

    <mvc:resources location="/css/" mapping="/css/**"/>

    <mvc:resources location="/js/" mapping="/js/**"/>

    <mvc:resources location="/fonts/" mapping="/fonts/**"/>

    <!-- 配置视图解析器 -->

    <bean class="org.springframework.web.servlet.view.InternalResourceViewResolver">

        <!-- 前缀 -->

        <property name="prefix" value="/WEB-INF/jsp/" />

        <!-- 后缀 -->

        <property name="suffix" value=".jsp" />

    </bean>

</beans>
接下来就算最关键的一步:web.xml配置
<?xml version="1.0" encoding="UTF-8"?>

<web-app xmlns:xsi="http://www.w3.org/2001/XMLSchema-instance"

    xmlns="http://java.sun.com/xml/ns/javaee"

    xsi:schemaLocation="http://java.sun.com/xml/ns/javaee http://java.sun.com/xml/ns/javaee/web-app_2_5.xsd"

    id="WebApp_ID" version="2.5">

    <display-name>SSM</display-name>

    <welcome-file-list>

        <welcome-file>index.html</welcome-file>

        <welcome-file>index.htm</welcome-file>

        <welcome-file>index.jsp</welcome-file>

        <welcome-file>default.html</welcome-file>

        <welcome-file>default.htm</welcome-file>

        <welcome-file>default.jsp</welcome-file>

    </welcome-file-list>

    <!-- 配置spring -->

    <context-param>

        <param-name>contextConfigLocation</param-name>

        <param-value>classpath:spring/applicationContext-*.xml</param-value>

    </context-param>

    <!-- 配置监听器加载spring -->

    <listener>

        <listener-class>org.springframework.web.context.ContextLoaderListener</listener-class>

    </listener>

    <!-- 配置过滤器,解决post的乱码问题 -->

    <filter>

        <filter-name>encoding</filter-name>

        <filter-class>org.springframework.web.filter.CharacterEncodingFilter</filter-class>

        <init-param>

            <param-name>encoding</param-name>

            <param-value>UTF-8</param-value>

        </init-param>

    </filter>

    <filter-mapping>

        <filter-name>encoding</filter-name>

        <url-pattern>/*</url-pattern>

    </filter-mapping>

    <!-- 配置SpringMVC -->

    <servlet>

        <servlet-name>ssm</servlet-name>

        <servlet-class>org.springframework.web.servlet.DispatcherServlet</servlet-class>

        <init-param>

            <param-name>contextConfigLocation</param-name>

            <param-value>classpath:spring/springmvc.xml</param-value>

        </init-param>

        <!-- 配置springmvc什么时候启动,参数必须为整数 -->

        <!-- 如果为0或者大于0,则springMVC随着TOMCAT容器启动而启动 -->

        <!-- 如果小于0,则在第一次请求进来的时候启动 -->

        <load-on-startup>1</load-on-startup>

    </servlet>

    <servlet-mapping>

        <servlet-name>ssm</servlet-name>

        <!-- 所有的请求都进入springMVC -->

        <url-pattern>/</url-pattern>

    </servlet-mapping>

</web-app>
其余的杂项配置:
1.数据库配置:用户名,数据库名,连接配置等等
jdbc.properties:
jdbc.driver=com.mysql.jdbc.Driver

jdbc.url=jdbc:mysql://localhost:3306/ssm?characterEncoding=utf-8

jdbc.username=root

jdbc.password=root
2.日志文件配置:
log4j.properties:
# Global logging configuration

log4j.rootLogger=DEBUG, stdout

# Console output...

log4j.appender.stdout=org.apache.log4j.ConsoleAppender

log4j.appender.stdout.layout=org.apache.log4j.PatternLayout

log4j.appender.stdout.layout.ConversionPattern=%5p [%t] - %m%n
3.至于resource.properties是后边项目需要的,和SSM框架无关
最后:Get方式乱码修改方式:
打开Tomcat的配置文件修改一个URIEncoding属性
    <!-- A "Connector" represents an endpoint by which requests are received

         and responses are returned. Documentation at :

         Java HTTP Connector: /docs/config/http.html (blocking & non-blocking)

         Java AJP  Connector: /docs/config/ajp.html

         APR (HTTP/AJP) Connector: /docs/apr.html

         Define a non-SSL HTTP/1.1 Connector on port 8080

    -->

    <Connector URIEncoding="UTF-8" connectionTimeout="20000" port="8080" protocol="HTTP/1.1" redirectPort="8443"/>

    <!-- A "Connector" using the shared thread pool-->

    <!--

    <Connector executor="tomcatThreadPool"

               port="8080" protocol="HTTP/1.1"

               connectionTimeout="20000"

               redirectPort="8443" />

    -->
JavaWeb开发SSM框架搭建详解的更多相关文章
- VirtualBox开发环境的搭建详解(转)
VirtualBox开发环境的搭建详解 有关VirtualBox的介绍请参考:VirtualBox_百度百科 由于VirtualBox官网提供的搭建方法不够详细,而且本人在它指导下,从下载所需的开 ...
- ssm框架使用详解&配置两个数据源
学习ssm框架已经快一年了,今天把这个框架总结一下. SSM 就是指 spring.SpringMVC和Mybatis.先说一下基本概念(百度上搜的) 1.基本概念 1.1.Spring Spring ...
- 嵌入式Qt开发环境的搭建详解
一.嵌入式Qt开发环境的搭建前奏 1.下载arm-linux-gcc-4.4.3-20100728.tar.gz 2.下载qt-everywhere-opensource-src-4.8.5.tar. ...
- VirtualBox开发环境的搭建详解
有关VirtualBox的介绍请参考:VirtualBox_百度百科 由于VirtualBox官网提供的搭建方法不够详细,而且本人在它指导下,从下载所需的开发包,到最后生成二进制文件,中间遇到了许多的 ...
- Android 开发 MaterialDialog框架的详解
前言 开始之前还是需要废话一下,因为有一些坑需要告知.首先MaterialDialog在GitHub上作者已经转型使用100% Kotlin语言编写,虽然可以在Java里调用Kotlin使用.但是个人 ...
- SSH框架搭建详解 及 乱码处理
http://www.360doc.com/content/15/1031/21/21693298_509739569.shtml struts 除了struts的mvc外,还有拦截器,国际化,str ...
- java web后台开发SSM框架(Spring+SpringMVC+MyBaitis)搭建与优化
一.ssm框架搭建 1.1创建项目 新建项目后规划好各层的包. 1.2导入包 搭建SSM框架所需包百度云链接:http://pan.baidu.com/s/1cvKjL0 1.3整合spring与my ...
- 【python3+request】python3+requests接口自动化测试框架实例详解教程
转自:https://my.oschina.net/u/3041656/blog/820023 [python3+request]python3+requests接口自动化测试框架实例详解教程 前段时 ...
- Spring4.X + spring MVC + Mybatis3 零配置应用开发框架搭建详解(1) - 基本介绍
Spring4.X + spring MVC + Mybatis3 零配置应用开发框架搭建详解(1) - 基本介绍 spring集成 mybatis Spring4.x零配置框架搭建 两年前一直在做后 ...
随机推荐
- datatable 给某一列添加title属性
简单描述:采用datatable拼接的表格,没有title属性,嗯就是这个情况,直接上代码 代码: //js代码$("#toAdd").click("click" ...
- Redis在Linux中安装使用
一.安装$ wget http://download.redis.io/releases/redis-x.x.x.tar.gz $ tar xzf redis-x.x.x.tar.gz $ cd re ...
- EntityFramework+EntityFramework.SqlServerCompact部署网站
1,最好通过Nuget添加引用EntityFramework.SqlServerCompact,省得去手动填写配置文件. 2,部署后遇到如下的问题: 原因是打包后的Bin下面缺少System.Data ...
- .asmx支持post请求或者get请求调用(WebService "因 URL 意外地以 结束,请求格式无法识别" 的解决方法)
使用Post调用以asmx形式提供的webservice时,在本机调试没有调用问题.一旦部署至服务器后会提示如下信息: <html> <head> <title>因 ...
- C# dynamic类型序列化和反序列化之Newtonsoft.Json,动态解析远端返回的jSON数据
一.说明 1.Newtonsoft.Json 中的Linq To Json中提供了方便的json数据查询.修改等操作. 例如:JObject,JArray 2.在JObject.FromObject( ...
- Linux内核优化
相信做运维的同仁,进行运维环境初建时,必须要考虑到操作系统内核参数的优化问题,本人经历数次的运维环境重建后,决定要自行收集一份比较完善的系统内核参数优化说明文件出来,于是就有了下文,本文当前值是官方 ...
- RSP小组——消消乐
RSP小组--消消乐 团队所有博客总结 1.团队第一周作业 2.团队第二周作业 3.RSP小组--团队冲刺博客一 4.RSP小组--团队冲刺博客二 5.RSP小组--团队冲刺博客三 6.RSP小组-- ...
- python基础知识总结(一)
学完python很久了,一直想着写个学习总结,奈何懒癌晚期,现在才开始写.以下是我总结的一小部分python基础知识点的总结: 1.什么是解释型语言?什么是编译型编程语言? ''' 解释型语言:无需编 ...
- 分布式、集群、微服务、SOA 之间的区别
分布式:不同模块部署在不同服务器上 作用:分布式解决网站高并发带来问题 集群:多台服务器部署相同应用构成一个集群 作用:通过负载均衡设备共同对外提供服务 SOA:Service Oriented Ar ...
- S7 Connection 通讯
参考两个链接: http://www.ad.siemens.com.cn/service/answer/solution.aspx?Q_ID=74626&cid=1029 https://su ...