dokcer3
安装好的文件位置:

/usr/sbin/nginx:主程序

/etc/nginx:存放配置文件

/usr/share/nginx:存放静态文件

/var/log/nginx:存放日志

其实从上面的根目录文件夹可以知道,Linux系统的配置文件一般放在/etc,日志一般放在/var/log,运行的程序一般放在/usr/sbin或者/usr/bin。

Nginx部署流程:
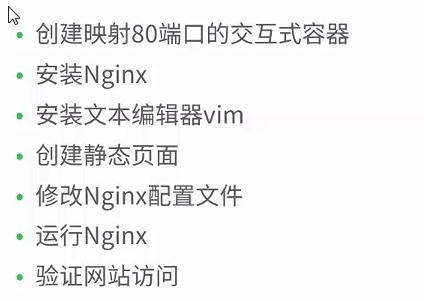
root@ubuntu:/home/yw1989# docker run -p 80 --name nginx_web1 -i -t ubuntu /bin/bash

root@417a0dbc5500:/#  : 进入容器中(先apt-get update不然安装不了nginx)

root@417a0dbc5500:/# apt-get install -y nginx  :  安装nginx

root@417a0dbc5500:/# apt-get install -y vim : 安装vim

root@3b1e8b137e4e:/# mkdir -p /var/www/html

root@3b1e8b137e4e:/# cd /var/www/html

root@3b1e8b137e4e:/var/www/html# vim index.html  :  编辑静态页面

修改nginx配置文件:

root@417a0dbc5500:/# whereis nginx

nginx: /usr/sbin/nginx /etc/nginx /usr/share/nginx

root@3b1e8b137e4e:/usr/share/nginx# cd /etc/nginx

root@3b1e8b137e4e:/etc/nginx# ls

root@417a0dbc5500:/etc/nginx# ls

conf.d          koi-utf     nginx.conf    sites-available  uwsgi_params

fastcgi.conf    koi-win     proxy_params  sites-enabled    win-utf

fastcgi_params  mime.types  scgi_params   snippets

root@3b1e8b137e4e:/etc/nginx# cd sites-enabled/

root@3b1e8b137e4e:/etc/nginx/sites-enabled# ls

default

root@3b1e8b137e4e:/etc/nginx/sites-enabled# vim default

修改root的值为usr/www/html

切换到根目录:运行nginx,

root@417a0dbc5500:/# ps -ef : 容器里面查看当前进程,nginx已经运行起来了。

UID         PID   PPID  C STIME TTY          TIME CMD

root          1      0  0 11:56 pts/0    00:00:00 /bin/bash

root        894      1  0 12:55 ?        00:00:00 nginx: master process nginx

www-data    895    894  0 12:55 ?        00:00:00 nginx: worker process

root        897      1  0 12:56 pts/0    00:00:00 ps -ef

使用ctrl+P ctrl+Q来退出。是容器在后台运行。

$docker ps 查看:

417a0dbc5500        ubuntu              "/bin/bash"              About an hour ago   Up About an hour    0.0.0.0:32768->80/tcp   nginx_web1

将容器的80端口映射到主机的32768端口上。

root@ubuntu:/home/yw1989# docker port nginx_web1  :查看容器中端口映射情况

80/tcp -> 0.0.0.0:32768

root@ubuntu:/home/yw1989# docker top nginx_web1  : 查看容器中进程的情况

UID   PID  PPID  C   STIME   TTY  TIME    CMD

root  3578   3566  0  03:56   pts/0   00:00:00   /bin/bash

Root  7505 3578  0  04:55   ?   00:00:00   nginx: master process nginx

www-data   7506  7505     0   04:55  ?    00:00:00  nginx: worker process

root@ubuntu:/home/yw1989# curl http://127.0.0.1:32768 :网站成功返回了刚才写的页面,虚拟机中使用http://127.0.0.1:32768/,http://172.17.0.2:80/可以访问,172.17.0.2是容器IP。在自己电脑http://192.168.115.129:32768/也可以访问(192.168.115.129是虚拟机的地址)。

<html>

<head>

  <title>fdfdsfdsfdsf</title>

</head>

<body>

<h1>

hhijhihii

</h1>

</body>

</html>

root@ubuntu:/home/yw1989# docker inspect nginx_web1 : 查看容器的ip地址

     "NetworkSettings": {

"IPAddress": "172.17.0.2",

$docker stop nginx_web : 停止容器

nginx_web1

root@ubuntu:/home/yw1989# docker start -i nginx_web1

root@417a0dbc5500:/# ps -ef  :  关闭后停止并没有启动nginx,退出

UID         PID   PPID  C STIME TTY          TIME CMD

root          1      0  0 13:22 pts/0    00:00:00 /bin/bash

root          9      1  0 13:22 pts/0    00:00:00 ps -ef

root@ubuntu:/home/yw1989# docker exec nginx_web1 nginx   :  启动nginx

root@ubuntu:/home/yw1989# docker top nginx_web1  :  查看到nginx再次启动了

UID                 PID                 PPID                C                   STIME               TTY                 TIME                CMD

root                10527               10508               0                   05:22               pts/0               00:00:00            /bin/bash

root                10718               10508               0                   05:24               ?                   00:00:00            nginx: master process nginx

www-data            10719               10718               0                   05:24               ?                   00:00:00            nginx: worker process

root@ubuntu:/home/yw1989# curl http://127.0.0.1:32768  :  访问失败

curl: (7) Failed to connect to 127.0.0.1 port 32768: Connection refused

root@ubuntu:/home/yw1989# docker inspect nginx_web1   :  ip地址和端口都变了

    "NetworkSettings": {

       "IPAddress": "172.17.0.2",

          "Ports": {

                "80/tcp": [

                    {

                        "HostIp": "0.0.0.0",

                        "HostPort": "32769"

                    }

                ]

            },

停止一个容器并重新启动,ip地址和端口改变。
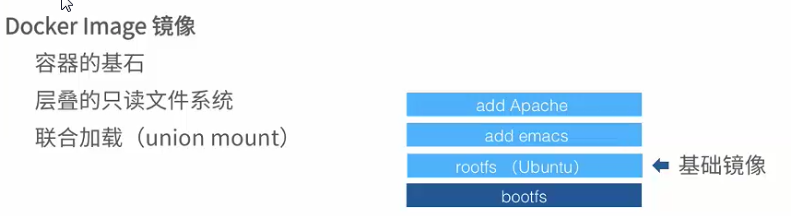
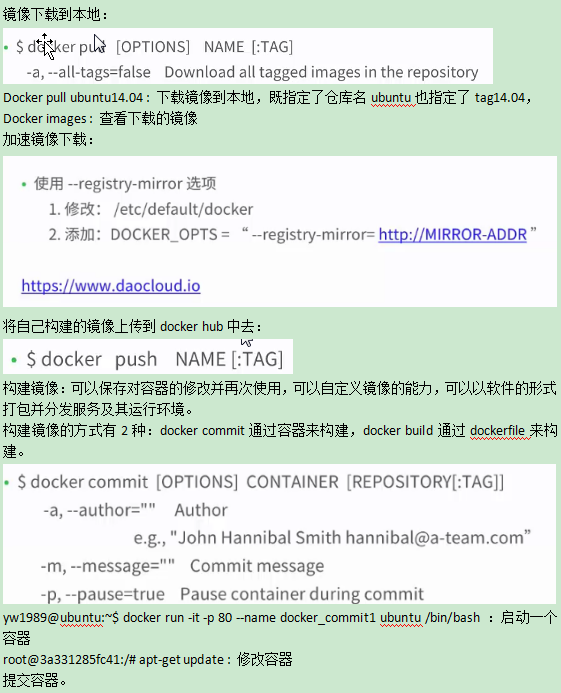
查看和删除镜像:

镜像是一种使用联合加载技术层叠的只读文件系统,是容器构建的基石。存储在/var/lib/docker,
root@ubuntu:/# docker info

Docker Root Dir: /var/lib/docker

Containers: 4

 Running: 3

 Paused: 0

 Stopped: 1

Images: 1

Server Version: 18.01.0-ce

Kernel Version: 4.10.0-28-generic

Operating System: Ubuntu 16.04.3 LTS

OSType: linux

Architecture: x86_64

CPUs: 1

Total Memory: 971.6MiB

Name: ubuntu
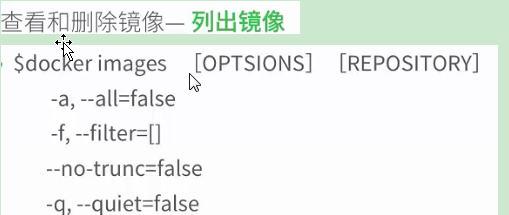
root@ubuntu:/# docker images  : 列出所有的镜像

REPOSITORY     TAG       IMAGE ID           CREATED        SIZE

ubuntu         latest      0458a4468cbc       6 days ago          112MB

REPOSITORY:镜像所属的仓库名

TAG       :镜像的标签名

IMAGE ID   :镜像的唯一id,就是镜像的文件名

CREATED   :镜像建立的时间

SIZE       :镜像的大小

REPOSITORY仓库是一系列镜像的集合,一个仓库包含的是一系列关联的镜像,比如ubuntu就是一个大的仓库,这与docker组件中的仓库(registry)很大区别,组件的仓库提供的是docker镜像的存储服务,REPOSITORY仓库包含了很多registry仓库。

Tag镜像的标签:在仓库中不同的镜像是以tag区分的,REPOSITORY仓库名加上标签名就构成了一个完整了镜像名字,这个镜像的名字就对应一个镜像的id。不同的标签可以对应相同的id名,就是说可以对不同的需求对镜像文件打上不同的标签。

root@ubuntu:/# docker images --no-trunc  : 查看完整的id(上面是截断的id)

REPOSITOR TAG IMAGE ID                                                                  CREATED             SIZE

ubuntu              latest              sha256:0458a4468cbceea0c304de953305b059803f67693bad463dcbe7cce2c91ba670   6 days ago          112MB

没有名字和标签的镜像就是中间层镜像。
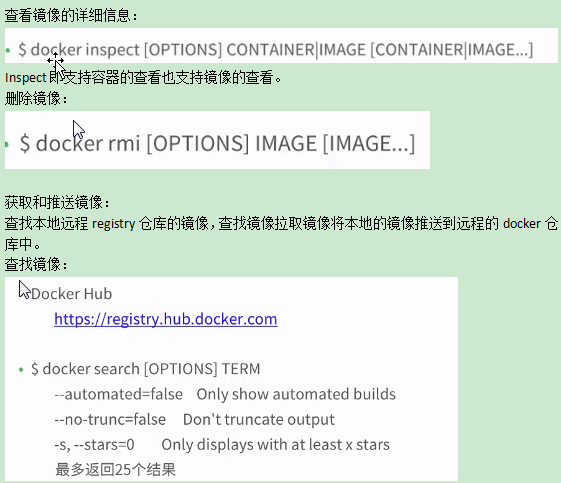
yw1989@ubuntu:~$ docker search ubuntu : 查找ubuntu仓库

NAME                                                   DESCRIPTION                                     STARS               OFFICIAL            AUTOMATED

ubuntu                                                 Ubuntu is a Debian-based Linux operating sys…   7183                [OK]

dorowu/ubuntu-desktop-lxde-vnc                         Ubuntu with openssh-server and NoVNC            159

yw1989@ubuntu:~$ docker search --filter=stars=100 ubuntu  :查找星级大于100的

NAME                             DESCRIPTION                                     STARS               OFFICIAL            AUTOMATED

ubuntu                           Ubuntu is a Debian-based Linux operating sys…   7183                [OK]

dorowu/ubuntu-desktop-lxde-vnc   Ubuntu with openssh-server and NoVNC            159                                     [OK]

rastasheep/ubuntu-sshd           Dockerized SSH service, built on top of offi…   130
dokcer3的更多相关文章
随机推荐
- AC日记——Super Mario hdu 4417
Super Mario Time Limit: 2000/1000 MS (Java/Others) Memory Limit: 32768/32768 K (Java/Others)Total ...
- 机器学习实战读书笔记(五)Logistic回归
Logistic回归的一般过程 1.收集数据:采用任意方法收集 2.准备数据:由于需要进行距离计算,因此要求数据类型为数值型.另外,结构化数据格式则最佳 3.分析数据:采用任意方法对数据进行分析 4. ...
- 洛谷—— P1577 切绳子
https://www.luogu.org/problemnew/show/P1577 题目描述 有N条绳子,它们的长度分别为Li.如果从它们中切割出K条长度相同的 绳子,这K条绳子每条最长能有多长? ...
- 洛谷——P1294 高手去散步
P1294 高手去散步 题目背景 高手最近谈恋爱了.不过是单相思.“即使是单相思,也是完整的爱情”,高手从未放弃对它的追求.今天,这个阳光明媚的早晨,太阳从西边缓缓升起.于是它找到高手,希望在晨读开始 ...
- gitlab升级、汉化、修改root密码
1.gitlab升级 # 查看当前版本 head -1 /opt/gitlab/version-manifest.txt gitlab-ce 8.9.5 grep "^external_ur ...
- 什么叫PV,UV,PR值
1.PV PV(page view),即页面浏览量:用户每1次对网站中的每个网页访问均被记录1次.用户对同一页面的多次访问,访问量累计. 2.什么是UV uv(unique visitor),指访问某 ...
- VS"后生成事件" 菜单的使用
网上有很多的文章都在介绍怎样创建一个自己定义的dll文件,以及怎样使用一个dll文件,在此不在赘述.本文主要介绍怎样使用VS2008的"生成后事件"的命令行,将一个dll文件直接复 ...
- c# Dictionary拓展2个key得到1个value
using System.Collections.Generic; using System.Collections; Dictionary<Tuple<int, int>, int ...
- sh脚本——#!/bin/bash
#!/bin/bash是指此脚本使用/bin/bash来解释执行. 其中,#!是一个特殊的表示符,其后,跟着解释此脚本的shell路径. bash只是shell的一种,还有很多其它shell,如:sh ...
- linux 启动ftp服务,sftp服务
启动ftp服务:yum install vsftpd 在/etc/rc.d/init.d/目录下:命令 service vsftp start启动ssh服务,sftp服务在/etc/init.d/目录 ...