Lock 深入理解acquire和release原理源码及lock独有特性acquireInterruptibly和tryAcquireNanos
https://blog.csdn.net/sophia__yu/article/details/84313234
Lock是一个接口,通常会用ReentrantLock(可重入锁)来实现这个接口。
独占式获取锁
1.lock()
ReentrantLock lock=new ReentrantLock();

lock.lock();
当获取锁时通常会调用ReentrantLock的lock()方法。而lock()方法在ReentrantLock是一个抽象方法,默认情况下ReentrantLock是一个非公平锁,
lock()方法具体实现在ReentrantLock的静态内部类NonfairSync中,源码如下:
public class ReentrantLock implements Lock, java.io.Serializable {

        abstract static class Sync extends AbstractQueuedSynchronizer {

        abstract void lock();

        }

        static final class NonfairSync extends Sync {

        final void lock() {

            if (compareAndSetState(0, 1))

                setExclusiveOwnerThread(Thread.currentThread());

            else

                acquire(1);

        }

}
这里的lock()方法先通过CAS将state的值从0变为1(ReentrantLock用state表示“持有锁的线程已经重复获取该锁的次数”):当state实际值等于预期值0时,表示当前没有线程持有该锁,更新state值为1,将ExclusiveOwnerThread的值为当前线程(Exclusive是独占的意思,ReentrantLock用exclusiveOwnerThread表示“持有锁的线程”),那么该线程获取锁成功。如果CAS失败。说明state实际值并不是0,也就是说已经有线程持有该锁,此时执行acquire(1)再次请求锁。
2.acquire()
调用acquire():会调用ReentrantLock的静态内部AbstractQueuedSynchronizer的acquire方法()。看源码:
public abstract class AbstractQueuedSynchronizer

    extends AbstractOwnableSynchronizer

    implements java.io.Serializable {

    /**

     * Acquires in exclusive mode, ignoring interrupts.  Implemented

     * by invoking at least once {@link #tryAcquire},

     * returning on success.  Otherwise the thread is queued, possibly

     * repeatedly blocking and unblocking, invoking {@link

     * #tryAcquire} until success.  This method can be used

     * to implement method {@link Lock#lock}.

     *

     * @param arg the acquire argument.  This value is conveyed to

     *        {@link #tryAcquire} but is otherwise uninterpreted and

     *        can represent anything you like.

     */

    public final void acquire(int arg) {

        if (!tryAcquire(arg) &&

            acquireQueued(addWaiter(Node.EXCLUSIVE), arg))

            selfInterrupt();

    }

}
从注释我们可以了解到acqiure的作用:我理解的是acquire请求独占锁,忽略所有中断,至少执行一次tryAcquire,如果tryAcquire()再次获取锁成功就直接退出,否则线程进入阻塞- - -唤醒2种状态切换中,直到tryAcquire成功。
可以看到if语句是&&,那么先看tryAcquire()方法。
注:以下方法没有特殊表明都在静态内部类AQS中。
3.tryAcquire()
acquire失败后再次用tryAcquire()获取同步状态。
final boolean nonfairTryAcquire(int acquires) {

            final Thread current = Thread.currentThread();

            int c = getState();

            if (c == 0) {

                if (compareAndSetState(0, acquires)) {

                    setExclusiveOwnerThread(current);

                    return true;

                }

            }

            else if (current == getExclusiveOwnerThread()) {

                int nextc = c + acquires;

                if (nextc < 0) // overflow

                    throw new Error("Maximum lock count exceeded");

                setState(nextc);

                return true;

            }

            return false;

        }
nonfairTryAcquire()再次获取锁,先判断state是否为0,如果为0即没有线程获取该锁,通过CAS该线程获取到锁。如果state不为0,判断当前线程是否是getExclusiveOwnerThread即持有锁线程,是的话,就将state++,也就是可重入的体现。否则再次获取同步状态失败。
当state=0通过CAS保证同步,即同一个时刻只有一个线程可以获取到锁,但是如果当前线程是持有锁线程并没有保证同步是因为线程可重入是再次获取锁才触发的操作,当前线程拥有该锁,所以对ReentrantLock的属性操作是不用加锁的。
当tryAcquire()再次获取同步状态失败后,会执行addWaiter()方法。
4.addWaiter()
addWaiter()向同步队列中添加一个特定模式(独占式、共享式)的结点。
看源码:
 /**

     * Creates and enqueues node for current thread and given mode.

     *

     * @param mode Node.EXCLUSIVE for exclusive, Node.SHARED for shared

     * @return the new node

     */

    private Node addWaiter(Node mode) {

        Node node = new Node(Thread.currentThread(), mode);

        // Try the fast path of enq; backup to full enq on failure

        Node pred = tail;

        if (pred != null) {

            node.prev = pred;

            if (compareAndSetTail(pred, node)) {

                pred.next = node;

                return node;

            }

        }

        enq(node);

        return node;

    }
这个方法的注释:创建一个为当前线程的节点入队,Node.EXCLUSIVE 是独占锁,Node.SHARED是共享锁。返回所创建的结点。
方法实现思路:创建一个当前线程的指定模式(独占式、共享式)结点后,由于同步队列是具有头尾结点的双向链表,找到尾结点pred,如果pred不为空,使用CAS将当前结点尾插到同步队列中,CAS尾插成功,返回当前Node结点。
如果尾结点不存在或者尾插失败(尾插失败是因为:假如多个线程都需要在同步队列尾插,那么只有一个线程结点会成功,其余都会失败)执行enq()方法。
5.enq()
当前队列为空或者CAS尾插失败调enq()方法来初始化队列或不断尾插。
源码如下:
/**

     * Inserts node into queue, initializing if necessary. See picture above.

     * @param node the node to insert

     * @return node's predecessor

     */

    private Node enq(final Node node) {

        for (;;) {

            Node t = tail;

            if (t == null) { // Must initialize

                if (compareAndSetHead(new Node()))

                    tail = head;

            } else {

                node.prev = t;

                if (compareAndSetTail(t, node)) {

                    t.next = node;

                    return t;

                }

            }

        }

    }
for循环是死循环,也就是说还有将这个节点尾插成功才会退出for循环。如果队列为空,创建初始化同步队列,头尾结点指向匿名结点。如果尾结点存在,不断CAS将当前结点尾插到同步队列中。
当前线程结点插入同步队列后,调用acquireQueued()排队获取同步状态。
6.acquireQueued()
当前线程结点入队列后,调用acquireQueued()排队获取同步状态。
源码如下:
/**

     * Acquires in exclusive uninterruptible mode for thread already in

     * queue. Used by condition wait methods as well as acquire.

     *

     * @param node the node

     * @param arg the acquire argument

     * @return {@code true} if interrupted while waiting

     */

    final boolean acquireQueued(final Node node, int arg) {

        boolean failed = true;

        try {

            boolean interrupted = false;

            //自旋

            for (;;) {

            获取当前结点的前驱

                final Node p = node.predecessor();

                //获取同步状态成功条件:前驱结点是头结点并且再次获取同步状态成功

                if (p == head && tryAcquire(arg)) {

                //将当前结点设置为头结点

                    setHead(node);

                    //删除原来头结点

                    //将原来头结点的next置空,将头结点指向该结点时,该节点的前驱为null

                    p.next = null; // help GC

                    failed = false;

                    return interrupted;

                }

                if (shouldParkAfterFailedAcquire(p, node) &&

                    parkAndCheckInterrupt())

                    interrupted = true;

            }

        } finally {

            if (failed)

                cancelAcquire(node);

        }

    }
获取到该结点的前驱,如果前驱结点是头结点并且此时可以获取同步状态,那么该线程结点就成功获取到锁,将该线程结点置空并设置为头结点。(因为此时已经获取到锁,可以把该线程释放)
//设置为头结点,该结点置空

private void setHead(Node node) {

        head = node;

        node.thread = null;

        node.prev = null;

    }
否则就执行shouldParkAfterFailedAcquire()。
7.shouldParkAfterFailedAcquire()
不断重试,直到前驱结点状态为-1,因为只有这样,前驱获取到锁后,释放同步状态后会通知当前结点,使当前结点继续运行。
/**

     * Checks and updates status for a node that failed to acquire.

     * Returns true if thread should block. This is the main signal

     * control in all acquire loops.  Requires that pred == node.prev.

     *

     * @param pred node's predecessor holding status

     * @param node the node

     * @return {@code true} if thread should block

     */

    private static boolean shouldParkAfterFailedAcquire(Node pred, Node node) {

    //获取前驱结点的结点状态

        int ws = pred.waitStatus;

        //如果前驱结点状态为SIGNAL(-1),直接返回true

        if (ws == Node.SIGNAL)

            /*

             * This node has already set status asking a release

             * to signal it, so it can safely park.

             */

            return true;

            //当前结点状态大于0,只能是取消状态

        if (ws > 0) {

            /*

             * Predecessor was cancelled. Skip over predecessors and

             * indicate retry.

             */

             //不断重试,直到找到一个前驱结点不是取消状态的结点

            do {

                node.prev = pred = pred.prev;

            } while (pred.waitStatus > 0);

            pred.next = node;

        } else {

            /*

             * waitStatus must be 0 or PROPAGATE.  Indicate that we

             * need a signal, but don't park yet.  Caller will need to

             * retry to make sure it cannot acquire before parking.

             */

            //前驱结点状态不是取消状态时,将前驱结点状态置为-1,表示后继结点应处于阻塞状态

            compareAndSetWaitStatus(pred, ws, Node.SIGNAL);

        }

        return false;

    }
当该前驱结点不是SIGNAL状态时,返回false,进入acquireQueued中的for循环。假设node的前驱结点不是头结点或者获取锁失败,则会再次进入shouldParkAfterFailedAcquire()。上一轮循环中,已经将pred.waitStatus设置为SIGNAL=-1,则会进入第一个判断条件。直接返回true,表示应该将当前结点阻塞,进入parkAndCheckInterrupt()方法。
8.parkAndCheckInterrupt()
前驱结点状态为-1,表示需要将当前结点阻塞。
private final boolean parkAndCheckInterrupt() {

        LockSupport.park(this);

        return Thread.interrupted();

    }
调用 LockSupport.park(this)将当前线程阻塞,当前驱线程结点获取锁并且将锁释放后,唤醒该结点,唤醒后再次进入第6步acquireQueued的for循环获取同步状态。
现在返回到第6步acquireQueued()的finally代码块:
finally {

            if (failed)

                cancelAcquire(node);

        }
如果出现异常或者出现中断,就会执行finally的取消线程的请求操作,核心代码是node.waitStatus = Node.CANCELLED;将线程的状态改为CANCELLED。
acquireQueued(final Node node, int arg):
进入同步队列后排队获取同步状态。
如果当前线程结点的前驱结点为头结点并且能成功获取同步状态,那么当前线程获取锁成功,方法退出。
如果获取锁失败,先不断自旋将前驱结点状态设为SIGNAL,而后调用LockSupport.park()方法将当前线程阻塞来等待唤醒。
整个过程用一张图表示为: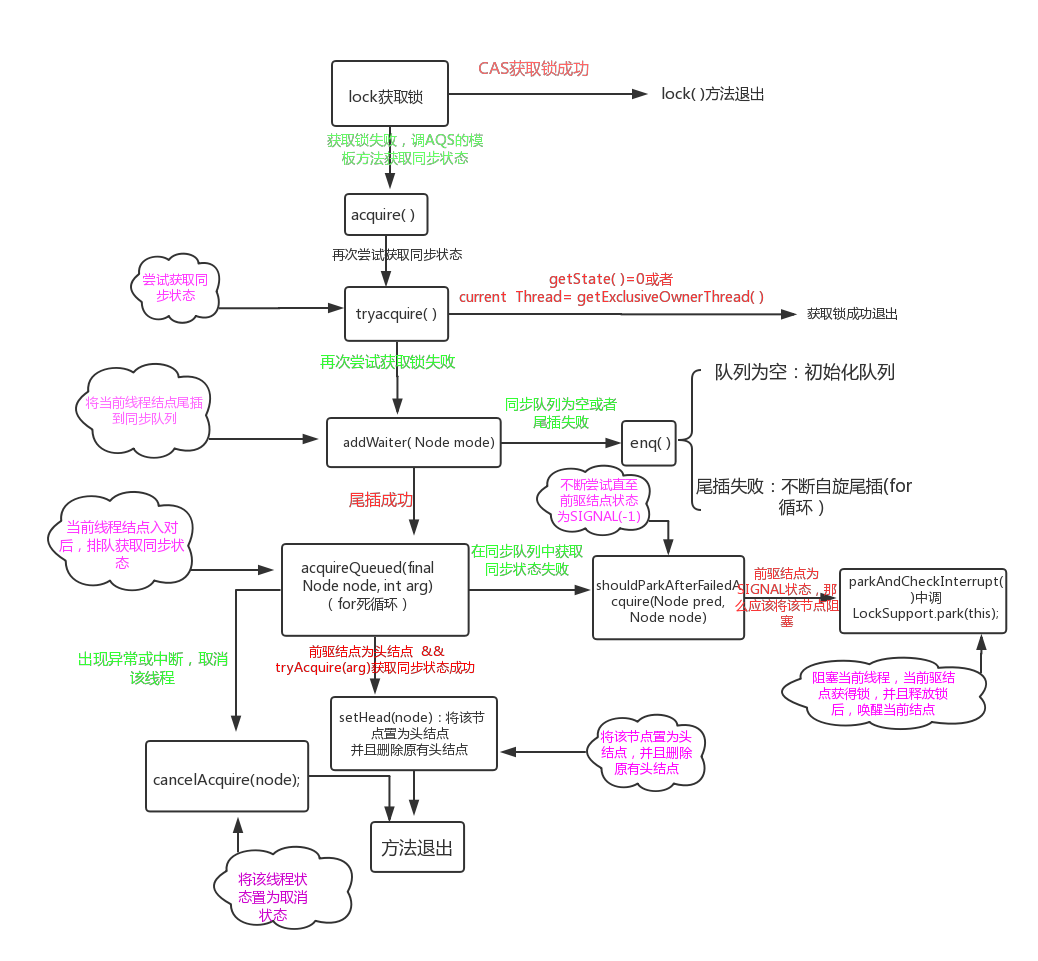
独占式释放锁
1.unlock( )
调Lock接口的实现子类ReentrantLock的unlock( )方法。
public void unlock() {

        sync.release(1);

    }
2.release( )
通过注释可以理解到:释放独占锁,如果tryRelease成功返回true,就会唤醒阻塞等待的线程。否则,释放锁失败。
再调AQS的模板方法release( ),看源码:
     /**

     * Releases in exclusive mode.  Implemented by unblocking one or

     * more threads if {@link #tryRelease} returns true.

     * This method can be used to implement method {@link Lock#unlock}.

     *

     * @param arg the release argument.  This value is conveyed to

     *        {@link #tryRelease} but is otherwise uninterpreted and

     *        can represent anything you like.

     * @return the value returned from {@link #tryRelease}

     */

public final boolean release(int arg) {

        if (tryRelease(arg)) {

            Node h = head;

            if (h != null && h.waitStatus != 0)

                unparkSuccessor(h);

            return true;

        }

        return false;

    }
用tryRelease( )方法来释放锁,如果释放成功,先判断头结点是否有效,最后用unparkSuccessor( )启动后续等待的线程。
2.tryRelease( )
protected final boolean tryRelease(int releases) {

            int c = getState() - releases;

            if (Thread.currentThread() != getExclusiveOwnerThread())

                throw new IllegalMonitorStateException();

            boolean free = false;

            if (c == 0) {

                free = true;

                setExclusiveOwnerThread(null);

            }

            setState(c);

            return free;

        }
tryRelease( )方法先获取state减去要释放的一次,然后判断当前线程是否和持有锁线程一样,如果不一致会抛异常(都没有锁,要释放什么锁呢~ ~),如果一致,再判断state值,只有当值state值为0的时候,才将锁持有者置空,否则说明是重入锁,需要多次释放直至state为空。并且要重新更新state值。
3.unparkSuccessor()
unparkSuccessor():唤醒同步队列中最前边的有效线程。
private void unparkSuccessor(Node node) {

        /*

         * If status is negative (i.e., possibly needing signal) try

         * to clear in anticipation of signalling.  It is OK if this

         * fails or if status is changed by waiting thread.

         */

        int ws = node.waitStatus;

        if (ws < 0)

            compareAndSetWaitStatus(node, ws, 0);

        /*

         * Thread to unpark is held in successor, which is normally

         * just the next node.  But if cancelled or apparently null,

         * traverse backwards from tail to find the actual

         * non-cancelled successor.

         */

        Node s = node.next;

        if (s == null || s.waitStatus > 0) {

            s = null;

            for (Node t = tail; t != null && t != node; t = t.prev)

                if (t.waitStatus <= 0)

                    s = t;

        }

        if (s != null)

            LockSupport.unpark(s.thread);

    }
unparkSuccessor():启动后续线程,先将头结点的状态置空,并且获取头结点的next结点。如果next为空或者是取消线程,则从同步队列的尾部向前寻找有效结点,依次更新有效结点。取到同步队列中第一个有效结点后, 通过LockSupport.unpark(s.thread)将该线程唤醒。此时再和acquireQueued()获取同步状态联系起来,假如被唤醒的线程为S,线程S进入 if (p == head && tryAcquire(arg))来获取同步状态。
独占式获取锁和独占式释放锁总结
1.独占式:一个线程在获取锁或者释放锁时会阻塞其他线程。
2.独占式获取锁:线程获取锁失败后,会调用addWaiter( )将该线程封装为结点尾插到同步队列。addWaiter( )中的enq( )完成同步队列的初始化和CAS尾插失败后不断尾插的操作。
3.入队之后排队获取锁的核心方法:acquireQueued( ),结点排队获取锁是一个自旋过程。当且仅当当前结点的前驱结点为头结点并且成功获取同步状态,结点出队并且该结点的线程获取到锁。否则,不断自旋将前驱结点的状态设置为SIGNAL而后调用LockSupport.park( )将该线程阻塞。
4.释放锁时会唤醒同步队列里第一个有效线程结点。(该结点不为空而且线程状态不为取消)
Lock锁和synchronized锁相比独有的特性有:
1.获取锁时响应中断
acquireInterruptibly(int arg);
public final void acquireInterruptibly(int arg) throws InterruptedException {

        if (Thread.interrupted())

            throw new InterruptedException();

        if (!tryAcquire(arg))

        //再次获取同步状态失败

            doAcquireInterruptibly(arg);

    }

private void doAcquireInterruptibly(int arg) throws InterruptedException {

        final Node node = addWaiter(Node.EXCLUSIVE); //将该结点尾插到同步队列

        boolean failed = true;

        try {

            for (;;) {

                final Node p = node.predecessor();

                if (p == head && tryAcquire(arg)) {

                    setHead(node);

                    p.next = null; // help GC

                    failed = false;

                    return;

                }

                //不断自旋直至将前驱结点状态设置为SIGNAL,然后阻塞当前线程

                if (shouldParkAfterFailedAcquire(p, node) &&

                    parkAndCheckInterrupt())

                    //当前线程被阻塞后,会抛异常

                    throw new InterruptedException();

            }

        } finally {

            if (failed)

                cancelAcquire(node);

        }

    }
获取锁响应中断和acquire( )原理几乎一样,唯一区别在于获取锁响应中断的parkAndCheckInterrupt( )返回true时即该线程阻塞时被中断,抛中断异常后线程退出,不会执行后面语句。
2.超时等待获取锁
tryAcquireNanos(int arg, long nanosTimeout) ;
在获取锁 响应中断的基础上可以超时等待。
public final boolean tryAcquireNanos(int arg, long nanosTimeout)   throws InterruptedException {

        if (Thread.interrupted())

            throw new InterruptedException();

        return tryAcquire(arg) ||

            doAcquireNanos(arg, nanosTimeout);

    }

 private boolean doAcquireNanos(int arg, long nanosTimeout)  throws InterruptedException {

         //如果限时时间小于0直接返回false

        if (nanosTimeout <= 0L)

            return false;

            //计算出等待线程截止时间:当前时间+等待时间

        final long deadline = System.nanoTime() + nanosTimeout;

        //因为tryacquire()失败,所以讲当前线程结点尾插到同步队列

        final Node node = addWaiter(Node.EXCLUSIVE);

        boolean failed = true;

        try {

            //不断自旋将前驱结点状态设置为SIGNAL

            for (;;) {

                final Node p = node.predecessor();

                if (p == head && tryAcquire(arg)) {

                    setHead(node);

                    p.next = null; // help GC

                    failed = false;

                    return true;

                }

                //如果超过截止时间,线程不再等待,获取锁失败

                nanosTimeout = deadline - System.nanoTime();

                if (nanosTimeout <= 0L)

                    return false;

                if (shouldParkAfterFailedAcquire(p, node) &&

                    nanosTimeout > spinForTimeoutThreshold)

                    LockSupport.parkNanos(this, nanosTimeout);

                if (Thread.interrupted())

                    throw new InterruptedException();

            }

        } finally {

            if (failed)

                cancelAcquire(node);

        }

    }
超时获取锁和响应中断获取锁的原理基本相同,唯一区别在于获取锁失败后,增加一个时间处理:如果当前时间超过截止时间,线程不再等待,而是直接返回false,即获取锁失败,否则将线程阻塞在同步队列排队获取锁。
超时获取锁tryAcquireNanos( )会返回的情况:
1.到截止时间,线程仍未获取到锁,不再等待直接返回false,即线程获取锁失败;
2.当前线程在超时时间内被中断,抛中断异常后,线程退出。
3.在截止时间内,线程获取到锁,返回true。
Lock 深入理解acquire和release原理源码及lock独有特性acquireInterruptibly和tryAcquireNanos的更多相关文章
- Spring Boot自动装配原理源码分析
1.环境准备 使用IDEA Spring Initializr快速创建一个Spring Boot项目 添加一个Controller类 @RestController public class Hell ...
- 从ReentrantLock详解AQS原理源码解析
数据结构 java.util.concurrent.locks.AbstractQueuedSynchronizer类中存在如下数据结构. // 链表结点 static final class Nod ...
- SpringMvc 启动原理源码分析
了解一个项目启动如何实现是了解一个框架底层实现的一个必不可少的环节.从使用步骤来看,我们一般是引入包之后,配置web.xml文件.官方文档示例的配置如下: <web-app> <se ...
- Java中HashMap底层原理源码分析
在介绍HashMap的同时,我会把它和HashTable以及ConcurrentHashMap的区别也说一下,不过本文主要是介绍HashMap,其实它们的原理差不多,都是数组加链表的形式存储数据,另外 ...
- Spring Boot中@ConfigurationProperties注解实现原理源码解析
0. 开源项目推荐 Pepper Metrics是我与同事开发的一个开源工具(https://github.com/zrbcool/pepper-metrics),其通过收集jedis/mybatis ...
- Java ArrayList底层实现原理源码详细分析Jdk8
简介 ArrayList是基于数组实现的,是一个动态数组,其容量能自动增长,类似于C语言中的动态申请内存,动态增长内存. ArrayList不是线程安全的,只能用在单线程环境下,多线程环境下可以考虑用 ...
- Java HashMap底层实现原理源码分析Jdk8
在JDK1.6,JDK1.7中,HashMap采用位桶+链表实现,即使用链表处理冲突,同一hash值的链表都存储在一个链表里.但是当位于一个桶中的元素较多,即hash值相等的元素较多时,通过key值依 ...
- SpringBoot自动配置原理源码级别分析
SpringBoot自动配置原理 前言 后面还会讲到SpringBoot自动配置原理,会主要讲解@EnableAutoConfiguratuon注解帮助我们做了什么事情,是如何自动把自动配置类扫描到容 ...
- jQuery1.9.1--结构及$方法的工作原理源码分析
jQuery的$方法使用起来非常的多样式,接口实在太灵活了,有点违反设计模式的原则职责单一.但是用户却非常喜欢这种方式,因为不用记那么多名称,我只要记住一个$就可以实现许多功能,这个$简直就像个万能的 ...
随机推荐
- 疑难杂症:运用 transform 导致文本模糊的现象探究
在我们的页面中,经常会出现这样的问题,一块区域内的文本或者边框,在展示的时候,变得特别的模糊,如下(数据经过脱敏处理): 正常而言,应该是这样的: emmm,可能大图不是很明显,我们取一细节对比,就非 ...
- linux系统开机流程
基本步骤:上电->bios->MBR引导->GRUB菜单->加载内核->运行init进程初始化->启动/etc/rc.d*脚本与相关配置文件->执行rc.lo ...
- python中继承的语法及案列
案例: 1 class Chinese: # 类的创建,类名首字母大写 2 eye = 'black' # 类属性的创建 3 4 def eat(self): # 实例方法创建 5 print('吃饭 ...
- CVE-2017-0213漏洞复现
CVE-2017-0213漏洞形成的原因 类型混淆的漏洞通常可以通过内存损坏的方式来进行利用.然而漏洞发现者在利用时,并未采用内存损坏的方式来进行漏洞利用.按照漏洞发现者的说法,内存损坏的利用方式需要 ...
- 16进制转字符串得到flag
工业协议分析2 666c61677b37466f4d3253746b6865507a7d
- Smartbi实践:制作可视化分析报表的感悟
估计看到这篇文章的朋友,都是有使用过Smartbi制作数据可视化图表的.但是不是制作过程跟制作效果并没有让自己那么满意.使用过程也经常遇到一些问题解决不了?那是因为你使用的方法不对.你是否在使用Sm ...
- Flink学习笔记(详细待补充)
目录 简单入门 Flink安装部署 Standalone模式 Yarn模式 Kubernetes部署 Flink运行架构 运行时四大组件 任务提交流程 任务调度原理 Flink流处理API 执行环境E ...
- Java基础--环境变量配置
安装JDK配置编程或运行环境(必要) ①下载JDK 在下载页面中你需要选择接受许可,并根据自己的系统选择对应的版本,本文以 Window 64位系统为例: 根据安装提示一步一步安装完成. ②配置环境变 ...
- Chrome:F12开发者模式下console不打印信息
控制台不打印信息的解决方法 你要看看你是否在之前进行过查找关键字操作,操作之后忘记删去这个关键字,导致console中只会留下对于该关键字的查询结果.
- LeetCode-022-括号生成
括号生成 题目描述:数字 n 代表生成括号的对数,请你设计一个函数,用于能够生成所有可能的并且 有效的 括号组合. 示例说明请见LeetCode官网. 来源:力扣(LeetCode) 链接:https ...