
Training a classifier
你已经学习了如何定义神经网络,计算损失和执行网络权重的更新。
现在你或许在思考。
What about data?
通常当你需要处理图像,文本,音频,视频数据,你能够使用标准的python包将数据加载进numpy数组。之后你能够转换这些数组到torch.*Tensor。
- 对于图片,类似于Pillow,OPenCV的包很有用
- 对于音频,类似于scipy和librosa的包
- 对于文字,无论是基于原生python和是Cython的加载,或者NLTK和SpaCy都有效
对于视觉,我们特意创建了一个包叫做torchvision,它有常见数据集的数据加载,比如ImageNet,CIFAR10,MNIST等,还有图片的数据转换,torchvision.datasets和torch.utils.data.Dataloader。
这提供了很方便的实现,避免了写样板代码。
对于这一文章,我们将使用CIFAR10数据集。它拥有飞机,汽车,鸟,猫,鹿,狗,雾,马,船,卡车等类别。CIFAR-10的图片尺寸为3*32*32,也就是3个颜色通道和32*32个像素。
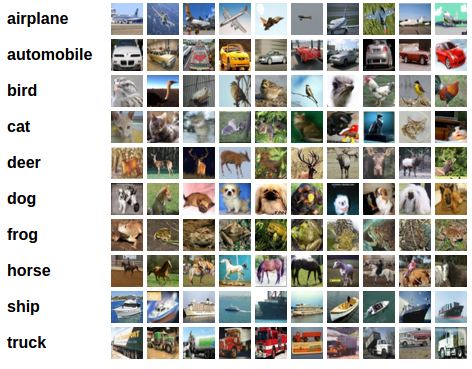
Training an image classifier
我们将按照顺序执行如下步骤:
- 使用torchvision加载并且标准化CIFAR10训练和测试数据集
- 定义一个卷积神经网络
- 定义损失函数
- 使用训练数据训练网络
- 使用测试数据测试网络
1.加载并标准化CIFAR10
使用torchvision,加载CIFAR10非常简单
import torch

import torchvision

import torchvision.transforms as transforms
torchvision数据集的输出是PIL图片库图片,范围为[0,1]。我们将它们转换为tensor并标准化为[-1,1]。
import torch

import torchvision

import torchvision.transforms as transforms

transform=transforms.Compose([transforms.ToTensor(),

transforms.Normalize((0.5,0.5,0.5),(0.5,0.5,0.5))])


trainset=torchvision.datasets.CIFAR10(root='./data',train=True,download=True,transform=transform)

trainloader=torch.data.Dataloader(trainset,batch_size=4,shuffle=True,num_workers=2)


testset=torchvision.datasets.CIFAR10(root='./data',train=False,download=True,transform=transform)

testloader=torch.utils.data.Dataloader(testset,batch_size=4,shuffle=False,num_workers=2)


classes = ('plane', 'car', 'bird', 'cat','deer', 'dog', 'frog', 'horse', 'ship', 'truck')
out:

Downloading https://www.cs.toronto.edu/~kriz/cifar-10-python.tar.gz to ./data/cifar-10-python.tar.gz

Files already downloaded and verified
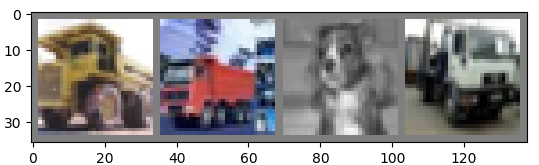
我们来观察一下训练集图片
import matplotlib.pyplot as plt

import numpy as np

def imshow(img):

    img=img/2+0.5

    npimg=img.numpy()

    plt.imshow(np.transpose(npimg,(1,2,0)))

dataiter=iter(trainloader)

images,labels=dataiter.next()

imshow(torchvision.utils.make_grid(images))

plt.show()

print(''.join('%5s'%classes[labels[j]] for j in range(4)))
out:

truck truck  dog truck
2.定义卷积神经网络
从前面神经网络章节复制神经网络,并把它改成接受3维图片输入(而不是之前定义的一维图片)。
import torch.nn as nn

import torch.nn.functional as F

class Net(nn.Module):

    def __init__(self):

        super(Net,self).__init__()

        self.conv1=nn.Conv2d(3,6,5)

        self.pool=nn.MaxPool2d(2,2)

        self.conv2=nn.Conv2d(6,16,5)

        self.fc1=nn.Linear(16*5*5,120)

        self.fc2=nn.Linear(120,84)

        self.fc3=nn.Linear(84,10)

    def forward(self,x):

        x=self.pool(F.relu(self.conv1(x)))

        x=self.pool(F.relu(self.conv2(x)))

        x=x.view(-1,16*5*5)

        x=F.relu(self.fc1(x))

        x=F.relu(self.fc2(x))

        x=self.fc3(x)

        return x

net=Net()
3.定义损失函数和优化器
我们使用分类交叉熵损失和带有动量的SGD
import torch.optim as optim

criterion = nn.CrossEntropyLoss()

optimizer=optim.SGD(net.parameters(),lr=0.001,momentum=0.9)
4.训练网络
我们只需要简单地迭代数据,把输入喂进网络并优化。
import torch.optim as optim

criterion = nn.CrossEntropyLoss()

optimizer = optim.SGD(net.parameters(),lr=0.001,momentum=0.9)

for epoch in range(2):

    running_loss=0.0

    for i,data in enumerate(trainloader,0):

        inputs,labels=data

        optimizer.zero_grad()

        outputs=net(inputs)

        loss=criterion(outputs,labels)

        loss.backward()

        optimizer.step()

        running_loss+=loss.item()

        if i%2000==1999:

            print('[%d, %5d] loss: %.3f' %(epoch + 1, i + 1, running_loss / 2000))

            running_loss=0

print('Finished Training')
out:

[1,  2000] loss: 2.208

[1,  4000] loss: 1.797

[1,  6000] loss: 1.627

[1,  8000] loss: 1.534

[1, 10000] loss: 1.508

[1, 12000] loss: 1.453

[2,  2000] loss: 1.378

[2,  4000] loss: 1.365

[2,  6000] loss: 1.326

[2,  8000] loss: 1.309

[2, 10000] loss: 1.290

[2, 12000] loss: 1.262

Finished Training
4.在测试数据集上测试网络
我们已经遍历了两遍训练集来训练网络。需要检查下网络是不是已经学习到了什么。
我们将检查神经网络输出的预测标签是否与真实标签相同。如果预测是正确的,我们将这一样本加入到正确预测的列表。
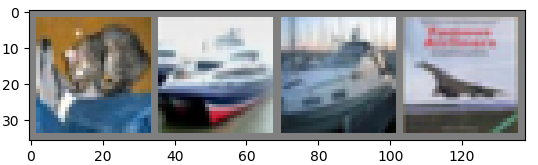
我们先来熟悉一下训练图片。
dataiter=iter(testloader)

images,labes=dataiter.next()

imshow(torchvision.utils.make_grid(images))

plt.show()

print('GroundTruth: ',' '.join('%5s' % classes[labels[j]] for j in range(4)))
out:

GroundTruth:  plane  deer   dog horse
ok,现在让我们看一下神经网络认为这些样本是什么。
outputs=net(images)
输出是10个类别的量值,大的值代表网络认为某一类的可能性更大。所以我们来获得最大值得索引:
_,predicted=torch.max(outputs,1)

print("Predicted: ",' '.join('%5s' %classes[predicted[j]] for j in range(4)))
out:

Predicted:   bird   dog  deer horse
让我们看看整个数据集上的模型表现。
out:

Accuracy of the network on the 10000 test images: 54 %
这看起来要好过瞎猜,随机的话只要10%的准确率(因为是10类)。看来网络是学习到了一些东西。
我们来继续看看在哪些类上的效果好,在哪些类上的效果比较差:
out:

Accuracy of plane : 56 %

Accuracy of   car : 70 %

Accuracy of  bird : 27 %

Accuracy of   cat : 16 %

Accuracy of  deer : 44 %

Accuracy of   dog : 64 %

Accuracy of  frog : 61 %

Accuracy of horse : 73 %

Accuracy of  ship : 68 %

Accuracy of truck : 61 %
好了,接下来该干点啥?
我们怎样将这个神经网络运行在GPU上呢?
Trainning on GPU
就像你怎么把一个Tensor转移到GPU上一样,现在把神经网络转移到GPU上。
如果我们有一个可用的CUDA,首先将我们的设备定义为第一个可见的cuda设备:
device=torch.device("cuda:0" if torch.cuda.is_available() else "cpu")

print(device)
out:

cuda:0
剩下的章节我们假定我们的设备是CUDA。
之后这些方法将递归到所有模块,将其参数和缓冲区转换为CUDA张量:
net.to(device)
记得你还需要在每步循环里将数据转移到GPU上:
inputs,labels=inputs.to(device),labels.to(device)
为什么没注意到相对于CPU巨大的速度提升?这是因为你的网络还非常小。
练习:尝试增加你网络的宽度(第一个nn.Conv2d的参数2应该与第二个nn.Conv2d的参数1是相等的数字),观察你得到的速度提升。
达成目标:
- 更深一步理解Pytorch的Tensor库和神经网络
- 训练一个小神经网络来分类图片
Trainning on multiple GPUs
如果你想看到更加显著的GPU加速,请移步:https://pytorch.org/tutorials/beginner/blitz/data_parallel_tutorial.html
Training a classifier的更多相关文章
- pytorch例子学习——TRAINING A CLASSIFIER
参考:https://pytorch.org/tutorials/beginner/blitz/cifar10_tutorial.html#sphx-glr-beginner-blitz-cifar1 ...
- PyTorch教程之Training a classifier
我们已经了解了如何定义神经网络,计算损失并对网络的权重进行更新. 接下来的问题就是: 一.What about data? 通常处理图像.文本.音频或视频数据时,可以使用标准的python包将数据加载 ...
- DEEP LEARNING WITH PYTORCH: A 60 MINUTE BLITZ | TRAINING A CLASSIFIER
你已经知道怎样定义神经网络,计算损失和更新网络权重.现在你可能会想, 那么,数据呢? 通常,当你需要解决有关图像.文本或音频数据的问题,你可以使用python标准库加载数据并转换为numpy arra ...
- MATLAB 图像分类 Image Category Classification Using Bag of Features
使用MATLAB实现图像的识别,这是MATLAB官网上面的例子,学习一下. http://cn.mathworks.com/help/vision/examples/image-category-cl ...
- LingPipe-TextClassification(文本分类)
What is Text Classification? Text classification typically involves assigning a document to a catego ...
- Struck: Structrued Output Tracking with Kernels 论文笔记
Main idear Treat the tracking problem as a classification task and use online learning techniques to ...
- OpenCV OpenGL手写字符识别
另外一篇文章地址:这个比较详细,但是程序略显简单,现在这个程序是比较复杂的 http://blog.csdn.net/wangyaninglm/article/details/17091901 整个项 ...
- KCF:High-Speed Tracking with Kernelized Correlation Filters 的翻译与分析(一)。分享与转发请注明出处-作者:行于此路
High-Speed Tracking with Kernelized Correlation Filters 的翻译与分析 基于核相关滤波器的高速目标跟踪方法,简称KCF 写在前面,之所以对这篇文章 ...
- 深度学习框架PyTorch一书的学习-第一/二章
参考https://github.com/chenyuntc/pytorch-book/tree/v1.0 希望大家直接到上面的网址去查看代码,下面是本人的笔记 pytorch的设计遵循tensor- ...
随机推荐
- C#中检查null的语法糖
今天看到已经更新了devblogs,新增的C# 11的!!(用于检查null的语法)经过非常长的讨论,最后取消了.然后我又想起来null检查,这个可以说一说. 函数参数null检查 传统写法 写一个函 ...
- redis 添加hash报错
报错信息 127.0.0.1:6379> hset ii name ss (error) MISCONF Redis is configured to save RDB snapshots, b ...
- 虚拟机VMware 安装centos、常规配置、共享文件等
安装centos7[通过vm来安装运行centos7] 一.准备工作 1.centos7 的安装镜像下载链接:http://isoredirect.centos.org/centos/7/isos/x ...
- WIN10 使用POWERSHELL 设置单应用KIOSK模式(win10家庭版或企业版)
win10 使用PowerShell 设置单应用kiosk模式 win10 家版或企业版PowerShellshell 启动器 v1Autologon.exe 注意事项 win10 家庭版或企业版. ...
- html单页面通过cdn引入element-ui组件样式不显示问题
html单页面通过cdn引入element-ui组件样式不显示问题 必须先引入vue,再通过cdn引入element,否则element-ui组件与样式无效. <!DOCTYPE html> ...
- 伪元素选择器,选择器优先级,CSS修改文字属性,CSS修改字体属性,CSS修改其他属性
伪元素选择器 未使用元素选择器的效果 第一行:伪元素选择器:选择部分内容 第二行:伪元素选择器:选择部分内容 伪元素选择器:选择部分内容 伪元素选择器:选择部分内容 ::selection:选择指定元 ...
- Python技法:实用运维脚本编写(进程/文件/目录操作)
Python在很大程度上可以对shell脚本进行替代.笔者一般单行命令用shell,复杂点的多行操作就直接用Python了.这篇文章就归纳一下Python的一些实用脚本操作. 1. 执行外部程序或命令 ...
- 513. Find Bottom Left Tree Value - LeetCode
Question 513. Find Bottom Left Tree Value Solution 题目大意: 给一个二叉树,求最底层,最左侧节点的值 思路: 按层遍历二叉树,每一层第一个被访问的节 ...
- CentOS 7.9 安装 zookeeper-3.7.0
1. 下载 Zookeeper Zookeeper 官网 使用 wget 下载: wget https://mirrors.bfsu.edu.cn/apache/zookeeper/zookeeper ...
- 20212115 实验二 《python程序设计》实验报告
实验二 计算器设计 #20212115 2021-2022-2 <python程序设计> 实验报告二 课程: 课程:<Python程序设计>班级: 2121姓名: 朱时鸿学号: ...