Spring 源码(3)Spring BeanFactory 是怎么创建的?
Spring创建 BeanFactory 的方式
按照Bean的配置方式手动创建可以分为两种:
使用
XMl配置的Bean
这种方式使用xml配置文件配置Bean的信息并且设置扫描的路径,扫描到的包可以使用注解进行配置Bean信息,一般来说手动创建BeanFactory容器的实现类为ClassPathXmlApplicationContext和SystemFileXmlApplicationContext,设置xml的路径即可创建出IOC容器。例如:
ClassPathXmlApplicationContext context = new ClassPathXmlApplicationContext("classpath:spring-test.xml");

User user = context.getBean(User.class);
使用注解配置的
Bean这种方式不使用
xml配置文件,全部基于注解方式配置Bean的信息,比如使用@Component、@Configuration进行Bean的配置,实现类为AnnotationConfigApplicationContext设置扫描的包,然后调用refresh方法进行IOC容器的创建。例如:
AnnotationConfigApplicationContext context = new AnnotationConfigApplicationContext();

context.scan("com.redwinter.test");

context.refresh();
但是一般来说开发中都是使用web容器进行IOC容器的创建的,比如tomcat容器、jetty容器、undertow容器、netty容器,在Spring中有一个BeanFactory的实现类:GenericApplicationContext,他的子类有一个叫GenericWebApplicationContext,在Spring Boot中,就是通过实现这个类完成Web容器的创建+IOC容器的创建的。在Spring Boot中有个类叫ServletWebServerApplicationContext就是继承了GenericWebApplicationContext这个类,然后ServletWebServerApplicationContext中有个属性叫webServer,这个是一个接口,这个接口对应的实现就是Web容器的实现:
public class ServletWebServerApplicationContext extends GenericWebApplicationContext

		implements ConfigurableWebServerApplicationContext {

	public static final String DISPATCHER_SERVLET_NAME = "dispatcherServlet";

	// web 容器,实现类有TomcatWebServer、JettyWebServer、NettyWebServer、UndertowWebServer

	private volatile WebServer webServer;

	// .... 去掉其他代码

	}
本文介绍使用XML配置文件手动创建IOC容器的方式
Spring 使用Xml启动IOC容器
根据上一篇文章 https://www.cnblogs.com/redwinter/p/16151489.htmlSpring Bean IOC 的创建流程种的第一个方法AbstractApplicationContext#prepareRefresh前戏准备工作继续解读AbstractApplicationContext#refresh方法中的第二方法 AbstractApplicationContext#obtainFreshBeanFactory获取BeanFactory,这个方法会创建一个DefaultListableBeanFactory 默认的可列出Bean的工厂。
AbstractApplicationContext#obtainFreshBeanFactory中主要是刷新BeanFactory,源码如下:
@Override

protected final void refreshBeanFactory() throws BeansException {

  // 如果有BeanFactory 就销毁掉并关闭

  if (hasBeanFactory()) {

    destroyBeans();

    closeBeanFactory();

  }

  try {

    // 直接new一个BeanFactory 实现出来 DefaultListableBeanFactory

    DefaultListableBeanFactory beanFactory = createBeanFactory();

    // 根据上一步创建BeanFactory创建的Id进行获取

    beanFactory.setSerializationId(getId());

    // 定制化BanFactory ,比如设置allowBeanDefinitionOverriding 和allowCircularReferences 的属性

    customizeBeanFactory(beanFactory);

    // 加载BeanDefinitions 从xml 和注解定义的Bean

    // 从configLocations -> String[] -> String -> Resource[] -> Resource -> InputStream -> Document -> 解析成一个一个的BeanDefinition 对象

    loadBeanDefinitions(beanFactory);

    this.beanFactory = beanFactory;

  }

  catch (IOException ex) {

    throw new ApplicationContextException("I/O error parsing bean definition source for " + getDisplayName(), ex);

  }

}
- 首先判断是否已经有
BeanFactory了,如果有就销毁掉并且关闭工厂 - 直接创建一个
BeanFactory,默认就是使用new DefaultListableBeanFactory,不过在创建的过程中可能会默认初始化一些属性,比如:allowBeanDefinitionOverriding和allowCircularReferences允许Bean覆盖和解决循环依赖的问题,还有就是BeanFactory的序列化id等属性。 - 设置序列化
id - 定制
BeanFactory,这里是一个扩展点,你可以对BeanFactory进行定制 - 加载
BeanDefinition,这里从XML配置文件中去加载,这里面的逻辑非常的复杂繁琐 - 将创建的
BeanFactory设置出去
定制个性化的BeanFactory
在customizeBeanFactory(beanFactory);这个方法中,spring设置了两个属性,一个是设置是否可以覆盖Bean,一个是否允许循环依赖,源码如下:
protected void customizeBeanFactory(DefaultListableBeanFactory beanFactory) {

  // 可以定制设置是否允许Bean覆盖

  if (this.allowBeanDefinitionOverriding != null) {

    beanFactory.setAllowBeanDefinitionOverriding(this.allowBeanDefinitionOverriding);

  }

  // 可以定制设置是否允许循环依赖

  if (this.allowCircularReferences != null) {

    beanFactory.setAllowCircularReferences(this.allowCircularReferences);

  }

}
spring提供了这个扩展点,那么我们就可以定制BeanFactory,比如我们新建一个类继承ClassPathXmlApplicationContext,然后重写customizeBeanFactory这个方法:
/**

 * @author <a href="https://www.cnblogs.com/redwinter/">redwinter</a>

 * @since 1.0

 **/

public class MyClassPathXmlApplicationContext extends ClassPathXmlApplicationContext {

	public MyClassPathXmlApplicationContext(String... configLocation) throws BeansException {

		super(configLocation);

	}

	@Override

	protected void customizeBeanFactory(DefaultListableBeanFactory beanFactory) {

		// 扩展点 设置不去处理循环依赖或者beanDefinition覆盖

		super.setAllowBeanDefinitionOverriding(true);

         // 设置不允许循环依赖

		super.setAllowCircularReferences(false);

        // 调用父类的方法

		super.customizeBeanFactory(beanFactory);

	}

}
创建两个类,并且设置为循环依赖:
/**

 * @author <a href="https://www.cnblogs.com/redwinter/">redwinter</a>

 * @since 1.0

 **/

@Service

public class PersonService {

	@Autowired

	private UserService userService;

	public void test() {

		System.out.println(userService);

	}

}

/**

 * @author <a href="https://www.cnblogs.com/redwinter/">redwinter</a>

 * @since 1.0

 **/

@Service

public class UserService {

	@Autowired

	private PersonService personService;

	public void test(){

		System.out.println(personService);

	}

}
创建之后然后使用自定义的MyClassPathXmlApplicationContext类进行启动:
/**

 * @author <a href="https://www.cnblogs.com/redwinter/">redwinter</a>

 * @since 1.0

 **/

public class BeanCreate {

  @Test

  public void classPathXml() {

    //		ClassPathXmlApplicationContext context = new     ClassPathXmlApplicationContext("classpath:spring-test.xml");

    ClassPathXmlApplicationContext context = new                       MyClassPathXmlApplicationContext("classpath:spring-test.xml");

    UserService userService = context.getBean(UserService.class);

	userService.test();

  }

}
启动之后发现报错了:
四月 19, 2022 1:26:55 下午 org.springframework.context.support.AbstractApplicationContext refresh

警告: Exception encountered during context initialization - cancelling refresh attempt: org.springframework.beans.factory.UnsatisfiedDependencyException: Error creating bean with name 'personService': Unsatisfied dependency expressed through field 'userService'; nested exception is org.springframework.beans.factory.UnsatisfiedDependencyException: Error creating bean with name 'userService': Unsatisfied dependency expressed through field 'personService'; nested exception is org.springframework.beans.factory.BeanCurrentlyInCreationException: Error creating bean with name 'personService': Requested bean is currently in creation: Is there an unresolvable circular reference?
如果设置为true,那么启动不会报错了并且输出了:
com.redwinter.test.service.PersonService@6fc6f14e
BeanDefinition 的加载
在刷新BeanFactory的方法中,有个方法叫loadBeanDefinitions,这个方法就是进行BeanDefinition的加载的,他的大致流程是这样的:
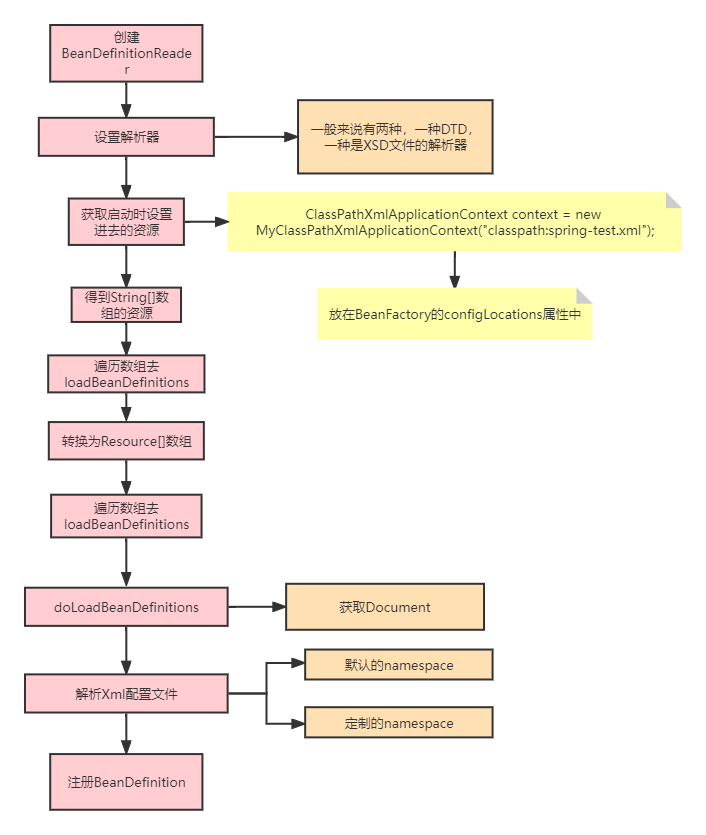
在BeanDefinition加载的过程中,有个关键点可以让我们自定义标签进行BeanDefinition的加载和解析,在设置解析器的时候,Spring是这样设置解析器的:
public DelegatingEntityResolver(@Nullable ClassLoader classLoader) {

		// 创建dtd解析器

		this.dtdResolver = new BeansDtdResolver();

		// 创建schema 解析器

		// 在Debug的时候,这里会调用toString方法,然后去调用getSchemaMappings 方法,将schemaMappings 设置属性进去

		this.schemaResolver = new PluggableSchemaResolver(classLoader);

	}
在Spring中一般解析XML文件的时候都是从网上下载对应的标签解析,比如Spring配置文件中的https://www.springframework.org/schema/beans/spring-beans-3.1.xsd ,但是一般来说都是不需要进行下载的,Spring提供了本地文件的xsd文件,这些xsd文件就配置在META-INF/spring.shames文件中进行配置,由于文件中内容比较多我就不复制出来了。
在Spring进行xml解析之前会创建一个namespace的处理器的解析器:
public NamespaceHandlerResolver getNamespaceHandlerResolver() {

  if (this.namespaceHandlerResolver == null) {

    // 创建默认的namespace处理器解析器,加载spring.handlers中配置的处理器

    this.namespaceHandlerResolver = createDefaultNamespaceHandlerResolver();

  }

  return this.namespaceHandlerResolver;

}
这里创建的namespace处理器就是放在META-INF/spring.handlers文件中,比如util标签、context标签的都是在这个文件中配置的处理器,对于util标签的namespace处理器如下:
public class UtilNamespaceHandler extends NamespaceHandlerSupport {

	private static final String SCOPE_ATTRIBUTE = "scope";

	@Override

	public void init() {

		// 注册constant标签的解析器

		registerBeanDefinitionParser("constant", new ConstantBeanDefinitionParser());

		// 注册property-path标签的解析器

		registerBeanDefinitionParser("property-path", new PropertyPathBeanDefinitionParser());

		// 注册list标签的解析器

		registerBeanDefinitionParser("list", new ListBeanDefinitionParser());

		// 注册set标签的解析器

		registerBeanDefinitionParser("set", new SetBeanDefinitionParser());

		// 注册map标签的解析器

		registerBeanDefinitionParser("map", new MapBeanDefinitionParser());

		// 注册properties标签的解析器

		registerBeanDefinitionParser("properties", new PropertiesBeanDefinitionParser());

	}

  // ....省略其他代码

}
这些处理器加载完之后就会进行BeanDefinition的解析:
protected void parseBeanDefinitions(Element root, BeanDefinitionParserDelegate delegate) {

  if (delegate.isDefaultNamespace(root)) {

    NodeList nl = root.getChildNodes();

    for (int i = 0; i < nl.getLength(); i++) {

      Node node = nl.item(i);

      if (node instanceof Element) {

        Element ele = (Element) node;

        // 如果节点是默认的命名空间则使用默认的解析

        if (delegate.isDefaultNamespace(ele)) {

          parseDefaultElement(ele, delegate);

        }

        else {

          // 定制的namespace标签

          delegate.parseCustomElement(ele);

        }

      }

    }

  }

  else {

    delegate.parseCustomElement(root);

  }

}

private void parseDefaultElement(Element ele, BeanDefinitionParserDelegate delegate) {

  // 解析import节点

  if (delegate.nodeNameEquals(ele, IMPORT_ELEMENT)) {

    importBeanDefinitionResource(ele);

  }

  // 解析alias 别名节点

  else if (delegate.nodeNameEquals(ele, ALIAS_ELEMENT)) {

    processAliasRegistration(ele);

  }

  // 解析bean节点

  else if (delegate.nodeNameEquals(ele, BEAN_ELEMENT)) {

    processBeanDefinition(ele, delegate);

  }

  // 解析beans节点

  else if (delegate.nodeNameEquals(ele, NESTED_BEANS_ELEMENT)) {

    // recurse

    doRegisterBeanDefinitions(ele);

  }

}
解析完之后就会调用注册,将解析到的BeanDefinition放在beanDefinitionMap和beanDefinitionNames集合中,最终完成了BeanDefinition的加载过程。
现在开发基本都是使用Spring Boot,是全注解方式,这种BeanDefinition的加载实际上就是指定了一个包的扫描,然后扫描这些包下标记了@Configuration、@Component、@Service、@Controller等注解的类。感兴趣的可以去看下AnnotationConfigApplicationContext这个类是如何扫描的。
这就是Spring BeanFactory的创建过程,并且包括了BeanDefinition的加载过程,接下来我们进行自定义标签,让spring进行解析。
Spring 源码(3)Spring BeanFactory 是怎么创建的?的更多相关文章
- Spring源码学习-容器BeanFactory(四) BeanDefinition的创建-自定义标签的解析.md
写在前面 上文Spring源码学习-容器BeanFactory(三) BeanDefinition的创建-解析Spring的默认标签对Spring默认标签的解析做了详解,在xml元素的解析中,Spri ...
- Spring源码学习-容器BeanFactory(三) BeanDefinition的创建-解析Spring的默认标签
写在前面 上文Spring源码学习-容器BeanFactory(二) BeanDefinition的创建-解析前BeanDefinition的前置操作中Spring对XML解析后创建了对应的Docum ...
- Spring源码学习-容器BeanFactory(二) BeanDefinition的创建-解析前BeanDefinition的前置操作
写在前面 上文 Spring源码学习-容器BeanFactory(一) BeanDefinition的创建-解析资源文件主要讲Spring容器创建时通过XmlBeanDefinitionReader读 ...
- Spring源码学习-容器BeanFactory(一) BeanDefinition的创建-解析资源文件
写在前面 从大四实习至今已一年有余,作为一个程序员,一直没有用心去记录自己工作中遇到的问题,甚是惭愧,打算从今日起开始养成写博客的习惯.作为一名java开发人员,Spring是永远绕不过的话题,它的设 ...
- Spring源码学习之BeanFactory体系结构
一.BeanFactory BeanFactory是Spring IOC容器的鼻祖,是IOC容器的基础接口,所有的容器都是从它这里继承实现而来.可见其地位.BeanFactory提供了最基本的IOC容 ...
- Spring源码阅读-spring启动
web.xml web.xml中的spring容器配置 <listener> <listener-class>org.springframework.web.context.C ...
- Spring源码分析(十八)创建bean
本文结合<Spring源码深度解析>来分析Spring 5.0.6版本的源代码.若有描述错误之处,欢迎指正. 目录 一.创建bean的实例 1. autowireConstructor 2 ...
- Spring源码解读Spring IOC原理
一.什么是Ioc/DI? IoC 容器:最主要是完成了完成对象的创建和依赖的管理注入等等. 先从我们自己设计这样一个视角来考虑: 所谓控制反转,就是把原先我们代码里面需要实现的对象创建.依赖的代码,反 ...
- 初探Spring源码之Spring Bean的生命周期
写在前面的话: 学无止境,写博客纯粹是一种乐趣而已,把自己理解的东西分享出去,不意味全是对的,欢迎指正! Spring 容器初始化过程做了什么? AnnotationConfigApplication ...
- Spring源码:Spring IoC容器加载过程(1)
Spring源码版本:4.3.23.RELEASE 一.加载过程概览 Spring容器加载过程可以在org.springframework.context.support.AbstractApplic ...
随机推荐
- super.getClass()方法调用?
下面程序的输出结果是多少? import java.util.Date; public class Test extends Date{ public static void main(String[ ...
- Oracle :value too large for column "SCHEMA"."TABLE"."COLUMN" (actual: 519, maximum: 500)的解决方案
原因:我是使用 CREATE TABLE XXX AS subquery 进行创建的数据表,主要是将相关的数据聚合在一起,然后通过导出为SQL脚本文件,进行导入到新库中,导致部分INSERT INTO ...
- spring cloud 和dubbo区别?
1.服务调用方式 dubbo是RPC springcloud Rest Api2.注册中心,dubbo 是zookeeper springcloud是eureka,也可以是zookeeper3.服务网 ...
- springmvc对参数接收的两个注解@RequestParam和@RequestBody
@RequestParam 作用:将请求参数绑定到控制器的方法参数上,主要用于接收几班类型参数 语法:@RequestParam(value="参数名",required=&quo ...
- JDBC 能否处理 Blob 和 Clob?
Blob 是指二进制大对象(Binary Large Object),而 Clob 是指大字符对象 (Character Large Objec),因此其中 Blob 是为存储大的二进制数据而设计的, ...
- Pycharm连接MySQL步骤及注意点
1.数据库连接修改MySQL: 默认:MySQLDB #MySQLDB只支持Python2,暂不支持python3,所以要修改, 修改成:pymysql,在每个项目中都需要先导入pymysql模块, ...
- Java 面试问题列表包含的主题?
多线程,并发及线程基础 数据类型转换的基本原则 垃圾回收(GC) Java 集合框架 数组 字符串 GOF 设计模式 SOLID 抽象类与接口 Java 基础,如 equals 和 hashcode ...
- 解决IDEA包重叠在一起的问题
问题显现: 解决方法:
- 记MyBaits-Plus 实现菜单的无限层关系
Mybatis-Plus父子菜单 首先来看一下实现的效果 pojo层 @Data @TableName("platform_role") public class Role imp ...
- 树莓派安装ros
之前电脑安装过ros感觉还好,没成想这次在树莓派上安装费老劲了,出现了很多错误,装了卸,卸了装废了半天劲下面将一些安装的错误和问题做个总结方便以后的安装也希望给别人一个参考 ros安装(对照自己的版本 ...