[spring]spring详细总结
spring
1.spring简介
Spring框架是一个开源的应用程序框架,是针对bean的生命周期进行管理的轻量级容器。
Spring解决了开发者在J2EE开发中遇到的许多常见的问题,提供了功能强大IOC、AOP及Web MVC等功能。
Spring可以单独应用于构筑应用程序,也可以和Struts、Webwork、Tapestry等众多Web框架组合使用,并且可以与 Swing等桌面应用程序AP组合。
Spring不仅仅能应用于J2EE应用程序之中,也可以应用于桌面应用程序以及小应用程序之中。
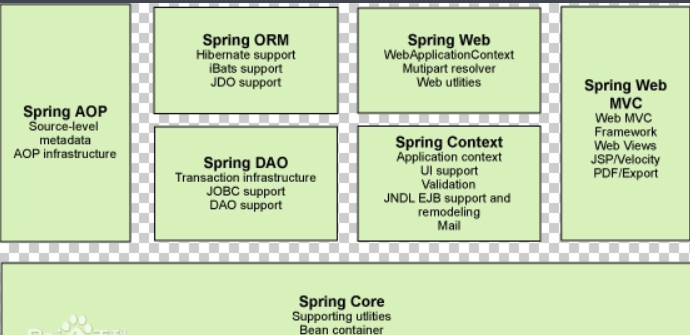
Spring框架主要由七部分组成,分别是 Spring Core、 Spring AOP、 Spring ORM、 Spring DAO、Spring Context、 Spring Web和 Spring Web MVC。
官方文档地址:
https://docs.spring.io/spring-framework/docs/4.3.9.RELEASE/spring-framework-reference/
中文
https://www.docs4dev.com/docs/zh/spring-framework/5.1.3.RELEASE/reference/
优点:
- 开源免费
- 轻量级的非入侵式的
- 控制反转(IOC),面向切面编程(aop)
- 支持事务处理
使用spring的jar包支持:
<!-- https://mvnrepository.com/artifact/org.springframework/spring-web -->

<dependency>

    <groupId>org.springframework</groupId>

    <artifactId>spring-web</artifactId>

    <version>5.3.22</version>

</dependency>
七大模块:
弊端:发展了太久后,配置越来越多,人称“配置地狱”
2.IOC理论推导
在我们之前的业务中,用户的需求可能会影响程序的代码,可能需要修改代码,如果程序的代码量十分大,修改一次的成本十分的昂贵!
原来的方式:
private UserMapper usermapper=new UserMapperImpl();
现在将对象的传递由new变成set动态注入
private UserMapper userMapper;

public void setUserMapper(UserMapper userMapper){

    this.userMapper=userMapper;

}
原来是程序控制的,现在变成用户控制了。
3.一个spring项目的快速搭建
(1)写一个实体类
package com.pojo;

/**

 * @author panglili

 * @create 2022-07-23-21:40

 */

public class HelloSpring {

    private String name;

    public void setName(String name) {

        this.name = name;

    }

    public String getName() {

        return name;

    }

    @Override

    public String toString() {

        return name;

    }

}
(2)将实体类配置在spring容器
<?xml version="1.0" encoding="UTF-8"?>

<beans  xmlns = "http://www.springframework.org/schema/beans"

        xmlns:xsi = "http://www.w3.org/2001/XMLSchema-instance"

        xsi:schemaLocation = "http://www.springframework.org/schema/beans

        http://www.springframework.org/schema/beans/spring-beans.xsd" >

    <!--使用spring来创建对象,在spring中被称为bean -->

    <!-- class="com.pojo.HelloSpring"  相当于在newHelloSpring

         id="helloSpring"              相当于对象变量名字

         name="name"                   属性

         value="spring"                属性值

     -->

<bean id="helloSpring" class="com.pojo.HelloSpring">

<property name="name"  value="spring"></property>

</bean>

</beans>
(3)测试
import com.pojo.HelloSpring;

import org.springframework.context.ApplicationContext;

import org.springframework.context.support.ClassPathXmlApplicationContext;

/**

 * @author panglili

 * @create 2022-07-23-21:43

 */

public class MyTest {

    public static void main(String[] args) {

        ApplicationContext context = new ClassPathXmlApplicationContext( "application.xml");

        HelloSpring hello =(HelloSpring) context.getBean("helloSpring");

        System.out.println(hello.toString());

    }

}
4.IOC创建对象的过程
- 使用无参构造创造
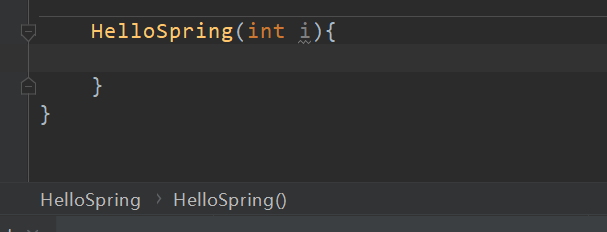
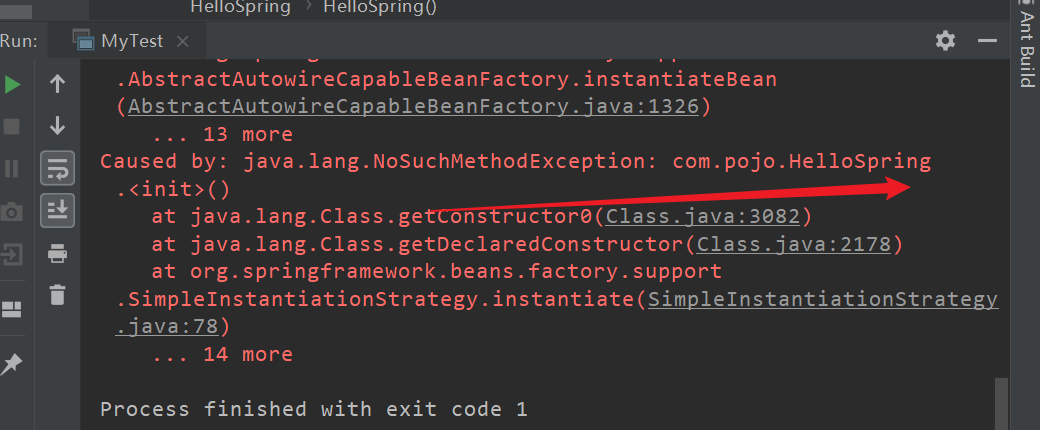
设定为有参后,就会报错!
对象在被注册进去的时候,就被实例化了,直接使用就好。
5.IO注入
(1)前面的构造器注入
(2)set注入
<?xml version="1.0" encoding="UTF-8"?>

<beans xmlns="http://www.springframework.org/schema/beans"

      xmlns:xsi="http://www.w3.org/2001/XMLSchema-instance"

      xsi:schemaLocation="http://www.springframework.org/schema/beans

       https://www.springframework.org/schema/beans/spring-beans.xsd">

   <bean id="user" class="cn.itnanls.User">

       <!--构造注入——参数类型注入-->

       <!--<constructor-arg type="java.lang.Integer" value="12"/>-->

       <!--<constructor-arg type="java.lang.String" value="Tom"/>-->

       <!--构造注入——下标注入-->

       <!--<constructor-arg index="0" value="tom"/>-->

       <!--<constructor-arg index="1" value="12"/>-->

       <!--构造注入——名字注入,最常用-->

       <!--<constructor-arg name="name" value="lucy"/>-->

       <!--<constructor-arg name="age" value="12"/>-->

       <!--setter注入-->

       <!--<property name="name" value="tom"/>-->

   </bean>

</beans>
构造注入对象之间的关系为组合
set注入的对象之间的关系为聚合
(3)p命名空间注入
- 使用set方式注入
<beans  xmlns = "http://www.springframework.org/schema/beans"

    xmlns:xsi = "http://www.w3.org/2001/XMLSchema-instance"

    xmlns:p = "http://www.springframework.org/schema/p"

    xsi:schemaLocation = "http://www.springframework.org/schema/beans

        http://www.springframework.org/schema/beans/spring-beans.xsd" >

     <bean id="helloSpring" class="com.pojo.HelloSpring">

<property name="name"  value="spring"></property>

</bean>

     <bean id="p-name" class="com.pojo.HelloSpring" p:name="ss">

</beans>
(4)c命名空间注入
- 使用构造器方式注入,开启构造器才能用
HelloSpring(String name){

    this.name=name;

}

HelloSpring(){

}
<bean id="c-name" class="com.pojo.HelloSpring" c:name="cName"/>
注意导入头文件
xmlns:p = "http://www.springframework.org/schema/p"

xmlns:c="http://www.springframework.org/schema/c"
6.作用域
ScopeDescription
(Default) Scopes a single bean definition to a single object instance for each Spring IoC container.
Scopes a single bean definition to any number of object instances.
Scopes a single bean definition to the lifecycle of a single HTTP request. That is, each HTTP request has its own instance of a bean created off the back of a single bean definition. Only valid in the context of a web-aware Spring ApplicationContext.
Scopes a single bean definition to the lifecycle of an HTTP Session. Only valid in the context of a web-aware Spring ApplicationContext.
Scopes a single bean definition to the lifecycle of a ServletContext. Only valid in the context of a web-aware Spring ApplicationContext.
Scopes a single bean definition to the lifecycle of a WebSocket. Only valid in the context of a web-aware Spring ApplicationContext.
- 单例
<bean id="accountService" class="com.DefaultAccountService"/>

*<!-- the following is equivalent, though redundant (singleton scope is the default) -->*

<bean id="accountService" class="com.DefaultAccountService" scope="singleton"/>
- 原型
<bean id="accountService" class="com.something.DefaultAccountService" scope="prototype"/>
7.bean的自动装配
- 是spring满足bean依赖的一种方式
- spring会在上下文中自动寻找,并自动给bean装配属性
spring的装配方式:
(1)手动装配
- 在people类中依赖了cat和dog对象,所以属性中手动装配他们的属性
<?xml version="1.0" encoding="UTF-8"?>
<beans xmlns = "http://www.springframework.org/schema/beans"
xmlns:xsi = "http://www.w3.org/2001/XMLSchema-instance"
xsi:schemaLocation = "http://www.springframework.org/schema/beans
http://www.springframework.org/schema/beans/spring-beans.xsd" >
<bean id="cat" class="pojo.Cat">
<property name="voice" value="mom~"/>
</bean>
<bean id="dog" class="pojo.Dog">
<property name="voice" value="wow~"/>
</bean>
<bean id="people" class="pojo.People">
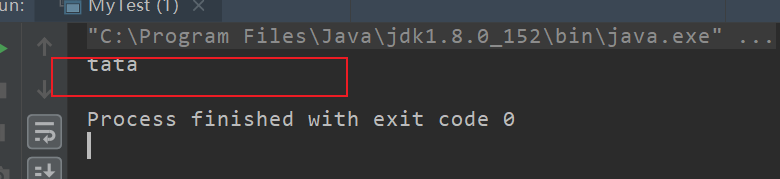
<property name="name" value="tata"/>
<property name="dog" ref="dog"/>
<property name="cat" ref="cat"/>
</bean>
</beans>
(2)自动装配
通过byName自动装配
- spring会自动去找people中的set后面相对应的cat和dog与bean中id对应
<bean id="people" class="pojo.People" autowire="byName">

    <property name="name" value="tata"/>

</bean>
通过byType自动装配
- spring会自动去找people中的对象依赖和bean中class类相同的对应
<bean id="people" class="pojo.People" autowire="byType">

    <property name="name" value="tata"/>

</bean>
(3)使用注解实现自动装配
使用之前导入注解依赖的配置和支持
<?xml version="1.0" encoding="UTF-8"?>

<beans xmlns="http://www.springframework.org/schema/beans"

    xmlns:xsi="http://www.w3.org/2001/XMLSchema-instance"

    xmlns:context="http://www.springframework.org/schema/context"

    xsi:schemaLocation="http://www.springframework.org/schema/beans

        https://www.springframework.org/schema/beans/spring-beans.xsd

        http://www.springframework.org/schema/context

        https://www.springframework.org/schema/context/spring-context.xsd">

    <context:annotation-config/>

</beans>
不再使用显示引用对象依赖的其他属性
<bean id="cat" class="pojo.Cat"/>

<bean id="dog" class="pojo.Dog"/>

<bean id="people" class="pojo.People"/>
@Autowired
直接在对象上面使用@Autowired注解
private String name;

@Autowired

private Dog dog;

@Autowired

private Cat cat;
如果装配环境复杂的话,可以通过@Qualifier(value = "cat")指定bean注入
例如多个cat对象bean,属性值不同的时候
<bean id="cat" class="pojo.Cat">

    <property name="eat" value="fish"/>

</bean>

<bean id="cat11" class="pojo.Cat">

    <property name="eat" value="cookie"/>

</bean>
就需要
@Qualifier
否则,只会spring会走第一个bean
@Autowired

@Qualifier(value = "cat11")

private Cat cat;
Resource
- 这个注解跟上面的@Autowired功能相似,但是它可以通过名字再通过类型装配,都没有才会报错,要比@Autowired智能一点,但使用较少。
@Resource(name="cat")

private Cat cat;
8.使用注解开发
1.bean
spring4以后,注解依赖于aop包,确保你的lib中有它
确保开启了使用注解
<context:annotation-config/>
2.组件代替bean实现自动注入
在配置文件中自动扫描包下的所有类为bean
<context:component-scan base-package="pojo"/>
在类对象上加上注解@Component可以被扫描
- @component (把普通pojo实例化到spring容器中,相当于配置文件中的 )
@Component
使用注解给属性注入值
package pojo;

import org.springframework.beans.factory.annotation.Autowired;

import org.springframework.beans.factory.annotation.Qualifier;

import org.springframework.beans.factory.annotation.Value;

import org.springframework.stereotype.Component;

import javax.annotation.Resource;

/**

 * @author panglili

 * @create 2022-07-24-9:52

 */

@Component

public class People {

    private String name;

    @Value("123")

   public int age;

    private Dog dog;

    private Cat cat;

 }

}
- 但是复杂的属性配置还是建议使用xml统一管理注入
3.component衍生的注解
dao:@repository
service:@service
controller:@controller
跟component功能相同只是能够使得分工更加的明确
小结:
xml与注解:
- xml更加万能,适用于各种场合!维护简单方便
- 注解 不是自己类使用不了,维护相对复杂
最佳实践:
- xml用来管理bean
- 注解只负责属性的注入
9.使用javaconfig实现代替xml配置
The central artifacts in Spring’s new Java-configuration support are @Configuration-annotated classes and @Bean-annotated methods.
根据官方文档的说明,创建一个java—configuration的配置类,使用@configuration注解,再使用@Bean在方法上面就可以实现xml中的功能。
(1)创建一个java—configuration
package config;

import org.springframework.context.annotation.Bean;

import org.springframework.context.annotation.Configuration;

import pojo.User;

/**

 * @author panglili

 * @create 2022-07-24-11:24

 */

@Configuration

public class Java_config {

    @Bean

    public User getUser(){

        return new User();

    }

}
(2)实体类
package pojo;

import org.springframework.beans.factory.annotation.Autowired;

import org.springframework.beans.factory.annotation.Value;

import org.springframework.context.annotation.Bean;

import org.springframework.stereotype.Component;

/**

 * @author panglili

 * @create 2022-07-24-11:24

 */

@Component

public class User {

    @Value("tata")

    private String name;

    public String getName() {

        return name;

    }

    public void setName(String name) {

        this.name = name;

    }

}
(3)测试
现在也可以拿到值
import config.Java_config;

import org.springframework.context.annotation.AnnotationConfigApplicationContext;

import pojo.User;

/**

 * @author panglili

 * @create 2022-07-24-11:28

 */

public class MyTest {

    public static void main(String[] args) {

        AnnotationConfigApplicationContext context = new AnnotationConfigApplicationContext(Java_config.class);

        User user =(User) context.getBean("getUser");

        System.out.println(user.getName());

    }

}
这种java代替xml的实现方式,在springboot中大量使用。
10.代理模式
代理模式的分类:
- 静态代理
- 动态代理
关系分析
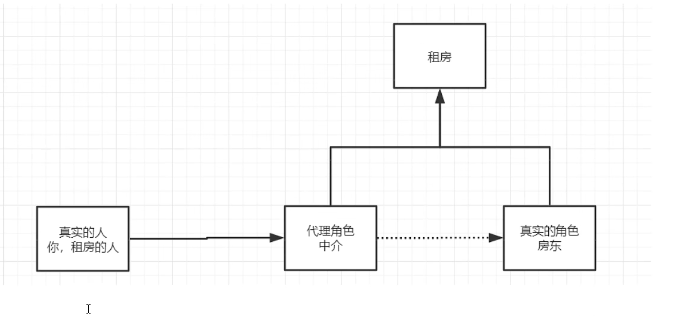
抽象角色:一般会使用接口或者抽象类
真实角色:被代理的角色
代理角色:代理真实的角色,做一些附属的操作
客户:访问代理对象的人
静态代理
步骤:
抽象角色:
/**

 * @author panglili

 * @create 2022-07-24-15:00

 */

public interface Rent {

    public void rent();

}
真实角色:
/**

 * @author panglili

 * @create 2022-07-24-15:01

 */

public class Host implements Rent {

    public void rent() {

        System.out.println("host would rent house");

    }

}
代理角色:
/**

 * @author panglili

 * @create 2022-07-24-15:02

 */

public class Proxy implements Rent {

    private Host host;

    public Proxy(){

    }

    public Proxy(Host host){

        this.host=host;

    }

    public void rent() {

        host.rent();

        seeHouse();

    }

    //look house

    public void seeHouse(){

        System.out.println("look House");

    }

}
客户:
/**

 * @author panglili

 * @create 2022-07-24-15:02

 */

public class Client  {

    public static void main(String[] args) {

        Host host = new Host();

        Proxy proxy = new Proxy(host);

        proxy .rent();

    }

}
动态代理
- 和静态代理的角色一样
- 动态生成,不是我们直接写好了的
- 动态代理分为两大类:基于接口的动态代理和基于类的动态代理
- 基于接口——jdbc
- 基于类——cglib
- 基于字节码
11.AOP切面编程
使用aop植入,需要导入一个依赖包
<dependency>

    <groupId>org.aspectj</groupId>

    <artifactId>aspectjweaver</artifactId>

    <version>1.9.7</version>

</dependency>
- 横切关注点
- 切面
- 通知
- 目标
- 代理
- 切入点
- 连接点
在执行的方法前动态的添加一个日志输出
方法一使用spring类实现
(1)接口
package service;

/**

 * @author panglili

 * @create 2022-07-24-16:09

 */

public interface Service {

    public void add();

    public void delete();

    public void update();

    public void select();

}
(2)要代理的实现类
package service;

/**

 * @author panglili

 * @create 2022-07-24-16:09

 */

public class ServiceImpl implements Service {

    public void add() {

        System.out.println("add");

    }

    public void delete() {

        System.out.println("delete");

    }

    public void update() {

        System.out.println("update");

    }

    public void select() {

        System.out.println("select");

    }

}
(3)代理商
package log;

import org.springframework.aop.MethodBeforeAdvice;

import java.lang.reflect.Method;

/**

 * @author panglili

 * @create 2022-07-24-16:11

 */

public class Log implements MethodBeforeAdvice {

    public void before(Method method, Object[] args, Object target) throws Throwable {

        System.out.println("excutor"+method.getName()+target);

    }

}
<!--注册bean -->

<bean id="userSer" class="service.ServiceImpl"/>

  <bean id="log" class="log.Log"/>

  <!--方式一:使用原生的spring api接口 -->

  <aop:config>

      <!-- 切入点expression要切入的位置-->

      <aop:pointcut id="pointcut" expression="execution(* service.ServiceImpl.*(..))"/>

       <!--执行环绕增加 -->

      <aop:advisor advice-ref="log" pointcut-ref="pointcut"/>

  </aop:config>
(4)客户调用
import org.springframework.context.ApplicationContext;

import org.springframework.context.support.ClassPathXmlApplicationContext;

import service.Service;

/**

 * @author panglili

 * @create 2022-07-24-16:28

 */

public class MyTest  {

    public static void main(String[] args) {

      ApplicationContext context = new ClassPathXmlApplicationContext("application.xml");

        //注意,代理的是接口类型

        Service ser = (Service) context.getBean("userSer");

        ser.add();

    }

}
方法二 使用自定义类实现
(1)自定义一个类,是被横切进去的内容
package dir;

/**

 * @author panglili

 * @create 2022-07-24-17:00

 */

public class PointMethod {

    public void after(){

        System.out.println("执行方法之后切入……");

    }

    public void before(){

        System.out.println("执行方法之前切入……");

    }

}
(2)在配置文件中使用aop切入
<!--方式二 自定义类切入 -->

<bean id="in" class="dir.PointMethod"/>

<aop:config>

    <!--自定义切面 -->

    <aop:aspect ref="in">

        <aop:pointcut id="point" expression="execution(* service.ServiceImpl.*(..))"/>

        <aop:after method="after" pointcut-ref="point"/>

        <aop:before method="before" pointcut-ref="point"/>

    </aop:aspect>

</aop:config>
(3)测试
import org.springframework.context.ApplicationContext;

import org.springframework.context.support.ClassPathXmlApplicationContext;

import service.Service;

/**

 * @author panglili

 * @create 2022-07-24-16:28

 */

public class MyTest  {

    public static void main(String[] args) {

      ApplicationContext context = new ClassPathXmlApplicationContext("application.xml");

        //注意,代理的是接口类型

        Service ser = (Service) context.getBean("userSer");

        ser.add();

    }

}

方式三 使用注解实现aop
(1)在要被切入的地方使用@Aspect和@After等注解标识切面和切点等
package dir;

import org.aspectj.lang.annotation.After;

import org.aspectj.lang.annotation.Aspect;

import org.aspectj.lang.annotation.Before;

/**

 * @author panglili

 * @create 2022-07-24-17:00

 */

@Aspect

public class PointMethod {

    @After("execution(* service.ServiceImpl.*(..))")

    public void after(){

        System.out.println("执行方法之后切入……");

    }

    @Before("execution(* service.ServiceImpl.*(..))")

    public void before(){

        System.out.println("执行方法之前切入……");

    }

}
(2)将此类配置到spring中,别忘了开启注解支持
<!--方式三 注解 -->

<bean id="in1" class="dir.PointMethod"/>

<!--一定要开启 否则注解不生效 -->

<aop:aspectj-autoproxy/>
(3)测试
同上面一样的测试,不再赘述
12.spring和mybatis整合
1.导包
<dependencies>
<dependency>
<groupId>junit</groupId>
<artifactId>junit</artifactId>
<version>4.13.1</version>
</dependency>
<!-- https://mvnrepository.com/artifact/mysql/mysql-connector-java -->
<dependency>
<groupId>mysql</groupId>
<artifactId>mysql-connector-java</artifactId>
<version>8.0.29</version>
</dependency>
<dependency>
<groupId>org.mybatis</groupId>
<artifactId>mybatis</artifactId>
<version>3.5.3</version>
</dependency>
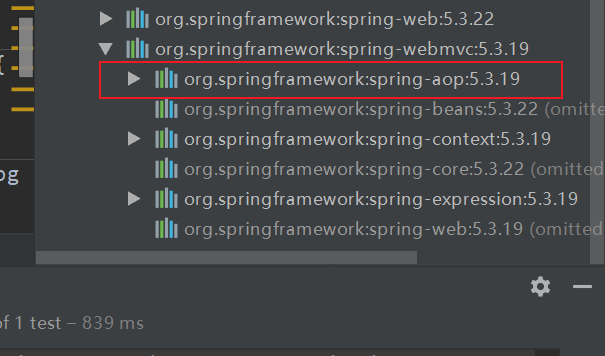
<dependency>
<groupId>org.springframework</groupId>
<artifactId>spring-webmvc</artifactId>
<version>5.3.19</version>
</dependency>
<dependency>
<groupId>org.springframework</groupId>
<artifactId>spring-jdbc</artifactId>
<version>5.3.18</version>
</dependency>
<dependency>
<groupId>org.aspectj</groupId>
<artifactId>aspectjweaver</artifactId>
<version>1.9.7</version>
</dependency>
<dependency>
<groupId>org.mybatis</groupId>
<artifactId>mybatis-spring</artifactId>
<version>2.0.2</version>
</dependency>
</dependencies>
2.将mybatis中的配置到spring中
mybatis被spring接管后,他自己的配置文件只需要写别名和日志,事务和数据库连接交给spring
<?xml version="1.0" encoding="UTF-8" ?>

<!DOCTYPE configuration

        PUBLIC "-//mybatis.org//DTD Config 3.0//EN"

        "http://mybatis.org/dtd/mybatis-3-config.dtd">

<configuration>

    <settings>

        <setting name="logImpl" value="STDOUT_LOGGING"/>

    </settings>

    <typeAliases>

        <package name="com.pang.pojo"/>

    </typeAliases>

</configuration>
<?xml version="1.0" encoding="UTF-8"?>
<beans xmlns="http://www.springframework.org/schema/beans"
xmlns:xsi="http://www.w3.org/2001/XMLSchema-instance"
xmlns:context="http://www.springframework.org/schema/context"
xmlns:aop="http://www.springframework.org/schema/aop"
xsi:schemaLocation="http://www.springframework.org/schema/beans
https://www.springframework.org/schema/beans/spring-beans.xsd
http://www.springframework.org/schema/context
https://www.springframework.org/schema/context/spring-context.xsd http://www.springframework.org/schema/aop https://www.springframework.org/schema/aop/spring-aop.xsd">
<!--整合mybatis的数据库 -->
<bean id="dataSource" class="org.springframework.jdbc.datasource.DriverManagerDataSource">
<property name="driverClassName" value="com.mysql.cj.jdbc.Driver"/>
<property name="url" value="jdbc:mysql://localhost:3306/jdbc?useSSL=false&useUnicode=true&characterEncoding=utf-8"/>
<property name="username" value="root"/>
<property name="password" value="123123"/>
</bean>
<!--整合mybatis的SQLSessionFactory -->
<bean id="sqlSessionFactory" class="org.mybatis.spring.SqlSessionFactoryBean">
<property name="dataSource" ref="dataSource"/>
<!--绑定mybatis配置文件 -->
<property name="configLocation" value="classpath:mybatis_config.xml"/>
<property name="mapperLocations" value="classpath:mapper/*.xml"/>
</bean>
<bean id="sqlSession" class="org.mybatis.spring.SqlSessionTemplate">
<!--只能用构造器注入 没有set方法 -->
<constructor-arg index="0" ref="sqlSessionFactory"/>
</bean>
<bean id="user" class="mapper.UserMapperImpl">
<property name="session" ref="sqlSession"/>
</bean>
</beans>
3.接口实现类
package mapper;

import org.mybatis.spring.SqlSessionTemplate;

import pojo.User;

import java.util.List;

/**

 * @author panglili

 * @create 2022-07-24-18:42

 */

public class UserMapperImpl implements UserMapper {

    private SqlSessionTemplate sqlSession;

    public void setSession(SqlSessionTemplate session) {

        this.sqlSession = session;

    }

    public List<User> user() {

        UserMapper mapper = sqlSession.getMapper(UserMapper.class);

        return mapper.user();

    }

}
测试
import mapper.UserMapper;

import org.junit.Test;

import org.springframework.context.ApplicationContext;

import org.springframework.context.support.ClassPathXmlApplicationContext;

import pojo.User;

import java.util.List;

/**

 * @author panglili

 * @create 2022-07-24-18:01

 */

public class MyTest {

  @Test

    public void Test(){

       ApplicationContext context = new ClassPathXmlApplicationContext("application.xml");

        UserMapper user1 = context.getBean("user", UserMapper.class);

        List<User> list = user1.user();

        for(User u :list){

            System.out.println(u);

        }

    }

}
13.事务支持
只需要在spring中简单的配置两点就可以实现
<tx:advice id="txAdvice">

        <tx:attributes>

            <tx:method name="get*" read-only="true"/>

            <tx:method name="*"/>

        </tx:attributes>

    </tx:advice>
注意代理的是接口不是类!!!
 <aop:config>

        <aop:pointcut id="serviceOperation"

                expression="execution(* service..*Service.*(..))"/>

        <aop:advisor pointcut-ref="serviceOperation" advice-ref="txAdvice"/>

    </aop:config>
[spring]spring详细总结的更多相关文章
- Spring Security3详细配置
Spring Security3详细配置 表名:RESOURCE 解释:资源表备注: 资源表 RESOURCE(资源表) 是否主键 字段名 字段描述 数据类型 长度 可空 约束 缺省值 备注 是 ID ...
- spring入门详细教程(五)
前言 本篇紧接着spring入门详细教程(三),建议阅读本篇前,先阅读第一篇,第二篇以及第三篇.链接如下: Spring入门详细教程(一) https://www.cnblogs.com/jichi/ ...
- Spring入门详细教程(四)
前言 本篇紧接着spring入门详细教程(三),建议阅读本篇前,先阅读第一篇,第二篇以及第三篇.链接如下: Spring入门详细教程(一) https://www.cnblogs.com/jichi/ ...
- Spring入门详细教程(三)
前言 本篇紧接着spring入门详细教程(二),建议阅读本篇前,先阅读第一篇和第二篇.链接如下: Spring入门详细教程(一) https://www.cnblogs.com/jichi/p/101 ...
- Spring入门详细教程(二)
前言 本篇紧接着spring入门详细教程(一),建议阅读本篇前,先阅读第一篇.链接如下: Spring入门详细教程(一) https://www.cnblogs.com/jichi/p/1016553 ...
- 最详细的SSM(Spring+Spring MVC+MyBatis)项目搭建
速览 使用Spring+Spring MVC+MyBatis搭建项目 开发工具IDEA(Ecplise步骤类似,代码完全一样) 项目类型Maven工程 数据库MySQL8.0 数据库连接池:Druid ...
- 基于Spring + Spring MVC + Mybatis + shiro 高性能web构建
一直想写这篇文章,前段时间 痴迷于JavaScript.NodeJs.AngularJS,做了大量的研究,对前后端交互有了更深层次的认识. 今天抽个时间写这篇文章,我有预感,这将是一篇很详细的文章,详 ...
- [转]基于Spring + Spring MVC + Mybatis 高性能web构建
http://blog.csdn.net/zoutongyuan/article/details/41379851/ 一直想写这篇文章,前段时间 痴迷于JavaScript.NodeJs.Angula ...
- Spring+Spring MVC+MyBatis
Spring+Spring MVC+MyBatis 目录 一.新建一个基于Maven的Web项目 二.创建数据库与表 三.添加依赖包 四.新建POJO实体层 五.新建MyBatis SQL映射层 六. ...
- 基于Spring + Spring MVC + Mybatis 高性能web构建
基于Spring + Spring MVC + Mybatis 高性能web构建 一直想写这篇文章,前段时间 痴迷于JavaScript.NodeJs.AngularJs,做了大量的研究,对前后端交互 ...
随机推荐
- .Net 在容器中操作宿主机
方案描述 在 docker 容器中想操作宿主机,一般会使用 ssh 的方式,然后 .Net 通过执行远程 ssh 指令来操作宿主机.本文将使用 交互式 .Net 容器版 中提供的镜像演示 .Net 在 ...
- python+pytest接口自动化(16)-接口自动化项目中日志的使用 (使用loguru模块)
通过上篇文章日志管理模块loguru简介,我们已经知道了loguru日志记录模块的简单使用.在自动化测试项目中,一般都需要通过记录日志的方式来确定项目运行的状态及结果,以方便定位问题. 这篇文章我们使 ...
- 710. Random Pick with Blacklist - LeetCode
Question 710. Random Pick with Blacklist Solution 题目大意:给一个N,表示一个范围[0,N),给一个黑名单列表blacklist,其中blacklis ...
- Fail2ban 命令详解 fail2ban-server
Fail2ban的服务端操作命令,用于启动一个Fail2ban服务. root@local:~# fail2ban-server --help Usage: /usr/bin/fail2ban-ser ...
- 一文学完Linux常用命令
一.Linux 终端命令格式 1.终端命令格式 完整版参考链接:Linux常用命令完整版 command [-options] [parameter] 说明: command : 命令名,相应功能的英 ...
- 碎碎念软件研发02:敏捷之Scrum
一.什么是 Scrum 1.1 Scrum 定义 Scrum 是敏捷开发方法之一,它使用比较广泛. 敏捷的其它开发方法还有 XP(极限编程).FDD(特性驱动开发).Crystal(水晶方法).TDD ...
- stm32f103ve+BH1750使用教程+oled(HAL库)
1.硬件:BH1750模块+oled 2.代码:BH1750是标准的iic协议的外设,我这里单独有iic的文件,之后想要实现多个设备共用一个iic. BH1750.c 1 #include " ...
- npm切换到国内华为云的镜像
npm下载包很慢?不能忍,切换到国内华为云的镜像吧. npm config set registry https://repo.huaweicloud.com/repository/npm/ npm ...
- C#.NET读取文本文件的几种办法
一次读取一个字符 //文件路径 string filePath = @"C:\Users\Administrator\Downloads\test\test.txt"; //文本读 ...
- python基础知识-day9(库学习)
1.os学习 1 print(os.name) #获取操作系统 2 print(os.path.exists("D:\soft\python")) #判断路径是否存在 3 prin ...