
Spring04:JdbcTemplate及事务控制(AOP、XML、注解)
- Spring中的JdbcTemplate
- 作业:Spring基于AOP的事务控制
- Spring中的事务控制
- 基于XML的
- 基于注解的
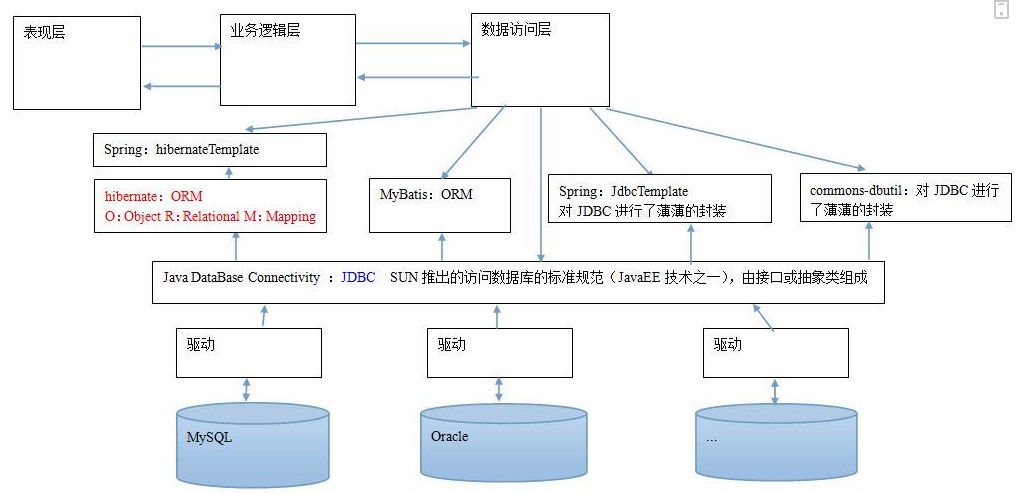
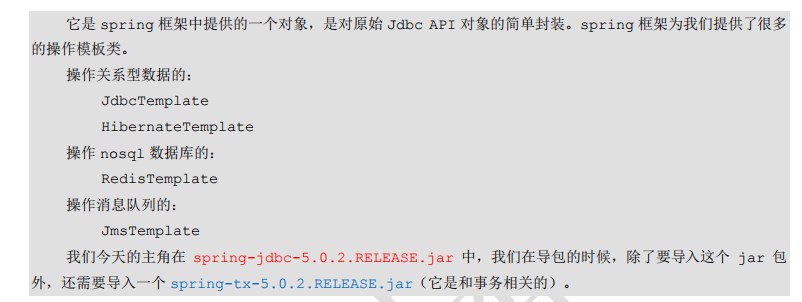
- JdbcTemplate的作用
- 用于和数据库交互,实现对表的CRUD操作
- 如何获取该对象
- 对象中的常用方法
package com.itheima.jdbcTemplate;

import org.springframework.jdbc.core.JdbcTemplate;

import org.springframework.jdbc.datasource.DriverManagerDataSource;

import java.sql.DriverManager;

/**

 * JdbcTemplate的最基本用法

 */

public class JdbcTemplateDemo1 {

    public static void main(String[] args) {

        //准备数据源:c3p0、dbcp都可,今天介绍Spring的内置数据源

        DriverManagerDataSource ds = new DriverManagerDataSource();

        ds.setDriverClassName("com.mysql.jdbc.Driver");

        ds.setUrl("jdbc:mysql://localhost:3306/eesy");

        ds.setUsername("root");

        ds.setPassword("root");

        //1.创建JdbcTemplate对象

        JdbcTemplate jt = new JdbcTemplate();//可以加带数据源的构造方法

        //给jt设置数据源

        jt.setDataSource(ds);

        //2.执行操作

        jt.execute("insert into account(name,money) values('ccc',1000)");

    }

}<?xml version="1.0" encoding="UTF-8"?>
<beans xmlns="http://www.springframework.org/schema/beans"
xmlns:xsi="http://www.w3.org/2001/XMLSchema-instance"
xsi:schemaLocation="http://www.springframework.org/schema/beans
http://www.springframework.org/schema/beans/spring-beans.xsd">
<!--配置JdbcTemplate-->
<bean id="jdbcTemplate" class="org.springframework.jdbc.core.JdbcTemplate">
<property name="dataSource" ref="dataSource"></property>
</bean>
<bean id="dataSource" class="org.springframework.jdbc.datasource.DriverManagerDataSource">
<property name="driverClassName" value="com.mysql.jdbc.Driver"></property>
<property name="url" value="jdbc:mysql://localhost:3306/eesy"></property>
<property name="username" value="root"></property>
<property name="password" value="root"></property>
</bean>
</beans>package com.itheima.jdbcTemplate;
import org.springframework.context.ApplicationContext;
import org.springframework.context.support.ClassPathXmlApplicationContext;
import org.springframework.jdbc.core.JdbcTemplate;
import org.springframework.jdbc.datasource.DriverManagerDataSource;
import java.sql.DriverManager;
/**
* JdbcTemplate的最基本用法
*/
public class JdbcTemplateDemo1 {
public static void main(String[] args) {
//1.获取容器
ApplicationContext ac = new ClassPathXmlApplicationContext("bean.xml");
//2.获取对象
JdbcTemplate jt = ac.getBean("jdbcTemplate",JdbcTemplate.class);
//2.执行操作
jt.execute("insert into account(name,money) values('ccc',1000)");
}
}


package com.itheima.jdbcTemplate;

import com.itheima.domain.Account;

import org.springframework.context.ApplicationContext;

import org.springframework.context.support.ClassPathXmlApplicationContext;

import org.springframework.jdbc.core.BeanPropertyRowMapper;

import org.springframework.jdbc.core.JdbcTemplate;

import org.springframework.jdbc.core.RowMapper;

import java.sql.ResultSet;

import java.sql.SQLException;

import java.util.List;

/**

 * JdbcTemplate的CRUD操作

 */

public class JdbcTemplateDemo3 {

    public static void main(String[] args) {

        //1.获取容器

        ApplicationContext ac = new ClassPathXmlApplicationContext("bean.xml");

        //2.获取对象

        JdbcTemplate jt = ac.getBean("jdbcTemplate",JdbcTemplate.class);

        //2.可带参数的执行操作(单表)

        //保存

        //jt.update("insert into account(name,money) values (?,?)","ssss",333f);

        //更新

        //jt.update("update account set name=?,money=? where id=?","ssss",333f,5);

        //删除

        //jt.update("delete from account where id=?",1);

        //查询所有

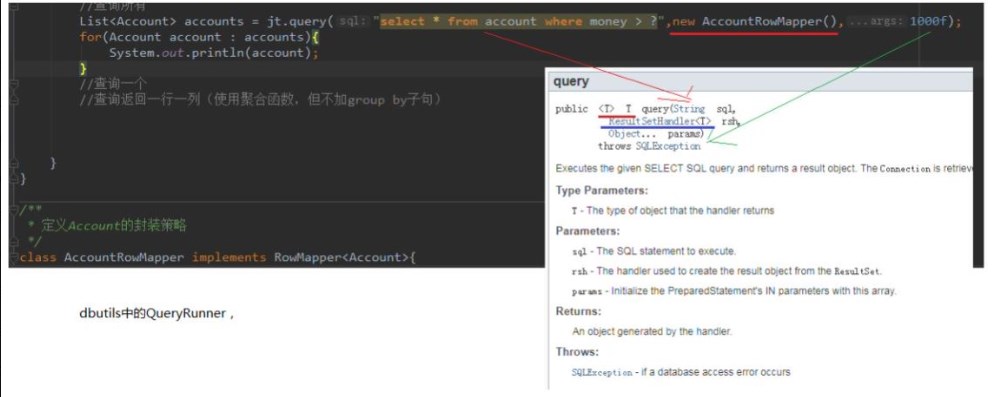
        //queryRunner提供的

        //List<Account> accounts = jt.query("select * from account where money > ?",new AccountRowMapper(),100f);

        //Spring提供的

        /*List<Account> accounts1 = jt.query("select * from account where money > ?",new BeanPropertyRowMapper<Account>(Account.class),100f);

        for (Account account : accounts1) {

            System.out.println(account);

        }*/

        //查询一个

        /*List<Account> account = jt.query("select * from account where id = ?",new BeanPropertyRowMapper<Account>(Account.class),1);

        System.out.println(account.isEmpty()?"没有内容":account.get(0));*/

        //使用聚合函数查询,返回一行一列,但不加groupby子句

        //int count = jt.queryForObject("select count(*) from account where money >= ?",Integer.class,100f);

        Long count = jt.queryForObject("select count(*) from account where money >= ?",Long.class,100f);

        //大数据,常用long接收

        System.out.println(count);

    }

}

/**

 * 定义Account的封装策略

 */

class AccountRowMapper implements RowMapper<Account> {

    /**

     * 把结果集中的数据封装到Account中,然后由Spring把每个Account加入到集合中

     * @param resultSet

     * @param i

     * @return

     * @throws SQLException

     */

    @Override

    public Account mapRow(ResultSet resultSet, int i) throws SQLException {

        Account account = new Account();

        account.setId(resultSet.getInt("id"));

        account.setName(resultSet.getString("name"));

        account.setMoney(resultSet.getFloat("money"));

        return account;

    }

} <!--配置账户的持久层-->
<bean id="accountDao" class="com.itheima.dao.impl.AccountDaoImpl">
<property name="jdbcTemplate" ref="jdbcTemplate"></property>
</bean>
<!--配置JdbcTemplate-->
<bean id="jdbcTemplate" class="org.springframework.jdbc.core.JdbcTemplate">
<property name="dataSource" ref="dataSource"></property>
</bean>package com.itheima.dao.impl;
import com.itheima.dao.IAccountDao;
import com.itheima.domain.Account;
import org.springframework.jdbc.core.BeanPropertyRowMapper;
import org.springframework.jdbc.core.JdbcTemplate;
import java.util.List;
/**
* 账户的持久层实现类
*/
public class AccountDaoImpl implements IAccountDao {
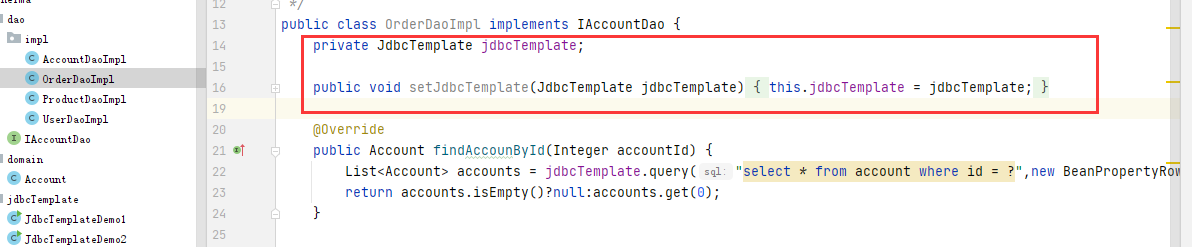
private JdbcTemplate jdbcTemplate;
public void setJdbcTemplate(JdbcTemplate jdbcTemplate) {
this.jdbcTemplate = jdbcTemplate;
}
@Override
public Account findAccounById(Integer accountId) {
List<Account> accounts = jdbcTemplate.query("select * from account where id = ?",new BeanPropertyRowMapper<Account>(Account.class),accountId);
return accounts.isEmpty()?null:accounts.get(0);
}
@Override
public Account findAccountByName(String accounName) {
List<Account> accounts = jdbcTemplate.query("select * from account where name = ?",new BeanPropertyRowMapper<Account>(Account.class),accounName);
if (accounts.isEmpty()){
return null;
}
if (accounts.size()>1){
throw new RuntimeException("结果集不一致");
}
return accounts.get(0);
}
@Override
public void updateAccount(Account account) {
jdbcTemplate.update("update account set name=?,money=? where id=?",account.getName(),account.getMoney(),account.getId());
}
}
package com.itheima.jdbcTemplate;

import com.itheima.dao.IAccountDao;

import com.itheima.domain.Account;

import org.springframework.context.ApplicationContext;

import org.springframework.context.support.ClassPathXmlApplicationContext;

import org.springframework.jdbc.core.JdbcTemplate;

/**

 * JdbcTemplate的最基本用法

 */

public class JdbcTemplateDemo4 {

    public static void main(String[] args) {

        //1.获取容器

        ApplicationContext ac = new ClassPathXmlApplicationContext("bean.xml");

        //2.获取对象

        IAccountDao accountDao =ac.getBean("accountDao",IAccountDao.class);

        Account account = accountDao.findAccounById(5);

        System.out.println(account);

        account.setMoney(10000f);

        accountDao.updateAccount(account);

    }

}
/**

 * 账户的持久层实现类

 */

@Repository

public class AccountDaoImpl2 implements IAccountDao {

    @Autowired

    private JdbcTemplate jdbcTemplate;

    /*public void setJdbcTemplate(JdbcTemplate jdbcTemplate) {

        this.jdbcTemplate = jdbcTemplate;

    }*/

    @Override

    public Account findAccounById(Integer accountId) {

        List<Account> accounts = jdbcTemplate.query("select * from account where id = ?",new BeanPropertyRowMapper<Account>(Account.class),accountId);

        return accounts.isEmpty()?null:accounts.get(0);

    }
package com.itheima.dao.impl;
import org.springframework.jdbc.core.JdbcTemplate;
import javax.sql.DataSource;
/**
* 此类用于抽取dao中的重复代码
*/
public class JdbcDaoSupport {
private JdbcTemplate jdbcTemplate;
public JdbcTemplate getJdbcTemplate() {
return jdbcTemplate;
}
public void setJdbcTemplate(JdbcTemplate jdbcTemplate) {
this.jdbcTemplate = jdbcTemplate;
}
public DataSource getDateSource() {
return dateSource;
}
public void setDateSource(DataSource dateSource) {
//this.dateSource = dateSource;
if(jdbcTemplate == null){
jdbcTemplate = createJdbcTemplate(dateSource);
}
}
private JdbcTemplate createJdbcTemplate(DataSource dateSource) {
return new JdbcTemplate(dateSource);//支持构造函数和set方法
}
private DataSource dateSource;
}/**
* 账户的持久层实现类
*/
public class AccountDaoImpl extends JdbcDaoSupport implements IAccountDao {
/*private JdbcTemplate jdbcTemplate;
public void setJdbcTemplate(JdbcTemplate jdbcTemplate) {
this.jdbcTemplate = jdbcTemplate;
}*/
@Override
public Account findAccounById(Integer accountId) {
List<Account> accounts = getJdbcTemplate() .query("select * from account where id = ?",new BeanPropertyRowMapper<Account>(Account.class),accountId);
return accounts.isEmpty()?null:accounts.get(0);
}<?xml version="1.0" encoding="UTF-8"?>
<beans xmlns="http://www.springframework.org/schema/beans"
xmlns:xsi="http://www.w3.org/2001/XMLSchema-instance"
xsi:schemaLocation="http://www.springframework.org/schema/beans
http://www.springframework.org/schema/beans/spring-beans.xsd">
<!--配置账户的持久层-->
<bean id="accountDao" class="com.itheima.dao.impl.AccountDaoImpl">
<property name="dateSource" ref="dataSource"></property>
</bean>
<bean id="dataSource" class="org.springframework.jdbc.datasource.DriverManagerDataSource">
<property name="driverClassName" value="com.mysql.jdbc.Driver"></property>
<property name="url" value="jdbc:mysql://localhost:3306/eesy"></property>
<property name="username" value="root"></property>
<property name="password" value="root"></property>
</bean>
</beans><?xml version="1.0" encoding="UTF-8"?>
<beans xmlns="http://www.springframework.org/schema/beans"
xmlns:xsi="http://www.w3.org/2001/XMLSchema-instance"
xmlns:aop="http://www.springframework.org/schema/aop"
xsi:schemaLocation="http://www.springframework.org/schema/beans
http://www.springframework.org/schema/beans/spring-beans.xsd
http://www.springframework.org/schema/aop
http://www.springframework.org/schema/aop/spring-aop.xsd">
<!-- 配置Service -->
<bean id="accountService" class="com.itheima.service.impl.AccountServiceImpl">
<!-- 注入dao对象 -->
<property name="accountDao" ref="accountDao"></property>
</bean>
<!--配置dao对象-->
<bean id="accountDao" class="com.itheima.dao.impl.AccountDaoImpl">
<!--注入QueryRunner-->
<property name="runner" ref="runner"></property>
<!--注入ConnectionUtils-->
<property name="connectionUtils" ref="connectionUtils"></property>
</bean>
<!--配置QueryRunner对象-->
<!--不再提供Connection对象,没有数据源,不会从数据源中获取连接-->
<bean id="runner" class="org.apache.commons.dbutils.QueryRunner" scope="prototype"></bean>
<!--配置数据源-->
<bean id="dataSource" class="com.mchange.v2.c3p0.ComboPooledDataSource">
<!--连接数据库的必备信息-->
<property name="driverClass" value="com.mysql.jdbc.Driver"></property>
<property name="jdbcUrl" value="jdbc:mysql://localhost:3306/eesy02"></property>
<property name="user" value="root"></property>
<property name="password" value="root"></property>
</bean>
<!--配置Connection的工具类-ConnectionUtils-->
<bean id="connectionUtils" class="com.itheima.utils.ConnectionUtils">
<!--注入数据源的配置-->
<property name="dataSource" ref="dataSource"></property>
</bean>
<!--配置事务管理器-->
<bean id="txManager" class="com.itheima.utils.TransactionManager">
<!--注入ConnectionUtils-->
<property name="connectionUtils" ref="connectionUtils"></property>
</bean>
<!--配置AOP-->
<aop:config>
<aop:aspect id="txAdvice" ref="txManager">
<!--配置通用的切入点表达式-->
<aop:pointcut id="pt1" expression="execution(* com.itheima.service.impl.*.*(..))"/>
<!--配置前置通知:开启事务-->
<aop:before method="beginTransaction" pointcut-ref="pt1"></aop:before>
<!--配置后置通知:提交事务-->
<aop:after-returning method="commit" pointcut-ref="pt1"></aop:after-returning>
<!--配置异常通知:回滚事务-->
<aop:after-throwing method="rollback" pointcut-ref="pt1"></aop:after-throwing>
<!--配置最终通知:释放连接-->
<aop:after method="release" pointcut-ref="pt1"></aop:after>
</aop:aspect>
</aop:config>
</beans><?xml version="1.0" encoding="UTF-8"?>
<beans xmlns="http://www.springframework.org/schema/beans"
xmlns:xsi="http://www.w3.org/2001/XMLSchema-instance"
xmlns:aop="http://www.springframework.org/schema/aop"
xmlns:context="http://www.springframework.org/schema/context"
xsi:schemaLocation="http://www.springframework.org/schema/beans
http://www.springframework.org/schema/beans/spring-beans.xsd
http://www.springframework.org/schema/aop
http://www.springframework.org/schema/aop/spring-aop.xsd
http://www.springframework.org/schema/context
http://www.springframework.org/schema/context/spring-context.xsd">
<!--配置Spring创建容器时要扫描的包-->
<context:component-scan base-package="com.itheima"></context:component-scan>
<!-- 配置Service -->
<!--配置QueryRunner对象-->
<!--不再提供Connection对象,没有数据源,不会从数据源中获取连接-->
<bean id="runner" class="org.apache.commons.dbutils.QueryRunner" scope="prototype"></bean>
<!--配置数据源-->
<bean id="dataSource" class="com.mchange.v2.c3p0.ComboPooledDataSource">
<!--连接数据库的必备信息-->
<property name="driverClass" value="com.mysql.jdbc.Driver"></property>
<property name="jdbcUrl" value="jdbc:mysql://localhost:3306/eesy02"></property>
<property name="user" value="root"></property>
<property name="password" value="root"></property>
</bean>
<!--开启Spring对注解aop的支持-->
<aop:aspectj-autoproxy></aop:aspectj-autoproxy>
</beans>package com.itheima.utils;
import org.aspectj.lang.annotation.*;
import org.springframework.beans.factory.annotation.Autowired;
import org.springframework.stereotype.Component;
import java.sql.SQLException;
/**
* 和事务管理相关的工具类,包含开启事务、提交事务、回滚事务和释放连接
*/
@Component("txManager")
public class TransactionManager {
//获取当前线程上的Connection
@Autowired
private ConnectionUtils connectionUtils;
@Pointcut("execution(* com.itheima.*.*(..))")
private void pt1(){}
/**
* 开启事务
*/
@Before("pt1")
public void beginTransaction(){
try {
connectionUtils.getThreadConnection().setAutoCommit(true);
} catch (Exception e) {
e.printStackTrace();
}
}
/**
* 提交事务
*/
@AfterReturning("pt1")
public void commit(){
try {
connectionUtils.getThreadConnection().commit();
} catch (Exception e) {
e.printStackTrace();
}
}
/**
* 回滚事务
*/
@AfterThrowing("pt1")
public void rollback(){
try {
connectionUtils.getThreadConnection().rollback();
} catch (Exception e) {
e.printStackTrace();
}
}
/**
* 释放连接
*/
@After("pt1")
public void release(){
try {
connectionUtils.getThreadConnection().close();//并不是真正关闭连接,而是还回连接池中
connectionUtils.removeConnection();//进行线程的解绑
} catch (Exception e) {
e.printStackTrace();
}
}
}package com.itheima.utils;
import org.springframework.beans.factory.annotation.Autowired;
import org.springframework.stereotype.Component;
import javax.sql.DataSource;
import java.sql.Connection;
import java.sql.SQLException;
/**
* 连接的工具类,用于从数据源中获取一个连接,并且实现和线程的绑定
*/
@Component("connectionUtils")
public class ConnectionUtils {
private ThreadLocal<Connection> tl = new ThreadLocal<Connection>();
@Autowired
private DataSource dataSource;
/**
* 获取当前线程上的连接
*/
public Connection getThreadConnection(){
try {
//1.先从ThreadLocal上获取
Connection conn = tl.get();
//2.判断当前线程上是否有连接
if (conn == null){
//3.从数据源中获取一个连接,并且和线程绑定,存入ThreadLocal中
conn = dataSource.getConnection();
tl.set(conn);
}
//4.返回当前线程上的连接
return conn;
} catch (Exception e) {
throw new RuntimeException(e);
}
}
/**
* 把连接和线程解绑
*/
public void removeConnection(){
tl.remove();
}
}package com.itheima.service.impl;
import com.itheima.dao.IAccountDao;
import com.itheima.domain.Account;
import com.itheima.service.IAccountService;
import com.itheima.utils.TransactionManager;
import org.springframework.beans.factory.annotation.Autowired;
import org.springframework.stereotype.Service;
import java.util.List;
/**
* 账户的业务层实现类
* 事务控制应当在业务层
*/
@Service("accountService")
public class AccountServiceImpl implements IAccountService {
/**
* 每次获取连接,无法实现事务控制
*/
@Autowired
private IAccountDao accountDao;
@Override
public List<Account> findAllAccount() {
return accountDao.findAllAccount();
}
@Override
public Account findAccountById(Integer accountId) {
//2.执行操作
return accountDao.findAccountById(accountId);
}
@Override
public void saveAccount(Account account) {
accountDao.saveAccount(account);
}
@Override
public void updateAccount(Account account) {
accountDao.updateAccount(account);
}
@Override
public void deleteAccount(Integer accountId) {
accountDao.deleteAccount(accountId);
}
@Override
public void transfer(String sourceName, String targetName, Float money) {
System.out.println("transfer开始执行");
//2.1根据名称查询转出账户
Account source = accountDao.findAccountByName(sourceName);
//2.2根据名称查询转入账户
Account target = accountDao.findAccountByName(targetName);
//2.3转出账户金额减少
source.setMoney(source.getMoney() - money);
//2.4.转入账户金额增加
target.setMoney(target.getMoney() + money);
//int i = 1 / 0;
//2.5.更新转出账户
accountDao.updateAccount(source);
//2.6.更新转入账户
accountDao.updateAccount(target);
//3.提交事务
//txManager.commit();
}
}package com.itheima.utils;
import org.aspectj.lang.ProceedingJoinPoint;
import org.aspectj.lang.annotation.*;
import org.springframework.beans.factory.annotation.Autowired;
import org.springframework.stereotype.Component;
import java.sql.SQLException;
/**
* 和事务管理相关的工具类,包含开启事务、提交事务、回滚事务和释放连接
*/
@Component("txManager")
public class TransactionManager {
//获取当前线程上的Connection
@Autowired
private ConnectionUtils connectionUtils;
@Pointcut("execution(* com.itheima.*.*(..))")
private void pt1(){}
/**
* 开启事务
*/
public void beginTransaction(){
try {
connectionUtils.getThreadConnection().setAutoCommit(true);
} catch (Exception e) {
e.printStackTrace();
}
}
/**
* 提交事务
*/
@AfterReturning("pt1")
public void commit(){
try {
connectionUtils.getThreadConnection().commit();
} catch (Exception e) {
e.printStackTrace();
}
}
/**
* 回滚事务
*/
public void rollback(){
try {
connectionUtils.getThreadConnection().rollback();
} catch (Exception e) {
e.printStackTrace();
}
}
/**
* 释放连接
*/
public void release(){
try {
connectionUtils.getThreadConnection().close();//并不是真正关闭连接,而是还回连接池中
connectionUtils.removeConnection();//进行线程的解绑
} catch (Exception e) {
e.printStackTrace();
}
}
@Around("pt1")
public Object aroundAdvice(ProceedingJoinPoint pjp){
Object rtValue = null;
try {
//1.获取参数
Object[] args = pjp.getArgs();
//2.开启事务
this.beginTransaction();
//3.执行方法
rtValue = pjp.proceed(args);
//4.提交事务
this.commit();
//返回结果
return rtValue;
} catch (Throwable e) {
//5.回滚事务
this.rollback();
throw new RuntimeException(e);
} finally {
//6.释放资源
this.release();
}
}
}
<?xml version="1.0" encoding="UTF-8"?>

<beans xmlns="http://www.springframework.org/schema/beans"

       xmlns:xsi="http://www.w3.org/2001/XMLSchema-instance"

       xsi:schemaLocation="http://www.springframework.org/schema/beans

        http://www.springframework.org/schema/beans/spring-beans.xsd">

    <!--配置业务层-->

    <bean id="accountService" class="com.itheima.service.impl.AccountServiceImpl">

        <property name="accountDao" ref="accountDao"></property>

    </bean>

    <!--配置账户的持久层-->

    <bean id="accountDao" class="com.itheima.dao.impl.AccountDaoImpl">

<!--        <property name="jdbcTemplate" ref="jdbcTemplate"></property>-->

        <property name="dataSource" ref="dataSource"></property>

    </bean>

    <bean id="dataSource" class="org.springframework.jdbc.datasource.DriverManagerDataSource">

        <property name="driverClassName" value="com.mysql.jdbc.Driver"></property>

        <property name="url" value="jdbc:mysql://localhost:3306/eesy"></property>

        <property name="username" value="root"></property>

        <property name="password" value="root"></property>

    </bean>

</beans>
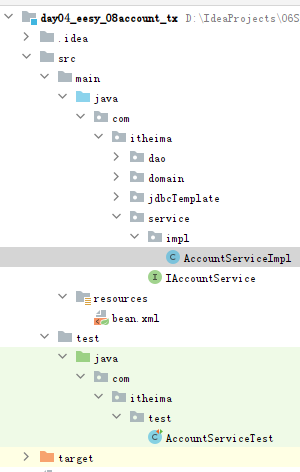
import java.util.List;
/**
* 使用Junit单元测试:测试我们的配置
*/
@RunWith(SpringJUnit4ClassRunner.class)
@ContextConfiguration(locations = {"classpath:bean.xml"})
public class AccountServiceTest {
@Autowired
private IAccountService as;
@Test
public void testTransfer(){
as.transfer("aaa","bbb",100f);
}
}<?xml version="1.0" encoding="UTF-8"?>
<beans xmlns="http://www.springframework.org/schema/beans"
xmlns:xsi="http://www.w3.org/2001/XMLSchema-instance"
xmlns:aop="http://www.springframework.org/schema/aop"
xmlns:tx="http://www.springframework.org/schema/tx"
xsi:schemaLocation="
http://www.springframework.org/schema/beans
http://www.springframework.org/schema/beans/spring-beans.xsd
http://www.springframework.org/schema/tx
http://www.springframework.org/schema/tx/spring-tx.xsd
http://www.springframework.org/schema/aop
http://www.springframework.org/schema/aop/spring-aop.xsd">
<!--配置业务层-->
<bean id="accountService" class="com.itheima.service.impl.AccountServiceImpl">
<property name="accountDao" ref="accountDao"></property>
</bean>
<!--配置账户的持久层-->
<bean id="accountDao" class="com.itheima.dao.impl.AccountDaoImpl">
<!-- <property name="jdbcTemplate" ref="jdbcTemplate"></property>-->
<property name="dataSource" ref="dataSource"></property>
</bean>
<bean id="dataSource" class="org.springframework.jdbc.datasource.DriverManagerDataSource">
<property name="driverClassName" value="com.mysql.jdbc.Driver"></property>
<property name="url" value="jdbc:mysql://localhost:3306/eesy"></property>
<property name="username" value="root"></property>
<property name="password" value="root"></property>
</bean>
<!--Spring中基于XML的声明式事务配置步骤
1、配置事务管理器
2、配置事务的通知
此时需要导入事务的约束:tx名称空间和约束,同时也需要aop的
使用tx:advice标签配置事务通知
属性:
id:给事务通知起一个唯一标识
transaction-manager:给事务通知提供一个事务管理器引用
3、配置AOP中的通用切入点表达式
4、建立事务通知和切入点表达式的对应关系
5、配置事务的属性
在事务的通知tx:advice标签的内部配置
-->
<!--配置事务管理器-->
<bean id="transactionManager" class="org.springframework.jdbc.datasource.DataSourceTransactionManager">
<property name="dataSource" ref="dataSource"></property>
</bean>
<!--配置事务通知的标签-->
<tx:advice id="txAdvice" transaction-manager="transactionManager">
<!--配置事务的属性-->
<tx:attributes>
<!--标识transfer是业务层接口的方法,其需要一些属性
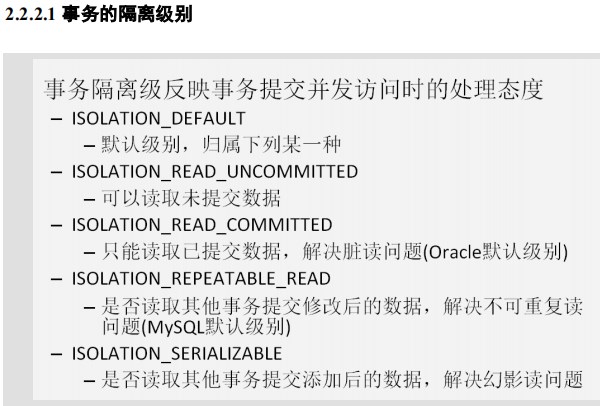
isolation="" 指定事务的隔离级别,默认是default,表示是数据库的默认隔离级别
no-rollback-for="" 用于指定一个异常,当产生该异常时,事务不会滚 ,产生其他异常时,事务回滚。没有默认值,表示任何异常都回滚
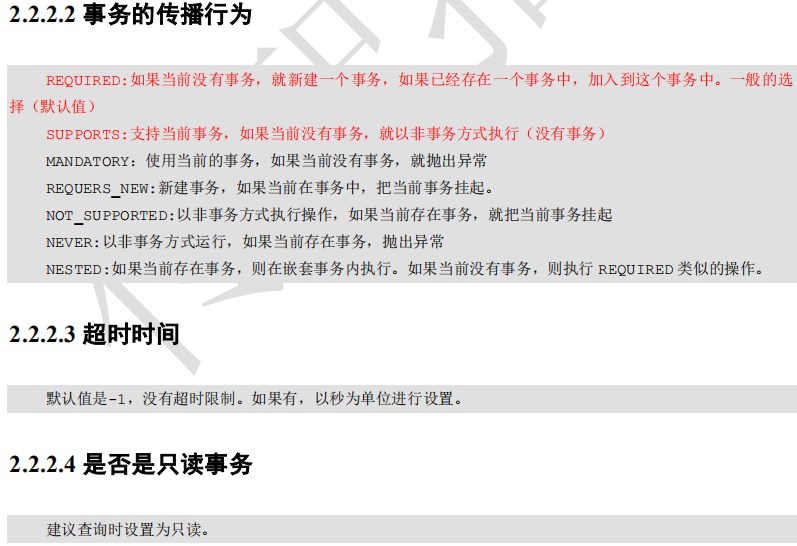
propagation="" 用于指定事务的传播行为,默认是REQUIRED,表示一定会有事务,增删改的选择,查询方法可以选择SUPPORT
read-only="" 指定事务是否只读,只有查询才能设置为true,默认为false表示读写
rollback-for="" 用于指定一个异常,当产生异常时,事务回滚。产生其他异常时,事务不回滚,没有默认值,表示任何异常都会滚
timeout="" 指定事务的超时时间,默认值是-1,表示永不超时,如果指定了数值,以秒为单位
-->
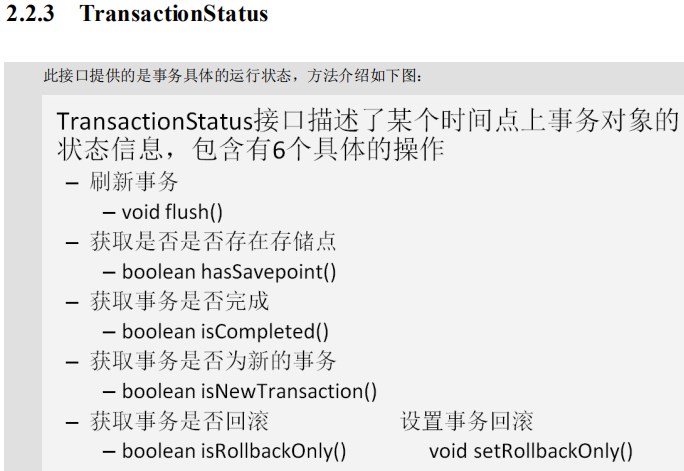
<tx:method name="*" read-only="false" propagation="REQUIRED"/>
<!--指定查询方法-->
<tx:method name="find*" propagation="SUPPORTS" read-only="true"></tx:method>
</tx:attributes>
</tx:advice>
<!--配置AOP-->
<aop:config>
<!--配置切入点表达式-->
<aop:pointcut id="pt1" expression="execution(* com.itheima.*.*(..))"/>
<!--建立切入点表达式和事务通知的对应关系-->
<aop:advisor advice-ref="txAdvice" pointcut-ref="pt1"></aop:advisor>
</aop:config>
</beans><?xml version="1.0" encoding="UTF-8"?>
<beans xmlns="http://www.springframework.org/schema/beans"
xmlns:xsi="http://www.w3.org/2001/XMLSchema-instance"
xmlns:aop="http://www.springframework.org/schema/aop"
xmlns:tx="http://www.springframework.org/schema/tx"
xmlns:context="http://www.springframework.org/schema/context"
xsi:schemaLocation="http://www.springframework.org/schema/beans
http://www.springframework.org/schema/beans/spring-beans.xsd
http://www.springframework.org/schema/tx
http://www.springframework.org/schema/tx/spring-tx.xsd
http://www.springframework.org/schema/aop
http://www.springframework.org/schema/aop/spring-aop.xsd
http://www.springframework.org/schema/context
http://www.springframework.org/schema/context/spring-context.xsd">
<!--配置业务层-->
<!--配置spring创建容器时要扫描的包-->
<context:component-scan base-package="com.itheima"></context:component-scan>
<!--配置JdbcTemplate-->
<bean id="jdbcTemplate" class="org.springframework.jdbc.core.JdbcTemplate">
<property name="dataSource" ref="dataSource"></property>
</bean>
<bean id="dataSource" class="org.springframework.jdbc.datasource.DriverManagerDataSource">
<property name="driverClassName" value="com.mysql.jdbc.Driver"></property>
<property name="url" value="jdbc:mysql://localhost:3306/eesy02"></property>
<property name="username" value="root"></property>
<property name="password" value="root"></property>
</bean>
<!--Spring中基于注解的声明式事务配置步骤
1、配置事务管理器
2、开启Spring对注解事务的支持
3、在需要事务支持的地方使用@Transactional注解
4、建立事务通知和切入点表达式的对应关系
5、配置事务的属性
在事务的通知tx:advice标签的内部配置
-->
<!--配置事务管理器-->
<bean id="transactionManager" class="org.springframework.jdbc.datasource.DataSourceTransactionManager">
<property name="dataSource" ref="dataSource"></property>
</bean>
<!--开启Spring对注解事务的支持-->
<tx:annotation-driven transaction-manager="transactionManager"></tx:annotation-driven>
</beans>package com.itheima.service.impl;
import com.itheima.dao.IAccountDao;
import com.itheima.domain.Account;
import com.itheima.service.IAccountService;
import org.springframework.beans.factory.annotation.Autowired;
import org.springframework.stereotype.Service;
import org.springframework.transaction.annotation.Propagation;
import org.springframework.transaction.annotation.Transactional;
@Service("accountService")
@Transactional(propagation = Propagation.SUPPORTS,readOnly = true)//只读型事务控制
public class AccountServiceImpl implements IAccountService {
@Autowired
private IAccountDao accountDao;
@Override
public Account findAccountById(Integer accountId) {
return accountDao.findAccountById(accountId);
}
//需要的是读写型事务控制
@Transactional(propagation = Propagation.REQUIRED,readOnly = false)//读写型
//xml一劳永逸
@Override
public void transfer(String sourceName, String targetName, Float money) {
System.out.println("transfer开始执行");
//2.1根据名称查询转出账户
Account source = accountDao.findAccountByName(sourceName);
//2.2根据名称查询转入账户
Account target = accountDao.findAccountByName(targetName);
//2.3转出账户金额减少
source.setMoney(source.getMoney() - money);
//2.4.转入账户金额增加
target.setMoney(target.getMoney() + money);
//2.5.更新转出账户
accountDao.updateAccount(source);
//2.6.更新转入账户
accountDao.updateAccount(target);
//int i = 1 / 0;
//3.提交事务
//txManager.commit();
}
}/**
* 账户的持久层实现类
*/
@Repository("accountDao")
public class AccountDaoImpl implements IAccountDao {
@Autowired
private JdbcTemplate jdbcTemplate;
public void setJdbcTemplate(JdbcTemplate jdbcTemplate) {
this.jdbcTemplate = jdbcTemplate;
}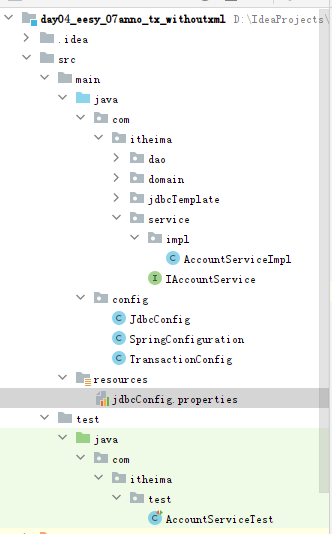
jdbc.driver=com.mysql.jdbc.Driver

jdbc.url=jdbc:mysql://localhost:3306/eesy02

jdbc.username=root

jdbc.password=root

package config;

import org.springframework.beans.factory.annotation.Value;

import org.springframework.context.annotation.Bean;

import org.springframework.jdbc.core.JdbcTemplate;

import org.springframework.jdbc.datasource.DriverManagerDataSource;

import javax.sql.DataSource;

/**

 * 和连接数据库相关的配置类

 */

public class JdbcConfig {

    @Value("${jdbc.driver}")

    private String driver;

    @Value("${jdbc.url}")

    private String url;

    @Value("${jdbc.username}")

    private String username;

    @Value("${jdbc.password}")

    private String password;

    /**

     * 创建JdbcTemplate对象

     * @param dataSource

     * @return

     */

    //进入容器需要bean注解

    @Bean(name="jdbcTemplate")

    public JdbcTemplate createJdbcTemplate(DataSource dataSource){

        return new JdbcTemplate(dataSource);

    }

    /**

     * 创建一个数据源对象

     * @return

     */

    @Bean(name="dataSource")

    public DataSource createDatasouce(){

        DriverManagerDataSource ds = new DriverManagerDataSource();

        ds.setDriverClassName(driver);

        ds.setUrl(url);

        ds.setUsername(username);

        ds.setPassword(password);

        return ds;

    }

}
package config;
import org.springframework.context.annotation.Bean;
import org.springframework.jdbc.datasource.DataSourceTransactionManager;
import org.springframework.transaction.PlatformTransactionManager;
import javax.sql.DataSource;
/**
* 和事务相关的配置类
*/
public class TransactionConfig {
/**
* 用于创建事务管理器对象
* @param dataSource
* @return
*/
@Bean(name="transactionManager")
public PlatformTransactionManager createTransactionManager(DataSource dataSource){
return new DataSourceTransactionManager(dataSource);
}
}package config;
import org.springframework.context.annotation.ComponentScan;
import org.springframework.context.annotation.Configuration;
import org.springframework.context.annotation.Import;
import org.springframework.context.annotation.PropertySource;
import org.springframework.transaction.annotation.EnableTransactionManagement;
/**
* Spring的配置类,相当于bean.xml
*/
@Configuration
@ComponentScan("com.itheima")
@Import({JdbcConfig.class,TransactionConfig.class})
@PropertySource("jdbcConfig.properties")
@EnableTransactionManagement //开启事务注解的支持
public class SpringConfiguration {
}
<?xml version="1.0" encoding="UTF-8"?>

<beans xmlns="http://www.springframework.org/schema/beans"

       xmlns:xsi="http://www.w3.org/2001/XMLSchema-instance"

       xsi:schemaLocation="http://www.springframework.org/schema/beans

        http://www.springframework.org/schema/beans/spring-beans.xsd">

    <!--配置业务层-->

    <bean id="accountService" class="com.itheima.service.impl.AccountServiceImpl">

        <property name="accountDao" ref="accountDao"></property>

        <property name="transactionTemplate" ref="transactionTemplate"></property>

    </bean>

    <!--配置账户的持久层-->

    <bean id="accountDao" class="com.itheima.dao.impl.AccountDaoImpl">

<!--        <property name="jdbcTemplate" ref="jdbcTemplate"></property>-->

        <property name="dataSource" ref="dataSource"></property>

    </bean>

    <bean id="dataSource" class="org.springframework.jdbc.datasource.DriverManagerDataSource">

        <property name="driverClassName" value="com.mysql.jdbc.Driver"></property>

        <property name="url" value="jdbc:mysql://localhost:3306/eesy02"></property>

        <property name="username" value="root"></property>

        <property name="password" value="root"></property>

    </bean>

    <!--配置事务管理器-->

    <bean id="transactionManager" class="org.springframework.jdbc.datasource.DataSourceTransactionManager">

        <property name="dataSource" ref="dataSource"></property>

        <!--注入连接池数据源-->

    </bean>

    <!--配置事务模板对象-->

    <bean id="transactionTemplate" class="org.springframework.transaction.support.TransactionTemplate">

        <property name="transactionManager" ref="transactionManager"></property>

    </bean>

</beans>

Spring04:JdbcTemplate及事务控制(AOP、XML、注解)的更多相关文章
- Spring jdbctemplate和事务管理器 全注解配置 不使用xml
/** * spring的配置类,相当于bean.xml */@Configuration//@Configuration标注在类上,相当于把该类作为spring的xml配置文件中的<beans ...
- 28Spring_的事务管理_银行转账业务加上事务控制_基于注解进行声明式事务管理
将applicationContext.xml 和 AccountServiceImpl 给备份一个取名为applicationContext2.xml 和 AccountServiceImpl2.j ...
- Spring的事务控制-基于xml方式
介绍:该程序模拟了转账操作,即Jone减少500元,tom增加500元 1.导入坐标 <dependency> <groupId>junit</groupId> & ...
- 使用Spring实现AOP(XML+注解)
一.Spring对AOP的支持 AOP并不是Spring框架特有的,Spring只是支持AOP编程的框架之一,每一个框架对AOP的支持各有特点,有些AOP能够对方法的参数进行拦截,有些AOP对方法进行 ...
- Spring第八篇【XML、注解实现事务控制】
前言 本博文主要讲解Spring的事务控制,如何使用Spring来对程序进行事务控制-. 一般地,我们事务控制都是在service层做的..为什么是在service层而不是在dao层呢??有没有这样的 ...
- Spring的事务控制-基于注解的方式
模拟转账操作,即Jone减少500,tom增加500 如果有疑问请访问spring事务控制-基于xml方式 1.创建数据表 2.创建Account实体类 public class Account { ...
- 阶段3 2.Spring_10.Spring中事务控制_1 基于XML的AOP实现事务控制
新建项目 首先把依赖复制进来 aop必须引入.aspectjweaver 复制src下的所有内容 复制到我们的新项目里面 factory文件夹删掉 删除后测试类必然就报错 配置文件 beanFacto ...
- Java实战之03Spring-05Spring中的事务控制(基于AOP)
五.Spring中的事务控制(基于AOP) 1.Spring中事务有关的接口 1.1.明确: JavaEE体系进行分层开发,事务处理位于业务层,Spring提供了分层设计业务层的事务处理解决方案 1. ...
- spring基于XML的声明式事务控制
<?xml version="1.0" encoding="utf-8" ?><beans xmlns="http://www.sp ...
- SpringBoot系列: JdbcTemplate 事务控制
============================Spring JdbcTemplate 事务控制============================之前使用 JDBC API 操作, 经常 ...
随机推荐
- CentOS7 系统服务器初始化配置、安全加固、内核升级优化常用软件安装的Shell脚本分享
转载自:https://www.bilibili.com/read/cv13875630?spm_id_from=333.999.0.0 描述: 适用于企业内部 CentOS7 系列操作服务器初始化. ...
- Ceph分布式存储详述
存储发展史 企业中使用存储按照其功能,使用场景,一直在持续发展和迭代,大体上可以分为四个阶段: DAS:Direct Attached Storage,即直连存储,第一代存储系统,通过SCSI总线扩展 ...
- GitLab 之 PlantUML 的配置及使用
转载自:https://cloud.tencent.com/developer/article/1010617 1.PlantUML介绍 UML 统一建模语言是一个通用的可视化建模语言,用于对软件进行 ...
- 了解Pytorch|Get Started with PyTorch
一个开源的机器学习框架,加速了从研究原型到生产部署的路径. !pip install torch -i https://pypi.tuna.tsinghua.edu.cn/simple import ...
- 巧用VBA实现:基于多个关键词模糊匹配Excel多行数据
在用Excel处理实际业务中,我们会碰到如下场景: 1.从一堆人名中找到包含某些关键字的名字: 2.从银行流水文件中根据[备注]字段找到包含某些关键字的,统一识别为[手续费业务]等. 这本质说的都是一 ...
- 【Java】Java中的零拷贝
物理内存 计算机物理内存条的容量,比如我们买电脑会关注内存大小有多少G,这个容量就是计算机的物理内存. 虚拟内存 操作系统为每个进程分配了独立的虚拟地址空间,也就是虚拟内存,虚拟地址空间又分为用户空间 ...
- JavaScript基本语法(函数与对象)
3.函数 #①内置函数 内置函数:系统已经声明好了可以直接使用的函数. #[1]弹出警告框 alert("警告框内容"); #[2]弹出确认框 用户点击『确定』返回true,点 ...
- 在vue中的form表单中下拉框中的数据来自数据库查询到的数据
文章目录 1.实现的效果: 2.前端html代码 3.js中的代码 4.后端的方法 1.实现的效果: 增加一个新的类型到数据库 2.前端html代码 需要注意的部分:prop后边是表单中的字段 v-m ...
- python如何引入外部其他py文件
新手常常会遇到这种问题 解决方法如下: 比如我在C:\Users\123\Desktop有一个mmm.py文件,内容为: def abc(): print('hello,world') 当我写程序想引 ...
- Ruoyi表单构建
Ruoyi表单构建通过拖动组件就能自动生成前端代码,很方便,所以本文简单通过上层函数源码来梳理一下大致流程,如有需要再自行仔细一行行分析底层代码. 组件拖动 实现组件拖动功能主要依赖第三方库:VueD ...