
Flask-websocket实现聊天功能
群聊无昵称
原生js代码
<!DOCTYPE html>

<html lang="en">

<head>

  <meta charset="UTF-8">

  <title>群聊</title>

</head>

<body>

<p>

    <input type="text" id="content">

    <button onclick="send_msg()">发送</button> <!--给按钮绑定点击事件-->

</p>

<div id="chat_list">

</div>

</body>

<script type="application/javascript">

  var ws = new WebSocket("ws://192.168.16.42:9527/my_socket");

  // 监听后端发来的消息,ws.onmessage起到监听的作用,只要有消息过来函数会自动执行

  ws.onmessage = function (eventMessage) {

      console.log(eventMessage.data); // 获取后端发来的消息

      var p = document.createElement("p");

      p.innerText = eventMessage.data;

      document.getElementById("chat_list").appendChild(p); // 将消息内容添加到div内

  };

  // 将我们输入的内容发送给后端

  function send_msg() {

      var content = document.getElementById("content").value;

      ws.send(content);

  };

</script>

</html>
后端逻辑代码
# -*- coding: utf-8 -*-

# @Time    : 2019/7/15 16:42

from flask import render_template,request,Flask

from geventwebsocket.handler import WebSocketHandler  # 提供WS协议处理

from geventwebsocket.server import WSGIServer # 承载服务

from geventwebsocket.websocket import WebSocket  # 语法提示

app = Flask(__name__)

user_socket_list = []

@app.route("/my_socket")

def my_socket():

    # 获取当前客户端与服务器的Socket连接

    user_socket = request.environ.get("wsgi.websocket")  # type:WebSocket

    if user_socket:

            user_socket_list.append(user_socket)

            print(len(user_socket_list),user_socket_list)

        # 1 [<geventwebsocket.websocket.WebSocket object at 0x000001D0D70E1458>]

        # print(user_socket,"OK 连接已经建立好了,接下来发消息吧")

    while 1:

        # 等待前端将消息发送过来

        msg = user_socket.receive()

        print(msg)

        for usocket in user_socket_list:

            try:

                usocket.send(msg)

            except:

                continue

@app.route("/qunliao")

def gc():

    return render_template("qunliao.html")

if __name__ == '__main__':

    http_serv = WSGIServer(("0.0.0.0",9527),app,handler_class=WebSocketHandler) # 这种启动方式和app.run()不冲突,该启动方式发什么请求都可以接受到

    http_serv.serve_forever()
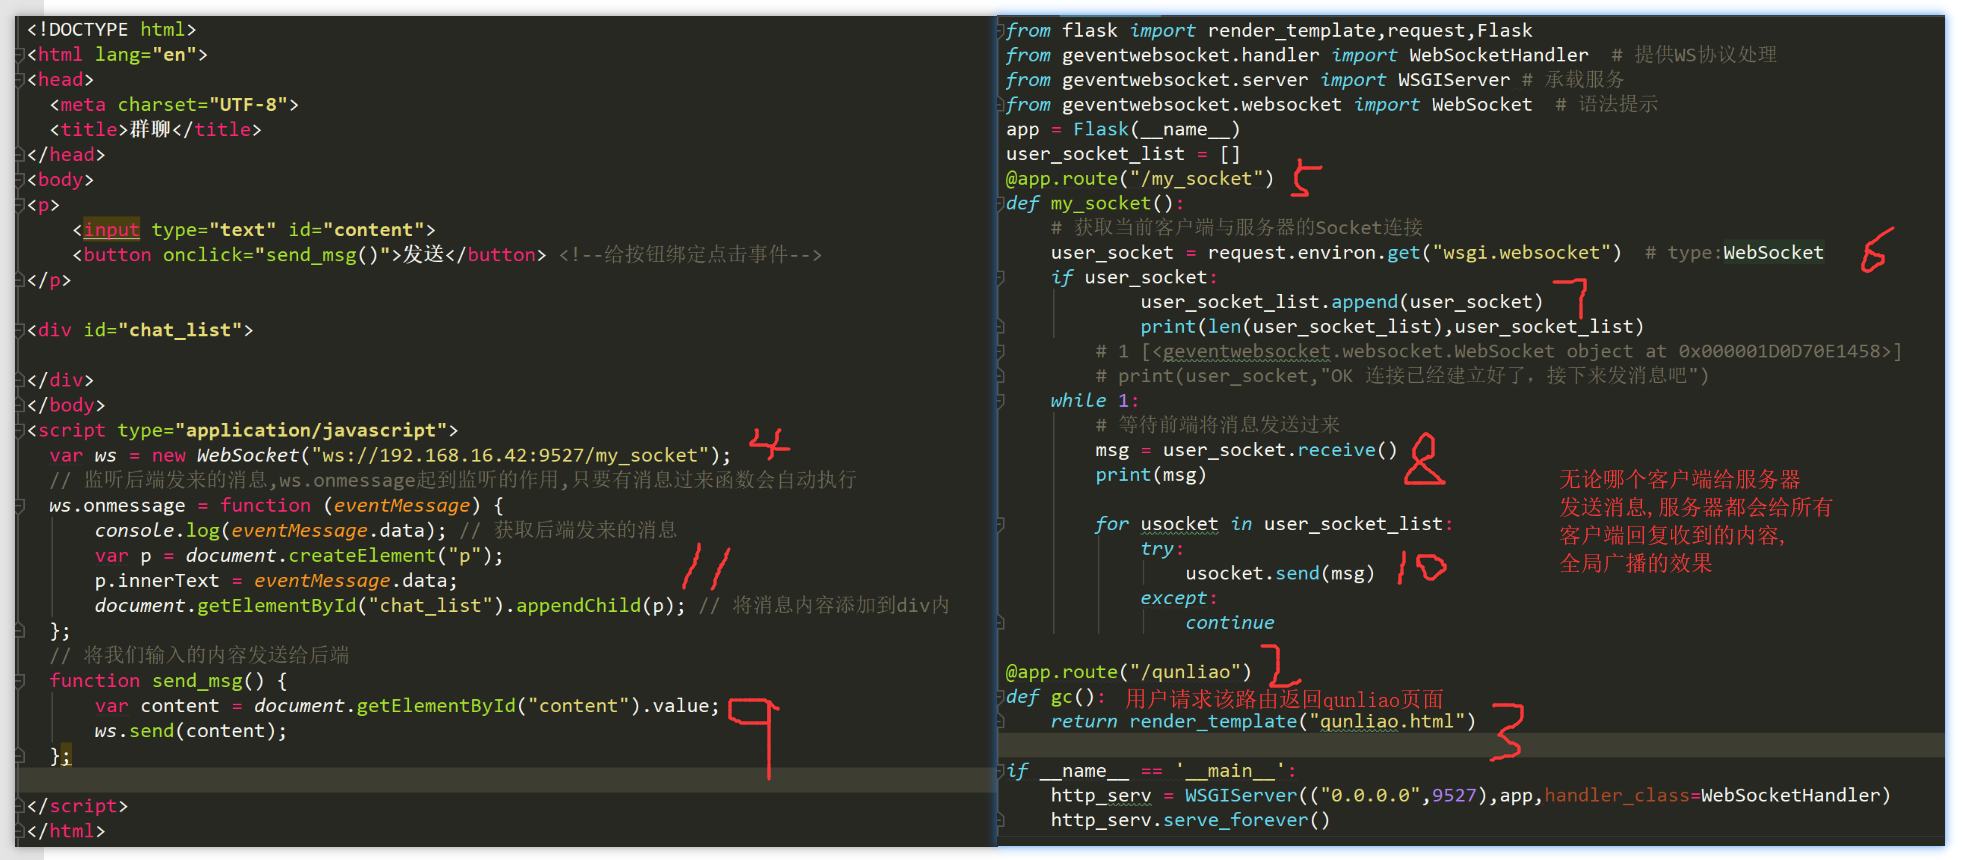
流程
1、用户在网页请求http://192.168.16.42:9527/qunliao

2、请求/qunliao这个路由走后端对应的视图函数gc返回qunliao.html这个页面,

3、页面在加载的过程中走到script代码时建立WebSocket连接请求ws://192.168.16.42:9527/my_socket,

4、ws://192.168.16.42:9527/my_socket请求走后端对应的视图函数,获取当前客户端与服务器的socket连接对象,调用该对象的receive方法,等待前端发来消息,

5、前端我们通过给input框绑定点击事件,获取用户输入的内容发送给服务器;

6、后端将前端发来的消息在发送给前端;

7、前端通过ws.onmessage这个事件监听着后端过来的消息,只要有消息就会自动触发函数执行并获取数据;
第一步是浏览器向/quliao这个路径发起请求:
jQuery
<!DOCTYPE html>

<html lang="en">

<head>

  <meta charset="UTF-8">

  <title>群聊</title>

</head>

<body>

<p>

    <input type="text" id="content">

    <button id="send_msg" >发送</button> <!--给按钮绑定点击事件-->

</p>

<div id="chat_list">

</div>

</body>

<script src="/static/jquery-3.4.1.js"></script>

<script type="application/javascript">

    var ws = new WebSocket("ws://192.168.16.42:9527/my_socket");

    // 监听后端发来的消息,ws.onmessage起到监听的作用,只要有消息过来函数会自动执行

    ws.onmessage = function (eventMessage) {

      console.log(eventMessage.data);       // 获取后端发来的消息

      var p = document.createElement("p"); // 创建一个p标签

      p.innerText = eventMessage.data;     // 将后端发来的数据添加到p标签内

      $("#chat_list").append(p)            // 将p标签添加到div内

    };

  // 将我们输入的内容发送给后端

    $("#send_msg").click(function () {

        var content = $("#content").val();

        ws.send(content);

    })

</script>

</html>
前端代码
from flask import render_template,request,Flask

from geventwebsocket.handler import WebSocketHandler  # 提供WS协议处理

from geventwebsocket.server import WSGIServer # 承载服务

from geventwebsocket.websocket import WebSocket  # 语法提示

app = Flask(__name__,static_folder="statics",static_url_path="/static")  # 获取静态文件

user_socket_list = []

@app.route("/my_socket")

def my_socket():

    # 获取当前客户端与服务器的Socket连接

    user_socket = request.environ.get("wsgi.websocket")  # type:WebSocket

    if user_socket:

            user_socket_list.append(user_socket)

            print(len(user_socket_list),user_socket_list)

        # 1 [<geventwebsocket.websocket.WebSocket object at 0x000001D0D70E1458>]

        # print(user_socket,"OK 连接已经建立好了,接下来发消息吧")

    while 1:

        # 等待前端将消息发送过来

        msg = user_socket.receive()

        print(msg)

        for usocket in user_socket_list:

            try:

                usocket.send(msg)

            except:

                continue

@app.route("/qunliao")

def gc():

    return render_template("qunliao.html")

if __name__ == '__main__':

    http_serv = WSGIServer(("0.0.0.0",9527),app,handler_class=WebSocketHandler)

    http_serv.serve_forever()
后端代码
带群昵称的群聊
通过动态路由参数获取前端传过来的用户名
<!DOCTYPE html>

<html lang="en">

<head>

  <meta charset="UTF-8">

  <title>群聊</title>

</head>

<body>

<input type="text" id="username">

<button id="login">登录</button>

<p>

    <input type="text" id="content">

    <button id="send_msg" >发送</button> <!--给按钮绑定点击事件-->

</p>

<div id="chat_list">

</div>

</body>

<script src="/static/jquery-3.4.1.js"></script>

<script type="application/javascript">

    var ws = null; // 创建全局变量,ws多处使用

    $("#login").click(function () {

         var username = $("#username").val();

         console.log(username);

         // 创建一个websocket对象,建立websocket连接,更改了全局的ws,将用户名拼接上

         ws = new WebSocket("ws://192.168.16.42:9527/my_socket/" + username);

        // 监听后端发来的消息,ws.onmessage起到监听的作用,只要有消息过来函数会自动执行

        ws.onmessage = function (eventMessage) {

            console.log(eventMessage.data);       // 获取后端发来的消息

            var str_obj = JSON.parse(eventMessage.data);  // 反序列化,因为我们在发送给后端的时候是json

            var p = document.createElement("p"); // 创建一个p标签

            $(p).text(str_obj.from_user +":"+str_obj.chat);     // 将dom对象转换成jQuery对象,将后端发来的数据添加到p标签内

            $("#chat_list").append(p)            // 将p标签添加到div内

        };

    });

    // 将我们输入的内容发送给后端

    $("#send_msg").click(function () {

        var content = $("#content").val();

        var username = $("#username").val();

        // 将要发送的内容封装成自定义对象

        var sendStr = {

            from_user:username,

            chat:content

        };

        console.log(sendStr);

        // 序列化后发送给后端

        ws.send(JSON.stringify(sendStr));

    });

</script>

</html>
前端代码
from flask import render_template,request,Flask

from geventwebsocket.handler import WebSocketHandler  # 提供WS协议处理

from geventwebsocket.server import WSGIServer # 承载服务

from geventwebsocket.websocket import WebSocket  # 语法提示

app = Flask(__name__,static_folder="statics",static_url_path="/static")

user_socket_dict = {}

# 建立websocket连接时,前端将名字发送过来了

@app.route("/my_socket/<username>")

def my_socket(username):

    # 获取当前客户端与服务器的Socket连接

    user_socket = request.environ.get("wsgi.websocket")  # type:WebSocket

    if user_socket:

        # 以名字为key,连接对象为value添加到字典中

        user_socket_dict[username] = user_socket

    while 1:

        # 等待前端将消息发送过来,此时是json数据

        msg = user_socket.receive()

        for usocket in user_socket_dict.values():

            try:

                # 将收到的信息在发送给所有与服务器建立连接的前端

                usocket.send(msg)

            except:

                continue

@app.route("/qunliao")

def gc():

    return render_template("qunliaonicheng.html")

if __name__ == '__main__':

    http_serv = WSGIServer(("0.0.0.0",9527),app,handler_class=WebSocketHandler)

    http_serv.serve_forever()
后端代码
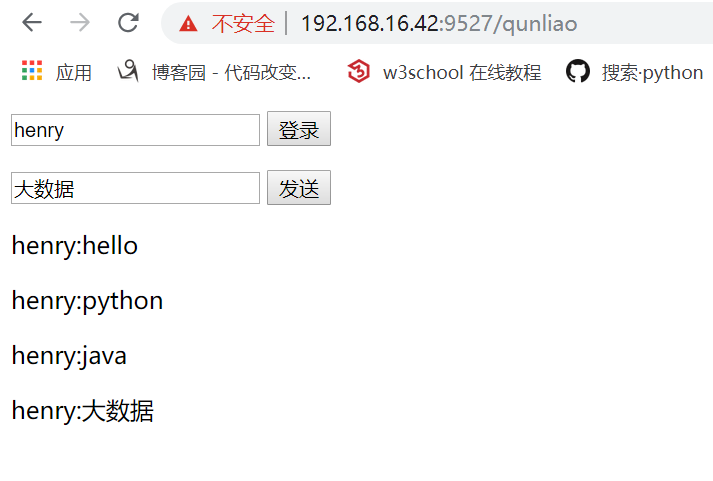
效果:
websocket实现私聊
<!DOCTYPE html>

<html lang="en">

<head>

  <meta charset="UTF-8">

  <title>群聊</title>

</head>

<body>

我的昵称:<input type="text" id="username">

<button id="login">登录</button>

<p>

    给<input type="text" id="to_user">发送

    <input type="text" id="content">

    <button id="send_msg" >发送</button> <!--给按钮绑定点击事件-->

</p>

<div id="chat_list">

</div>

</body>

<script src="/static/jquery-3.4.1.js"></script>

<script type="application/javascript">

    var ws = null; // 创建全局变量,ws多处使用

    $("#login").click(function () {

         var username = $("#username").val();

         console.log(username);

         // 创建一个websocket对象,建立websocket连接,更改了全局的ws,将用户名拼接上

         ws = new WebSocket("ws://192.168.16.42:9527/my_socket/" + username);

        // 监听后端发来的消息,ws.onmessage起到监听的作用,只要有消息过来函数会自动执行

        ws.onmessage = function (eventMessage) {

            console.log(eventMessage.data);       // 获取后端发来的消息

            var str_obj = JSON.parse(eventMessage.data);  // 反序列化,因为我们在发送给后端的时候是json

            var p = document.createElement("p"); // 创建一个p标签

            $(p).text(str_obj.from_user +":"+str_obj.chat);     // 将dom对象转换成jQuery对象,将后端发来的数据添加到p标签内

            $("#chat_list").append(p)            // 将p标签添加到div内

        };

    });

    // 将我们输入的内容发送给后端

    $("#send_msg").click(function () {

        var content = $("#content").val();

        var username = $("#username").val();

        var to_user = $("#to_user").val();

        // 将要发送的内容封装成自定义对象

        var sendStr = {

            from_user:username,

            chat:content,

            to_user:to_user,

        };

        console.log(sendStr);

        // 序列化后发送给后端

        ws.send(JSON.stringify(sendStr));

    });

</script>

</html>
前端页面
import json

from flask import render_template,request,Flask

from geventwebsocket.handler import WebSocketHandler  # 提供WS协议处理

from geventwebsocket.server import WSGIServer # 承载服务

from geventwebsocket.websocket import WebSocket  # 语法提示

app = Flask(__name__,static_folder="statics",static_url_path="/static")

user_socket_dict = {}

# 建立websocket连接时,前端将名字发送过来了

@app.route("/my_socket/<username>")

def my_socket(username):

    # 获取当前客户端与服务器的Socket连接

    user_socket = request.environ.get("wsgi.websocket")  # type:WebSocket

    if user_socket:

        # 以名字为key,连接对象为value添加到字典中

        user_socket_dict[username] = user_socket

    while 1:

        # 等待前端将消息发送过来,此时是json数据

        msg = user_socket.receive()

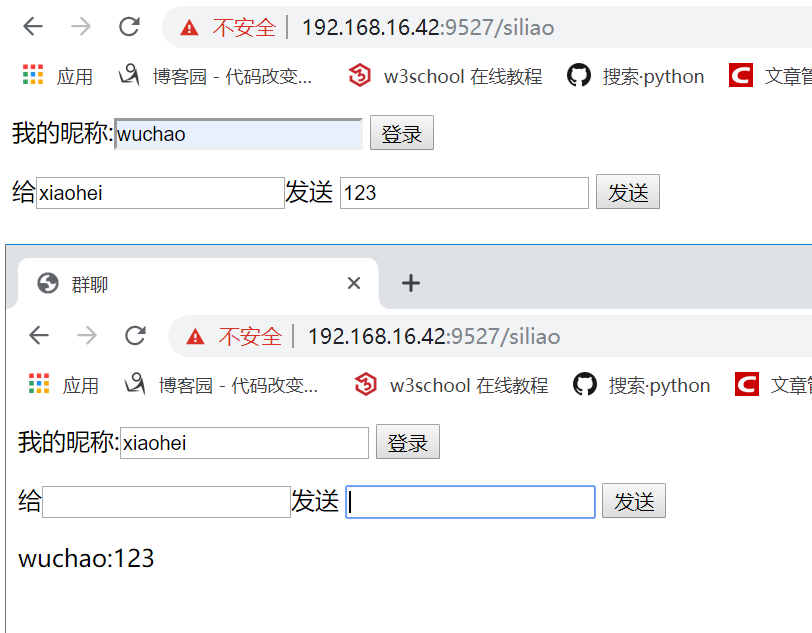
        print(msg)    # {"from_user":"wuchao","chat":"123","to_user":"xiaohei"}

        # 反序列化

        msg_dict = json.loads(msg)

        # 查找字典中前端要发送信息给那个人的名字

        to_username = msg_dict.get("to_user")

        # 获取目标人物的连接地址

        to_user_socket = user_socket_dict.get(to_username)

        # 将信息发送给目标人物

        to_user_socket.send(msg)

@app.route("/siliao")

def gc():

    return render_template("siliao.html")

if __name__ == '__main__':

    http_serv = WSGIServer(("0.0.0.0",9527),app,handler_class=WebSocketHandler)

    http_serv.serve_forever()
后端代码
效果
Flask-websocket实现聊天功能的更多相关文章
- spring boot集成websocket实现聊天功能和监控功能
本文参考了这位兄台的文章: https://blog.csdn.net/ffj0721/article/details/82630134 项目源码url: https://github.com/zhz ...
- 基于vs2015 SignalR开发的微信小程序使用websocket实现聊天功能
一)前言 在微信小程上实现聊天功能,大致有三种方式:1)小程序云开发 2)购买第三方IM服务 3)使用自己的服务器自己开发. 这里重要讲使用自己的服务器自己开发,并且是基于vs的开发. 网上提供的解决 ...
- 在Spring Boot框架下使用WebSocket实现聊天功能
上一篇博客我们介绍了在Spring Boot框架下使用WebSocket实现消息推送,消息推送是一对多,服务器发消息发送给所有的浏览器,这次我们来看看如何使用WebSocket实现消息的一对一发送,模 ...
- websocket 实现聊天功能
<html> <head> <base href="<%=basePath%>"> <title>webscoket t ...
- 基于java 的websocket的聊天功能,一开始初始化websocket,执行打开连接之后就直接关闭连接了。
1 错误描述: java 后台没有报错,但是就是连接不上,一连上又自动关闭. 2 错误根源: 缺少jar包. 对比了报错的tomcat 的jar包和不报错的jar包 发现是tomcat下缺少上图绿色框 ...
- Netty 实现 WebSocket 聊天功能
上一次我们用Netty快速实现了一个 Java 聊天程序(见http://www.waylau.com/netty-chat/).现在,我们要做下修改,加入 WebSocket 的支持,使它可以在浏览 ...
- Spring 学习——基于Spring WebSocket 和STOMP实现简单的聊天功能
本篇主要讲解如何使用Spring websocket 和STOMP搭建一个简单的聊天功能项目,里面使用到的技术,如websocket和STOMP等会简单介绍,不会太深,如果对相关介绍不是很了解的,请自 ...
- 使用websocket实现在线聊天功能
很早以前为了快速达到效果,使用轮询实现了在线聊天功能,后来无意接触了socket,关于socket我的理解是进程间通信,首先要有服务器跟客户端,服务的启动监听某ip端口定位该进程,客户端开启socke ...
- WebSocket(3)---实现一对一聊天功能
实现一对一聊天功能 功能介绍:实现A和B单独聊天功能,即A发消息给B只能B接收,同样B向A发消息只能A接收. 本篇博客是在上一遍基础上搭建,上一篇博客地址:[WebSocket]---实现游戏公告功能 ...
- Spring Websocket实现简易在线聊天功能
针对Spring Websocket的实现,我参照了其他博主的文章https://www.cnblogs.com/leechenxiang/p/5306372.html 下面直接给出实现: 一.引入相 ...
随机推荐
- zookeeper客户端KeeperErrorCode = ConnectionLoss异常问题排查历险记
经过线报,说前方应用有异常,导致了可用性变差.咦!讨厌的异常,抛异常是程序猿最讨厌的事情之一. 经过收集异常信息如下 2019-06-24 10:57:41.806 ERROR [hades- ...
- IntelliJ IDEA 搭建 Go 开发环境
本文介绍 Windows7 x64 基于 IntelliJ IDEA 搭建 Go 语言开发环境.主要是一些操作过程截图以及简单文字描述,如有不清楚的地方,欢迎指正.所有软件使用当前(2016.12. ...
- SpringBoot下实现MongoDB字段类型转换器
1 目的 MongoDB Java String LocalDateTime 2 实现 先定义实体类 @Data // lombok @Accessors(chain = true) @Documen ...
- python+django学习二
所有模型类型的准备和迁移 在setting.py中添加:AUTH_USER_MODEL = 'users.UserProfile' 继承用户模板 确保子项目的url现在都是空的, 在pycharm的f ...
- js组合继承
//组合继承指的是将原型链和借用构造函数(call.apply)的技术组合到一起,从而发挥二者之长的一种继承模式,//其背后的思路就是使用原型链实现对原型属性和方法的继承://而通过借用构造函数来实现 ...
- java大框架
本文章,列出了一些程序员需要学习的技术和知识点,有些技术和知识点没有写道,欢迎大家进行修改和补充,有些技术公司用到,大家需要先学习,有些技术和知识点过时,大家可以了解.本人笔记连接[[http://2 ...
- 【php设计模式】策略模式
策略模式是针对一组算法,将每一种算法都封装到具有共同接口的独立的类中,从而是它们可以相互替换.策略模式的最大特点是使得算法可以在不影响客户端的情况下发生变化,从而改变不同的功能. <?php i ...
- python中的not的意思
python中的not的意思 在python中,not是逻辑判断,用于布尔值true和false,not true是false,not false是true.以下是not的一些常见用法:(1)当表达式 ...
- RobHess的SIFT环境配置
平台:win10 x64 +VS 2015专业版 +opencv-2.4.11 + gtk_-bundle_2.24.10_win32 参考博客:https://www.cnblogs.com/cql ...
- Delphi 特性限定符