JavaWeb_(SpringMVC框架)SpringMVC&Spring&MyBatis整合
JavaWeb_(SpringMVC框架)测试SpringMVC&Spring&MyBatis三大整合 传送门
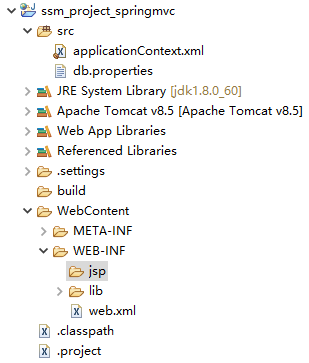
1、整合ssm 3大框架 过程
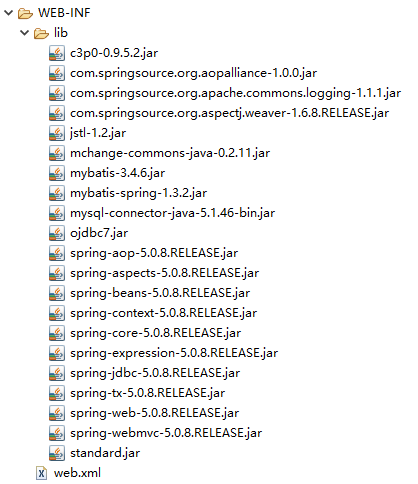
a)导包 -> spring_Jar整理 -> ssm框架整合包
b)配置 -> web.xml
i.读取spring配置文件;
ii.配置springmvc前端控制器;
c)配置 -> applicationContext.xml
i.读取数据库配置文件;
ii.配置数据源连接池;
iii.开启注解扫描;
iv.配置事务核心管理器;
v.开启注解事务;
vi.配置视图解析器;
vii.配置Mybatis:
1.配置sqlSessionFactory;
2.配置别名;
3.配置mapper工厂;
a)导包 -> spring_Jar整理 -> ssm框架整合包
b)配置 -> web.xml
i.读取spring配置文件;
ii.配置springmvc前端控制器;
<!-- 配置springmvc前端控制器 和 读取配置文件 -->

  <servlet>

      <servlet-name>springmvc</servlet-name>

          <servlet-class>org.springframework.web.servlet.DispatcherServlet</servlet-class>

          <init-param>

              <!-- 读取配置文件 -->

              <param-name>contextConfigLocation</param-name>

              <param-value>classpath:applicationContext.xml</param-value>

          </init-param>

  </servlet>

  <servlet-mapping>

      <servlet-name>springmvc</servlet-name>

      <url-pattern>*.do</url-pattern>

  </servlet-mapping>
<?xml version="1.0" encoding="UTF-8"?>

<web-app xmlns:xsi="http://www.w3.org/2001/XMLSchema-instance" xmlns="http://xmlns.jcp.org/xml/ns/javaee" xsi:schemaLocation="http://xmlns.jcp.org/xml/ns/javaee http://xmlns.jcp.org/xml/ns/javaee/web-app_3_1.xsd" id="WebApp_ID" version="3.1">

  <display-name>ssm_project_springmvc</display-name>

  <!-- 配置springmvc前端控制器 和 读取配置文件 -->

  <servlet>

      <servlet-name>springmvc</servlet-name>

          <servlet-class>org.springframework.web.servlet.DispatcherServlet</servlet-class>

          <init-param>

              <!-- 读取配置文件 -->

              <param-name>contextConfigLocation</param-name>

              <param-value>classpath:applicationContext.xml</param-value>

          </init-param>

  </servlet>

  <servlet-mapping>

      <servlet-name>springmvc</servlet-name>

      <url-pattern>*.do</url-pattern>

  </servlet-mapping>

  <welcome-file-list>

    <welcome-file>index.html</welcome-file>

    <welcome-file>index.htm</welcome-file>

    <welcome-file>index.jsp</welcome-file>

    <welcome-file>default.html</welcome-file>

    <welcome-file>default.htm</welcome-file>

    <welcome-file>default.jsp</welcome-file>

  </welcome-file-list>

</web-app>
web.xml
c)配置 -> applicationContext.xml
i.读取数据库配置文件;
ii.配置数据源连接池;
iii.开启注解扫描;
iv.配置事务核心管理器;
v.开启注解事务;
vi.配置视图解析器;
vii.配置Mybatis:
1.配置sqlSessionFactory;
2.配置别名;
3.配置mapper工厂;
db.properties
jdbc.driverClass=com.mysql.jdbc.Driver

jdbc.jdbcUrl=jdbc:mysql://localhost:3306/ssm_springmvc

jdbc.user=root

jdbc.password=123456
jdbc.driverClass=com.mysql.jdbc.Driver

jdbc.jdbcUrl=jdbc:mysql://localhost:3306/ssm_springmvc

jdbc.user=root

jdbc.password=123456
db.properties
applicationContext.xml
    <!-- 读取配置文件 数据库 -->

    <context:property-placeholder location="classpath:db.properties"/>

        <!-- 配置数据源 -->

        <bean name="dataSource" class="com.mchange.v2.c3p0.ComboPooledDataSource">

            <property name="driverClass" value="${jdbc.driverClass}"/>

            <property name="jdbcUrl" value="${jdbc.jdbcUrl}"/>

            <property name="user" value="${jdbc.user}"/>

            <property name="password" value="${jdbc.password}"/>

        </bean>

        <!-- 开启注解扫描 -->

        <context:component-scan base-package="com.Gary"></context:component-scan>

        <!-- 事务核心管理器 -->

        <bean name="transactionManager" class="org.springframework.jdbc.datasource.DataSourceTransactionManager">

            <property name="dataSource" ref="dataSource"/>

        </bean>

        <!-- 开启注解事务 -->

        <tx:annotation-driven/>

        <!-- 配置视图解析器 -->

        <bean class="org.springframework.web.servlet.view.InternalResourceViewResolver">

            <property name="prefix" value="/WEB-INF/jsp/"/>

            <property name="suffix" value=".jsp"/>

        </bean>

        <!-- 配置mybatis -->

        <bean name="sqlSessionFactory" class="org.mybatis.spring.SqlSessionFactoryBean">

            <property name="dataSource" ref="dataSource"/>

            <property name="typeAliasesPackage" value="com.Gary.bean"/>

        </bean>

        <!-- mapper工厂 -->

        <bean class="org.mybatis.spring.mapper.MapperScannerConfigurer">

            <property name="basePackage" value="com.Gary.mapper"/>

        </bean>
<?xml version="1.0" encoding="UTF-8"?>

<beans xmlns="http://www.springframework.org/schema/beans"

    xmlns:xsi="http://www.w3.org/2001/XMLSchema-instance"

    xmlns:context="http://www.springframework.org/schema/context"

    xmlns:aop="http://www.springframework.org/schema/aop"

    xmlns:mvc="http://www.springframework.org/schema/mvc"

    xmlns:tx="http://www.springframework.org/schema/tx"

    xsi:schemaLocation="http://www.springframework.org/schema/mvc http://www.springframework.org/schema/mvc/spring-mvc-4.3.xsd

        http://www.springframework.org/schema/beans http://www.springframework.org/schema/beans/spring-beans-4.3.xsd

        http://www.springframework.org/schema/context http://www.springframework.org/schema/context/spring-context-4.3.xsd

        http://www.springframework.org/schema/aop http://www.springframework.org/schema/aop/spring-aop-4.3.xsd

        http://www.springframework.org/schema/tx http://www.springframework.org/schema/tx/spring-tx-4.3.xsd">

        <!-- 读取配置文件 数据库 -->

        <context:property-placeholder location="classpath:db.properties"/>

        <!-- 配置数据源 -->

        <bean name="dataSource" class="com.mchange.v2.c3p0.ComboPooledDataSource">

            <property name="driverClass" value="${jdbc.driverClass}"/>

            <property name="jdbcUrl" value="${jdbc.jdbcUrl}"/>

            <property name="user" value="${jdbc.user}"/>

            <property name="password" value="${jdbc.password}"/>

        </bean>

        <!-- 开启注解扫描 -->

        <context:component-scan base-package="com.Gary"></context:component-scan>

        <!-- 事务核心管理器 -->

        <bean name="transactionManager" class="org.springframework.jdbc.datasource.DataSourceTransactionManager">

            <property name="dataSource" ref="dataSource"/>

        </bean>

        <!-- 开启注解事务 -->

        <tx:annotation-driven/>

        <!-- 配置视图解析器 -->

        <bean class="org.springframework.web.servlet.view.InternalResourceViewResolver">

            <property name="prefix" value="/WEB-INF/jsp/"/>

            <property name="suffix" value=".jsp"/>

        </bean>

        <!-- 配置mybatis -->

        <bean name="sqlSessionFactory" class="org.mybatis.spring.SqlSessionFactoryBean">

            <property name="dataSource" ref="dataSource"/>

            <property name="typeAliasesPackage" value="com.Gary.bean"/>

        </bean>

        <!-- mapper工厂 -->

        <bean class="org.mybatis.spring.mapper.MapperScannerConfigurer">

            <property name="basePackage" value="com.Gary.mapper"/>

        </bean>

</beans>
applicationContext.xml
JavaWeb_(SpringMVC框架)SpringMVC&Spring&MyBatis整合的更多相关文章
- 3.springMVC+spring+Mybatis整合Demo(单表的增删该查,这里主要是贴代码,不多解释了)
前面给大家讲了整合的思路和整合的过程,在这里就不在提了,直接把springMVC+spring+Mybatis整合的实例代码(单表的增删改查)贴给大家: 首先是目录结构: 仔细看看这个目录结构:我不详 ...
- SpringMVC+Spring+Mybatis整合
SpringMVC+Spring+Mybatis整合 导包 配置jdbc.properties.log4j.properties jdbc.driver=com.mysql.jdbc.Driver j ...
- 整合SpringMVC框架和Spring框架
-------------------------siwuxie095 整合 SpringMVC 框架和 Spring 框架 ...
- Springmvc+Spring+Mybatis整合开发(架构搭建)
Springmvc+Spring+Mybatis整合开发(架构搭建) 0.项目结构 Springmvc:web层 Spring:对象的容器 Mybatis:数据库持久化操作 1.导入所有需要的jar包 ...
- SSM 即所谓的 Spring MVC + Spring + MyBatis 整合开发。
SSM 即所谓的 Spring MVC + Spring + MyBatis 整合开发.是目前企业开发比较流行的架构.代替了之前的SSH(Struts + Spring + Hibernate) 计划 ...
- Spring + mybatis整合方案总结 结合实例应用
Spring + mybatis整合实例应用 项目结构图 (Spring3.0.2 +mybatis3.0.4) 方案一: 通过配置文件整合Spring和mybatis 应用数据库 -- --数据库 ...
- Spring+Mybatis整合时 Failed to read candidate component class,Caused by:IllegalArgumentException
Spring+Mybatis整合时Caused by: java.lang.IllegalArgumentException错误 org.springframework.beans.factory.B ...
- springMVC + Spring + MyBatis 整合
整理下SSM(基于注解)的整合 1. web.xml 配置文件 <?xml version="1.0" encoding="UTF-8"?> < ...
- mybatis学习(十一)——springmvc++spring+mybatis整合
做任何一个项目都以一个需求,这里先定义一下需求:利用三大框架查询酒店列表. 一.搭建开发环境 1.创建一个web项目 我这里用的是 jdk1.8+tomact7.0 2.创建hotel表 CREATE ...
随机推荐
- java01_简介_开发环境
JAVA的前世今生 美国SUN(Stanford University Network)公司,在中国大陆的正式中文名为"太阳计算机系统(中国)有限公司",在中国台湾的正式中文名为& ...
- ROUTE: route addition failed
ROUTE: route addition failed 1)报FlushIpNetTable failed on interface错误 应对:以管理员身份运行OpenV-P-N 2)报Warnin ...
- nginx分割日志
实现nginx日志按照时间分割存储 backups_log.sh #设置log日志的存储地址 LOG_PATH=/home/soft/nginx/logs #设置历史日志的存储地址 HISTORY_L ...
- export default和export的使用方式
在node中使用 var 名称=require('模块标识符') 来导入 module.exports 和exports 来暴露成员 在ES6中,也通过规范的形式,规定了ES6中如何导入和导出模块 E ...
- webpack如何使用vue
1.安装vue的包: cnpm i vue -S 2.在main.js中导入包 3.运行起来报错 3.1第一种解决办法: 3.2第二种解决办法: 让我们先回顾一下包的查找规则: //1.找项目根目录 ...
- ES6 Proise 简单理解
Promise 这是ES6中增加的一个处理异步的对象. 传统变成写异步函数的时候,经常会遇到回调套回调: Promise 是异步编程的一种解决方案,比传统的解决方案 -----回调函数和事件----- ...
- 【小知识点】如何通过jq获取textarea的值
textarea和input本质差不多,只不过input是一行文本,textarea是多行文本. 所以获取textarea的值的方法和获取input的值的方法是一致的, $('textarea').v ...
- leetcode-174. Dungeon Game 地下城游戏
一道关于骑士救公主故事的题目. 一些恶魔抓住了公主(P)并将她关在了地下城的右下角.地下城是由 M x N 个房间组成的二维网格.我们英勇的骑士(K)最初被安置在左上角的房间里,他必须穿过地下城并通过 ...
- 一步步用ABAP Development Tools连接SAP云平台上的ABAP编程环境
使用ABAP Development Tools的项目创建向导: New->ABAP Cloud Project: Service Instance Connection,选择SAP Cloud ...
- ASE19团队项目beta阶段Backend组 scrum8 记录
本次会议于12月17日,19:30在微软北京西二号楼sky garden召开,持续10分钟. 与会人员:Hao Wang, Lihao Ran, Xin Kang, Zhikai Chen 每个人的工 ...