
SpringBoot中使用 RabbitMQ -测试
本章主要建立在已经安装好Erlang以及RabbitMQ的基础上,接下来,简单介绍一下使用
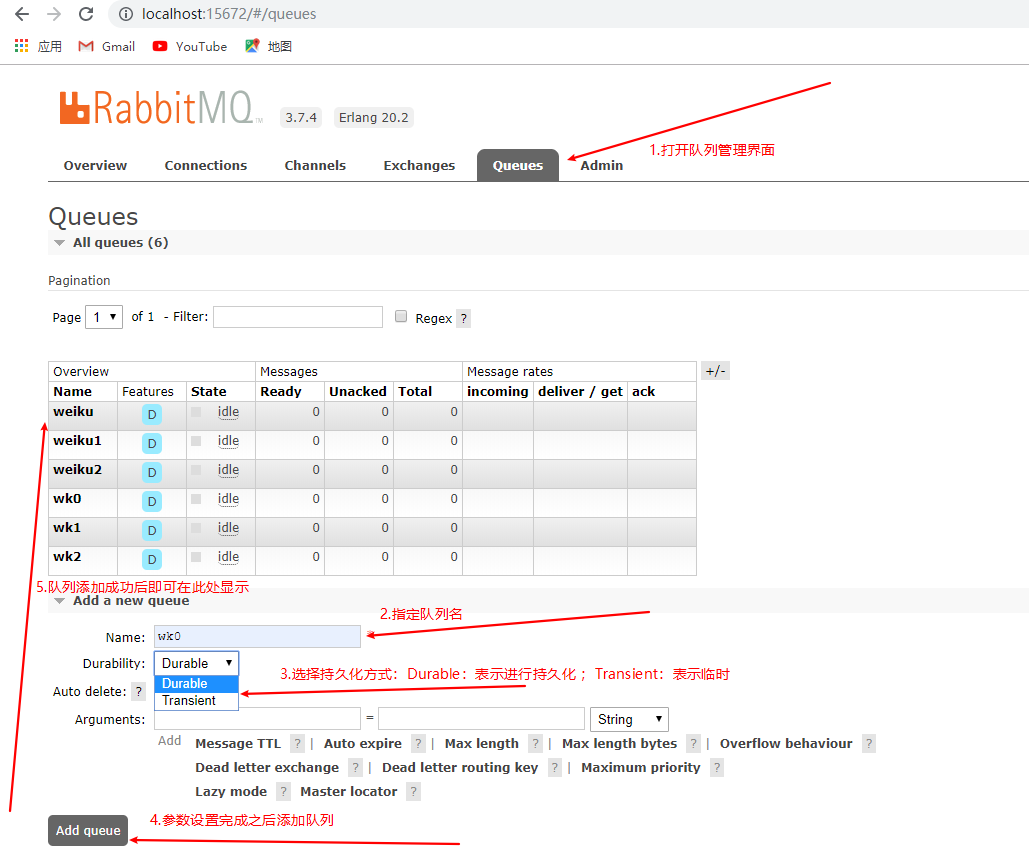
1、首先到RabbitMQ的管理界面新建一个队列(Direct模式)
2、测试项目的基础结构如下:
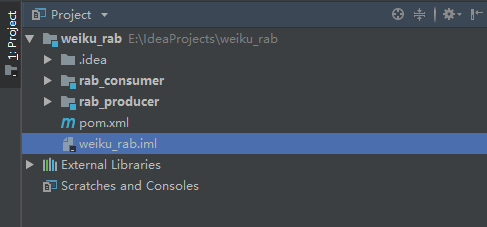
这里为了方便测试,直接在父项目中建立两个子模块(生产者和消费者)
3、pom.xml文件的依赖如下:
父项目:
<parent>

        <groupId>org.springframework.boot</groupId>

        <artifactId>spring-boot-starter-parent</artifactId>

        <version>2.0.1.RELEASE</version>

</parent>
引入SpringBoot的父依赖
子项目:
两个模块都是同样的依赖
    <dependencies>

        <!--1、amqp高级消息队列的依赖-->

        <dependency>

            <groupId>org.springframework.boot</groupId>

            <artifactId>spring-boot-starter-amqp</artifactId>

        </dependency>

        <!--2、测试的依赖-->

        <dependency>

            <groupId>org.springframework.boot</groupId>

            <artifactId>spring-boot-starter-test</artifactId>

        </dependency>

    </dependencies>
2、准备发送的数据
回到IDEA中,打开子模块的生产者模块,我这边是rab_producer,在resource下建立springboot的配置文件:application.yml文件,内容如下:
spring:

  rabbitmq:

    host: localhost

# host 为RabbitMQ主机的地址
之后新建一个SpringBoot的启动类:
@SpringBootApplication

public class RabbitMQApplication {

    public static void main(String[] args) {

        SpringApplication.run(RabbitMQApplication.class);

    }

}
然后新建测试类:
@RunWith(SpringRunner.class)    // 固定写法

@SpringBootTest(classes = RabbitMQApplication.class)    // SpringBoot启动类(自定义的)

public class RabTest {

    @Autowired

    private RabbitTemplate rabbitTemplate;  // 注入一个RabbitMQ的模板对象,操作消息队列的对象

    // 发送一条点对点(Direct)的消息,又称为直连

    @Test

    public void sendQueue(){

        System.out.println("开始向队列中发送一条消息!");

        // 参数1:管理中的队列名  参数2:发送的消息

        rabbitTemplate.convertAndSend("weiku","message:这是一条消息!");

        System.out.println("消息发送完毕!");

    }

}
运行测试方法即可把消息发送到队列(weiku)中。
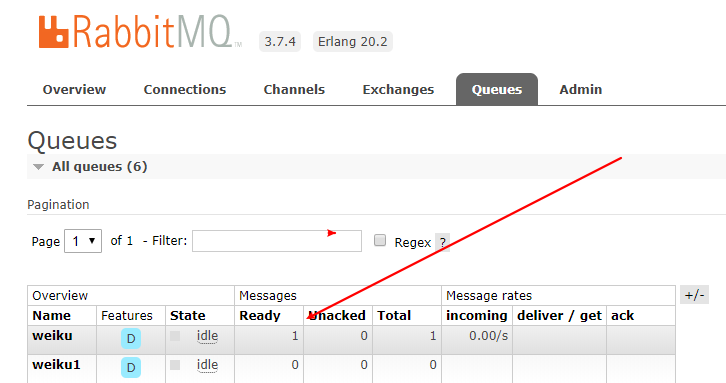
如果消息未被消费,可在管理界面查看到:
3、准备消费者接收消息
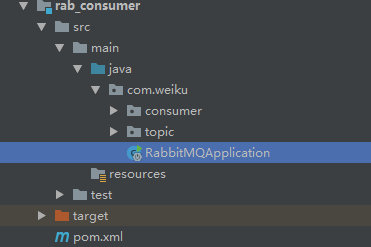
回到IDEA中,打开子模块的消费者模块,我这边是rab_consumer,在子模块中创建一个启动类,内容如下:
@SpringBootApplication

public class RabbitMQApplication {

    public static void main(String[] args) {

        SpringApplication.run(RabbitMQApplication.class);

    }

}
完成之后,定义一个接收消息的监听器,并且注入到Spring容器中,代码如下:
@Component  // 需要注入到Spring容器中

@RabbitListener(queues = "weiku")   // 指定监听的队列名

public class Consumer1 {

    @RabbitHandler  // 消息接收处理

    public void showMSG(String message){    // 得到我们producer中发送的Object数据,此处可根据传过来的类型来选择接收,否则抛出异常

        System.out.println("weiku收到的消息内容为:" + message);

    }

}
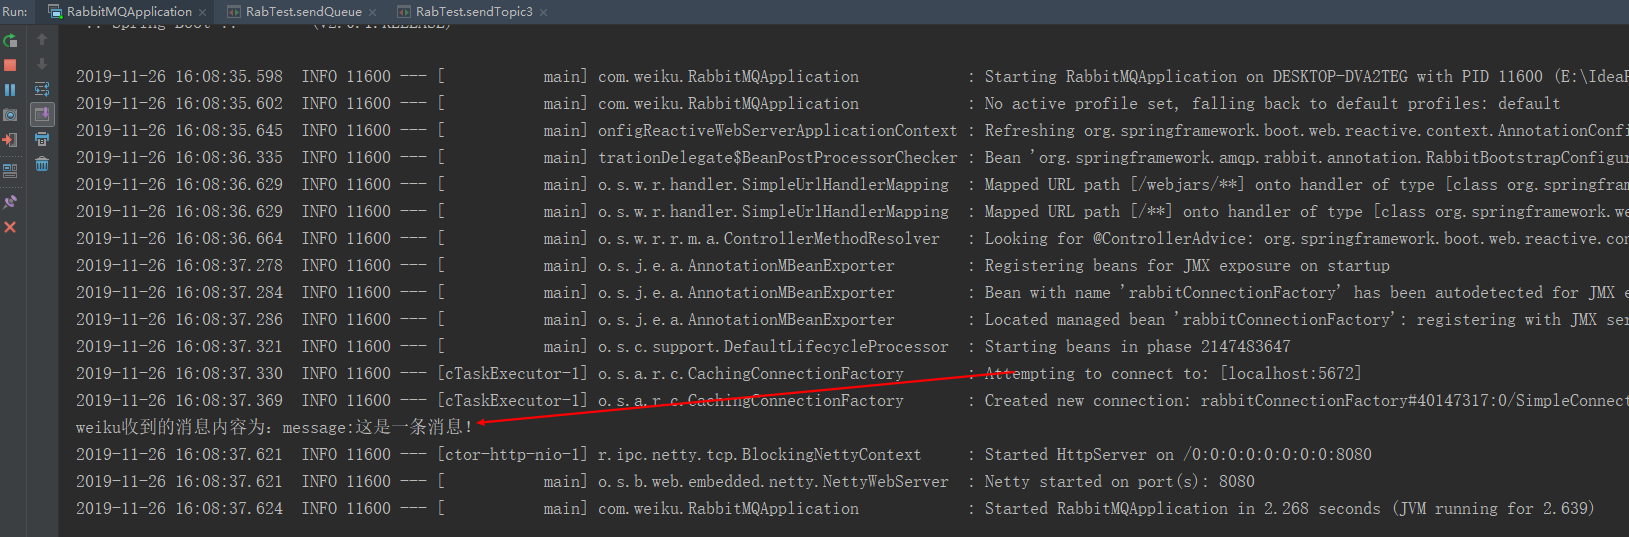
准备完成之后,运行启动类可接收到我们刚刚发送的Direct点对点的消息,这种模式的消息只能被一个消费者所消费到,运行结果如下:
4、测试使用 发布/订阅 来发送消息
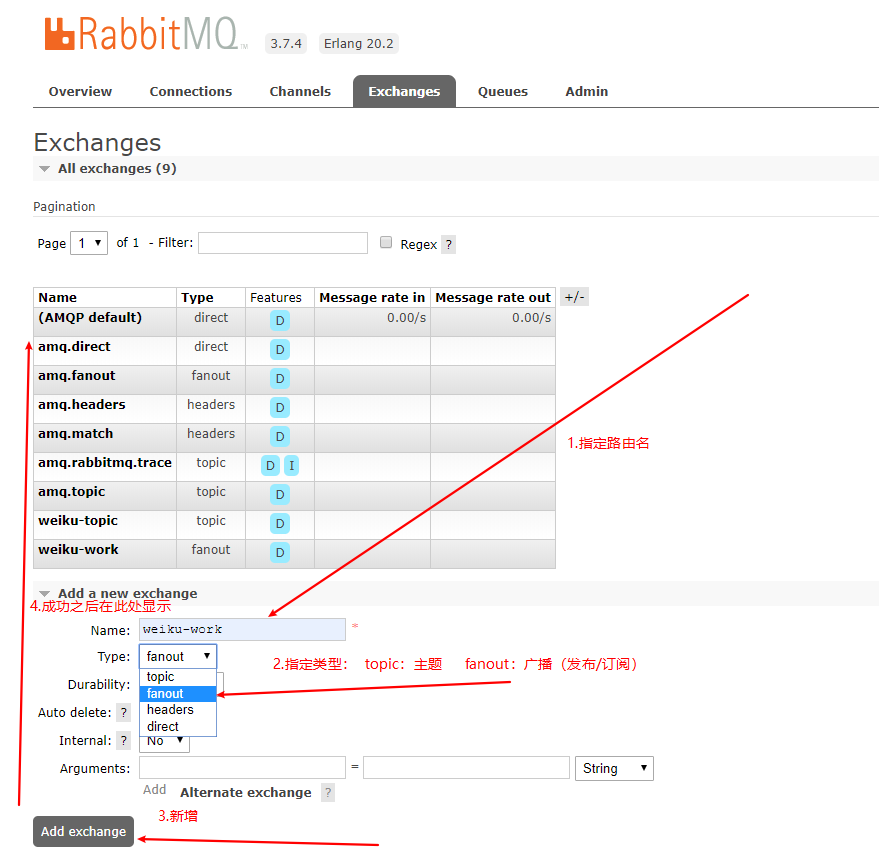
首先需要到RabbitMQ的管理界面新增一个路由交换机(Exchange)
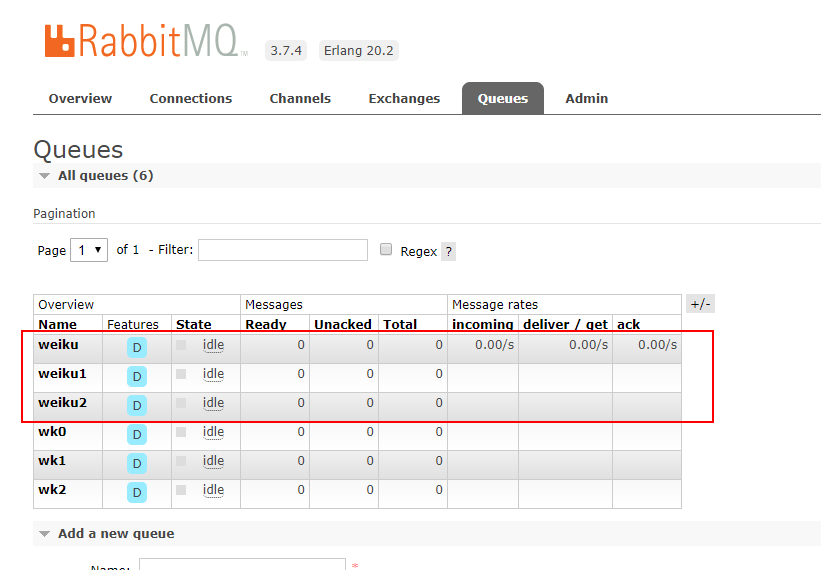
新建完路由之后,需要再新建几个队列,如图:
之后,还没完,需要把我们新建路由和我们新建的队列绑定:
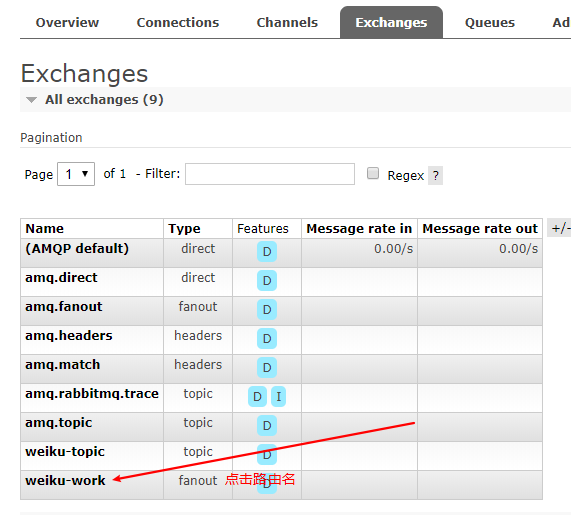 出现如图界面: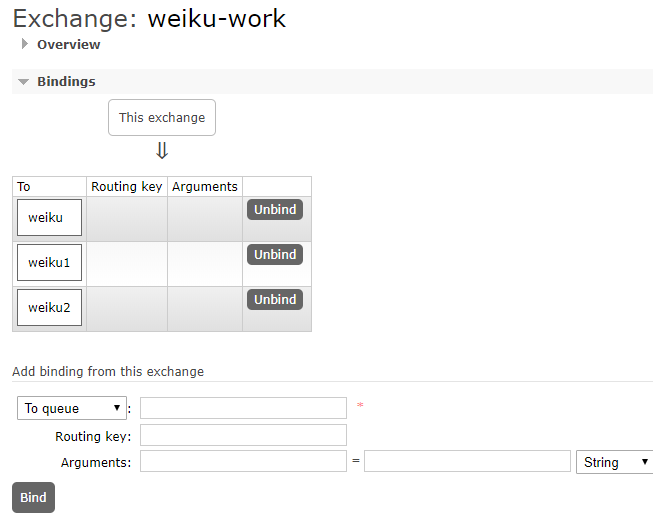
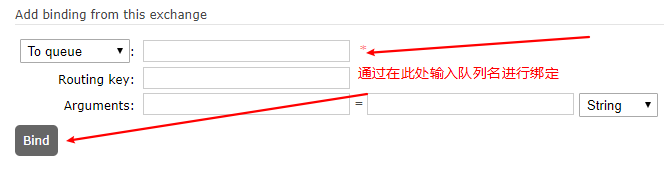
绑定完成之后,开始代码测试。
5、进行 发布/订阅 的代码测试
生产者:
    // 广播的形式发送,同一个路由下的所有队列都能接收到消息

    @Test

    public void sendFanout(){

        System.out.println("开始向路由发送消息(路由下的所有Queue都能收到该消息)");

        // 参数1:路由名  参数2:可有可无    参数3:发送的消息内容

        rabbitTemplate.convertAndSend("weiku-work","","这是一条所有消费者都能收到的消息!");

        System.out.println("消息发送成功!");

    }
消费者:
消费者1:
@Component  // 需要注入到Spring容器中

@RabbitListener(queues = "weiku")   // 指定监听的队列名

public class Consumer1 {

    @RabbitHandler  // 消息接收处理

    public void showMSG(String message){    // 得到我们producer中发送的Object数据,此处可根据传过来的类型来选择接收,否则抛出异常

        System.out.println("weiku收到的消息内容为:" + message);

    }

}
消费者2:
@Component  // 需要注入到Spring容器中

@RabbitListener(queues = "weiku1")  // 指定监听的队列名

public class Consumer2 {

    @RabbitHandler  // 消息接收处理

    public void getMSG(String msg){

        System.out.println("weiku1收到的消息如下:" + msg);

    }

}
消费者3:
@Component  // 需要注入到Spring容器中

@RabbitListener(queues = "weiku2")  // 指定监听的队列名

public class Consumer3 {

    @RabbitHandler  // 消息接收处理

    public void getMSG(String msg){

        System.out.println("weiku2收到的消息如下:" + msg);

    }

}
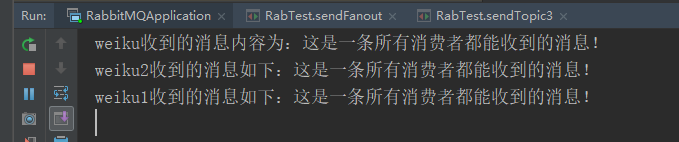
先运行生产者的测试发送消息的方法,再运行消费者的SpringBoot启动类。
运行结果如下:
6、最后,进行发送主题(Topic)的测试
新建一个用来发送主题的路由
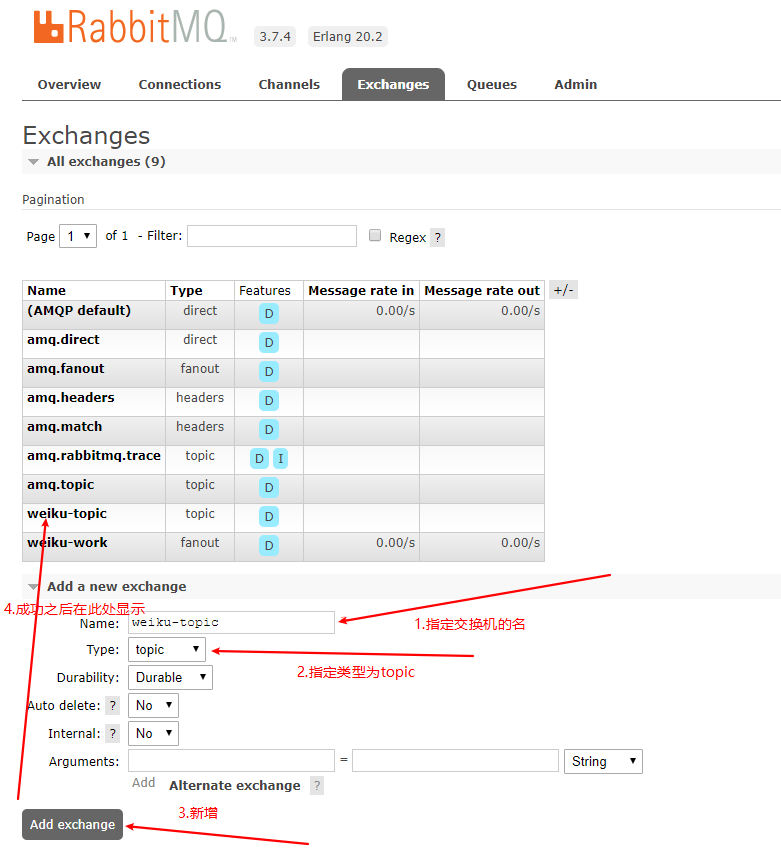
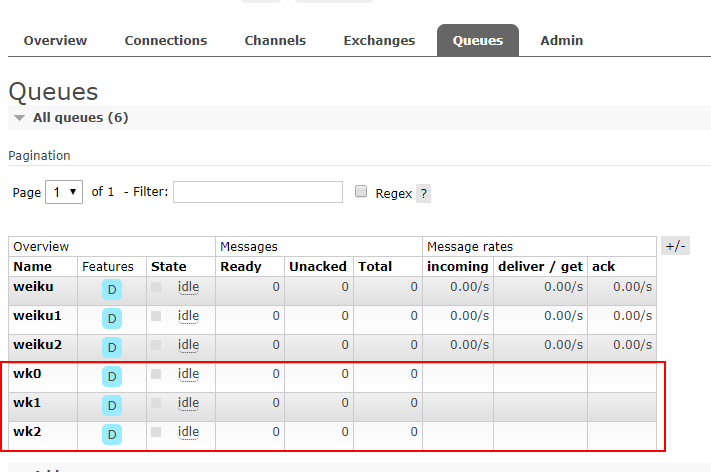
路由新建完之后,新建3个队列,用来接收发布的 topic,如图:
之后还需把我们新建的队列和路由进行绑定,如图所示:
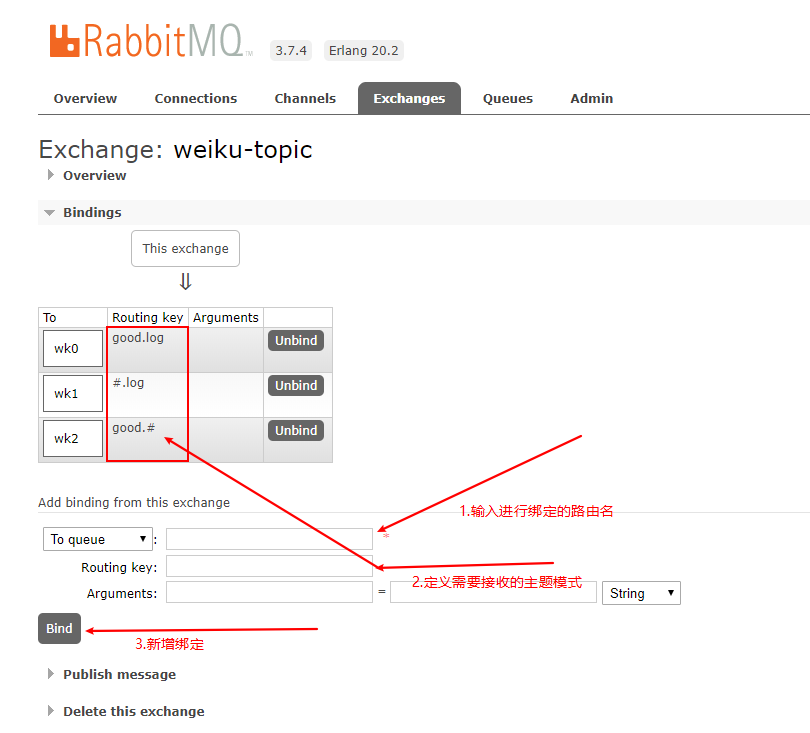
这里的 # 代表所有类型匹配。
以上的准备完成之后,开始代码测试:
测试1:
生产者:
    @Test

    public void sendTopic1(){

        System.out.println("开始向路由中发送消息!参数2:routingKey");

        // 参数1:路由器名  参数2:类似于发送的规则名

        rabbitTemplate.convertAndSend("weiku-topic","good.log","这是一条good.log消息");

    }
此处三个队列都能接收到数据,因为都匹配。
消费者:
消费者1:
@Component

@RabbitListener(queues = "wk0")

public class Con1 {

    @RabbitHandler

    public void getMSG(String msg){

        System.out.println("wk0收到的消息为:" + msg);

    }

}
消费者2:
@Component

@RabbitListener(queues = "wk1")

public class Con2 {

    @RabbitHandler

    public void getMSG(String msg){

        System.out.println("wk1收到的消息如下:" + msg);

    }

}
消费者3:
@Component

@RabbitListener(queues = "wk2")

public class Con3 {

    @RabbitHandler

    public void getMSG(String msg){

        System.out.println("wk2收到的消息如下:" + msg);

    }

    /**

     * 可以进行重载,会找到指定参数的queue上

     * @param map

     */

    @RabbitHandler

    public void getMSG(Map map){

        System.out.println("wk2收到的(map)消息如下:" + map);

    }

    @RabbitHandler

    public void getMSG(List list){

        System.out.println("wk2收到的(list)消息如下:" + list);

    }

}
启动SpringBoot,运行结果如下:
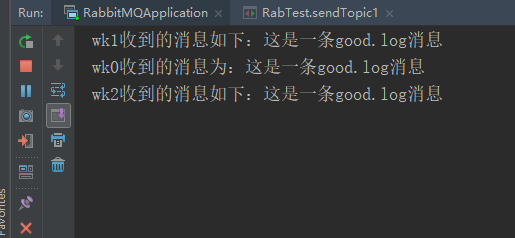
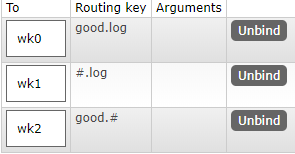
因为这边3个队列都符合了规则,所以都能消费到消息
测试2:
生产者:
    @Test

    public void sendTopic2(){

        System.out.println("开始向路由中发送消息!参数2:routingKey");

        rabbitTemplate.convertAndSend("weiku-topic","维护.log","这是一条 维护.log消息");

        rabbitTemplate.convertAndSend("weiku-topic","日志.log","这是一条 日志.log消息");

    }
消费者运行结果:
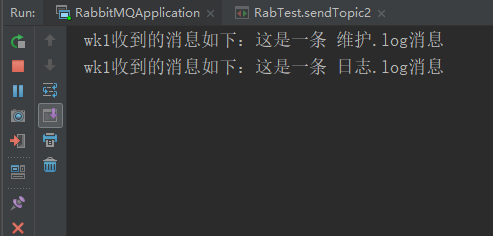
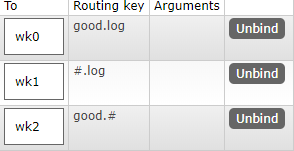
此处这又 wk1 能接收到消息,因为 wk1 符合以 . log 结尾
测试3:
生产者:
    @Test

    public void sendTopic3(){

        // 1.准备发送的数据

        Map map = new HashMap();

        map.put(1,"a");

        map.put(2,"b");

        List list = new ArrayList();

        list.add("qq");

        list.add("ww");

        list.add("SS");

        System.out.println("开始向路由中发送消息!参数2为routingKey");

        // 2.开始发送消息(发送了2条)

        // 2.1 发送的数据为map类型

        rabbitTemplate.convertAndSend("weiku-topic","good.txt",map);

        // 2.2 发送的数据为list类型

        rabbitTemplate.convertAndSend("weiku-topic","good.txt",list);

    }
消费者运行效果如下:
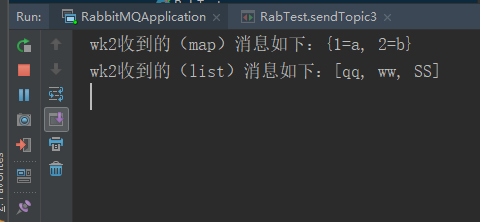
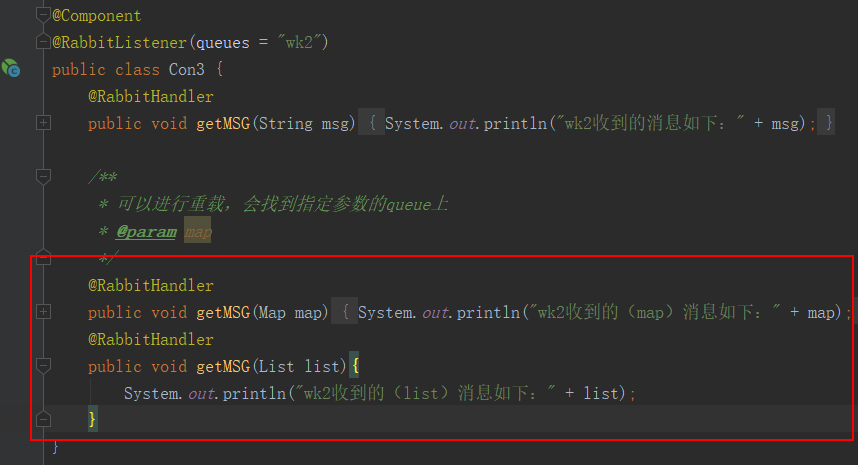
此处只有 wk2 能够收到消息,且被指定类型的监听器所消费。
至此,我们的测试就结束了。
SpringBoot中使用 RabbitMQ -测试的更多相关文章
- SpringBoot学习笔记(11)-----SpringBoot中使用rabbitmq,activemq消息队列和rest服务的调用
1. activemq 首先引入依赖 pom.xml文件 <dependency> <groupId>org.springframework.boot</groupId& ...
- SpringBoot中使用rabbitmq,activemq消息队列和rest服务的调用
1. activemq 首先引入依赖 pom.xml文件 <dependency> <groupId>org.springframework.boot</groupId& ...
- springboot中使用RabbitMq
转载:http://www.ityouknow.com/springboot/2016/11/30/spring-boot-rabbitMQ.html RabbitMQ 即一个消息队列,主要是用来实现 ...
- 在SpringBoot中使用RabbitMQ
目录 RabbitMQ简介 RabbitMQ在CentOS上安装 配置文件 实践 概述 Demo 遇到的BUG 启动异常 无法自动创建队列 RabbitMQ简介 wikipedia RabbitMQ在 ...
- 在SpringBoot中使用Junit测试
一:加入依赖 <dependency> <groupId>junit</groupId> <artifactId>junit</artifactI ...
- springboot入门系列(三):SpringBoot教程之RabbitMQ示例
SpringBoot教程之RabbitMQ示例 SpringBoot框架已经提供了RabbitMQ的使用jar包,开发人员在使用RabbitMQ的时候只需要引用jar包简单的配置一下就可以使用Rabb ...
- Springboot的日志管理&Springboot整合Junit测试&Springboot中AOP的使用
==============Springboot的日志管理============= springboot无需引入日志的包,springboot默认已经依赖了slf4j.logback.log4j等日 ...
- springBoot中使用使用junit测试文件上传,以及文件下载接口编写
本篇文章将介绍如何使junit在springBoot中测试文件的上传,首先先阅读如何在springBoot中进行接口测试. 文件上传操作测试代码 import org.junit.Before; im ...
- 测试开发专题:如何在spring-boot中进行参数校验
上文我们讨论了spring-boot如何去获取前端传递过来的参数,那传递过来总不能直接使用,需要对这些参数进行校验,符合程序的要求才会进行下一步的处理,所以本篇文章我们主要讨论spring-boot中 ...
随机推荐
- 百度UEditor编辑器从word粘贴公式
官网地址http://ueditor.baidu.com Git 地址 https://github.com/fex-team/ueditor 参考博客地址 http://blog.ncmem.com ...
- python打包成exe,太大了该怎么解决?
这是一个很长的故事,嫌长的直接看最后的结论 事情经过 上周接了个需求,写了个小工具给客户,他要求打包成exe文件,这当然不是什么难事.因为除了写Python的,绝大多数人电脑里都没有Python编译器 ...
- jquery做个折叠面板
<!DOCTYPE html> <html lang="en"> <head> <meta charset="UTF-8&quo ...
- jQuery Cookie (内附 上百行的中文使用手册,与 所有的注释中文翻译)
jQuery Cookie (内附 上百行的中文使用手册,与 所有的注释中文翻译) 博主亲自翻译. 大家多多捧场. 更多资源请点击"查看TA 的资源" .全场通通 2积分. htt ...
- cmake入门之内部构建
https://www.cnblogs.com/coderfenghc/tag/cmake/ https://cmake.org/cmake/help/v3.16/guide/tutorial/ind ...
- ICEMCFD中,face裂缝修复的小窍门【转载】
转载自:http://blog.sina.com.cn/s/blog_4a21884b010005ng.html 采用ICEMCFD画网格的初学者,都对由cad(proe/ug/solidworks) ...
- sqlmap环境搭建
1.安装Python2.7.12 1.1.下载Python2.7.12地址:https://www.python.org/downloads/ 1.2.环境变量配置Python2.7.11 1.3.验 ...
- Go 语言入门(二)方法和接口
写在前面 在学习 Go 语言之前,我自己是有一定的 Java 和 C++ 基础的,这篇文章主要是基于A tour of Go编写的,主要是希望记录一下自己的学习历程,加深自己的理解 Go 语言入门(二 ...
- C# 客户端网络请求 对HttpClient的封装
版权声明:本文为博主原创文章,遵循 CC 4.0 BY-SA 版权协议,转载请附上原文出处链接和本声明.本文链接:https://blog.csdn.net/a1037949156/article/d ...
- poj2456
Aggressive cows Time Limit: 1000MS Memory Limit: 65536K Total Submissions: 24979 Accepted: 11594 ...