SpringCloud 融入 Python - Tornado
前言
该篇文章分享如何将Python Web服务融入到Spring Cloud微服务体系中,并调用其服务,Python Web框架用的是Tornado
构建Python web服务
- 引入
py-eureka-client客户端
pip install py_eureka_client
manage.py
import tornado.httpserver

import tornado.ioloop

import tornado.options

import tornado.web

import py_eureka_client.eureka_client as eureka_client

from tornado.options import define, options

from time import sleep

define("port", default=3000, help="run on the given port", type=int)

class IndexHandler(tornado.web.RequestHandler):

    def get(self):

        username = self.get_argument('username', 'Hello')

        self.write(username + ', Administrator User!')

    def post(self):

        username = self.get_argument('username', 'Hello')

        self.write(username + ', Administrator User!')

class MainHandler(tornado.web.RequestHandler):

    def get(self):

        username = self.get_argument('username', 'Hello')

        self.write(username + ', Coisini User!')

    def post(self):

        username = self.get_argument('username', 'Hello')

        self.write(username + ', Coisini User!')

def main():

    tornado.options.parse_command_line()

    # 注册eureka服务

    eureka_client.init_registry_client(eureka_server="http://localhost:31091/eureka/,http://localhost:8761/eureka/",

                                       app_name="tornado-server",

                                       instance_port=3000)

    app = tornado.web.Application(handlers=[(r"/test", IndexHandler), (r"/main", MainHandler)])

    http_server = tornado.httpserver.HTTPServer(app)

    http_server.listen(options.port)

    tornado.ioloop.IOLoop.instance().start()

if __name__ == '__main__':

    main()
大致说下上述代码,向端口为31091的注册中心注册服务名为tornado-server的服务,端口为3000,提供两个请求方式为GET和POST,接口路径为/test和/main的外部调用接口
- 启动python服务(在此之前要创建一个Eureka服务注册中心)
python manage.py runserver
- 运行结果


服务调用 - consumer-server工程
pom.xml
<dependencies>

		<dependency>

			<groupId>org.springframework.cloud</groupId>

			<artifactId>spring-cloud-starter-eureka-server</artifactId>

		</dependency>

		<dependency>

			<groupId>org.springframework.cloud</groupId>

			<artifactId>spring-cloud-starter-hystrix</artifactId>

		</dependency>

		<!-- Feign Client -->

		<dependency>

			<groupId>org.springframework.cloud</groupId>

			<artifactId>spring-cloud-starter-feign</artifactId>

		</dependency>

		<dependency>

			<groupId>io.github.openfeign.form</groupId>

			<artifactId>feign-form</artifactId>

			<version>3.4.1</version>

		</dependency>

		<dependency>

			<groupId>io.github.openfeign.form</groupId>

			<artifactId>feign-form-spring</artifactId>

			<version>3.4.1</version>

		</dependency>

	</dependencies>
ConsumerApplication.java
import org.springframework.boot.SpringApplication;

import org.springframework.cloud.client.SpringCloudApplication;

import org.springframework.cloud.client.loadbalancer.LoadBalanced;

import org.springframework.context.annotation.Bean;

import org.springframework.web.client.RestTemplate;

@SpringCloudApplication

public class ConsumerApplication {

	@Bean

	@LoadBalanced

	RestTemplate restTemplate() {

		return new RestTemplate();

	}

	public static void main(String[] args) {

		SpringApplication.run(ConsumerApplication.class, args);

	}

}
application.yml
spring:

  profiles:

    active: "dev"

  application:

    name: consumer-server

server:

  port: 8325

eureka:

  client:

    healthcheck:

      enabled: true

    service-url:

      defaultZone: http://${registry.host:localhost}:${registry.port:8761}/eureka/

---

spring:

  profiles: dev

registry:

  host: localhost

  port: 31091
TestController.java
import org.springframework.beans.factory.annotation.Autowired;

import org.springframework.web.bind.annotation.*;

import com.coisini.consumer.client.TestAPIClient;

@RestController

public class TestController {

    private TestAPIClient testAPIClient;

    @Autowired

    public TestController(TestAPIClient testAPIClient) {

        this.testAPIClient = testAPIClient;

    }

    @PostMapping("/test")

    public String test(@RequestParam String username) throws Exception {

        return this.testAPIClient.test(username);

    }

    @GetMapping("/test")

    public String test1() throws Exception {

        return this.testAPIClient.test1();

    }

}
TestAPIClient.java
import org.springframework.cloud.netflix.feign.FeignClient;

import org.springframework.web.bind.annotation.GetMapping;

import org.springframework.web.bind.annotation.PostMapping;

import org.springframework.web.bind.annotation.RequestParam;

import com.coisini.consumer.config.FeignConfigure;

@FeignClient(name="tornado-server", configuration = FeignConfigure.class)

public interface TestAPIClient {

    @PostMapping("/test")

    String test(@RequestParam("username") String username);

    @GetMapping("/test")

    String test1();

}
FeignConfigure.java
import feign.Logger;

import feign.codec.Encoder;

import feign.form.spring.SpringFormEncoder;

import org.springframework.beans.factory.ObjectFactory;

import org.springframework.beans.factory.annotation.Autowired;

import org.springframework.boot.autoconfigure.web.HttpMessageConverters;

import org.springframework.cloud.netflix.feign.EnableFeignClients;

import org.springframework.cloud.netflix.feign.support.SpringEncoder;

import org.springframework.context.annotation.Bean;

import org.springframework.context.annotation.Configuration;

@Configuration

@EnableFeignClients(basePackages = "com.coisini")

public class FeignConfigure {

    @Bean

    Logger.Level feignLoggerLevel() {

        return Logger.Level.FULL;

    }

    @Autowired

    private ObjectFactory<HttpMessageConverters> messageConverters;

    @Bean

    public Encoder feignFormEncoder() {

        return new SpringFormEncoder(new SpringEncoder(messageConverters));

    }

}
运行结果


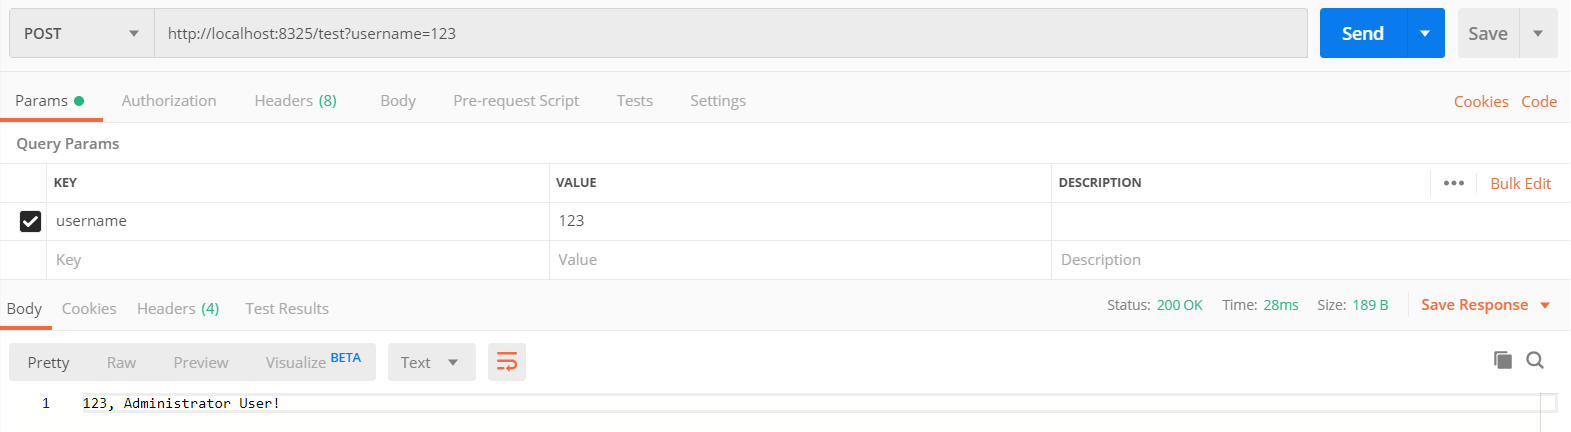
在这里,我们用请求工具Postman来测试一下,可以看出,由TestController调用TestAPIClient再调用Python服务成功,至此,已完成微服务调用Python Web服务
Demo下载
GitHub:SpringCloud 整合 Python - Tornado
Gitee:SpringCloud 整合 Python - Tornado
end
SpringCloud 融入 Python - Tornado的更多相关文章
- python tornado websocket 多聊天室(返回消息给部分连接者)
python tornado 构建多个聊天室, 多个聊天室之间相互独立, 实现服务器端将消息返回给相应的部分客户端! chatHome.py // 服务器端, 渲染主页 --> 聊天室建立web ...
- Python.tornado.0
Tornado https://github.com/facebook/tornado http://www.tornadoweb.org/en/stable/guide/intro.html (A ...
- python tornado 入门
#!/usr/bin/env python # coding:utf-8 import textwrap import tornado.httpserver import tornado.ioloop ...
- Python Tornado
按照http://www.tornadoweb.cn/所提供的方法下载安装后编写如下程序: import tornado.ioloop import tornado.web class MainHan ...
- 使用python + tornado 做项目demo演示模板
很简单,可是却也折腾了不是时间,走了不少弯路.在此备注记录一下,以供后需. # web_server.py #!/usr/bin/env python # coding=utf-8 import os ...
- python tornado+mongodb的使用
tornado tar xvzf tornado-1.2.1.tar.gz cd tornado-1.2.1 python setup.py build sudo python setup.py in ...
- Windows在配置Python+tornado
1,安装Python 2.7.x版本号 地址:https://www.python.org/downloads/release/python-278/ 2,安装python setuptools工具 ...
- python tornado 实现类禅道系统
最近楼主加班 喽, 好久没有更新我的博客了,哎,一言难尽,废话我就不说了,来开始上精华. 背景:目前市面上有很多bug管理工具,但是各有各的特点,最著名,最流行的就是禅道,一个偶然的机会接触到了pyt ...
- Python Tornado篇
Tornado既是一个web server,也是web framework.而它作为web server 采用的是asynchronous IO的网络模型,这是一种很高效的模型. Tornado 和现 ...
随机推荐
- AOP的几种实现方法
C# 实现AOP 的几种常见方式 原文出处:http://www.cnblogs.com/zuowj/p/7501896.html AOP为Aspect Oriented Programming的缩写 ...
- 04-2-object类型
<!DOCTYPE html> <html lang="en"> <head> <meta charset="UTF-8&quo ...
- hdu4764
hdu4764bash博弈主要是找准必胜状态,以及好好理解题意.这里的必胜状态是n-1,虽然是写的数比上一个大1到k,但是相当于这个人拿1到k,然后是累加的效果 #include<iostrea ...
- 如何通过EditPlus远程连接Linux
1. File - FTP - FTP Settings 2. Add 3. 填写Linux的ip地址及用户名和密码 4. OK
- HZOI2019建造游乐园(play)组合数学,欧拉图
题目:https://www.cnblogs.com/Juve/articles/11186805.html(密码是我的一个oj用户名) solution: 反正我是想不出来... 题目大意就是要求出 ...
- Django项目:CRM(客户关系管理系统)--61--51PerfectCRM实现CRM客户报名流程学生合同上传照片
# sales_views.py # ————————47PerfectCRM实现CRM客户报名流程———————— from django.db import IntegrityError # 主动 ...
- jaxFileUpload插件异步上传图片
第一步:引入jquery文件和jaxFileUpload文件 文件位置:https://pan.baidu.com/s/1jHEyIyy 第二步,前端: <div class="for ...
- touch滑动事件---简单小案例
html: <!--导航栏头部--><div class="type_nav"> <ul class="clearfix " v- ...
- go 交叉编译扩展 ac68u 梅林固件, go 依赖 zoneinfo 的解决问题
CGO_ENABLED= GOOS=linux GOARCH=arm GOARM= go build ddns.go r8500 虽然是 ARMv7 , 但应该是被阉割过,不支持 ARMv7 的一些特 ...
- shell 启动脚本
启动脚本是bash启动时自动执行的脚本.用户可以把一些环境变量的设置和alias.umask设置放在启动脚本中,这样每次启动Shell时这些设置都自动生效.思考一下,bash在执行启动脚本时是以for ...