Spring MVC系列之JDBC Demo(SpringBoot)(七)
前言
前面我们了解了Spring MVC的基本使用,其实和.NET或.NET Core MVC无异,只是语法不同而已罢了,本节我们将和和数据库打交道,从最基础的JDBC讲解起,文中若有错误之处,还望指正。
JDBC Demo
我们需要下载三个包:JDBC驱动包(mysql-connector-java)、spring boot启用jdbc(spring-boot-starter-jdbc)、对数据进行序列化的json包(jackson-databind),如下:
<dependency>

    <groupId>mysql</groupId>

    <artifactId>mysql-connector-java</artifactId>

</dependency>

<dependency>

    <groupId>org.springframework.boot</groupId>

    <artifactId>spring-boot-starter-jdbc</artifactId>

</dependency>

<dependency>

    <groupId>com.fasterxml.jackson.core</groupId>

    <artifactId>jackson-databind</artifactId>

</dependency>
接下来我们在配置文件中,通过JDBC连接MySQL数据库,如下:
spring.datasource.url = jdbc:mysql://localhost:3306/user?serverTimezone=UTC

spring.datasource.username = root

spring.datasource.password = root
这里需要注意的是:对于不同的JDBC驱动版本,可能会抛出如下错误,这是由于在JDBC指定版本中存在的bug,所以要么如上显式指定serverTimezone,要么添加JDBC版本
The server time zone value '�й���ʱ��' is unrecognized or represents more than one time zone. You must configure either the server or JDBC driver
(via the serverTimezone configuration property) to use a more specifc time zone value if you want to utilize time zone support
接下来我们定义对用户进行增、删、改、查的接口,如下:
public interface UserRepository {

    int save(User user);

    int update(User user);

    int deleteById(int id);

    List<User> findAll();

}
接下来我们再来看用户类,我们将对提交用户信息通过注解进行校验,同时我们对之前添加的爱好的数据类型为数组序列化为JSON后存到MySQL数据库,如下:
public class User {

    private ObjectMapper objectMapper = new ObjectMapper();

    public User() {

    }

    public User(int userId,

                String firstName,

                String lastName,

                String gender,

                String email,

                String userName,

                String password,

                String country,

                String favoritesJson) throws JsonProcessingException {

        this.userId = userId;

        this.firstName = firstName;

        this.lastName = lastName;

        this.gender = gender;

        this.email = email;

        this.userName = userName;

        this.password = password;

        this.country = country;

        this.favorites = objectMapper.readValue(favoritesJson, new TypeReference<String[]>() {

        });

    }

    private int userId;

    @NotNull(message = "名字必填")

    private String firstName;

    @NotNull(message = "姓氏必填")

    private String lastName;

    @NotNull(message = "性别必填")

    private String gender;

    @NotNull(message = "邮箱必填")

    @Email(message = "请输入有效的邮箱")

    private String email;

    @NotNull(message = "用户名必填")

    private String userName;

    @NotNull(message = "密码必填")

    private String password;

    private String country;

    public int getUserId() {

        return userId;

    }

    public String getFavoritesJson() {

        String favoritesJson = null;

        try {

            favoritesJson = objectMapper.writeValueAsString(this.favorites);

        } catch (JsonProcessingException ex) {

        }

        return favoritesJson;

    }

    public void setUserId(int userId) {

        this.userId = userId;

    }

    private String[] favorites;

    public String[] getFavorites() {

        return favorites;

    }

    public void setFavorites(String[] favorites) {

        this.favorites = favorites;

    }

    public String getCountry() {

        return country;

    }

    public void setCountry(String country) {

        this.country = country;

    }

    public String getFirstName() {

        return firstName;

    }

    public void setFirstName(String firstName) {

        this.firstName = firstName;

    }

    public String getLastName() {

        return lastName;

    }

    public String getGender() {

        return gender;

    }

    public void setGender(String gender) {

        this.gender = gender;

    }

    public void setLastName(String lastName) {

        this.lastName = lastName;

    }

    public String getEmail() {

        return email;

    }

    public void setEmail(String email) {

        this.email = email;

    }

    public String getUserName() {

        return userName;

    }

    public void setUserName(String userName) {

        this.userName = userName;

    }

    public String getPassword() {

        return password;

    }

    public void setPassword(String password) {

        this.password = password;

    }

}
最后则是实现上述用户接口,这里我们使用JDBC中的参数化类(避免SQL注入)进行增删改查,如下:
@Repository

public class NamedParameterJdbcUserRepository implements UserRepository {

    @Autowired

    public NamedParameterJdbcTemplate namedParameterJdbcTemplate;

    @Override

    public int save(User user) {

        MapSqlParameterSource mapSqlParameterSource = new MapSqlParameterSource();

        mapSqlParameterSource.addValue("userName",user.getUserName());

        mapSqlParameterSource.addValue("password",user.getPassword());

        mapSqlParameterSource.addValue("firstName",user.getFirstName());

        mapSqlParameterSource.addValue("lastName",user.getLastName());

        mapSqlParameterSource.addValue("gender",user.getGender());

        mapSqlParameterSource.addValue("email",user.getEmail());

        mapSqlParameterSource.addValue("country",user.getCountry());

        mapSqlParameterSource.addValue("favorites",user.getFavoritesJson());

        return namedParameterJdbcTemplate.update(

                "insert into users (userName, password,firstName,lastName,gender,email,country,favorites)" +

                        " values(:userName,:password,:firstName,:lastName,:gender,:email,:country,:favorites)",

             mapSqlParameterSource);

    }

    @Override

    public int update(User user) {

        return 0;

    }

    @Override

    public int deleteById(int id) {

        MapSqlParameterSource mapSqlParameterSource = new MapSqlParameterSource();

        mapSqlParameterSource.addValue("userId", id);

        return namedParameterJdbcTemplate.update("delete from  users where userId = :userId", mapSqlParameterSource);

    }

    @Override

    public List<User> findAll() {

        return namedParameterJdbcTemplate.query(

                "select * from users",

                (rs, rowNum) ->

                {

                    try {

                        return new User(

                                rs.getInt("userId"),

                                rs.getString("firstName"),

                                rs.getString("lastName"),

                                rs.getString("gender"),

                                rs.getString("email"),

                                rs.getString("userName"),

                                rs.getString("password"),

                                rs.getString("country"),

                                rs.getString("favorites")

                        );

                    } catch (JsonProcessingException e) {

                        e.printStackTrace();

                        return null;

                    }

                });

    }

}
然后在进行提交用户时,在上一节内容基础上进行改造,添加校验注解,若有错误则返回,否则提交成功后则跳转到用户列表,如下:
    @RequestMapping(value = "/user", method = RequestMethod.POST)

    public String user(@Valid @ModelAttribute("user") User user, BindingResult bindingResult) {

        if (bindingResult.hasErrors()) {

            return "user";

        } else {

            jdbcUserRepository.save(user);

            return "users";

        }

    }
这里需要注意的是:对于空字符串即使添加了校验注解后依然会忽略,所以我们还需要初始化绑定器注解去除空字符串并对其进行校验,如下:
    @InitBinder

    public void initBinder(WebDataBinder dataBinder) {

        StringTrimmerEditor stringTrimmerEditor = new StringTrimmerEditor(true);

        dataBinder.registerCustomEditor(String.class, stringTrimmerEditor);

    }
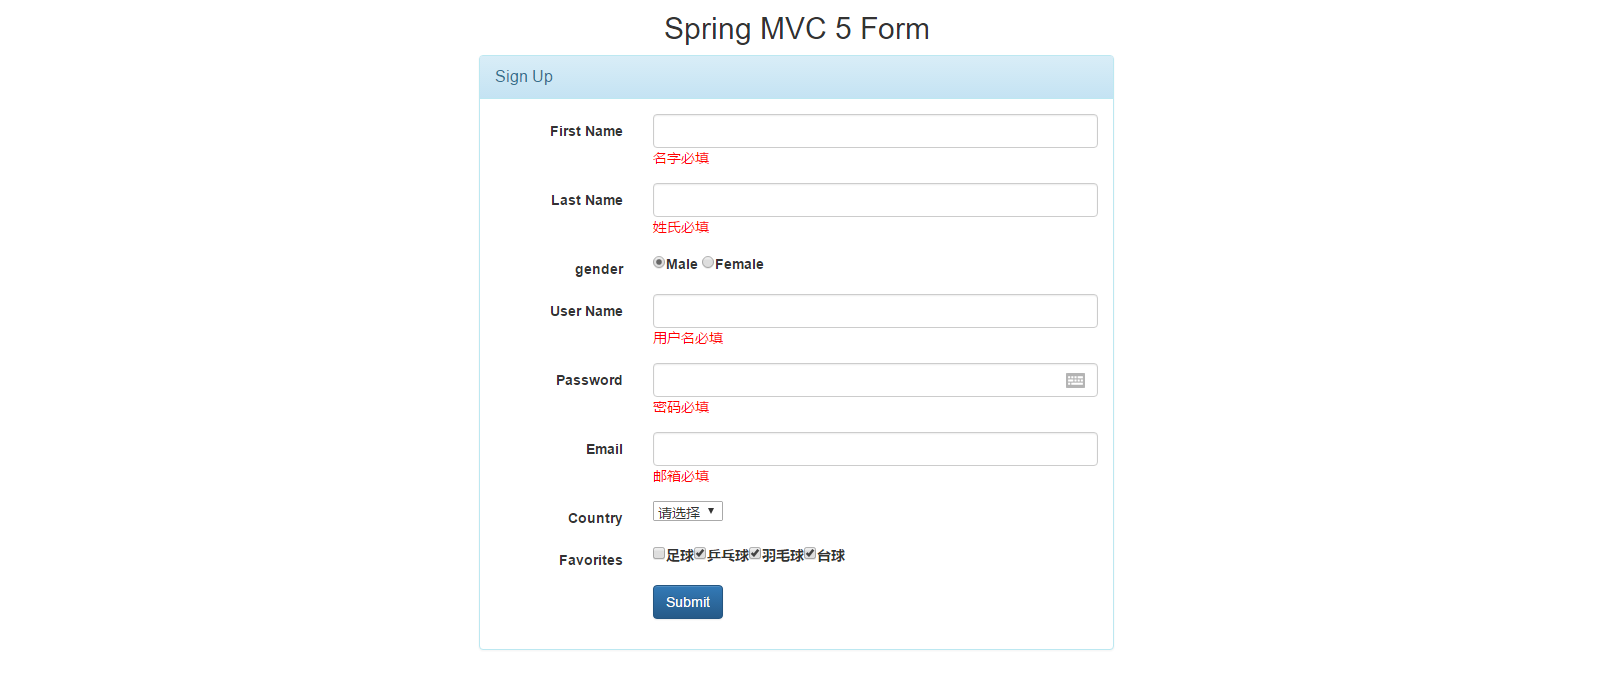
表单提交我们使用的是spring提供给我们的库,渲染用户列表,我们则是通过脚本并利用bootstrap-table实现,最终界面所呈现出的效果,如下:

总结
如上只是给出了部分重要代码,这里我已经将本节通过JDBC进行增删改查代码上传到github(https://github.com/wangpengxpy/SpringBoot),切换分支即可,后续会将每一块内容分别创建一个分支,以便供我复习和有需要的童鞋使用,本节我们到此结束,我们下节见。
Spring MVC系列之JDBC Demo(SpringBoot)(七)的更多相关文章
- 【Spring MVC系列】--(4)返回JSON
[Spring MVC系列]--(4)返回JSON 摘要:本文主要介绍如何在控制器中将数据生成JSON格式并返回 1.导入包 (1)spring mvc 3.0不需要任何其他配置,添加一个jackso ...
- Spring mvc系列一之 Spring mvc简单配置
Spring mvc系列一之 Spring mvc简单配置-引用 Spring MVC做为SpringFrameWork的后续产品,Spring 框架提供了构建 Web 应用程序的全功能 MVC 模块 ...
- Spring MVC系列之模型绑定(SpringBoot)(七)
前言 上一节我们在SpringBoot中启用了Spring MVC最终输出了HelloWorld,本节我们来讲讲Spring MVC中的模型绑定,这个名称来源于.NET或.NET Core,不知是否恰 ...
- Spring 框架系列之 JDBC 整合实例
微信公众号:compassblog 欢迎关注.转发,互相学习,共同进步! 有任何问题,请后台留言联系! 1.Spring框架整合 DAO 模板 JDBC:org.springframework.jdb ...
- Spring Mvc + Maven + BlazeDS 与 Flex 通讯 (七)
BlazeDS 说明 BlazeDS是由Adobe开源的基于amf协议的,用于解决flex与java通讯的组件; 基于传统的文本协议的XML传输方式,在抽象层方面会有很大的压力,特别在需要序列化与反序 ...
- 我看Spring MVC系列(一)
1.Spring MVC是什么: Spring MVC:Spring框架提供了构建Web应用程序的全功能MVC模块. 2.Spring helloWorld应用(基于Spring 4.2) 1.添加S ...
- Spring MVC系列[2]——参数传递及重定向
1.目录结构 2.代码 <?xml version="1.0" encoding="UTF-8"?> <web-app version=&qu ...
- Spring MVC系列-(1) Spring概述
1. Spring概述 本章主要介绍Spring中的体系结构和常见概念,比如bean.控制反转(Inverse of Control,IoC)等. 1.1 体系结构 Spring 框架提供约 20 个 ...
- Spring Mvc 上传文件Demo 实例
返得利购物. 淘宝.京东500家商城合作,包括全面的商城返利网.注冊就送5元,购物就有返利.随时提现. 同学们,新一轮的返利大潮正在慢慢靠近,让购物都认为自己在赚钱.购物,机票.游戏.酒店旅游,地方特 ...
随机推荐
- crawler 听课笔记 碎碎念 2 一些爬虫须知的基本常识和流程
html的宗旨: <标签 属性=”属性的值“></标签> 只是对于文本的一种解释划分吧 dom的宗旨: 就是一个大数组,处理方便,效率低 xm ...
- P1559 运动员最佳匹配问题 by hyl 天梦
#include<iostream> using namespace std; int n; int maxx[21][21]; int lie[21]; int aa[21]; int ...
- Redis常用命令详细介绍
一.字符串 字符串键是Redis最基本的键值对类型,将一个单独的键和一个单独的值关联起来.通过字符串键,不仅可以存储和读取字符串,如果输入能被解释为整数和浮点数,还能执行自增或自减操作. 1.SET: ...
- newSQL 到底是什么?
数据库发展至今已经有3代了: SQL,传统关系型数据库,例如 MySQL noSQL,例如 MongoDB newSQL SQL 的问题 互联网在本世纪初开始迅速发展,互联网应用的用户规模.数据量都越 ...
- .Net Core2.*学习手册
1.net core 基础知识解析(创建一个.net core网站)(视频录制) 1.1 Startup解析(没写) 1.2 目录结构分析(没写) 1.3 使用静态文件(没写) 1.4 Control ...
- Python入门小建议
"java从心"正式更名"KEN DO EVERTHING".Ken(Can) Do Everything,无所不能 Believe youseft then ...
- 用tensorflow的Eager执行模式
一.即时执行模式 import tensorflow as tfimport tensorflow.contrib.eager as tfetfe.enable_eager_execution() a ...
- 谈谈 InnoDB引擎中的一些索引策略
如果我们在工作能够更好的利用好索引,那将会极大的提升数据库的性能. 覆盖索引 覆盖索引是指在普通索引树中可以得到查询的结果,不需要在回到主键索引树中再次搜索 建立如下这张表来演示覆盖索引: creat ...
- MySql配置环境变量
完成后安装好MySQL,为MySQL配置环境变量. 0)在我的电脑上点击右键选择属性-->高级系统设置-->环境变量1)新建MYSQL_HOME变量,并配置:D:\Develop\mysq ...
- nginx白名单黑名单设置
nginx白名单黑名单设置 白名单设置,访问根目录 location / { allow 123.34.22.155; allow 33.56.32.1/100; deny all; } 黑名单设置, ...