
实现自己的Koa2
这部分的代码在https://github.com/zhaobao1830/koa2中demo文件夹中
Koa就是基于node自带的http模块,经过封装,监听端口,实现ctx(上下文)管理,中间件管理等
例子1、koa监听3000端口,在页面输出值
 const Koa = require('koa')

 const app = new Koa()

 app.use((ctx,next) => {

   ctx.body = 'hello koa2'

 })

 app.listen(, function () {

   console.log('启动3000端口')

 })
ctx 是封装了request和response的上下文
next 的作用就是执行下一个中间件
APP 启动应用
例子2、http监听3000端口,页面返回值
 const http = require('http')

 const server = http.createServer((req,res) => {

   res.writeHead('')

   res.end('hello node')

 })

 server.listen(, function () {

   console.log('启动了3000端口')

 })
例子3、使用http封装一个简单的web服务
 const http = require('http')

 class application{

   constructor() {

     this.callback = () => {}

   }

   use(callback) {

     this.callback = callback

   }

   listen(...args) {

     const server = http.createServer((req,res) => {

       this.callback(req, res)

     })

     server.listen(...args)

   }

 }

 module.exports = application
 const Koa3 = require('./index3')

 const app = new Koa3()

 app.use((req,res) => {

   res.writeHead()

   res.end('hello Koa3')

 })

 app.listen(, function () {

   console.log('启动3003端口')

 })
例子4:
koa2中的ctx就是上下文,用来挂载request和response对象
js的get和set方法
 const yese = {

   _name: '夜色',

   get name() {

     return this._name

   },

   set name(val) {

     console.log('new name is' + val)

     this._name = val

   }

 }

 console.log(yese.name)

 yese.name = '荷塘月色'

 console.log(yese.name)
加入ctx上下文,封装了http里的request和response
index7.js
 const http = require('http')

 //req是http模块里的

 let request = {

   get url () {

     return this.req.url

   }

 }

 let response = {

   get body () {

     return this._body

   },

   set body (val) {

     this._body = val

   }

 }

 // 把上面定义的request和response挂载到context对象中

 let context = {

    get url () {

      return this.request.url

    },

    get body () {

      return this.response.body

    },

   set body (val) {

      this.response.body = val

   }

 }

 class application{

   constructor() {

     // 把上面定义的context,request,response挂载到application中

     this.context = context

     this.request = request

     this.response = response

   }

   use(callback) {

     this.callback = callback

   }

   listen(...args) {

     const server = http.createServer(async (req, res) => {

       let ctx = this.createCtx(req,res)

       await this.callback(ctx)

       ctx.res.end(ctx.body)

     })

     server.listen(...args)

   }

   createCtx (req, res) {

     let ctx = Object.create(this.context)

     ctx.request = Object.create(this.request)

     ctx.response = Object.create(this.response)

     // 把http里的req赋值给ctx.request的req和ctx.req上

     ctx.req = ctx.request.req = req

     ctx.res = ctx.response.req = res

     return ctx

   }

 }

 module.exports = application
调用
 const Koa3 = require('./index7')

 const app = new Koa3()

 app.use(async (ctx) => {

   ctx.body = 'hello Koa2 '+ ctx.url

 })

 app.listen(, function () {

   console.log('启动3003端口')

 })
例子5、(这个例子是同步的)compose中间件
 function add(x, y) {

   return x + y

 }

 function double(z) {

   return z*

 }

 const middlewares = [add, double]

 let len = middlewares.length

 // 中间件

 function compose(midds) {

   console.log('midds:'+midds)

    return (...args) => {

     console.log(...args)

      // 初始值

      let res = midds[](...args)

      console.log(res)

      for (let i = ; i < len; i++) {

        res = midds[i](res)

      }

      return res

    }

 }

 const fn = compose(middlewares)

 const res = fn(,)

 console.log(res)
例子6、

自己实现的一个简单的compose代码
 async function fn1(next) {

   console.log('fn1')

   await next()

   console.log('end fn1')

 }

 async function fn2(next) {

   console.log('fn2')

   await delay()

   await next()

   console.log('end fn2')

 }

 function fn3() {

   console.log('fn3')

 }

 function delay() {

   return new Promise((resolve, reject) => {

     setTimeout(() => {

       resolve()

     }, )

   })

 }

 function compose (middlewares) {

   return function () {

     return dispatch()

     function dispatch(i) {

       let fn = middlewares[i]

       if(!fn) {

         return Promise.resolve()

       }

       // 这俩行是compose的核心代码

       return Promise.resolve(fn(function next() {

         return dispatch(i+)

       }))

     }

   }

 }

 const middlewares = [fn1, fn2, fn3]

 const finalfn = compose(middlewares)

 finalfn()
运行结果为:
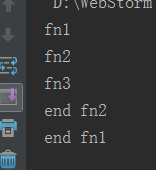
个人理解:核心就是先执行方法里的值,遇到了next(),就执行下一层的(koa2是一个类似洋葱圈的结构)
index11.js
 const http = require('http')

 //req是http模块里的

 let request = {

   get url () {

     return this.req.url

   }

 }

 let response = {

   get body () {

     return this._body

   },

   set body (val) {

     this._body = val

   }

 }

 // 把上面定义的request和response挂载到context对象中

 let context = {

   get url () {

     return this.request.url

   },

   get body () {

     return this.response.body

   },

   set body (val) {

     this.response.body = val

   }

 }

 class application{

   constructor() {

     // 把上面定义的context,request,response挂载到application中

     this.context = context

     this.request = request

     this.response = response

     this.middlewares = []

   }

   use(callback) {

     this.middlewares.push(callback)

     // this.callback = callback

   }

   compose (middlewares) {

     return function (context) {

       return dispatch()

         function dispatch(i) {

           let fn = middlewares[i]

           if(!fn) {

             return Promise.resolve()

           }

           // 这俩行是compose的核心代码

           return Promise.resolve(fn(context, function next() {

             return dispatch(i+)

           }))

         }

     }

   }

   listen(...args) {

     const server = http.createServer(async (req, res) => {

       let ctx = this.createCtx(req,res)

       const fn = this.compose(this.middlewares)

       await fn(ctx)

       ctx.res.end(ctx.body)

     })

     server.listen(...args)

   }

   createCtx (req, res) {

     let ctx = Object.create(this.context)

     ctx.request = Object.create(this.request)

     ctx.response = Object.create(this.response)

     // 把http里的req赋值给ctx.request的req和ctx.req上

     ctx.req = ctx.request.req = req

     ctx.res = ctx.response.req = res

     return ctx

   }

 }

 module.exports = application
 const Koa3 = require('./index11')

 const app = new Koa3()

 function delay() {

   return new Promise((resolve, reject) => {

     setTimeout(() => {

       resolve()

     }, )

   })

 }

 app.use(async (ctx, next) => {

   ctx.body = ''

   await next()

   ctx.body += ''

 })

 app.use(async (ctx, next) => {

   ctx.body += ''

   await delay()

   await next()

   ctx.body += ''

 })

 app.use(async (ctx, next) => {

   ctx.body += ''

 })

 app.listen(, function () {

   console.log('启动3003端口')

 })
运行结果:
打开页面 2秒以后出现:13542 (async await要等异步的操作都执行完,才会输出结果)

Koa2的其他知识
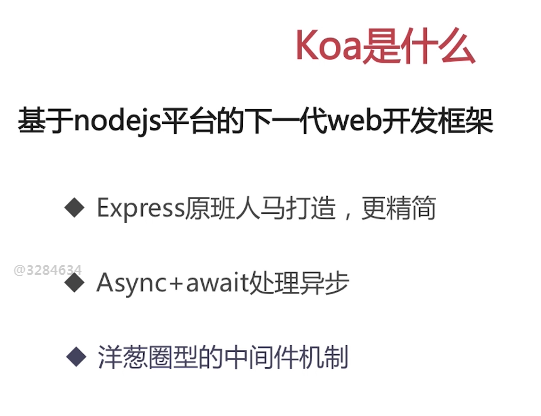
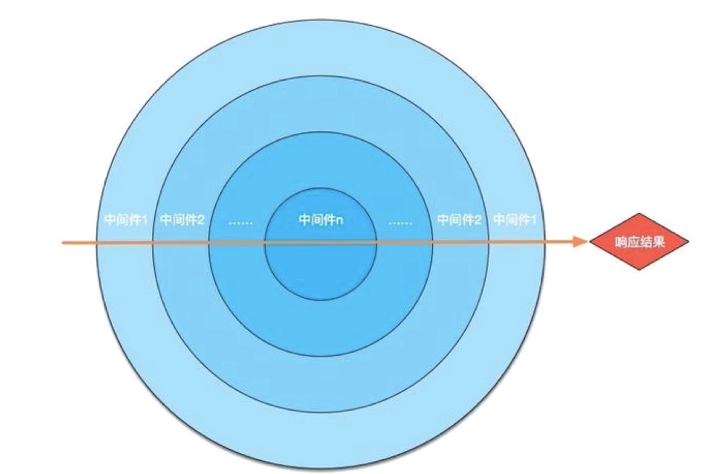
app.use()就算是一个中间件
中间件概念:一个http请求是:发起请求request,返回结果response,中间的部分就可以理解为中间件
实现自己的Koa2的更多相关文章
- Koa2 的安装运行记录(二)
参考 :koa2-boilerplate https://github.com/superalsrk/koa2-boilerplate Ajax Login and Ajax Logout in ...
- Koa2 的安装运行记录(一)
1.参考koa+react(一) http://blog.suzper.com/2016/10/19/koa-react-%E4%B8%80/ 为了使用 KOA2 能够运行,必须能够使用ES7语法 a ...
- koa2+koa-views示例
app.js var Koa = require('koa') var fs = require('fs') var path = require('path') var koaStaticPlus ...
- Koa2 源码解析(1)
Koa2 源码解析 其实本来不想写这个系列文章的,因为Koa本身很精简,一共就4个文件,千十来行代码. 但是因为想写 egg[1] 的源码解析,而egg是基于Koa2的,所以就先写个Koa2的吧,用作 ...
- nodejs6下使用koa2
koa2里面使用ES7的语法,如async.await所以需要运行在node7.6之后:但在node7.6之前也可以利用babel是的koa2可以运行. 首先项目中安装babel,和babel的几个模 ...
- koa2 use里面的next到底是什么
koa2短小精悍,女人不爱男人爱. 之前一只有用koa写一点小程序,自认为还吼吼哈,知道有一天某人问我,你说一下 koa或者express中间件的实现原理.然后我就支支吾吾,好久吃饭都不香. 那么了解 ...
- koa2 controller中实现类似sleep的延迟功能
今天有同事问我如何在koa2中的controller中使用延迟执行的功能,他直接在controller中使用setTimeout,但是没效果. 错误的代码类似下面这样: // 错误的方法 export ...
- 使用下一代web开发框架koa2搭建自己的轻服务器
Koa 是由 Express 原班人马亲情打造的新一代web框架.既然已经有 Express 了,为什么又要搞一个Koa出来呢?因为 Koa 相比 Express 体积更小,代码更健壮,作用更纯粹. ...
- 一键生成koa/koa2项目:
一键生成koa/koa2项目: 1. npm install -g koa-generator 2.新建项目目录 koa mytest (koa1项目) koa2 koa2test (koa2项目) ...
- Nodejs学习笔记(十五)--- Node.js + Koa2 构建网站简单示例
目录 前言 搭建项目及其它准备工作 创建数据库 创建Koa2项目 安装项目其它需要包 清除冗余文件并重新规划项目目录 配置文件 规划示例路由,并新建相关文件 实现数据访问和业务逻辑相关方法 编写mys ...
随机推荐
- 将make的输出重定向到文件(转)
原文:将make的输出重定向到文件 [用法] 1.想要把make输出的全部信息,输出到某个文件中,最常见的办法就是:make xxx > build_output.txt此时默认情况是没有改变2 ...
- 使用gdb+core查看错误信息
core的使用Linux下core文件调试方法 ulimit -c xxx可以设置core文件的大小 proc/sys/kernel/core_pattern可以控制core文件保存位置和文件名格式. ...
- python---一个简单的socket
server端: 1 创建socket对象.调用socket构造函数.如: socket = socket.socket( family, type ) #family参数代表地址家族,可为 ...
- python---ORM之SQLAlchemy(5)联合唯一的使用
# coding:utf8 # __author: Administrator # date: // # /usr/bin/env python import sqlalchemy from sqla ...
- ajax跨域原理和cors跨域资源共享
不需要设置前端太多,只需要在服务端是在请求头,使服务端的回复数据可以正常通过浏览器的限制,进入网站 首先说下简单请求和非简单请求: 简单请求:必须满足下列条件 1.请求方式:head,get,post ...
- UVA 10382 Watering Grass(区间覆盖)
n sprinklers are installed in a horizontal strip of grass l meters long and w meters wide. Each spri ...
- 字典(Dictionary)
字典(Dictionary) 字典是一种可变的容器模型,由键值对组成,键和值用冒号分隔,用花括号括起来: d = {key1 : value1, key2 : value} 字典的值可以是任何类型的数 ...
- HashMap分析及散列的冲突处理
1,Hashing过程 像二分查找.AVL树查找,这些查找算法的时间复杂度为O(logn),而对于哈希表而言,我们一般说它的查找时间复杂度为O(1).那它是怎么实现的呢?这就是一个Hashing过程. ...
- Postfix - Extmail 邮箱系统
Postfix Dovecot Extmail 邮箱系统早前的内部邮箱系统重新整理下:现在Extmail官方有集成镜像的EMOS_1.6_x86_64免费版:可直接下载安装: 系统环境: linux ...
- mysql select 时间戳转标准时间写法
select FROM_UNIXTIME(create_time, '%Y-%m-%d %H:%i:%S') as create_time from tabName