Socket网络编程--简单Web服务器(4)
上一小节已经实现了对图片的传输,接下来就是判断文件是否为js,css,png等格式。我们增加一个函数用于判断格式
 int WebServer::get_filetype(char *type,char *path)//用于判断该url指向文件的后缀

 {

     if(strstr(path,".html"))

         strcpy(type,"text/html");

     else if(strstr(path,".gif"))

         strcpy(type,"image/gif");

     else if(strstr(path,".jpg"))

         strcpy(type,"image/jpeg");

     else if(strstr(path,".png"))

         strcpy(type,"image/png");

     else if(strstr(path,".ico"))

         strcpy(type,"image/x-icon");

     else if(strstr(path,".js"))

         strcpy(type,"text/javascript");

     else if(strstr(path,".json"))

         strcpy(type,"application/json");

     else if(strstr(path,".css"))

         strcpy(type,"text/css");

     else

         strcpy(type,"text/plain");

     return ;

 }
然后修改一下主页index.html的文件
 <html>

     <head>

         <title>Test</title>

         <meta http-equiv="Content-Type" content="text/html ; charset=utf-8">

         <link rel="stylesheet" href="style.css" type="text/css"/>

         <script language="javascript" src="javascript.js"></script>

     </head>

     <body>

         <div class="ceshi">图片</div><img src="ab.jpg"></img>

         <input name="button" type="button" value="Click!" onclick=hi();></input>

     </body>

 </html>
两个外部文件如下
 [myuser@bogon www]$ cat style.css

 .ceshi {font-size:20px; color:#ff0000;}

 [myuser@bogon www]$ cat javascript.js

 function hi()

 {

     alert("js 调用,你单机了按钮");

 }

 [myuser@bogon www]$
下面这个是运行的结果图
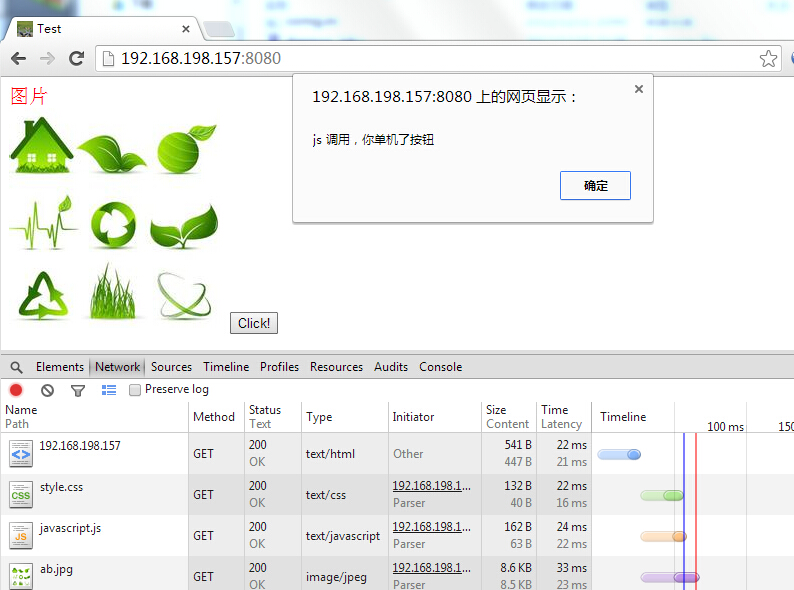
用chrome浏览器的F12调试工具获取到的状态,可以看到,该网页可以获取到index.html,然后浏览器会根据这个页面再发送index.html文件所需要的外部文件的请求,从上面可以看出请求了style.css,javascript.js和ab.jpg图片。然后显示网页,我单击了那个button也是可以调用js脚本的。
接下来就是判断一个提交是get还是post,网页index.html的源代码
     <body>

         <div class="ceshi">图片</div><img src="ab.jpg"></img>

         <input name="button" type="button" value="Click!" onclick=hi();></input>

         <hr>

         <br>使用post方式<br>

         <form method="post" name="frm1">

             <label>用户名:</label>

             <input type="text" name="username" />

             <br>

             <label>密码:</label>

             <input type="password" name="password" />

             <br>

             <input type="submit" name="commit" value="登陆"/>

             <br>

         </form>

         <hr>

         <br>使用get方式<br>

         <form method="get" name="frm1" action="index.html">

             <label>用户名:</label>

             <input type="text" name="username" />

             <br>

             <label>密码:</label>

             <input type="password" name="password" />

             <br>

             <input type="submit" name="commit" value="登陆"/>

             <br>

         </form>

     </body>
修改后的ServerRequest函数
 int WebServer::ServerRequest(int cli_fd)

 {

     char buf[];

     int size=;

     int i,j;

     char method[];//用于保存请求方式

     char url[];

     char path[];

     char args[];

     struct stat st;

     int cgi;//cgi 为0 表示get普通方法 1表示get带参方法  2表示post方法

     pid_t pid;

     memset(buf,,sizeof(buf));

     cgi=;

     //获取第一行请求信息 一般格式为: GET / HTTP/1.1

     //                               POST / HTTP/1.1

     size=get_line(cli_fd,buf,sizeof(buf));

     //cout<<"\t\t"<<buf<<endl;

     i=,j=;

     //截取第一个单词

     while(!isspace(buf[j]) && (i<sizeof(method)-))

     {

         method[i]=buf[j];

         i++;j++;

     }

     method[i]='\0';

     //取第一个与第二个单词之间的空格

     while(isspace(buf[j]) && (j<sizeof(buf)))

         j++;

     if(strcasecmp(method,"GET") && strcasecmp(method,"POST"))

     {

         Page_501(cli_fd);

         return -;

     }

     if(strcasecmp(method,"GET")==)

     {

         cout<<"此次请求的方式是GET方法"<<endl;

         cgi=;

     }

     else if(strcasecmp(method,"POST")==)

     {

         cout<<"此次请求的方式是POST方法"<<endl;

         cgi=;

     }

     //截取第二个单词

     i=;

     int flag=;

     while(!isspace(buf[j]) && (i<sizeof(url)-) && (j<sizeof(buf)))

     {

         if(buf[j]=='?')

         {

             flag=;

             j++;

             i=;

             url[i]='\0';

             cgi=(cgi==?:);

             continue;

         }

         if(flag==)

         {

             url[i]=buf[j];

             i++;j++;

         }

         else if(flag==)

         {

             args[i]=buf[j];

             i++;j++;

         }

     }

     if(flag==)

         url[i]='\0';

     else

         args[i]='\0';

     sprintf(path,"www%s",url);//这个是web服务器的主目录,这个以后可以处理成读取配置文件,这里就先写固定的www目录

     if(path[strlen(path)-]=='/')

         strcat(path,"index.html");//同上

     //cout<<"============>此次请求的地址为:"<<path<<":"<<args<<endl;

     //根据文件名,获取该文件的文件信息。如果为-1,表示获取该文件失败

     if(stat(path,&st)==-)

     {

         while((size>) && strcmp("\n",buf))//去除掉多余的请求头信息

             size=get_line(cli_fd,buf,sizeof(buf));

         Page_404(cli_fd);

     }

     else

     {

         if(S_ISDIR(st.st_mode))//判断url地址,如果是个目录,那么就访问该目录的index.html

         {

             strcat(path,"/index.html");

             //cout<<"此次请求的地址为:"<<path<<endl;

         }

         if(!S_ISDIR(st.st_mode)&&((st.st_mode & S_IXUSR) || (st.st_mode & S_IXGRP) || (st.st_mode & S_IXOTH)))//判断该url地址所对应的文件是否是可执行,并且是否有权限

         {

             cgi=;//是一个cgi程序

         }

         if(cgi==)//如果cgi为0,那么就表示该url所对应的文件不是cgi程序,而是一个简单的静态页面

         {

             pid = fork();

             if(pid==)

             {

                 ServerCatHttpPage(cli_fd,path,st.st_size);

             }

         }

         else if(cgi==)//get方法带参数

         {

             pid=fork();

             if(pid==)

             {

                 while((size>) && strcmp("\n",buf))//去除掉多余的请求头信息

                     size=get_line(cli_fd,buf,sizeof(buf));

                 ServerGetFunction(cli_fd,path,args);

             }

         }

         else if(cgi==)//post方法

         {

             pid=fork();

             if(pid==)

             {

                 int content_length=;

                 while((size>) && strcmp("\n",buf))//去除掉多余的请求头信息

                 {

                     size=get_line(cli_fd,buf,sizeof(buf));

                     buf[]='\0';

                     if(strcasecmp(buf,"Content-Length:")==)

                     {

                         content_length=atoi(&(buf[]));

                     }

                 }

                 if(content_length==)

                 {

                     Page_400(cli_fd);

                     return ;

                 }

                 char c;

                 j=;

                 for(int i=;i<content_length;i++)

                 {

                     recv(cli_fd,&c,,);

                     args[j]=c;

                     j++;

                 }

                 args[j]=;

                 ServerPostFunction(cli_fd,path,args);

             }

         }

     }

     close(cli_fd);

     return ;

 }
增加的两个处理cgi程序的函数(下小节实现)
 int WebServer::ServerGetFunction(int cli_fd,char *path,char *args)

 {

     cout<<"cli_fd:"<<cli_fd<<"  path:"<<path<<"  args:"<<args<<endl;

     Page_200(cli_fd);

     return ;

 }

 int WebServer::ServerPostFunction(int cli_fd,char *path,char *args)

 {

     cout<<"cli_fd:"<<cli_fd<<"  path:"<<path<<"  args:"<<args<<endl;

     Page_200(cli_fd);

     return ;

 }
下面这个是运行的结果

从上图可以看出通过GET方法和POST方法都可以正常的获取到从表单那里传过去的参数。我们知道中文在url地址中的显示是显示成16进制的。这个是URL编码。接下来要实现对这个URL编码进行转换,这里使用网上别人提供的代码。
 #include <ctype.h>

 #include <string>

 #include <string.h>

 #include <stdio.h>

 #include <iostream>

 #include <stdlib.h>

 using namespace std;

 static int php_htoi(char *s)

 {

     int value;

     int c;

     c = ((unsigned char *)s)[];

     if (isupper(c))

         c = tolower(c);

     value = (c >= '' && c <= '' ? c - '' : c - 'a' + ) * ;

     c = ((unsigned char *)s)[];

     if (isupper(c))

         c = tolower(c);

     value += c >= '' && c <= '' ? c - '' : c - 'a' + ;

     return (value);

 }

 /*

  *URL解码,提取自PHP 5.2.17

  *用法:string urldecode(string str_source)

  *时间:2012-8-14 By Dewei

  * */

 string urldecode(string &str_source)

 {

     char const *in_str = str_source.c_str();

     int in_str_len = strlen(in_str);

     int out_str_len = ;

     string out_str;

     char *str;

     str = strdup(in_str);

     char *dest = str;

     char *data = str;

     while (in_str_len--) {

         if (*data == '+') {

             *dest = ' ';

         }

         else if (*data == '%' && in_str_len >=  && isxdigit((int) *(data + ))

                 && isxdigit((int) *(data + ))) {

             *dest = (char) php_htoi(data + );

             data += ;

             in_str_len -= ;

         } else {

             *dest = *data;

         }

         data++;

         dest++;

     }

     *dest = '\0';

     out_str_len =  dest - str;

     out_str = str;

     free(str);

     return out_str;

 }

 int main()

 {

     string str="username=%E7%99%BB%E5%BD%95";

     string out=urldecode(str);

     cout<<out<<endl;

     return ;

 }
我们通过在传参的时候调用urldecode进行解码就可以实现中文显示了。

这一节就到这里,下一小节将实现对cgi的支持。
参考资料: http://blog.csdn.net/xiaojianpitt/article/details/4389247
: http://dewei.iteye.com/blog/1630969 (关于URL编码解码代码)
本文地址: http://www.cnblogs.com/wunaozai/p/3945218.html
Socket网络编程--简单Web服务器(4)的更多相关文章
- Socket网络编程--简单Web服务器(6)
本来是想实现ssl连接的,但是弄了好久都不成功,就索性不做了,等以后有能力再做了.所以这一小节就是本次的最后一节了.就简单的说几个注意点. 1.加个配置文件 使用单例模式,使用一个类,该类保存一些信息 ...
- Socket网络编程--简单Web服务器(1)
这一次的Socket系列准备讲Web服务器.就是编写一个简单的Web服务器,具体怎么做呢?我也不是很清楚流程,所以我找来了一个开源的小的Web服务器--tinyhttpd.这个服务器才500多行的代码 ...
- Socket网络编程--简单Web服务器(2)
上一小节通过阅读开源的Web服务器--tinyhttpd.大概知道了一次交互的请求信息和应答信息的具体过程.接下来我就自己简单的实现一个Web服务器. 下面这个程序只是实现一个简单的框架出来.这次先实 ...
- Socket网络编程--简单Web服务器(3)
上一小节已经实现了浏览器发送请求,然后服务器给出应答信息,然后浏览器显示出服务器发送过来的网页.一切看起来都是那么的美好.这一小节就准备实现可以根据地址栏url的不同来返回指定的网页.目前还不考虑带参 ...
- Socket网络编程--简单Web服务器(5)
这一小节我们将实现服务器对get和post的请求进行对cgi程序的调用.对于web服务器以前的章节已经实现了对get和post请求的调用接口,接下来给出对应接口的实现. int WebServer:: ...
- C++ socket 网络编程 简单聊天室
操作系统里的进程通讯方式有6种:(有名/匿名)管道.信号.消息队列.信号量.内存(最快).套接字(最常用),这里我们来介绍用socket来实现进程通讯. 1.简单实现一个单向发送与接收 这是套接字的工 ...
- C#中使用Socket实现简单Web服务器
上一篇博客中介绍了怎样使用socket访问web服务器.关键有两个: 熟悉Socket编程: 熟悉HTTP协议. 上一篇主要是通过socket来模拟浏览器向(任何)Web服务器发送(HTTP)请求,重 ...
- Java Web 基础(一) 基于TCP的Socket网络编程
一.Socket简单介绍 Socket通信作为Java网络通讯的基础内容,集中了异常.I/O流模式等众多知识点.学习Socket通信,既能够了解真正的网络通讯原理,也能够增强对I/O流模式的理解. 1 ...
- python之Socket网络编程
什么是网络? 网络是由节点和连线构成,表示诸多对象及其相互联系.在数学上,网络是一种图,一般认为专指加权图.网络除了数学定义外,还有具体的物理含义,即网络是从某种相同类型的实际问题中抽象出来的模型.在 ...
随机推荐
- Unicode字符编码表(转)
Unicode字符编码表 版权声明:本文为博主原创文章,未经博主允许不得转载. https://blog.csdn.net/zhenyu5211314/article/details/5153 ...
- Consul服务器配置
微服务带来最大的好处就是把整个大项目分割成不同的服务,运行在不同服务器上,实现解耦和分布式处理.微服务虽然有很多好处,但是也会有不好的一方面.任何事物都会有两面性,在微服务里面运维会是一个很大的难题, ...
- BufferedReader的小例子
注意: BufferedReader只能接受字符流的缓冲区,因为每一个中文需要占据两个字节,所以需要将System.in这个字节输入流变为字符输入流,采用: BufferedReader buf = ...
- C# 设置MDI子窗体只能弹出一个的方法
Windows程序设计中的MDI(Multiple Document Interface)官方解释就是所谓的多文档界面,与此对应就有单文档界面 (SDI), 它是微软公司从Windows .0下的Mi ...
- 仙剑奇侠传 游戏 开发 教程 Xianjian qixia development Game development tutorial
仙剑奇侠传 开发 游戏 开发 教程 Xianjian qixia development Game development tutorial 作者:韩梦飞沙 Author:han_meng_fei_ ...
- Python3绘图之Matplotlib(03)
饼图 = pie 散点图 = scatter plots 极化图 = polar charts 箭头 = Annotations 本节代码示例 import matplotlib.pyplot as ...
- 2016年3月17日Android学习笔记
1.Java.io.ByteArrayOutputStream.writeTo()方法实例 java.io.ByteArrayOutputStream.writeTo(OutputStream out ...
- Oracle中使用透明网关链接到Sqlserver(转)
测试环境介绍 1.ORACLEServer Database version:10.2.0 IP:192.168.1.5 ORACLE_HOME:D:\oracle\product\10.2.0\ ...
- HBase官方文档 之 Region的相关知识
HBase是以Region为最小的存储和负载单元(这里可不是HDFS的存储单元),因此Region的负载管理,关系到了数据读写的性能.先抛开Region如何切分不说,看看Region是如何分配到各个R ...
- API判断本机安装的Revit版本信息
start [Transaction(TransactionMode.Manual)] [Regeneration(RegenerationOption.Manual)] public class c ...