
快速构建springmvc+spring+swagger2环境
快速构建springmvc+spring+swagger2环境
开发工具:Intellij idea
jdk: 1.8
开发步骤:
1.创建maven工程,如图建立工程结构
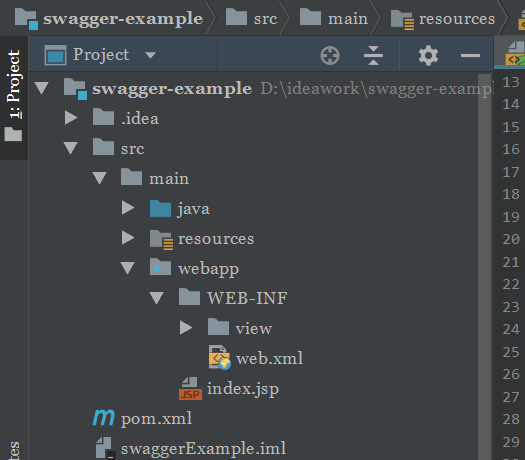
注意,wabapp一定在main目录下,否则工程可能读取不到wabapp文件。项目无法正常启动
2. 导入开发的依赖jar包。打开 pom.xml 引入依赖如下
<project xmlns:xsi="http://www.w3.org/2001/XMLSchema-instance" xmlns="http://maven.apache.org/POM/4.0.0"

         xsi:schemaLocation="http://maven.apache.org/POM/4.0.0 http://maven.apache.org/xsd/maven-4.0.0.xsd">

    <modelVersion>4.0.0</modelVersion>

    <groupId>com.idaoben</groupId>

    <artifactId>swaggerExample</artifactId>

    <version>1.0-SNAPSHOT</version>

    <packaging>war</packaging>

    <name>swaggerExample Maven Webapp</name>

    <!-- FIXME change it to the project's website -->

    <url>http://www.example.com</url>

    <properties>

        <project.build.sourceEncoding>UTF-8</project.build.sourceEncoding>

        <maven.compiler.source>1.8</maven.compiler.source>

        <maven.compiler.target>1.8</maven.compiler.target>

    </properties>

    <dependencies>

        <dependency>

            <groupId>junit</groupId>

            <artifactId>junit</artifactId>

            <version>4.11</version>

            <scope>test</scope>

        </dependency>

        <!-- spring -->

        <dependency>

            <groupId>org.springframework</groupId>

            <artifactId>spring-core</artifactId>

            <version>4.3.8.RELEASE</version>

        </dependency>

        <dependency>

            <groupId>org.springframework</groupId>

            <artifactId>spring-context</artifactId>

            <version>4.3.8.RELEASE</version>

        </dependency>

        <dependency>

            <groupId>org.springframework</groupId>

            <artifactId>spring-web</artifactId>

            <version>4.3.8.RELEASE</version>

        </dependency>

        <dependency>

            <groupId>org.springframework</groupId>

            <artifactId>spring-webmvc</artifactId>

            <version>4.3.8.RELEASE</version>

        </dependency>

        <dependency>

            <groupId>io.springfox</groupId>

            <artifactId>springfox-swagger2</artifactId>

            <version>2.7.0</version>

        </dependency>

        <dependency>

            <groupId>io.springfox</groupId>

            <artifactId>springfox-swagger-ui</artifactId>

            <version>2.7.0</version>

        </dependency>

        <!-- jackson -->

        <dependency>

            <groupId>com.fasterxml.jackson.core</groupId>

            <artifactId>jackson-databind</artifactId>

            <version>2.8.7</version>

        </dependency>

        <dependency>

            <groupId>com.fasterxml.jackson.core</groupId>

            <artifactId>jackson-core</artifactId>

            <version>2.8.7</version>

        </dependency>

        <!--日志框架-->

        <dependency>

            <groupId>org.slf4j</groupId>

            <artifactId>slf4j-api</artifactId>

            <version>1.8.0-beta2</version>

        </dependency>

        <dependency>

            <groupId>org.slf4j</groupId>

            <artifactId>slf4j-log4j12</artifactId>

            <version>1.8.0-beta2</version>

        </dependency>

        <dependency>

            <groupId>log4j</groupId>

            <artifactId>log4j</artifactId>

            <version>1.2.17</version>

        </dependency>

    </dependencies>

    <build>

        <finalName>swaggerExample</finalName>

        <pluginManagement><!-- lock down plugins versions to avoid using Maven defaults (may be moved to parent pom) -->

            <plugins>

                <plugin>

                    <artifactId>maven-clean-plugin</artifactId>

                    <version>3.0.0</version>

                </plugin>

                <!-- see http://maven.apache.org/ref/current/maven-core/default-bindings.html#Plugin_bindings_for_war_packaging -->

                <plugin>

                    <artifactId>maven-resources-plugin</artifactId>

                    <version>3.0.2</version>

                </plugin>

                <plugin>

                    <artifactId>maven-compiler-plugin</artifactId>

                    <version>3.7.0</version>

                </plugin>

                <plugin>

                    <artifactId>maven-surefire-plugin</artifactId>

                    <version>2.20.1</version>

                </plugin>

                <plugin>

                    <artifactId>maven-war-plugin</artifactId>

                    <version>3.2.0</version>

                </plugin>

                <plugin>

                    <artifactId>maven-install-plugin</artifactId>

                    <version>2.5.2</version>

                </plugin>

                <plugin>

                    <artifactId>maven-deploy-plugin</artifactId>

                    <version>2.8.2</version>

                </plugin>

            </plugins>

        </pluginManagement>

    </build>

</project>
注意,定义以war包方式打包,否则maven工具无法帮助完成构建
可以看到,除了spring基本的依赖以外,pom文件也已经引入日志框架,无需再另外导入。swagger2 依赖 jackson,所以必须把他们导入进来
3.新建文件:webapp/WEB-INF/web.xml,这是web项目启动配置文件,打开如下配置
<?xml version="1.0" encoding="UTF-8"?>

<web-app xmlns:xsi="http://www.w3.org/2001/XMLSchema-instance"

         xmlns="http://xmlns.jcp.org/xml/ns/javaee"

         xsi:schemaLocation="http://xmlns.jcp.org/xml/ns/javaee http://xmlns.jcp.org/xml/ns/javaee/web-app_3_1.xsd"

         version="3.1">

    <context-param>

        <param-name>contextConfigLocation</param-name>

        <param-value>classpath:applicationContext.xml</param-value>

    </context-param>

    <listener>

        <listener-class>org.springframework.web.context.ContextLoaderListener</listener-class>

    </listener>

    <servlet>

        <servlet-name>swagger-example</servlet-name>

        <servlet-class>org.springframework.web.servlet.DispatcherServlet</servlet-class>

        <init-param>

            <param-name>contextConfigLocation</param-name>

            <param-value>classpath:applicationContext-mvc.xml</param-value>

        </init-param>

        <load-on-startup>1</load-on-startup>

    </servlet>

    <servlet-mapping>

        <servlet-name>swagger-example</servlet-name>

        <url-pattern>/</url-pattern>

    </servlet-mapping>

</web-app>
主要分两部分,先配置 spring 的 ioc 容器,然后再配置springmvc 的 ioc 容器,这两个容器分别是父子关系,并在resources文件夹下新建applicationContext.xml文件和applicationContext-mvc.xml文件,分别对应spring的配置和springmvc的配置
4. 分别配置 spring ioc 容器和 springmvc ioc 容器
<?xml version="1.0" encoding="UTF-8"?>

<beans xmlns:xsi="http://www.w3.org/2001/XMLSchema-instance"

       xmlns:context="http://www.springframework.org/schema/context"

       xmlns="http://www.springframework.org/schema/beans"

       xsi:schemaLocation="http://www.springframework.org/schema/beans http://www.springframework.org/schema/beans/spring-beans.xsd http://www.springframework.org/schema/context http://www.springframework.org/schema/context/spring-context.xsd">

    <context:component-scan base-package="com.idaoben.swagger.example" use-default-filters="false">

        <context:exclude-filter type="annotation" expression="org.springframework.web.bind.annotation.RestController"/>

        <context:exclude-filter type="annotation"

                                expression="org.springframework.web.bind.annotation.ControllerAdvice"/>

    </context:component-scan>

</beans>
<?xml version="1.0" encoding="UTF-8"?>

<beans xmlns:xsi="http://www.w3.org/2001/XMLSchema-instance"

       xmlns:context="http://www.springframework.org/schema/context"

       xmlns:mvc="http://www.springframework.org/schema/mvc"

       xmlns="http://www.springframework.org/schema/beans"

       xsi:schemaLocation="http://www.springframework.org/schema/beans

       http://www.springframework.org/schema/beans/spring-beans.xsd

       http://www.springframework.org/schema/context

       http://www.springframework.org/schema/context/spring-context.xsd http://www.springframework.org/schema/mvc http://www.springframework.org/schema/mvc/spring-mvc.xsd">

    <context:component-scan base-package="com.idaoben.swagger.example" use-default-filters="false">

        <context:include-filter type="annotation" expression="org.springframework.web.bind.annotation.RestController"/>

        <context:include-filter type="annotation"

                                expression="org.springframework.web.bind.annotation.ControllerAdvice"/>

    </context:component-scan>

    <bean class="org.springframework.web.servlet.view.InternalResourceViewResolver">

        <property name="prefix" value="/WEB-INF/view/page"/>

        <property name="suffix" value=".jsp"/>

    </bean>

    <mvc:annotation-driven/>

</beans>
5.引入swagger2
在目录下新建 Swagger2Config.java 配置类,代码如下
@EnableSwagger2

public class Swagger2Config {

    public Swagger2Config() {

        System.out.println("Swagger2Config ......");

    }

    public Docket createApi() {

        return new Docket(DocumentationType.SWAGGER_2)

                .apiInfo(apiInfo())

                .select()

                .apis(RequestHandlerSelectors.withClassAnnotation(Api.class))

                .paths(PathSelectors.any())

                .build();

    }

    private ApiInfo apiInfo() {

        return new ApiInfoBuilder()

                .title("在线测试 api 文档")

                .description("在线接口api")

                .contact(new Contact("xxx信息科技有限公司", "https://testting.com", "123456@xxx.com"))

                .version("v1.0")

                .build();

    }

}
在applicationContext-mvc.xml文件中加上
<mvc:resources mapping="/springfox-swagger-ui/**" location="classpath:/META-INF/resources/webjars/"/>

    <mvc:resources mapping="/swagger-ui.html" location="classpath:/META-INF/resources/"/>

    <!--swagger配置-->

    <bean id="docketFactoryBean" class="com.idaoben.swagger.example.web.Swagger2Config"/>

    <bean id="docket" factory-bean="docketFactoryBean" factory-method="createApi"/>
6. 到这一步,基础环境已经搭建好了,我们可以写一个测试接口,如图创建项目工程结构
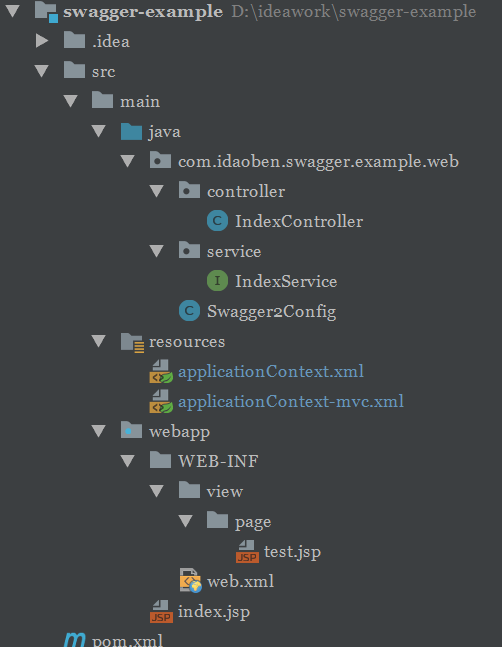
如图,新建了 controller 层和 service 层,在page下添加一个测试页面,IndexController接口代码如下
@Api(tags = "测试中心", value = "测试")

@RestController

@RequestMapping("/index")

public class IndexController {

    @ApiOperation("测试接口")

    @GetMapping("/test")

    public ModelAndView index() {

        ModelAndView mv = new ModelAndView();

        mv.setViewName("/test");

        return mv;

    }

}
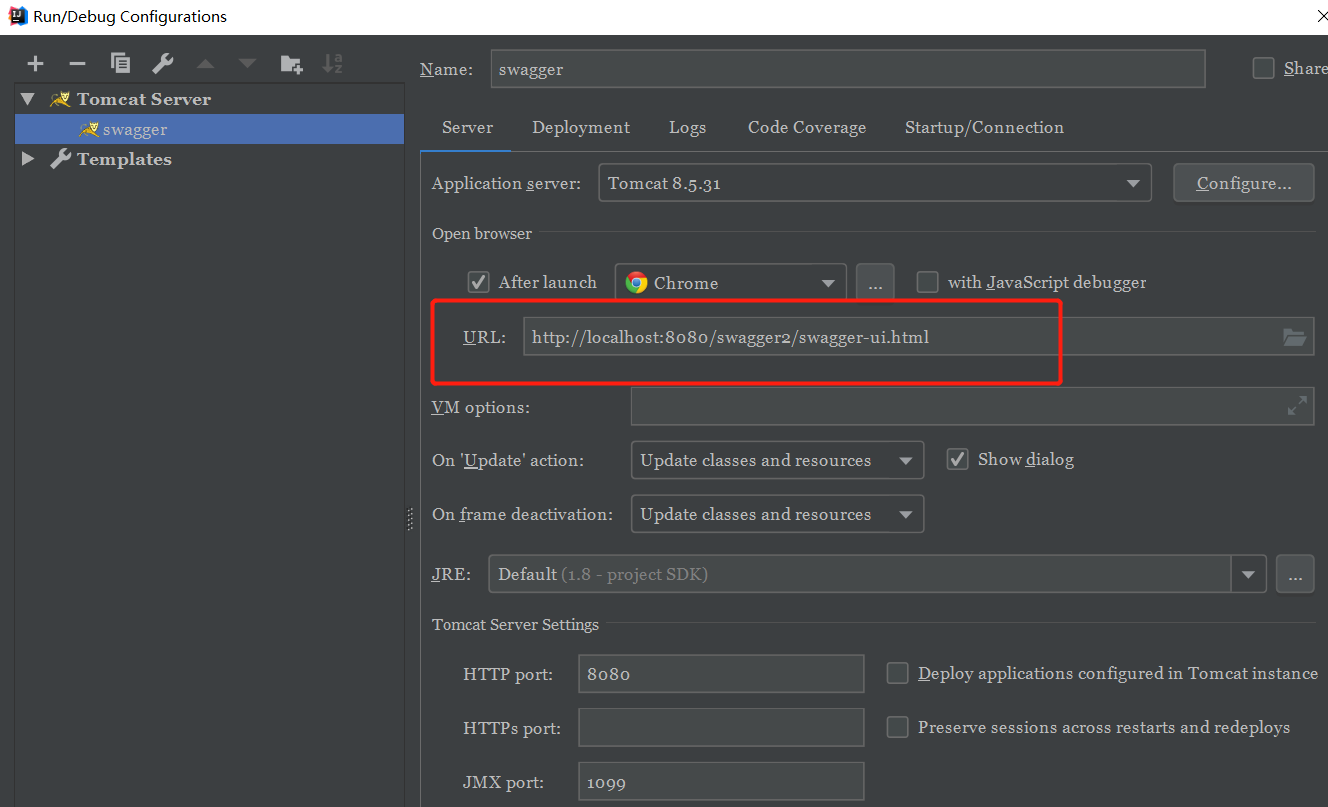
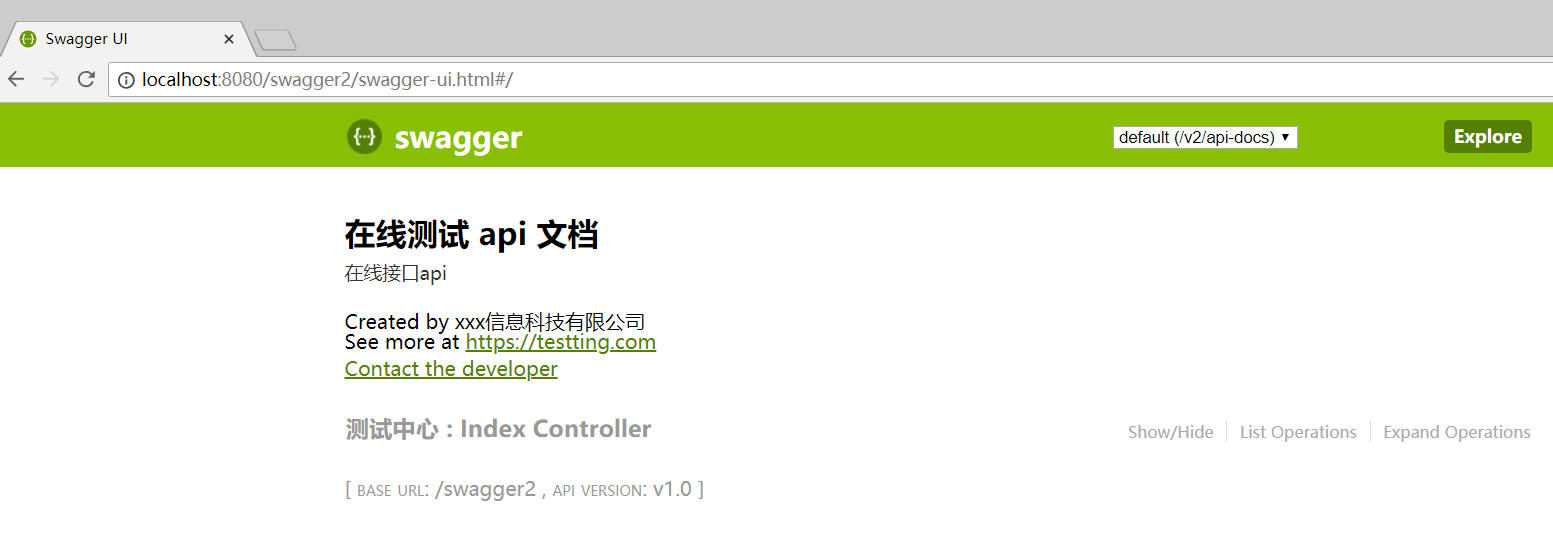
7.配置tomcat,在浏览器上打开项目
项目链接:
附上项目链接:https://github.com/yumiaoxia/swagger-example.git

快速构建springmvc+spring+swagger2环境的更多相关文章
- Maven构建 SpringMVC+Spring+MyBatis 环境整合
目录 1. Maven 项目搭建 2. Maven 插件生成 MyBatis 代码 3. 待续 ... 开发环境 开发环境请尽量保持一致,不一致的情况可能存在问题. JDK 1.7 MyEclipse ...
- [phvia/dkc] Docker Compose 快速构建(LNMP+Node)运行环境
快速构建(LNMP+Node)运行环境. dkc 在此作为 docker-compose 的缩写,你可以理解为 alias dkc=docker-compose 准备 安装 docker 选择1) 从 ...
- 从零入门 Serverless | 教你 7 步快速构建 GitLab 持续集成环境
作者 | 存诚 阿里云弹性计算团队 本文整理自<Serverless 技术公开课>,"Serverless"公众号后台回复"入门",即可获取系列文章 ...
- 快速搭建springmvc+spring data jpa工程
一.前言 这里简单讲述一下如何快速使用springmvc和spring data jpa搭建后台开发工程,并提供了一个简单的demo作为参考. 二.创建maven工程 http://www.cnblo ...
- Maven搭建springMVC+spring+hibernate环境
这次不再使用struts2做控制器,采用spring自己的springMVC框架实现. 首先,改写pom.xml文件,不需要struts2的相关jar了. pom.xml <project xm ...
- 集成SpringMVC, Spring, Mybatis环境
web.xml: <?xml version="1.0" encoding="UTF-8"?> <web-app version=" ...
- 只需两步!Eclipse+Maven快速构建第一个Spring Boot项目
随着使用Spring进行开发的个人和企业越来越多,Spring从一个单一简介的框架变成了一个大而全的开源软件,最直观的变化就是Spring需要引入的配置也越来越多.配置繁琐,容易出错,让人无比头疼, ...
- Spring MVC 环境搭建(maven+SpringMVC+mybatis+Freemarker)
Spring MVC 环境搭建(maven+SpringMVC+mybatis+Freemarker) 一.准备工作 1.Eclipse Java EE IDE(4.4.1) 2.JDK 3.Tomc ...
- SSM(Spring+SpringMVC+Mybatis)框架环境搭建(整合步骤)(一)
1. 前言 最近在写毕设过程中,重新梳理了一遍SSM框架,特此记录一下. 附上源码:https://gitee.com/niceyoo/jeenotes-ssm 2. 概述 在写代码之前我们先了解一下 ...
随机推荐
- IOS Using UIAlertView to show alerts
UIAlertView in other words, it's a dialog box. You want to show a message or ask user to confirm an ...
- 利用python制作在Linux服务器后台定时运行的任务-邮件提醒
1. 自动任务的功能为: 定时扫描数据库中的记录,然后发邮件 代码如下 scheduleMail.py import pymysql import smtplib from email.mime.te ...
- WPF如何为程序添加splashScreen(初始屏幕)
一.考虑到大部分的splashscreen其实都只是一个图片,所以最简单的做法是,先导入一张图片,然后设置它的生成操作为“splash screen” 二.通过程序设置SplashScreen pub ...
- 重写$.ajax方法
/*重写Jquery中的ajax 封装壳*/ $(function () { (function ($) { //首先备份下jquery的ajax方法 var _ajax = $.ajax; //重写 ...
- ceph 对象存储跨机房容灾
场景分析 每个机房的Ceph都是独立的cluster,彼此之间没有任何关系. 多个机房都独立的提供对象存储功能,每个Ceph Radosgw都有自己独立的命名空间和存储空间. 这样带来两个问题: 针对 ...
- 11G新特性 -- archival(long-term)backups
在oracle 10g中,提供了backup ... keep功能来重载配置好的retention策略. 在oracle 11g中,可以重定义backup ... keep命令来创建长期保留的备份,称 ...
- 一个vue请求接口渲染页面的例子
new Vue({ el:'#bodylist', data: { list: [ { "type_id": "1", "type_name" ...
- TypeScript学习笔记(八):1.5版本之后的模块和命名空间
我之前有写过TS1.5版本之前的“模块”的笔记:TypeScript学习笔记(七):模块 但是TS这里的模块和在ECMAScript 2015里的模块(即JS原生支持了模块的概念)概率出现了混淆,所以 ...
- RSA加密和解密工具类
import org.apache.commons.codec.binary.Base64; import javax.crypto.Cipher; import java.security.*; i ...
- MSP MCU I2C入门指南
这是一份介绍性指南,指导你如何用超低功耗MSP微控制器 (MCU) 开始一个与I2C通信有关的项目: 简介 I2C(或称为I2C,集成电路总线)是一种两线制通信形式,主要用来在短距离.电路板间的应用中 ...