14: element ui 使用
1.1 element ui 基本使用
参考网址: http://element.eleme.io/#/zh-CN/component/button
1、初始一个vue项目并安装element ui
vue init webpack-simple element-demo
cd element-demo
npm install
cnpm install element-ui -S
npm run dev
2、编辑main.js引入element ui (引入后就可以使用element中的样式了)
import Vue from 'vue'

import ElementUI from 'element-ui';                      // 引入element-ui

import 'element-ui/lib/theme-chalk/index.css';           // element-ui的css样式要单独引入

import App from './App.vue'

Vue.use(ElementUI);   // 这种方式引入了ElementUI中所有的组件

new Vue({

  el: '#app',

  render: h => h(App)

})
main.js
3、在webpack.config.js中添加loader
var path = require('path')

var webpack = require('webpack')

module.exports = {

  entry: './src/main.js',

  output: {

    path: path.resolve(__dirname, './dist'),

    publicPath: '/dist/',

    filename: 'build.js'

  },

  module: {

    rules: [

      {

        test: /\.css$/,

        use: [

          'vue-style-loader',

          'css-loader'

        ],

      },      {

        test: /\.vue$/,

        loader: 'vue-loader',

        options: {

          loaders: {

          }

          // other vue-loader options go here

        }

      },

      {

        test: /\.js$/,

        loader: 'babel-loader',

        exclude: /node_modules/

      },

      {

        test: /\.(png|jpg|gif|svg)$/,

        loader: 'file-loader',

        options: {

          name: '[name].[ext]?[hash]'

        }

      },

      // 添加加载字体字库的loader

      {

        test: /\.(eot|svg|ttf|woff|woff2)(\?\S*)?$/,

        loader: 'file-loader'

      },

    ]

  },

  resolve: {

    alias: {

      'vue$': 'vue/dist/vue.esm.js'

    },

    extensions: ['*', '.js', '.vue', '.json']

  },

  devServer: {

    historyApiFallback: true,

    noInfo: true,

    overlay: true

  },

  performance: {

    hints: false

  },

  devtool: '#eval-source-map'

}

if (process.env.NODE_ENV === 'production') {

  module.exports.devtool = '#source-map'

  // http://vue-loader.vuejs.org/en/workflow/production.html

  module.exports.plugins = (module.exports.plugins || []).concat([

    new webpack.DefinePlugin({

      'process.env': {

        NODE_ENV: '"production"'

      }

    }),

    new webpack.optimize.UglifyJsPlugin({

      sourceMap: true,

      compress: {

        warnings: false

      }

    }),

    new webpack.LoaderOptionsPlugin({

      minimize: true

    })

  ])

}
webpack.config.js
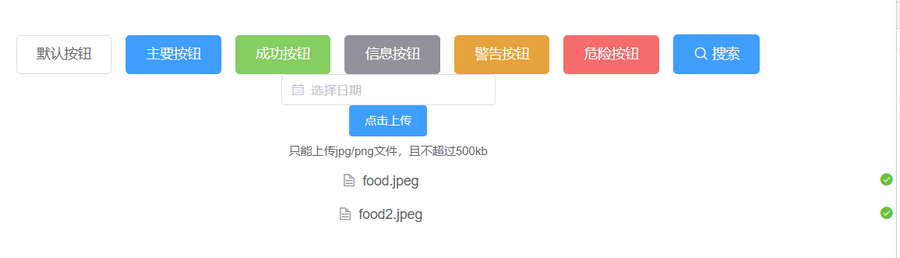
4、在App.vue中使用element-ui
<template>

  <div id="app">

    {{msg}}

    <!--图标-->

    <div>

      <el-row>

        <el-button>默认按钮</el-button>

        <el-button type="primary">主要按钮</el-button>

        <el-button type="success">成功按钮</el-button>

        <el-button type="info">信息按钮</el-button>

        <el-button type="warning">警告按钮</el-button>

        <el-button type="danger">危险按钮</el-button>

        <el-button type="primary" icon="el-icon-search">搜索</el-button>

      </el-row>

    </div>

    <!-- 日期选择器 -->

    <DatePicker></DatePicker>

    <!-- 文件上传 -->

    <Upload></Upload>

  </div>

</template>

<script>

  // 导入组件

  import DatePicker from './components/DatePicker.vue'

  import Upload from './components/Upload.vue'

export default {

  name: 'app',

  data () {

    return {

      msg: '测试msg'

    }

  },

  components:{

    DatePicker,

    Upload

  }

}

</script>

<style>

#app {

  font-family: 'Avenir', Helvetica, Arial, sans-serif;

  -webkit-font-smoothing: antialiased;

  -moz-osx-font-smoothing: grayscale;

  text-align: center;

  color: #2c3e50;

  margin-top: 60px;

}

h1, h2 {

  font-weight: normal;

}

ul {

  list-style-type: none;

  padding: 0;

}

li {

  display: inline-block;

  margin: 0 10px;

}

a {

  color: #42b983;

}

</style>
App.vue
5、在src中创建 components/DatePicker.vue 和 components/Upload.vue 两个组件
<template>

    <el-date-picker

      v-model="value"

      type="date"

      placeholder="选择日期"

      size="small"

      :picker-options="options">

    </el-date-picker>

</template>

<script>

    export default {

        data(){

            return {

                value:'',

                options:{

                    disabledDate(time) {

                        return time.getTime() < Date.now() - 8.64e7;

                    },

                    firstDayOfWeek:1

                }

            }

        }

    }

</script>
DatePicker.vue
<template>

    <el-upload

      class="upload-demo"

      action="https://jsonplaceholder.typicode.com/posts/"

      :on-preview="handlePreview"

      :on-remove="handleRemove"

      :file-list="fileList">

      <el-button size="small" type="primary">点击上传</el-button>

      <div slot="tip" class="el-upload__tip">只能上传jpg/png文件,且不超过500kb</div>

    </el-upload>

</template>

<script>

    export default {

        data(){

            return {

                fileList: [

                        {

                            name: 'food.jpeg',

                            url: 'https://fuss10.elemecdn.com/3/63/4e7f3a15429bfda99bce42a18cdd1jpeg.jpeg?imageMogr2/thumbnail/360x360/format/webp/quality/100'

                        },

                        {

                            name: 'food2.jpeg',

                            url: 'https://fuss10.elemecdn.com/3/63/4e7f3a15429bfda99bce42a18cdd1jpeg.jpeg?imageMogr2/thumbnail/360x360/format/webp/quality/100'

                        }

                ]

            }

        },

         methods: {

          handleRemove(file, fileList) {

            console.log(file, fileList);

          },

          handlePreview(file) {

            console.log(file);

          }

        }

    }

</script>
Upload.vue
14: element ui 使用的更多相关文章
- vue+element ui项目总结点(一)select、Cascader级联选择器、encodeURI、decodeURI转码解码、mockjs用法、路由懒加载三种方式
不多说上代码: <template> <div class="hello"> <h1>{{ msg }}</h1> <p> ...
- 【Element UI】使用问题记录
[Element UI]使用问题记录 转载:https://www.cnblogs.com/yangchongxing/p/10750994.html 下载地址: https://unpkg.com/ ...
- vue-cli按需引入Element UI组件
一.环境 使用vue-cli搭建的环境 二.安装 babel-plugin-component npm install babel-plugin-component -D 三.修改.babelrc文件 ...
- 使用element ui 日期选择器获取值后的格式问题
一般情况下,我们需要给后台的时间格式是: "yyyy-MM-dd" 但是使用Element ui日期选择器获取的值是这样的: Fri Sep :: GMT+ (中国标准时间) 在官 ...
- element ui 1.4 升级到 2.0.11
公司的框架 选取的是 花裤衩大神开源的 基于 element ui + Vue 的后台管理项目, 项目源码就不公开了,记录 分享下 步骤 1. 卸载 element ui 1.4的依赖包 2. 卸载完 ...
- [坑况]饿了么你是这样的前端——vue+element ui 【this dependency was not found:'element-ui/lib/theme-chalk/index.css'】
element ui 坑况:今日pull代码,潇洒npm run dev ,被告知:this dependency was not found:'element-ui/lib/theme-chalk/ ...
- Vue + Element UI项目初始化
1.安装相关组件 1.1安装Node 检查本地是否安装node node -v 如果没有安装,从Node官网下载 1.2安装npm npm -v 如果没有安装:使用该指令安装: npm install ...
- Element UI——本地引入iconfont不显示
前言 前面因为本地引入Element UI导致了iconfont不显示,所以只好再去Element UI官网去扒下iconfot 步骤 进入官网 组件 | Element UI F12进入控制台,找到 ...
- Html | Vue | Element UI——引入使用
前言 做个项目,需要一个效果刚好Element UI有,就想配合Vue和Element UI,放在tp5.1下使用,但是引入在线的地址各种报错,本地引入就完美的解决了问题! 代码 __STATIC_J ...
随机推荐
- SQL Server 2014忘记SA密码或禁用而且Windows身份验证也无法登录的解决办法
SQL Server双重验证都无法验证的情况下如何处理 1.以管理员身份运行sql配置管理器 2.打开[Sql Server 服务]节点关掉所有服务 3.双击本地实例[SQL Server (MSSQ ...
- fiddler2抓包数据工具使用教程
一款免费且功能强大的数据包抓取软件.它通过代理的方式获取程序http通讯的数据,可以用其检测网页和服务器的交互情况,能够记录所有客户端和服务器间的http请求,支持监视.设置断点.甚至修改输入输出数据 ...
- Android Studio -- 关联源码
1,昨天刚把SDK升级到25,然后准备开始 新的一年码代码,结果发现查看源码的时候出现了一堆的“ throw new RuntimeException("Stub!");” 网上搜 ...
- python subprocess中ssh命令的特殊性
今天尝试使用python 的 subprocess 模块 使用类似如下语句: p=subprocess.Popen(['ssh','root@localhost'],stdout=subprocess ...
- django后台将最新文章显示在前面
在你定义的views.py中修改 Models.objects.order_by("-pub_date") 更据时间排列 Models.objects.order_by(&q ...
- Robotframework 3- 安装
1. 安装, python3 安装好后,在cmd中运行 pip install robotframework # Install the latest version (does not upgrad ...
- scu 4439 Vertex Cover
题意: 给出n个点,m条边,将若干个点染色,使得每个边至少有一点染色,问至少染多少个点. 思路: 如果是二分图,那就是最小点覆盖,但是这是一般图. 一般图的最小覆盖是npc问题,但是这题有一个条件比较 ...
- arc 092C 2D Plane 2N Points
题意: 有n个红色的点和n个蓝色的点,如果红色的点的横坐标和纵坐标分别比蓝色的点的横坐标和纵坐标小,那么这两个点就可以成为一对友好的点. 问最多可以形成多少对友好的点. 思路: 裸的二分图匹配,对于满 ...
- 20155228 2016-2017-2 《Java程序设计》第5周学习总结
20155228 2016-2017-2 <Java程序设计>第5周学习总结 教材学习内容总结 异常处理 try-catch语法:JVM执行try区块中的代码,如果发生错误就会跳到catc ...
- Spring源码阅读(一)
Spring通过配置文件或者注解对类实例进行加载管理.稍微思考,可以猜测spring加载过程肯定先把配置转化为统一的配置对象,再把通过配置对象生产类实例.阅读源码,我们也可以发现这个逻辑. sprin ...