FS_11C14温湿度传感器(二)
作者:刘老师,华清远见嵌入式学院讲师。
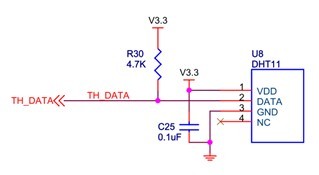
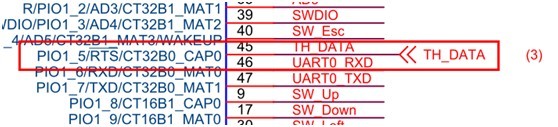
在FS_11C14平台DHT11传感器程序:
/*******************************************************************************
* Function Name : Read_Temp_Hum
* Description : Read Temp & Hum.
* Input : - temp : temp buf pointer.
* - hum : hum buf pointer.
* Output : - temp[0] : temp x. part
* - temp[1] : temp .x part
* - hum[0] : hum x. part
* - hum[1] : hum .x part
* Return : - 1, checksum ok
* - 0, checksum fail
*******************************************************************************/
uint32_t Read_Temp_Hum(uint8_t *temp, uint8_t *hum)
{
uint32_t cnt_last;
uint8_t hum_10, hum_01, temp_10, temp_01, chksum, chk;
uint32_t tc1, tc;
uint32_t i;
p3_2_counter = 0;
cnt_last = p3_2_counter;
GPIOIntDisable(PORT1, 5);
GPIOSetDir(PORT1, 5, 1); // Set PIO1_5 to output
GPIOSetValue(PORT1, 5, 0);
delay_ms(30);
GPIOSetValue(PORT1, 5, 1);
GPIOSetDir(PORT1, 5, 0);
GPIOSetInterrupt(PORT1, 5, 0, 0, 0);
GPIOIntEnable(PORT1, 5);
for(i=0; i<3; i++) //waiting 80uS low level and 80 uS high level
{
GPIOSetInterrupt(PORT1, 5, 0, 0, i&0x01);
while(p3_2_counter == cnt_last);
cnt_last = p3_2_counter;
}
for(i=0; i<40; i++)
{ // Loop to receive 40 bit data
GPIOSetInterrupt(PORT1, 5, 0, 0, 1);
while(p3_2_counter == cnt_last);
cnt_last = p3_2_counter;
tc1 = p3_2_tc;
GPIOSetInterrupt(PORT1, 5, 0, 0, 0);
while(p3_2_counter == cnt_last);
cnt_last = p3_2_counter;
if(p3_2_tc < tc1)
{
tc = tc1 - p3_2_tc;
}
else
{
tc = 48000 - (p3_2_tc - tc1);
}
if(i < 8) //one byte
{
hum_10 <<= 1;
if(tc >= 2328)
hum_10 |= 0x01;
}
else if(i < 16) // two byte
{
hum_01 <<= 1;
if(tc >= 2328)
hum_01 |= 0x01;
}
else if(i < 24) // three byte
{
temp_10 <<;= 1;
if(tc >= 2328)
temp_10 |= 0x01;
}
else if(i < 32) // four byte
{
temp_01 <<= 1;
if(tc >= 2328)
temp_01 |= 0x01;
}
else // five byte checksum
{
chksum <<= 1;
if(tc >= 2328)
chksum |= 0x01;
}
}
GPIOSetInterrupt(PORT1, 5, 0, 0, 1);
while(p3_2_counter == cnt_last);
GPIOIntDisable(PORT1, 5);
*temp = temp_10;
*(temp+1) = temp_01;
*hum = hum_10;
*(hum+1) = hum_01;
chk = hum_10; // Calculate to Checksum
chk += hum_01;
chk += temp_10;
chk += temp_01;
if(chk == chksum) // Received data is OK
return 1;
else
return 0;
}
/*******************************************************************************
* Function Name : Temp_Hum_Test
* Description : Temp & Hum func test.
* Input : None
* Output : None
* Return : None
*******************************************************************************/
void Temp_Hum_Test(void)
{
uint8_t temp[2], hum[2];
char buf[20];
uint32_t i;
OLED_ClearScreen();
OLED_DisStrLine(0, 0, "Temp & Hum");
while(1)
{
i = Read_Temp_Hum(temp, hum);
if(i)
{
if(temp[0]&0x80)
{
temp[0] &= 0x7f;
snprintf(buf, 16, "Temp: -%d.%d ", temp[0], temp[1]);
}
else
{
snprintf(buf, 16, "Temp: %d.%d ", temp[0], temp[1]);
}
OLED_DisStrLine(2, 0, (uint8_t *)buf);
snprintf(buf, 16, "Hum: %d.%d ", hum[0], hum[1]);
OLED_DisStrLine(3, 0, (uint8_t *)buf);
printf("\r\nTemp: %d.%d Hum: %d.%d", temp[0], temp[1], hum[0], hum[1]);
}
else
{
printf("\r\nfail");
}
delay_ms(500);
}
}
/**** End of File ****/
文章来源:华清远见嵌入式学院,原文地址:http://www.embedu.org/Column/Column858.htm


FS_11C14温湿度传感器(二)的更多相关文章
- 在树莓派上读取DHT11温湿度传感器-python代码实现及常见问题(全面简单易懂)
最近由于自己的课题需要,想要用在树莓派上使用DHT11温湿度传感器来读取空气中温湿度,遇到了几个问题,解决之后也对之前的知识进行了回顾,总结,特整理如下,希望能给也在学习树莓派的小伙伴们带来一些帮助. ...
- 数字温湿度传感器DHT11--操作源代码
//IO定义 #define P_DataIN_DHT11 PB0_IN #define P_DataOUT_DHT11 PB0_OUT //宏定义 #define BSET_DHT11 P_Data ...
- Arduino和C51开发DHT11温湿度传感器
技术:51单片机.Arduino.DHT11.温湿度传感器.传感器 概述 学习单片机离不开对传感器的学习,本文主要介绍DHT11温湿度传感器的使用方法,同学也可以了解更多的传感器,这对你以后开发产 ...
- 树莓派使用DHT11温湿度传感器
一.相关介绍 DHT11介绍: DHT11是一款比较便宜的温湿度传感器模块.读取数据只需要占用一个IO口.能够同时测量温度和相对湿度. DHT11的数据手册可以看这里:http://wenku.bai ...
- DHT11温湿度传感器编程思路以及代码的实现(转载)
源自:https://blog.csdn.net/qq_34952376/article/details/81193938 在我们刚开始进入单片机的学习中,练习写传感器的时序是必不可少的,其实我比较推 ...
- [开源硬件DIY] 自制一款精致炫酷的蓝牙土壤温湿度传感器,用于做盆栽呵护类产品(API开放,开发者可自行DIY微信小程序\安卓IOS应用)
目录 前言: 1. 成品展示 2. 原理图解析 3. pcb设计 4. 嵌入式对外提供接口 4.1 蓝牙广播 4.2 蓝牙服务和属性 4.3 数据包格式 4.4 数据通信模型 重要 . 前言: 本期给 ...
- Homekit_温湿度传感器
本款产品为Homekit相关产品需要使用苹果手机进行操作,有兴趣的可以去以下链接购买: https://item.taobao.com/item.htm?spm=a1z10.1-c.w4004-112 ...
- DH11数字温湿度传感器
DH11数字温湿度传感器是一种集温度.湿度一体的复合传感器,它能把温度和湿度物理量通过温.湿度敏感元件和相应电路转化成方便计算机.PLC.智能仪表等数据采集设备直接读取的数字量.DHT11由电阻式感湿 ...
- STM32读取温湿度传感器DHT11和DHT21(AM2301)系列问题
1.DHT11和DHT21传感器 这两种传感器都是奥松公司的产品,具体的传感器说明书在其官网上有(www.aosong.com). DHT11 数字温湿度传感器是一款含有已校准数字信号输出的温湿度复合 ...
随机推荐
- 攻城狮在路上(叁)Linux(十九)--- 磁盘分区
磁盘分区使用fdisk命令,该命令仅root有使用权限. 磁盘分区的一般步骤: 1.首先用df命令查看设备名 df -h; 2.fdisk /dev/sda; <== 按m显示help d:删除 ...
- [Spring] 事务级别定义
记录下来,以后备用 //事务传播属性 @Transactional(propagation=Propagation.REQUIRED)//如果有事务,那么加入事务,没有的话新创建一个 @Transac ...
- 老生常谈,正确使用memset
转自:http://blog.csdn.net/my_business/article/details/40537653 前段项目中发现一个问题,程序总是在某个dynamic_cast进行动态转换时出 ...
- (译)【Unity教程】使用Unity开发Windows Phone上的横版跑酷游戏
译者注: 目前移动设备的跨平台游戏开发引擎基本都是采用Cocos2d-x或者Unity.一般而言2d用cocos2d-x 3d用unity,但是对于Windows Phone开发者, cocos2d- ...
- Git提交基本流程
在无其他分支,大家都向同一分支master分支提交代码的情况下: 1.查看本地对代码的修改情况,即可以被提交的修改记录 git status 其中被修改过的文件标识为modified,删除的文件del ...
- Android开发的教程和资源
Android 设计指南非官方简体中文版 http://www.apkbus.com/design/index.html NDK下载 http://developer.android.com/tool ...
- uri,url.urn
uri:Web上可用的每种资源 - HTML文档.图像.视频片段.程序等 - 由一个通过通用资源标志符(Universal Resource Identifier, 简称"URI" ...
- 深入剖析Java中的装箱和拆箱
深入剖析Java中的装箱和拆箱 自动装箱和拆箱问题是Java中一个老生常谈的问题了,今天我们就来一些看一下装箱和拆箱中的若干问题.本文先讲述装箱和拆箱最基本的东西,再来看一下面试笔试中经常遇到的与装箱 ...
- 手机页面的meta标签
<meta charset="utf-8"/><meta name="viewport" content="width=device ...
- POJ 2774 后缀数组
题目链接:http://poj.org/problem?id=2774 题意:给定两个只含小写字母的字符串,求字符串的最长公共子串长度. 思路:根据<<后缀数组——处理字符串的有力工具&g ...