
C#串口数据收发数据
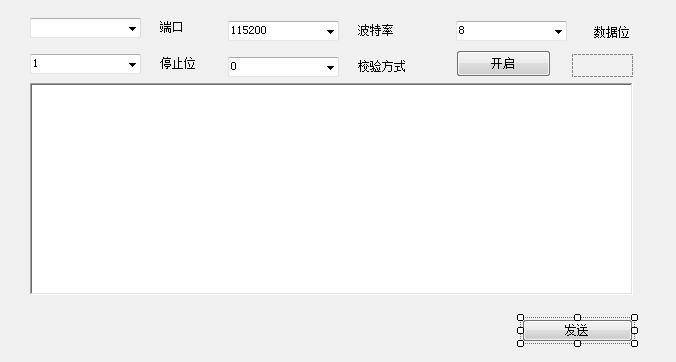
using System;
using System.Collections.Generic;
using System.ComponentModel;
using System.Data;
using System.Drawing;
using System.Linq;
using System.Text;
using System.Windows.Forms;
using System.IO.Ports;
using Microsoft.Win32;
namespace PotrTEST
{
public partial class Form1 : Form
{
public SerialPort com = new SerialPort();
//定义端口类
private SerialPort ComDevice = new SerialPort();
public Form1()
{
InitializeComponent();
InitralConfig(int.Parse(comboBox_BaudRate.Text));
}
/// <summary>
/// 从注册表获取系统串口列表
/// </summary>
public string[] GetComList()
{
RegistryKey keyCom = Registry.LocalMachine.OpenSubKey("Hardware\\DeviceMap\\SerialComm");
string[] sSubKeys = keyCom.GetValueNames();
string[] str = new string[sSubKeys.Length];
for (int i = 0; i < sSubKeys.Length; i++)
{
str[i] = (string)keyCom.GetValue(sSubKeys[i]);
}
return str;
}
/// <summary>
/// 配置初始化
/// </summary>
private void InitralConfig(int btl)
{
Boolean open = false;
string[] coms = GetComList();
for (int i = 0; i < coms.Length; i++)
{
open = false;
if (com.IsOpen)
{
com.Close();
}
comboBox_Port.Items.Add(coms[i]);
}
//向ComDevice.DataReceived(是一个事件)注册一个方法Com_DataReceived,当端口类接收到信息时时会自动调用Com_DataReceived方法
ComDevice.DataReceived += new SerialDataReceivedEventHandler(Com_DataReceived);
}
/// <summary>
/// 一旦ComDevice.DataReceived事件发生,就将从串口接收到的数据显示到接收端对话框
/// </summary>
/// <param name="sender"></param>
/// <param name="sender"></param>
/// <param name="sender"></param>
/// <param name="e"></param>
private void Com_DataReceived(object sender, SerialDataReceivedEventArgs e)
{
//开辟接收缓冲区
byte[] ReDatas = new byte[ComDevice.BytesToRead];
//从串口读取数据
ComDevice.Read(ReDatas, 0, ReDatas.Length);
//实现数据的解码与显示
AddData(ReDatas);
}
/// <summary>
/// 解码过程
/// </summary>
/// <param name="data">串口通信的数据编码方式因串口而异,需要查询串口相关信息以获取</param>
public void AddData(byte[] data)
{
StringBuilder sb = new StringBuilder();
for (int i = 0; i < data.Length; i++)
{
sb.AppendFormat("{0:x2}" + " ", data[i]);
}
AddContent(sb.ToString());//.ToUpper()
}
/// <summary>
/// 接收端对话框显示消息
/// </summary>
/// <param name="content"></param>
private void AddContent(string content)
{
BeginInvoke(new MethodInvoker(delegate
{
textBox_Receive.AppendText(content);
}));
}
/// <summary>
/// 串口开关
/// </summary>
/// <param name="sender"></param>
/// <param name="e"></param>
private void button_Switch_Click(object sender, EventArgs e)
{
if (comboBox_Port.Items.Count <= 0)
{
MessageBox.Show("未发现可用串口,请检查硬件设备");
return;
}
if (ComDevice.IsOpen == false)
{
//设置串口相关属性
ComDevice.PortName = comboBox_Port.Text;//comboBox_Port.SelectedItem.ToString();
ComDevice.BaudRate = Convert.ToInt32(comboBox_BaudRate.Text);//(comboBox_BaudRate.SelectedItem.ToString());
ComDevice.Parity = (Parity)Convert.ToInt32(comboBox_CheckBits.Text);//(comboBox_CheckBits.SelectedIndex.ToString());
ComDevice.DataBits = Convert.ToInt32(comboBox_DataBits.Text);// (comboBox_DataBits.SelectedItem.ToString());
ComDevice.StopBits = (StopBits)Convert.ToInt32(comboBox_StopBits.Text); //(comboBox_StopBits.SelectedItem.ToString());
try
{
//开启串口
ComDevice.Open();
button_Send.Enabled = true;
button_Switch.Text = "关闭";
//while (true)
{
//接收数据
ComDevice.DataReceived += new SerialDataReceivedEventHandler(Com_DataReceived);
}
}
catch (Exception ex)
{
MessageBox.Show(ex.Message, "未能成功开启串口", MessageBoxButtons.OK, MessageBoxIcon.Error);
return;
}
}
else
{
try
{
ComDevice.Close();
button_Send.Enabled = false;
}
catch (Exception ex)
{
MessageBox.Show(ex.Message, "串口关闭错误", MessageBoxButtons.OK, MessageBoxIcon.Error);
}
button_Switch.Text = "开启";
}
comboBox_Port.Enabled = !ComDevice.IsOpen;
comboBox_BaudRate.Enabled = !ComDevice.IsOpen;
comboBox_DataBits.Enabled = !ComDevice.IsOpen;
comboBox_StopBits.Enabled = !ComDevice.IsOpen;
comboBox_CheckBits.Enabled = !ComDevice.IsOpen;
}
/// <summary>
/// 将消息编码并发送
/// </summary>
/// <param name="sender"></param>
/// <param name="e"></param>
private void button_Send_Click(object sender, EventArgs e)
{
//if (textBox_Receive.Text.Length > 0)
//{
// textBox_Receive.AppendText("\n");
//}
byte[] sendData = null;
//sendData = Encoding.UTF8.GetBytes(textBox_Receive.Text);
sendData = Hex16StringToHex16Byte(textBox_Receive.Text);
SendData(sendData);
}
/// <summary>
/// 此方法用于将16进制的字符串转换成16进制的字节数组
/// </summary>
/// <param name="_hex16ToString">要转换的16进制的字符串。</param>
public static byte[] Hex16StringToHex16Byte(string _hex16String)
{
//去掉字符串中的空格。
_hex16String = _hex16String.Replace(" ", "");
if (_hex16String.Length / 2 == 0)
{
_hex16String += " ";
}
//声明一个字节数组,其长度等于字符串长度的一半。
byte[] buffer = new byte[_hex16String.Length / 2];
for (int i = 0; i < buffer.Length; i++)
{
//为字节数组的元素赋值。
buffer[i] = Convert.ToByte((_hex16String.Substring(i * 2, 2)), 16);
}
//返回字节数组。
return buffer;
}
/// <summary>
/// 此函数将编码后的消息传递给串口
/// </summary>
/// <param name="data"></param>
/// <returns></returns>
public bool SendData(byte[] data)
{
if (ComDevice.IsOpen)
{
try
{
//将消息传递给串口
ComDevice.Write(data, 0, data.Length);
return true;
}
catch (Exception ex)
{
MessageBox.Show(ex.Message, "发送失败", MessageBoxButtons.OK, MessageBoxIcon.Error);
}
}
else
{
MessageBox.Show("串口未开启", "错误", MessageBoxButtons.OK, MessageBoxIcon.Error);
}
return false;
}
/// <summary>
/// 16进制编码
/// </summary>
/// <param name="hexString"></param>
/// <returns></returns>
private byte[] strToHexByte(string hexString)
{
hexString = hexString.Replace(" ", "");
if ((hexString.Length % 2) != 0) hexString += " ";
byte[] returnBytes = new byte[hexString.Length / 2];
for (int i = 0; i < returnBytes.Length; i++)
returnBytes[i] = Convert.ToByte(hexString.Substring(i * 2, 2).Replace(" ", ""), 16);
return returnBytes;
}
private void Form1_Load(object sender, EventArgs e)
{
//button_Send.PerformClick();
}
//以下两个指令是结合一款继电器而设计的
//private void button_On_Click(object sender, EventArgs e)
//{
// textBox_Send.Text = "005A540001010000B0";
//}
//private void button_Off_Click(object sender, EventArgs e)
//{
// textBox_Send.Text = "005A540002010000B1";
//}
}
}
C#串口数据收发数据的更多相关文章
- Arduino通过串口监视器收发数据
在串口监视器中发送数据,板子收到数据并打印出来. 不需要额外电路,但是板子必须连接电脑,Arduino IDE的串口监视器也需要被打开. 代码 /* 串口事件 当新的串口数据到来时,我们会将它添加到一 ...
- 【AT91SAM3S】串口UART初始化及收发数据
SAM3S中的UART串口是一个两线异步收发器.这个串口能用来通信或者跟踪.有两个DMA通道与UART串口关联,可通过使用DMA处理串口传输以节省CPU时间. SAM3S4C中有两个UART.与外设引 ...
- STM32F407的串口采用DMA收发数据
源:STM32F407的串口采用DMA收发数据
- python 简单的串口收发数据
# -*- coding: utf- -*- import serial #打开串口 serialPort="COM3" #串口 baudRate= #波特率 ser=serial ...
- Java 实现TCP/IP协议的收发数据(服务端)
功能如下: 注: 只有服务端,没有客户端,测试时采用第三方软件作为客户端的. 收发数据目前能正常收发数据,只是中文的会变成乱码显示. 采用Thread类实现一个收发数据的线程. 服务端代码: impo ...
- C#串口通信及数据表格存储
1.开发环境 系统:win10 开发工具:Visual Studio 2017 2.界面设计 串口通信的界面大致如此,在此基础上添加项目所需的调试指令与数据存储功能,界面排布方面可参考其他教程. 3. ...
- HAL UART DMA 数据收发
UART使用DMA进行数据收发,实现功能,串口2发送指令到上位机,上位机返回数据给串口2,串口2收到数据后由串口1进行转发,该功能为实验功能 1.UART与DMA通道进行绑定 void HAL_UAR ...
- STM32与物联网02-网络数据收发
在上一节中,介绍了 ESP8266 的使用方法.不过上一节中都是通过串口调试工具手动发送信息的方式来操作 ESP8266 ,这肯定不能用于实际开发.因此,本节介绍如何编写合适的程序来和 ESP8266 ...
- 在Linux中如何使用命令进行RS-232串口通信和数据包解析
文章首发于浩瀚先森博客 1. 获取串口号 在Linux系统中一切皆为文件,所以串口端口号也不例外,都是以设备文件的形式出现.也就是说我们可以用访问文本文件的命令来访问它们. a. 一般串口都是以/de ...
随机推荐
- 第二节 Python基础之变量,运算符,if语句,while和for循环语句
我们在上一节中,我们发现当我们用字符串进行一些功能处理的时候,我们都是把整个字符串写下来的,比如"jasonhy".startwith("j"),如果我们在程序 ...
- CentOS下puppet安装
简介 Puppet是开源的基于Ruby的系统配置管理工具,puppet是一个C/S结构, 当然,这里的C可以有很多,因此,也可以说是一个星型结构. 所有的puppet客户端同一个服务器端的puppet ...
- bzoj5104: Fib数列
Description Fib数列为1,1,2,3,5,8... 求在Mod10^9+9的意义下,数字N在Fib数列中出现在哪个位置 无解输出-1 Input 一行,一个数字N,N < = 10 ...
- android SDK 安装
Android SDK在线更新镜像服务器 参见:http://www.androiddevtools.cn/ 1. 启动 Android SDK Manager ,打开主界面,依次选择『Too ...
- 通过 phpmyadmin getshell
通过 phpmyadmin getshell general_log默认为关闭的,root权限开启后,general_log_file会保存所有的查询语句 可以开启general_log,然后设置g ...
- Python中的取模运算
C++中的取模运算符%只能对整数使用(如果要对浮点数使用需要fmod),Python则不同,对整数或浮点数均有效. 在这里再介绍一下取模的定义:假设a,b两个数,那么a mod b = a - n*b ...
- linux安装mysql8.0及开启远程访问
第一步:获取mysql8.0的yum源 进入mysql官网获取RPM包下载地址 https://dev.mysql.com/downloads/repo/yum/ 点击下载后, 右键复制链接地 ...
- WordPress版微信小程序3.0版发布
距离WordPress版微信小程序上一个版本的发布过去了一个月了.在此间,我的工作有些变化,加上正在开发新版本,目前开源版的完善和升级稍稍有些滞后. 虽然这个版本是3.0版,期间有个过渡的2.8版,不 ...
- CSS3之圣杯布局和双飞翼布局
圣杯布局: <!DOCTYPE html> <html lang="en"> <head> <meta charset="UTF ...
- Bootstrap关闭子类页面,刷新父类页面
关闭子类页面,刷新父类页面 function doBack() { var index = parent.layer.getFrameIndex(window.name) //获取窗口索引值 pare ...