通过java程序调用ant build.xml配置文件中指定的target
一、概述
通过ant实现项目的自动化部署,jar包生成,替换,tomcat关停、启动,查看项目日志;
通过java程序调用已编辑好的ant脚本build.xml配置文件中指定的target;
文中文件路径均为作者自定义路径;读者可根据自己实际情况命名并做相应修改;只要实现目的即可;
二、环境
jdk版本:jdk1.8.0_161;
ant版本:apache-ant-1.10.5;
maven版本:apache-maven-3.5.2;
IDE:eclipse Luna Release (4.4.0);
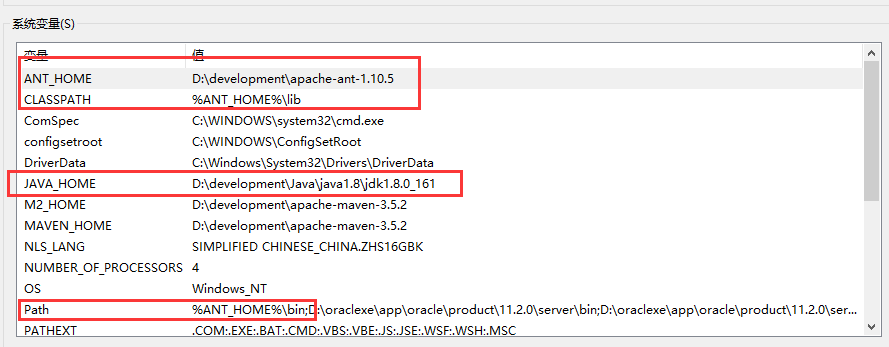
三、环境变量配置
1、ANT_HOME;
2、CLASSPATH
3、JAVA_HOME;
4、Path;
5、MAVEN_HOME;
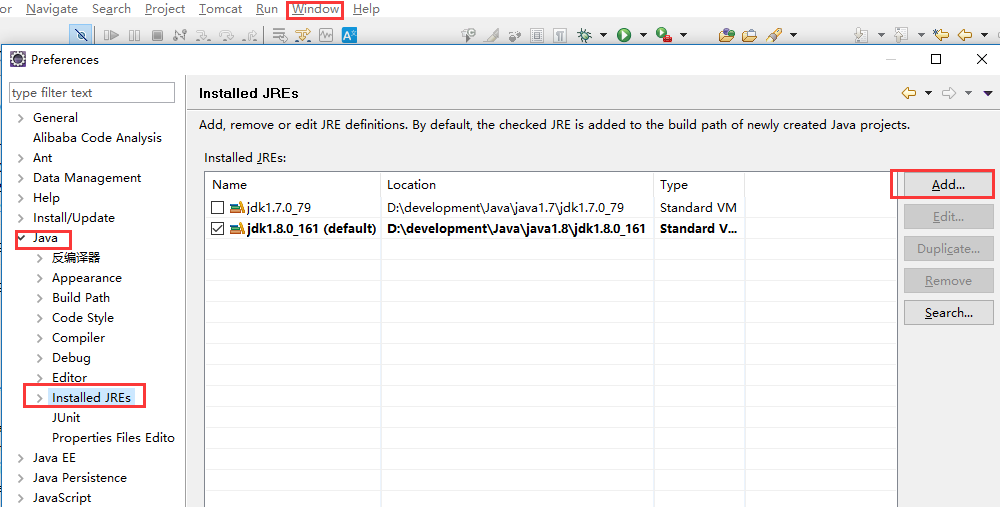
四、eclipse配置
1、Window-->Preferences-->Java-->Installed JREs-->Add
如下图所示:
2、添加JRE环境,如下图配置,
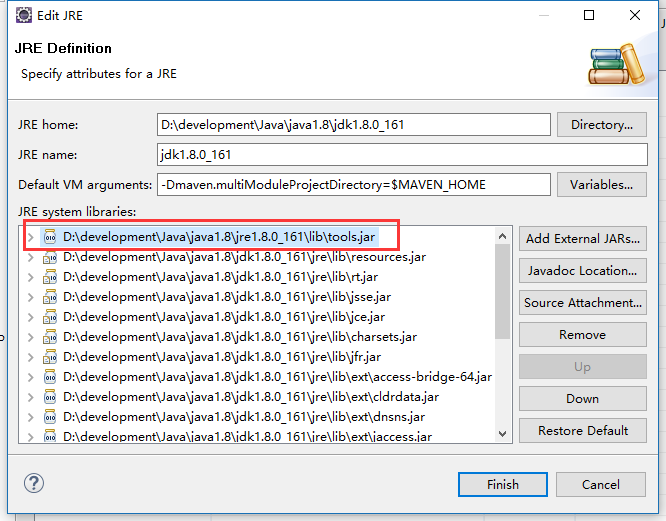
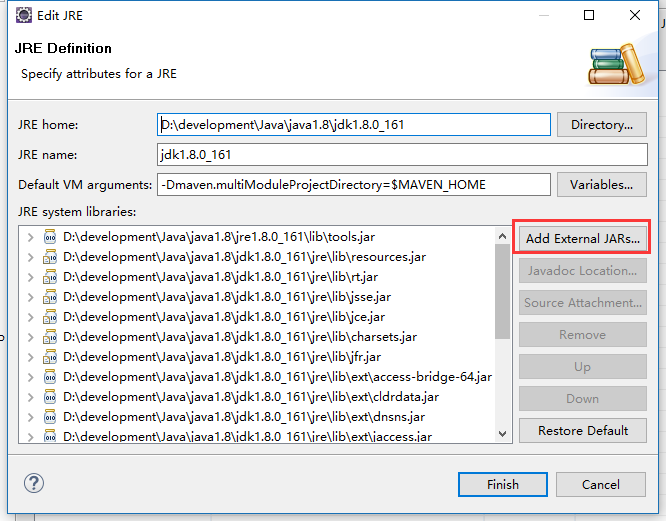
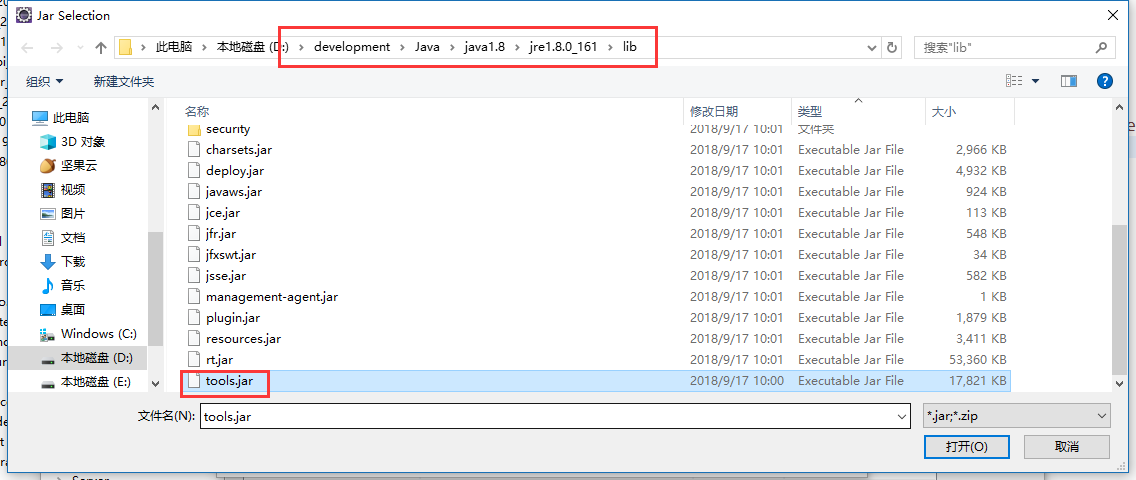
3、注意要将tools.jar包添加进JRE system libraries,(不然在程序调用ant脚本中打jar包的target时会报错)添加方法如下图:
五、调用ant脚本的java程序
 import java.io.File;

 import org.apache.tools.ant.BuildException;

 import org.apache.tools.ant.DefaultLogger;

 import org.apache.tools.ant.Project;

 import org.apache.tools.ant.ProjectHelper;

 import org.slf4j.Logger;

 import org.slf4j.LoggerFactory;

 public class AntDemo {

     public static void main(String[] args) throws Exception {

         final Logger logger = LoggerFactory.getLogger(AntDemo.class);

         String localPath ="D:/devcode/workspace/dataSourceTest/src/main/resources/test-display/build.xml";

         File buildFile = new File(localPath.toString());

         Project project = new Project();
       String targetName = "test";

         try {

             DefaultLogger consoleLogger = new DefaultLogger();

             consoleLogger.setErrorPrintStream(System.err);

             consoleLogger.setOutputPrintStream(System.out);

             consoleLogger.setMessageOutputLevel(Project.MSG_INFO);

             project.addBuildListener(consoleLogger);

             project.fireBuildStarted();

             project.init();

             ProjectHelper helper = ProjectHelper.getProjectHelper();

             helper.parse(project, buildFile);

             project.executeTarget(targetName);

             project.fireBuildFinished(null);

         } catch (BuildException e) {

             // 构建抛出异常

             project.fireBuildFinished(e);

             logger.error("Ant执行异常," + e.toString());

             throw new Exception("Ant执行异常," + e.toString(), e);

         }

     }

 }
六、ant脚本-build.xml
 <?xml version="1.0" encoding="UTF-8" ?>

 <project name="dataSource" default="test" basedir="D:/devcode/workspace/dataSource">

     <property file="D:/build.properties" />

     <target name="test">

         <echo message="test echo messsage, basedir=${basedir}" />

     </target>

     <!--*****************************export-jar-start***********************************************-->

     <target name="compile" depends="delete-jar">

         <echo message="--生成jar包开始--" />

         <javac srcdir="${src}" destdir="${dest}">

             <compilerarg line="-encoding UTF-8 " />

         </javac>

         <jar jarfile="${dest}\${jar_name}" basedir="${dest}" />

         <echo message="--完成jar包完成,本地保存路径 file:${dest}/${jar_name}--" />

     </target>

     <target name="delete-jar">

         <delete>

             <fileset dir="${dest}" includes="**/*.jar">

             </fileset>

         </delete>

         <echo message="--清空旧本地jar包完成,路径 file:${dest}/${jar_name}--" />

     </target>

     <!--*****************************export-jar-end***********************************************-->

     <!--*****************************scp-download-jar-start***********************************************-->

     <target name="download-jar" description="download" depends="init_backup">

         <echo message="--目标服务器待替换jar包下载--" />

         <scp todir="${localtion_file}/${system.name}/${host.name}/${backup.date}/${folder.backup}" file="${username}:${password}@${host.name}:

                         ${tomcat.home.linux}/${tomcat.name}/lib/${jar.name}.jar" trust="true" />

         <echo message="--目标服务器待替换jar包下载完成,本地保存路径

                     file:${localtion_file}/${system.name}/${host.name}/${backup.date}/${folder.backup}/${jar.name}.jar--" />

     </target>

     <target name="init_backup" description="create">

         <echo message="--本地备份文件夹创建--" />

         <mkdir dir="${localtion_file}/${system.name}/${host.name}/${backup.date}/${folder.backup}" />

         <echo message="--本地备份文件夹创建完成--" />

     </target>

     <!--*****************************scp-download-jar-end***********************************************-->

     <!--*****************************tomcat-stop-start***********************************************-->

         <target name="tomcat-stop" description="sshexec">

         <echo message="======关停目标服务器...======" />

         <sshexec host="${host.name}" username="${username}" password="${password}" port="${port}" command="${tomcat.home.linux}/${tomcat.name}/bin/shutdown.sh" trust="true" />

         <echo message="======关停目标服务器完成======" />

     </target>

     <!--*****************************tomcat-stop-end***********************************************-->

     <target name="tomcat-start" description="sshexec">

         <echo message="======启动服务器...======" />

         <sshexec host="${host.name}" username="${username}" password="${password}" port="22" command="${tomcat.home.linux}/${tomcat.name}/bin/startup.sh" trust="true" />

         <echo message="======启动服务器完成======" />

     </target>

 </project>
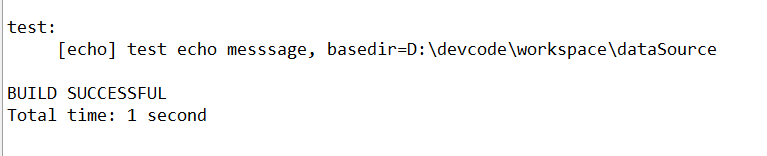
七、测试运行
七、常见报错
因为ant脚本中存在scp标签,用执行文件上传,下载;sshexec标签,用于执行连接服务器并执行Linux命令;
因此在执行程序过程中,调用target(download-jar)或(tomcat-stop)时,可能会报错;需要单独下载jsch-0.1.54.jar;并将其复制粘贴到D:\development\apache-ant-1.10.5\lib路径下;
常见报错一:
Cause: the class org.apache.tools.ant.taskdefs.optional.ssh.SSHExec was not found.
This looks like one of Ant's optional components.
Action: Check that the appropriate optional JAR exists in
-ANT_HOME\lib
-the IDE Ant configuration dialogs
Do not panic, this is a common problem.
The commonest cause is a missing JAR.
This is not a bug; it is a configuration problem
解决方案:
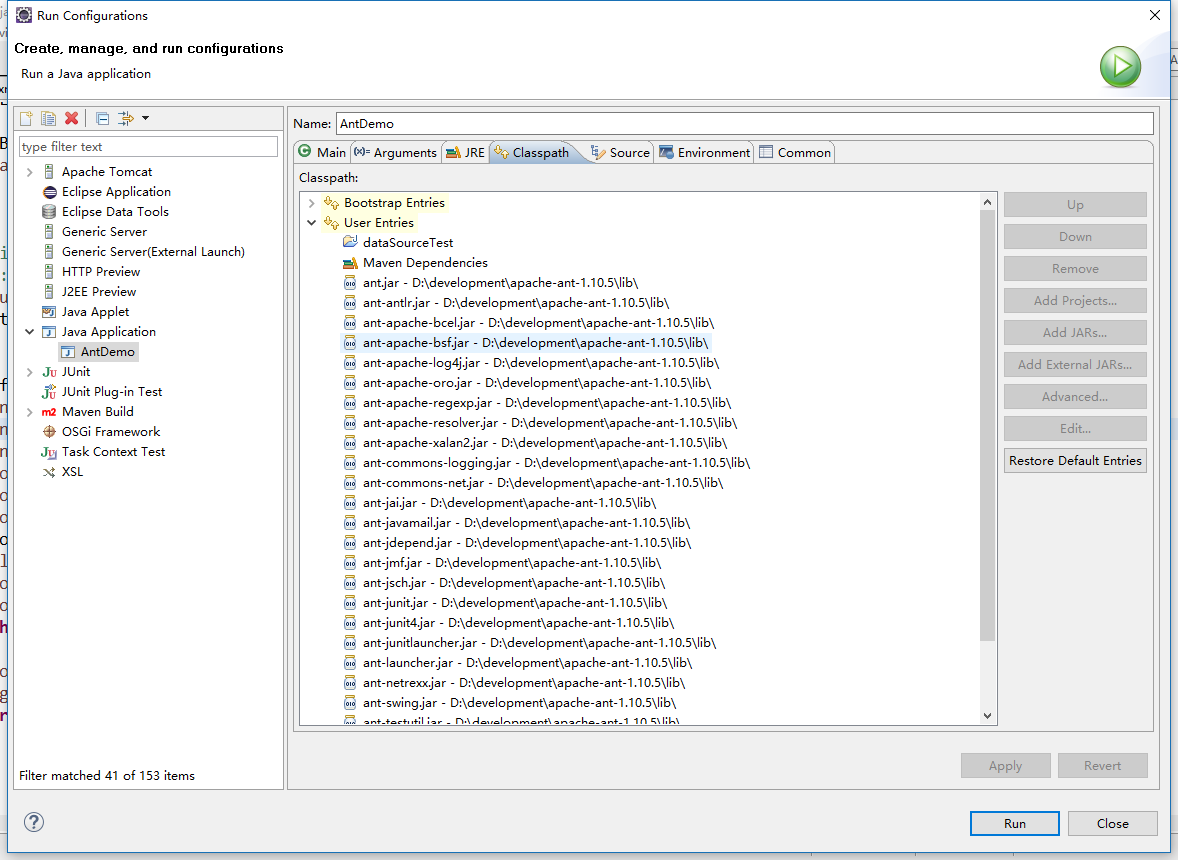
在程序代码上右键-->Run As-->Run Configurations...-->classpath--User Entries-->Add External JARs...
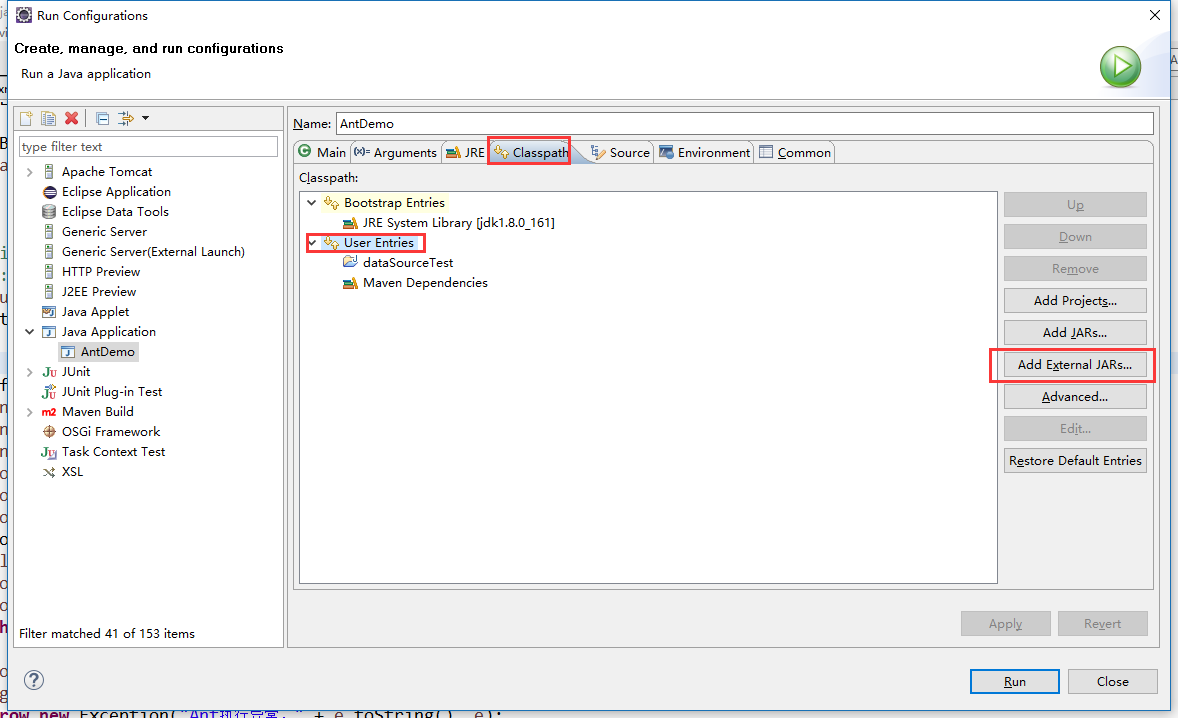
全选路径D:\development\apache-ant-1.10.5\lib 下的jar包;之所以全选是为了保险,避免缺失jar包;
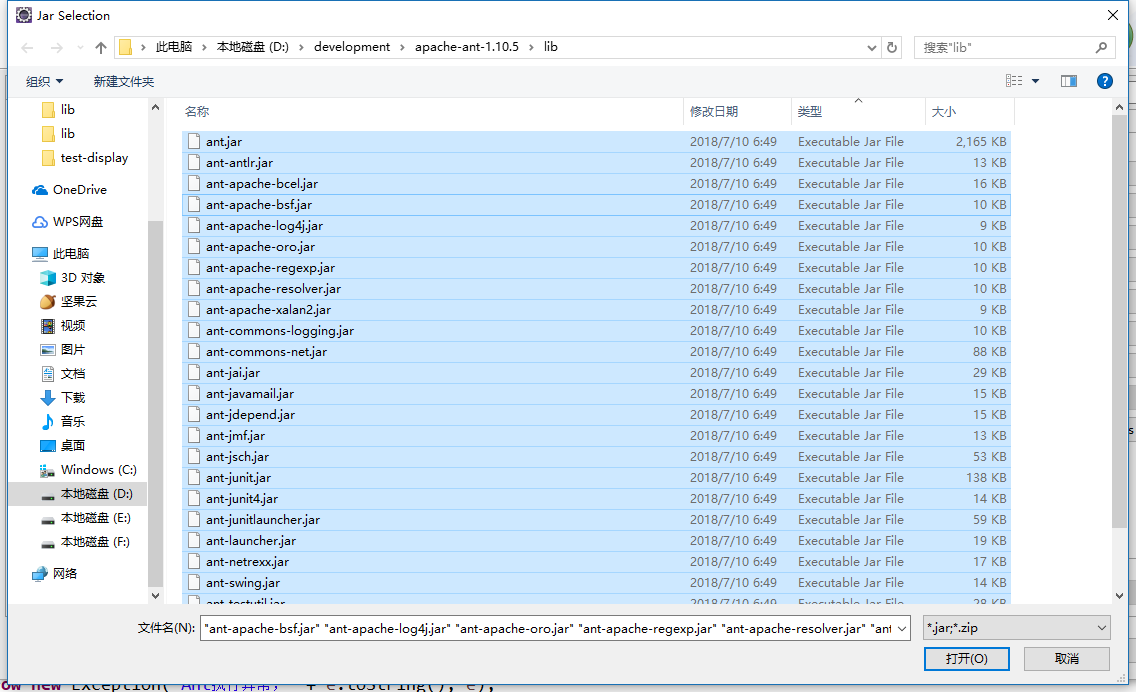
点击打开即添加成功;注意要事先将jsch-0.1.54.jar包复制到apache-ant-1.10.5\lib路径下;
再次运行,即正常;
通过java程序调用ant build.xml配置文件中指定的target的更多相关文章
- Java MyEclipse下Ant build.xml简单实例详解
一.下载配置ant 1.首先下载ant: http://www.apache.org/ 下载最新的版本2.解压ant 后设置ANT_HOME, PATH中添加ANT_HOME目录下的bin目录(如:A ...
- Java eclipse下 Ant build.xml实例详解
在有eclipse集成环境下ant其实不是很重要,但有些项目需要用到,另外通过eclipse来学习和理解ant是个很好的途径,所以写他demo总结下要点,希望能够帮到大家. 一.本人测试环境eclip ...
- 转:Java eclipse下 Ant build.xml实例详解
在有eclipse集成环境下ant其实不是很重要,但有些项目需要用到,另外通过eclipse来学习和理解ant是个很好的途径,所以写他demo总结下要点,希望能够帮到大家. 一.本人测试环境eclip ...
- Java eclipse下 Ant build.xml实例详解 附完整项目源码
在有eclipse集成环境下ant其实不是很重要,但有些项目需要用到,另外通过eclipse来学习和理解ant是个很好的途径,所以写他demo总结下要点,希望能够帮到大家. 一.本人测试环境eclip ...
- Java Ant build.xml详解
1,什么是antant是构建工具2,什么是构建概念到处可查到,形象来说,你要把代码从某个地方拿来,编译,再拷贝到某个地方去等等操作,当然不仅与此,但是主要用来干这个3,ant的好处跨平台 --因为 ...
- (转)Java Ant build.xml详解
1,什么是ant ant是构建工具2,什么是构建概念到处可查到,形象来说,你要把代码从某个地方拿来,编译,再拷贝到某个地方去等等操作,当然不仅与此,但是主要用来干这个3,ant的好处跨平台 --因 ...
- Eclipse 自动生成 Ant的Build.xml 配置文件
Eclipse 自动生成 Ant的Build.xml 配置文件,生成的方法很隐蔽 选择你要生成Build.xml文件的项目,右键. Export-> General -> Ant Buil ...
- Ant build.xml相关属性详解
关键字: ant build.xml Ant的概念 可能有些读者并不连接什么是Ant以及入可使用它,但只要使用通过Linux系统得读者,应该知道make这个命令.当编译Linux内核及一些软件的源程序 ...
- 一个完整的JENKINS下的ANT BUILD.XML文件(Jenkins可以参考)
一个完整的JENKINS下的ANT BUILD.XML文件 <?xml version="1.0" encoding="UTF-8"?> <p ...
随机推荐
- Calling Circles(UVa 247)(Floyd 算法)
用Floyd算法求出传递闭包,然后用dfs求出每条连通分量.注意其中用到的几个小技巧: #include<cstdio> #include<iostream> #include ...
- 简述rpm与yum命令的常见选项
rpm是一个功能十分强大的软件包管理系统,它使得在Linux下安装.升级和删除软件包的工作变的容易.并且具有查询.验证软件包的功能. 1)安装选项 命令格式:rpm {-i|--install} [i ...
- java项目---遍历系统文件(1星)
package Demo; import java.io.*; public class TraversalContent { public static void main(String []arg ...
- Educational Codeforces Round 54 (Rated for Div. 2) D:Edge Deletion
题目链接:http://codeforces.com/contest/1076/problem/D 题意:给一个n个点,m条边的无向图.要求保留最多k条边,使得其他点到1点的最短路剩余最多. 思路:当 ...
- How to detect, enable and disable SMBv1, SMBv2, and SMBv3 in Windows and Windows Server
转自:https://support.microsoft.com/en-us/help/2696547/detect-enable-disable-smbv1-smbv2-smbv3-in-windo ...
- Yii2 设计模式——工厂方法模式
工厂方法模式 模式定义 工厂方法模式(Factory Method Pattern)定义了一个创建对象的接口,但由子类决定要实例化的类是哪一个.工厂方法让类吧实例化推迟到子类. 什么意思?说起来有这么 ...
- 运维wiki
意识 1.责任心 要有 owner 意识.运维是线上产品的首要负责人,出现故障都默认是运维的故障,要推动改进. 2.细心 要有敏感的风险意识,稳定和安全是运维的最高责任 3.上进心 要善于学习,不断反 ...
- FileUpload上传
单文件上传: ASPX: <div> <!-- 文件上传 --> <asp:FileUpload ID="FileUpload1" runat=&qu ...
- Asp.Net : Page.RegisterStartupScript及 不执行的原因
RegisterStartupScript 把script放置在ASP.NET page的底部,而RegisterClientScriptBlock把script放置在ASP.NET page的顶部 ...
- MySQL运行内存不足时应采取的措施?
排除故障指南:MySQL运行内存不足时应采取的措施? 天一阁@ 老叶茶馆 1周前 导读 排除故障指南:MySQL运行内存不足时应采取的措施? 翻译团队:知数堂藏经阁项目 - 天一阁 团队成员:天一阁- ...