
【angularjs】使用angular搭建PC端项目,开关按钮
方法一(使用指令)
1.指令(angular-ui-switch.js)
angular.module('uiSwitch', [])

app.directive('switch', function(){

  return {

    restrict: 'AE'

  , replace: true

  , transclude: true

  , template: function(element, attrs) {

      var html = '';

      html += '<span';

      html +=   ' class="switch' + (attrs.class ? ' ' + attrs.class : '') + '"';

      html +=   attrs.ngModel ? ' ng-click="' + attrs.disabled + ' ? ' + attrs.ngModel + ' : ' + attrs.ngModel + '=!' + attrs.ngModel + (attrs.ngChange ? '; ' + attrs.ngChange + '()"' : '"') : '';

      html +=   ' ng-class="{ checked:' + attrs.ngModel + ', disabled:' + attrs.disabled + ' }"';

      html +=   '>';

      html +=   '<small></small>';

      html +=   '<input type="checkbox"';

      html +=     attrs.id ? ' id="' + attrs.id + '"' : '';

      html +=     attrs.name ? ' name="' + attrs.name + '"' : '';

      html +=     attrs.ngModel ? ' ng-model="' + attrs.ngModel + '"' : '';

      html +=     ' style="display:none" />';

      html +=     '<span class="switch-text">'; /*adding new container for switch text*/

      html +=     attrs.on ? '<span class="on">'+attrs.on+'</span>' : ''; /*switch text on value set by user in directive html markup*/

      html +=     attrs.off ? '<span class="off">'+attrs.off + '</span>' : ' ';  /*switch text off value set by user in directive html markup*/

      html += '</span>';

      return html;

    }

  }

});
2.css(angular-ui-switch.css)
.switch {

  background: #fff;

  border: 1px solid #dfdfdf;

  position: relative;

  display: inline-block;

  box-sizing: content-box;

  overflow: visible;

  width: 52px;

  height: 30px;

  padding: 0px;

  margin: 0px;

  border-radius: 20px;

  cursor: pointer;

  box-shadow: rgb(223, 223, 223) 0px 0px 0px 0px inset;

  transition: 0.3s ease-out all;

  -webkit-transition: 0.3s ease-out all;

  top: -1px;

}

/*adding a wide width for larger switch text*/

.switch.wide {

  width:80px;

}

.switch small {

  background: #fff;

  border-radius: 100%;

  box-shadow: 0 1px 3px rgba(0,0,0,0.4);

  width: 30px;

  height: 30px;

  position: absolute;

  top: 0px;

  left: 0px;

  transition: 0.3s ease-out all;

  -webkit-transition: 0.3s ease-out all;

}

.switch.checked {

  background: rgb(100, 189, 99);

  border-color: rgb(100, 189, 99);

}

.switch.checked small {

  left: 22px;

}

/*wider switch text moves small further to the right*/

.switch.wide.checked small {

  left:52px;

}

/*styles for switch-text*/

.switch .switch-text {

  font-family:Arial, Helvetica, sans-serif;

  font-size:13px;

}

.switch .off {

  display:block;

  position: absolute;

  right: 10%;

  top: 25%;

  z-index: 0;

  color:#A9A9A9;

}

.switch .on {

  display:none;

   z-index: 0;

  color:#fff;

  position: absolute;

  top: 25%;

  left: 9%;

}

.switch.checked .off {

  display:none;

}

.switch.checked .on {

  display:block;

}

.switch.disabled {

  opacity: .50;

  cursor: not-allowed;

}
3.在apps.js中注入
var app = angular.module('app', ['uiSwitch'])
4.index.html引入相关文件
<link rel="stylesheet" href="../angular-ui-switch.css"/>

<script src="../angular.min.js"></script>

<script src="../angular-ui-switch.js"></script>

<script src="app.js"></script>
5.应用:
<form data-ng-controller="MyController">

    <switch name="enabled" ng-model="enabled" ng-change="changeCallback"></switch>

    <p>

        <button ng-click="enabled=!enabled">Toggle</button>

    </p>

    <p>

        Enabled: {{ enabled }}

    </p>

    <!--Examples of using switch text on/off values.  These values can be anything.  First example shows basic on/off-->

    <switch name="onOff" ng-model="onOff" on="on" off="off"></switch>

    <p>

        <button ng-click="onOff=!onOff">Toggle</button>

    </p>

    <p>

        Enabled: {{ onOff }}

    </p>

    <!--Examples of using the nonsense words lorem/ipsum in the on/off values.  Because these are wider, added an option "wide" class to allow for more room-->

    <switch name="yesNo" ng-model="yesNo" on="lorem" off="ipsum" class="wide"></switch>

    <p>

        <button ng-click="onOff=!onOff">Toggle</button>

    </p>

    <p>

        Enabled: {{ yesNo }}

    </p>

    <!--Examples of using switch disabled states. -->

    <switch name="disabled" ng-model="disabled" disabled="true"></switch>

    <p>

        <button ng-click="disabled=!disabled">Toggle</button>

    </p>

    <p>

        Enabled: {{ disabled }}

    </p>

</form>
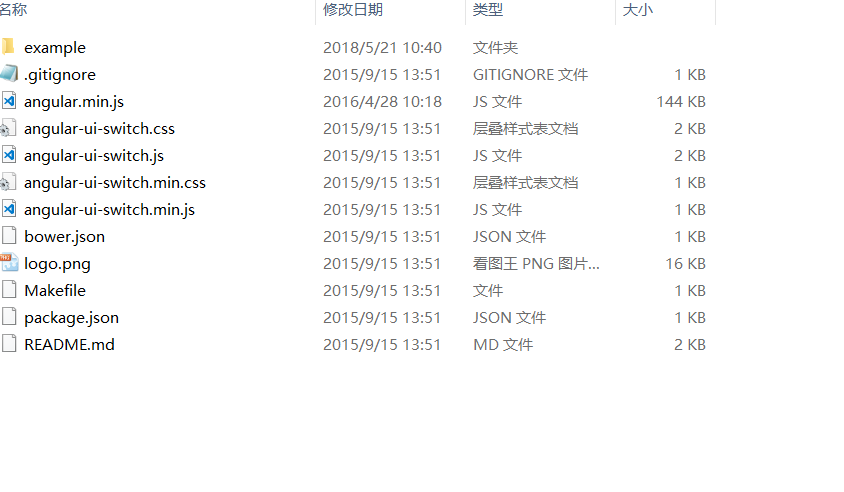
6.附录---目录结构
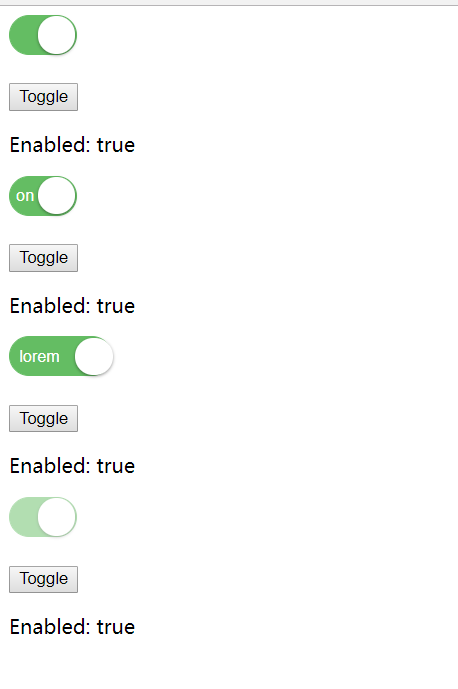
7.效果图:
方法二(使用背景图和ng-class)
html
<span class="wrap" ng-class="{true:'on',false:'off'}[isOn]" ng-click="isOn = !isOn"></span>
css
.wrap{

    display:block;

    width:68px;

    height:40px;

    background-size: cover;

    cursor: pointer;

}

.on{

    background:url(../on.png) no-repeat;

}

.off{

    background:url(../off.png) no-repeat;

}
js
$scope.isOn = false;//默认为关闭状态
效果:

相关链接:
个人资料:
作者:smile.轉角
QQ:493177502
【angularjs】使用angular搭建PC端项目,开关按钮的更多相关文章
- 【angularjs】使用ionic+angular 搭建移动端项目,字体适配
解析: 首先,rem是以html为基准. 一般的,各大主流浏览器的font-size默认值为16px,此时1rem=16px.如果此时将rem与px进行换算很麻烦,比如0.75rem=12px. 为了 ...
- 曾经的pc端项目踩到的一些兼容性的坑及其解决方案
曾经公司pc端项目一直最低兼容到IE7,要求和chrome下浏览效果一致,真心坑坏了我和另外一个小伙伴(另一个小伙伴以前也没处理过兼容问题).不过还好,在这里真心感谢鑫哥博客的详解,从底层原理讲到了具 ...
- react 开发 PC 端项目(一)项目环境搭建 及 处理 IE8 兼容问题
步骤一:项目环境搭建 首先,你不应该使用 React v15 或更高版本.使用仍然支持 IE8 的 React v0.14 即可. 技术选型: 1.react@0.14 2.bootstrap3 3. ...
- vue脚手架搭建移动端项目--flexible.js
通过命令行 node -v 查看是否安装node环境 在 nodejs 和 webpack已安装的前提下,随便一个文件夹下,输入命令行 npm install vue-cli -g 安装完成后,通过 ...
- pc端的企业网站(IT修真院test9)详解一个响应式完成的pc端项目
一:引入bootstrap框架 昨天一直被bootstrap栅格系统折磨. why? 我本来想一边码字,一边学习栅格布局的.but不成功.这时我头脑已经昏了. 下午,我查看了bootstrap的官网, ...
- vue PC端项目中解决userinfo问题
在vue2 中用脚手架建立的项目,后端提供接口获取数据.在公司做第一个项目的时候不清楚公司里的对接流程,结果后续代码被一个接口整的乱七八糟,这个接口是获取用户信息的接口——'usre/info'. 如 ...
- angular --- s3core移动端项目(三)
angular.module('myApp') .directive('listActive',functon(){ return { restrict:'A', scope:{ listActive ...
- angular --- s3core移动端项目(二)
product-ctrl.js angular.modules('myApp').controller('ProductCtrl',['$scope','$rootScope','$timeout', ...
- angular --- s3core移动端项目
因为记性不好的原因做个草稿笔记 app.js中 var myApp = angular.module('myApp',['ui.router','oc.lazyLoad','ngAnimate','数 ...
随机推荐
- crontab工具安装和检查
什么是crontab?crontab 是一个用于设置周期性执行任务的工具 重启crond守护进程 systemctl restart crond 查看当前crond状态 systemctl statu ...
- 移动前端—H5实现图片先压缩再上传
在做移动端图片上传的时候,用户传的都是手机本地图片,而本地图片一般都相对比较大,拿iphone6来说,平时拍很多图片都是一两M的,如果直接这样上传,那图片就太大了,如果用户用的是移动流量,完全把图片上 ...
- Tars 服务调服务
1,创建一个 tars 服务工程 2,把需要调用的服务的 客户端接口文件 拷贝到当前服务 3,构建通信器 CommunicatorConfig 调用,如果是 springboot 开发客户端可以使用注 ...
- ngx-moment汉化
1.导入汉化文件 import '../../../node_modules/moment/locale/zh-cn.js' 2.使用汉化 <span>{{item.time|amLoca ...
- spring学习总结——介绍
介绍:以下博客的内容都是依据<spring实战4>这本书.spring4.0 来总结. 一.spring作用 Spring可以做很多事情,它为企业级开发提供给了丰富的功能,但是这些功能的底 ...
- Python之给程序传参数
1.代码 import sys # 导入系统 args = sys.argv # 获取系统参数 if(args.__len__() == 2): print("%s是世界上最好的语言!&qu ...
- mssql sqlserver 规范使用方法分享
转自:http://www.maomao365.com/?p=5586 摘要:下文主要讲述sql server表设计及脚本编写中,相关规范 ———————————数据表字段类型选择:字符类型根据长度选 ...
- MySQL高性能优化实战总结!
1.1 前言 MySQL对于很多Linux从业者而言,是一个非常棘手的问题,多数情况都是因为对数据库出现问题的情况和处理思路不清晰.在进行MySQL的优化之前必须要了解的就是MySQL的查询过程,很多 ...
- C# json、xml序列化
json序列化: public static string SerializeJson<T>(T json) { // 1. 需要添加引用 Newtonsoft.Json.dll,默认为 ...
- GitHub-分支管理03-多人合作【重点】
参考博文:廖雪峰Git教程 1. 多人协作 当你从远程仓库克隆时,实际上Git自动把本地的master分支和远程的master分支对应起来了,并且,远程仓库的默认名称是origin. 要查看远程库的信 ...