Apache Tomcat Eclipse Integration
An Illustrated Quick Start Guide
Apache Tomcat makes hosting your applications easy. The Eclipse IDE makes development easy. It's simple math. If you haven't integrated Tomcat into your Eclipse environment, you're losing out on some great enhancements to your development process.
Imagine being able to write a new servlet, deploy it to a Tomcat server, test it, make changes, redeploy, and restart Tomcat - all within Eclipse, all without editing a single XML file by hand. Time-saver? Sanity-preserver? All of the above? You bet. Here's an easy guide to getting Tomcat and Eclipse working together, from installing the Tomcat plug-in, to configuring your first server.
In the interest of simplicity, this tutorial assumes that you've already installed:
- a JDK of version 1.4.2 or higher
- the Tomcat version of your choice (version 5.5.x or higher is recommended)
- Eclipse 3.1 or higher, along with the EMF (Eclipse Modeling Framework), GEF (Graphical Editing Framework), and JEM (Java EMF Model) components
If you need more information on installing these items, visit the Eclipse and Apache Tomcat documentation pages. And to make your Apache Tomcat environment enterprise ready, learn more about Tcat, the leading enterprise Apache Tomcat application server.
Step One - Installing the Eclipse Web Tools Platform
Eclipse uses a set of components called the Web Tools Platform, or WTP, to integrate application servers into the Eclipse environment. Although you can download WTP as a ZIP file, it's quite easy to install from within Eclipse, and this is the method we'll use in this tutorial.
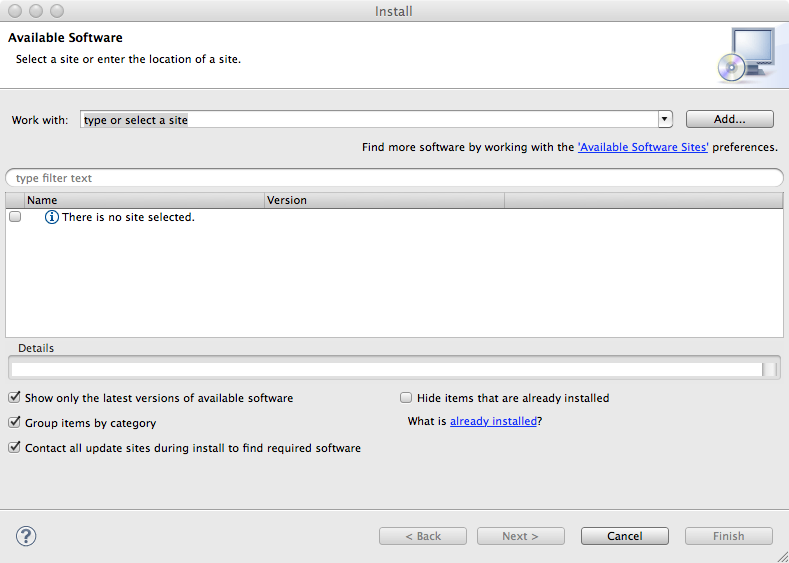
To install WTP, select the "Install New Software..." menu item from the Eclipse "Help" menu. This will call up the dialog pictured below:
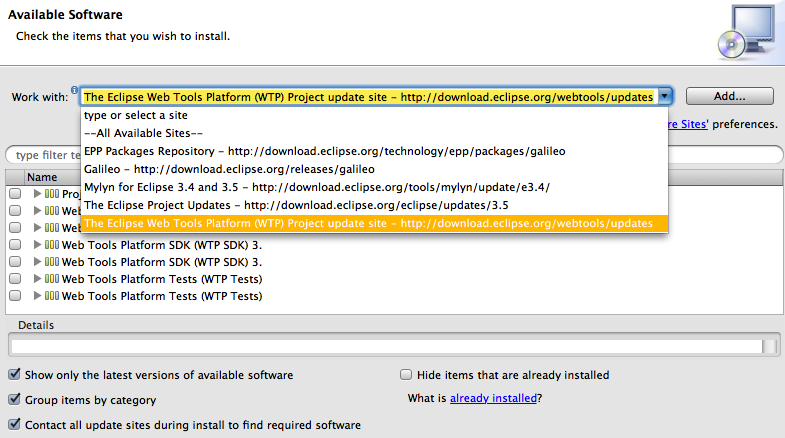
Click the "Work with:" drop down menu, and select the WTP Project site from the list:
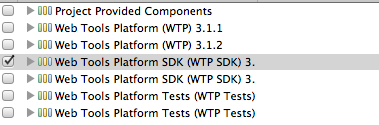
Next, select the latest version of the WTP SDK from the list of projects. In this tutorial, we'll use version 3.x:
Click "Next". Eclipse will fetch a list of components to be installed, and present them to you. You can review them if you want, but it's not necessary. Click "Next" again to reach the page "Review Licenses". Click the radio button in the lower right hand corner of the screen, indicating that you accept the licensing terms for the components that you are about to install (you only need to do this once), and the "Finish" button will become active.
Once you click the "Finish" button, Eclipse will begin downloading the components and installing them:
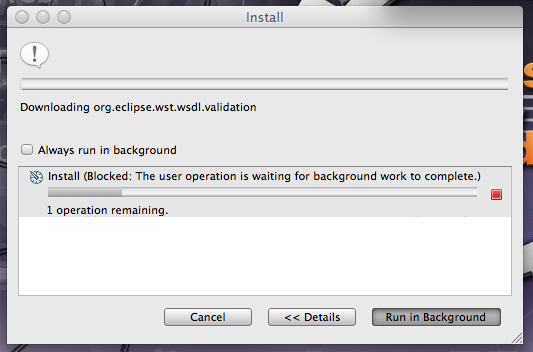
This process will take some time, so get up and go for a stroll. If you get any dialogues about installing unsigned content, don't worry - just click "OK".
At the end of the install process, Eclipse will give you the option to either restart, or apply the changes without restarting. Be safe - restart. It'll only take a few seconds, and when Eclipse starts up again, you'll be almost ready to start using Tomcat with Eclipse!
Creating Your First Tomcat-Integrated Eclipse Project
Now that you've installed the WTP, it's time to start using Tomcat with Eclipse. Start clicking "File-->New" and selecting "Dynamic Web Project" from the list of options. Eclipse will present you with this dialogue window:
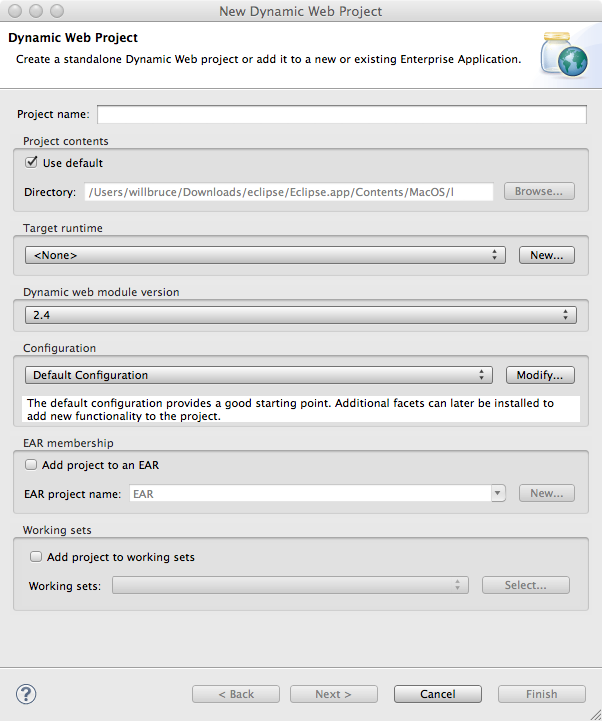
This dialogue should be familiar to you if you have used Eclipse before. What we're concerned with is the "Target runtime" box. Click "New..." to pull up the following dialogue:
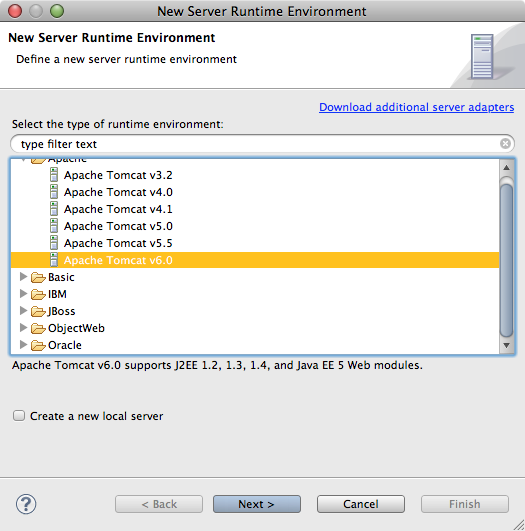
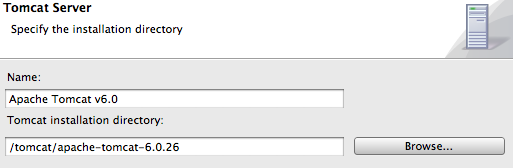
Open the Apache folder, and select the version of Tomcat you've installed on your system. For this example, we'll be using Tomcat 6. If you want to create a new local server for your project, check the box below the list of server runtimes. Click "Next", and Eclipse will ask you to locate your installation of Tomcat:
Click "Finish", configure any additional options you like on the New Dynamic Web Project dialogue screen, click "Finish" one more time, and you're done. Congratulations - you've created your first Tomcat-integrated Eclipse project.
Configuring a Tomcat Server In Eclipse
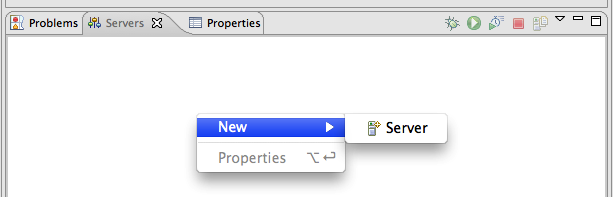
Now that you've created a Tomcat-aware project, you still need to define a Tomcat server for the project to use. You can do this in the "Server" tab, located in the lower half of Eclipse's development screen by default. Secondary click inside the tab to open the New Server dialogue:
On the next screen, choose a local name for your new server, as well as a Server name, and click Finish. If you did everything correctly, a new Server will appear in the Server list. Double-clicking on the server's name will call up a window in which you can edit basic information about the server:
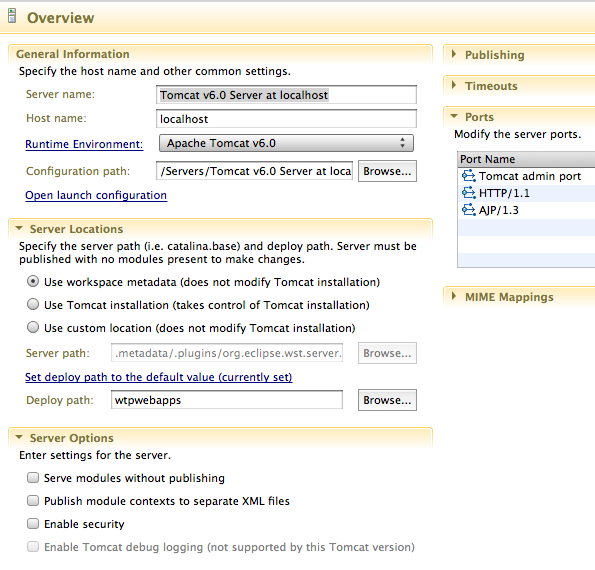
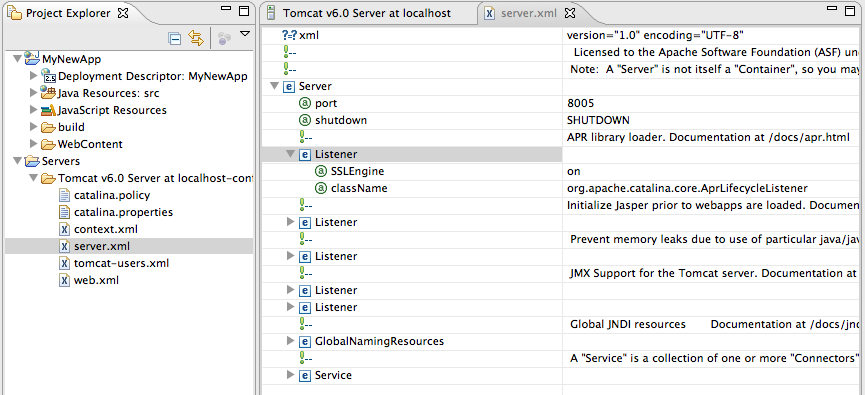
You can also edit Tomcat's Configuration files within Eclipse by selecting them from the Servers drop-down menu in Project Explorer, located on the left hand side of Eclipse's development view:
Running an Application On Your Tomcat Server
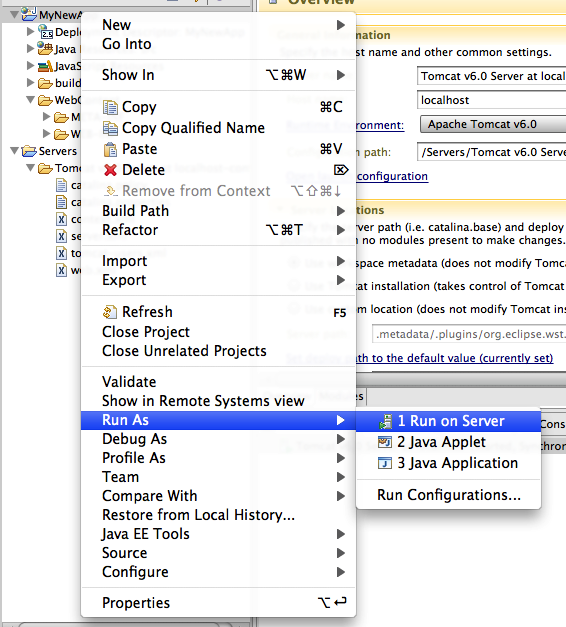
Now that you've configured a Tomcat Server for use in your Eclipse project, you can deploy whatever test application you choose to build on the server simply by starting the Server, right-clicking the application in the Project Explorer pane, and choosing Run On Server from the "Run As..." menu option:
That's the basics - the rest is up to you! For more information about using Eclipse with Apache Tomcat, visit the WTP Tomcat FAQ page.
Apache Tomcat Eclipse Integration的更多相关文章
- WEB服务器搭建(Apache+Tomcat+eclipse)
1.下载xampp安装,选择Apache+MySQL+Tomcat 官方下载链接:https://www.apachefriends.org/zh_cn/download.html 2.下载安装jav ...
- 【eclipse】Target runtime Apache Tomcat v7.0 is not defined解决
在eclipse中导入项目时提示Target runtime Apache Tomcat v7.0 is not defined, 解决方法:右键项目--properties--targeted ru ...
- 发现eclipse红叉,查看markers发现Target runtime Apache Tomcat 6.0 is not defined
1.导入以前的项目(Markers中注意查看,就在console选项卡旁边),报以下错误,但不影响操作: Description Resource Path Location TypeTarget r ...
- Eclipse配置tomcat8.5.7报错:The Apache Tomcat installation at this directory is version 8.5.27. A Tomcat 8.0 installation is...
Eclipse配置tomcat8.5.7报错:The Apache Tomcat installation at this directory is version 8.5.27. A Tomcat ...
- eclipse添加web项目报错“Target runtime Apache Tomcat v7.0 is not defined.”
项目检出后,发现是Tomcat7 发布的,修改文件: 工作空间--->项目名称--->.settings--->org.eclipse.wst.common.project.face ...
- 发现eclipse红叉,查看markers发现Target runtime Apache Tomcat v8.0 is not defined
导入以前的项目(Markers中注意查看,就在console选项卡旁边),报以下错误,但不影响操作: Faceted Project Problem Target runtime Apa ...
- 如何搭建Eclipse +Apache Tomcat配置Java开发环境
Linux平台下如何搭建Eclipse +Apache Tomcat配置的Java开发环境 本文出自 "李晨光原创技术博客" 博客,请务必保留此出处http://chenguang ...
- [Tomcat源码分析] Eclipse中搭建Apache Tomcat源码调试环境
网上很多文章都推荐使用Ant下载编译,但本地实践中屡屡失败,无法下载. 后来参考 https://blog.csdn.net/xiongyouqiang/article/details/7894107 ...
- Eclipse添加tomcat出现 The Apache Tomcat installation at this directory is version 8.5.6. A Tomcat 8.0 installation is expected.
打开tomcat安装目录:apache-tomcat-8.5.6\lib 找到catalina.jar 用解压缩工具打开 org/apache/catalina/util/ServerInfo.pro ...
随机推荐
- Alfred 3 如何设置默认搜索引擎(以百度搜索为例)
前提条件: Alfred 3 已经安装在MAC中 首先要有破解的Alfred 3 安装在MAC PRO中,然后进入到以下栏目:Features-->web Search-->Add Cus ...
- windows 10 透明毛玻璃,winform和wpf方法
win10的透明毛玻璃,winform和wpf方法,win7.8不能用,只是win10 public partial class Form1 : Form { [DllImport("use ...
- CentOS7 yum安装配置 drbd-84-utils (外部模式)
1 安装环境介绍 1.1 系统环境 内核:3.10.0-862.el7.x86_64 版本:CentOS Linux release 7.5.1804 (Core) 主服务器:hostname = ...
- max_delay/min_delay和input_delay/output_delay
今天在使用DC设置随路时钟的时候发现里两个比较容易混淆的设置:max_delay/min_delay和input_delay/output_delay. 1)max_delay/min_delay设置 ...
- html(),text(),var()区别与用法
text() 设置或返回所选元素的文本内容 html() 设置或返回所选元素的内容(包括HTML标记) val() 设置或返回表单字段的值 用html()效果把html标签也获取出来了: 用val() ...
- Spring 文件上传MultipartFile 执行流程分析
在了解Spring 文件上传执行流程之前,我们必须知道两点: 1.Spring 文件上传是基于common-fileUpload 组件的,所以,文件上传必须引入此包 2.Spring 文件上传需要在X ...
- pythone函数基础(14)发送邮件
导入yagmail模块import yagmailusername='uitestp4p@163.com'password='houyafan123'#生成授权码,qq.163.126都是授权码 ma ...
- MySQL增删改查常用语句命令
增删改查语句增删改查的语句命令为 增:insert删:delete改:update查:SELECT或者show 库操作创建数据库:create database shujukuba;创建带字符集的数据 ...
- yum 安装时遇到“UnicodeDecodeError: 'ascii' codec”的问题
今天新安装了一个6.9系统,配置好本地yum源后,用yum安装时报了以上的错误信息,在/etc/yum.repos.d/目录下多出了TTT的一个目录 (手动问号),在百度上查了一些文档. 解决方法:1 ...
- BP算法的矩阵推导
目录 1. 需要的微积分知识 1.1 导数 1.2 求导的链式法则 2. 梯度下降法 2.1 梯度 2.2 梯度算法的解释 3.误差反向传播算法 3.1 理论推导 3.1.1 符号说明 3.1.2 推 ...