ActiveMQ消息的发送原理
持久化消息和非持久化消息的发送策略:消息同步发送和异步发送
ActiveMQ支持同步、异步两种发送模式将消息发送到broker上。同步发送过程中,发送者发送一条消息会阻塞直到broker反馈一个确认消息,表示消息已经被broker处理。这个机制提供了消息的安全性保障,但是由于是阻塞的操作,会影响到客户端消息发送的性能。异步发送的过程中,发送者不需要等待broker提供反馈,所以性能相对较高。但是可能会出现消息丢失的情况。所以使用异步发送的前提是在某些情况下允许出现数据丢失的情况。
默认情况下,非持久化消息是异步发送的,持久化消息并且是在非事务模式下是同步发送的。但是在开启事务的情况下,消息都是异步发送。由于异步发送的效率会比同步发送性能更高。所以在发送持久化消息的时候,尽量去开启事务会话。除了持久化消息和非持久化消息的同步和异步特性以外,我们还可以通过以下几种方式来设置异步发送:
1.ConnectionFactory connectionFactory=new ActiveMQConnectionFactory("tcp://192.168.11.153:61616?jms.useAsyncSend=true");

2.((ActiveMQConnectionFactory) connectionFactory).setUseAsyncSend(true);

3.((ActiveMQConnection)connection).setUseAsyncSend(true);
消息发送的源码:
以producer.send为入口 进入的是ActiveMQSession 实现:
public void send(Destination destination, Message message, int deliveryMode, int priority, long timeToLive, AsyncCallback onComplete) throws JMSException {

        checkClosed(); //检查session的状态,如果session关闭则抛异常

        if (destination == null) {

            if (info.getDestination() == null) {

                throw new UnsupportedOperationException("A destination must be specified.");

            }

            throw new InvalidDestinationException("Don't understand null destinations");

        }

        //检查destination的类型,如果符合要求,就转变为ActiveMQDestination

        ActiveMQDestination dest;

        if (destination.equals(info.getDestination())) {

            dest = (ActiveMQDestination)destination;

        } else if (info.getDestination() == null) {

            dest = ActiveMQDestination.transform(destination);

        } else {

            throw new UnsupportedOperationException("This producer can only send messages to: " + this.info.getDestination().getPhysicalName());

        }

        if (dest == null) {

            throw new JMSException("No destination specified");

        }

        if (transformer != null) {

            Message transformedMessage = transformer.producerTransform(session, this, message);

            if (transformedMessage != null) {

                message = transformedMessage;

            }

        }

        //如果发送窗口大小不为空,则判断发送窗口的大小决定是否阻塞

        if (producerWindow != null) {

            try {

                producerWindow.waitForSpace();

            } catch (InterruptedException e) {

                throw new JMSException("Send aborted due to thread interrupt.");

            }

        }

        //发送消息到broker的topic

        this.session.send(this, dest, message, deliveryMode, priority, timeToLive, producerWindow, sendTimeout, onComplete);

        stats.onMessage();

    }
ActiveMQSession的send方法,this.session.send(this, dest, message, deliveryMode, priority, timeToLive, producerWindow, sendTimeout, onComplete):
protected void send(ActiveMQMessageProducer producer, ActiveMQDestination destination, Message message, int deliveryMode, int priority, long timeToLive,

                        MemoryUsage producerWindow, int sendTimeout, AsyncCallback onComplete) throws JMSException {

        checkClosed();

        if (destination.isTemporary() && connection.isDeleted(destination)) {

            throw new InvalidDestinationException("Cannot publish to a deleted Destination: " + destination);

        }

        //互斥锁,如果一个session的多个producer发送消息到这里,会保证消息发送的有序性

        synchronized (sendMutex) {

            // tell the Broker we are about to start a new transaction

            doStartTransaction();//告诉broker开始一个新事务,只有事务型会话中才会开启

            TransactionId txid = transactionContext.getTransactionId();//从事务上下文中获取事务id

            long sequenceNumber = producer.getMessageSequence();

            //Set the "JMS" header fields on the original message, see 1.1 spec section 3.4.11

            message.setJMSDeliveryMode(deliveryMode); //在JMS协议头中设置是否持久化标识

            long expiration = 0L;//计算消息过期时间

            if (!producer.getDisableMessageTimestamp()) {

                long timeStamp = System.currentTimeMillis();

                message.setJMSTimestamp(timeStamp);

                if (timeToLive > 0) {

                    expiration = timeToLive + timeStamp;

                }

            }

            message.setJMSExpiration(expiration);//设置消息过期时间

            message.setJMSPriority(priority);//设置消息的优先级

            message.setJMSRedelivered(false);;//设置消息为非重发

            // transform to our own message format here

            ActiveMQMessage msg = ActiveMQMessageTransformation.transformMessage(message, connection);

            msg.setDestination(destination);

            msg.setMessageId(new MessageId(producer.getProducerInfo().getProducerId(), sequenceNumber));

            // Set the message id.

            if (msg != message) {//如果消息是经过转化的,则更新原来的消息id和目的地

                message.setJMSMessageID(msg.getMessageId().toString());

                // Make sure the JMS destination is set on the foreign messages too.

                message.setJMSDestination(destination);

            }

            //clear the brokerPath in case we are re-sending this message

            msg.setBrokerPath(null);

            msg.setTransactionId(txid);

            if (connection.isCopyMessageOnSend()) {

                msg = (ActiveMQMessage)msg.copy();

            }

            msg.setConnection(connection);

            msg.onSend();//把消息属性和消息体都设置为只读,防止被修改

            msg.setProducerId(msg.getMessageId().getProducerId());

            if (LOG.isTraceEnabled()) {

                LOG.trace(getSessionId() + " sending message: " + msg);

            }

            //如果onComplete没有设置(这里传进来就是null),且发送超时时间小于0,且消息不需要反馈,且连接器不是同步发送模式,且消息非持久化或者连接器是异步发送模式

            //或者存在事务id的情况下,走异步发送,否则走同步发送

            if (onComplete==null && sendTimeout <= 0 && !msg.isResponseRequired() && !connection.isAlwaysSyncSend() && (!msg.isPersistent() || connection.isUseAsyncSend() || txid != null)) {

                this.connection.asyncSendPacket(msg);

                if (producerWindow != null) {

                    int size = msg.getSize();//异步发送的情况下,需要设置producerWindow的大小

                    producerWindow.increaseUsage(size);

                }

            } else {

                if (sendTimeout > 0 && onComplete==null) {

                    this.connection.syncSendPacket(msg,sendTimeout);//带超时时间的同步发送

                }else {

                    this.connection.syncSendPacket(msg, onComplete);//带回调的同步发送

                }

            }

        }

    }
我们从上面的代码可以看到,在执行发送操作之前需要把消息做一个转化,并且将我们设置的一些属性注入导指定的属性中,我们先来看看异步发送,会发现异步发送的时候涉及到producerWindowSize的大小:
ProducerWindowSize的含义
producer每发送一个消息,统计一下发送的字节数,当字节数达到ProducerWindowSize值时,需要等待broker的确认,才能继续发送。
主要用来约束在异步发送时producer端允许积压的(尚未ACK)的消息的大小,且只对异步发送有意义。每次发送消息之后,都将会导致memoryUsage大小增加(+message.size),当broker返回producerAck时,memoryUsage尺寸减少(producerAck.size,此size表示先前发送消息的大小)。
可以通过如下2种方式设置:
Ø 在brokerUrl中设置: "tcp://localhost:61616?jms.producerWindowSize=1048576",这种设置将会对所有的producer生效。
Ø 在destinationUri中设置: "myQueue?producer.windowSize=1048576",此参数只会对使用此Destination实例的producer生效,将会覆盖brokerUrl中的producerWindowSize值。
注意:此值越大,意味着消耗Client端的内存就越大。
接下去我们进入异步发送流程,看看消息是怎么异步发送的this.connection.asyncSendPacket(msg):
private void doAsyncSendPacket(Command command) throws JMSException {

        try {

            this.transport.oneway(command);

        } catch (IOException e) {

            throw JMSExceptionSupport.create(e);

        }

    }
这里的 Command 其实就是之前一步所转化的message ,并且经过一系列的属性注入。因为ActiveMQMessage 继承了 baseCommand ,该类实现了 Command 。所以可以转化,然后我们发现 oneway 方法又很多的实现,都是基于 transport ,那么我们就需要来看看这个 transport 是什么。这里我们把代码往前翻并没有发现他的初始化,按照我们以往的思路,这里就会在初始化连接的时候进行初始化该对象:
ConnectionFactory connectionFactory = new ActiveMQConnectionFactory("tcp://192.168.254.135:61616");

Connection connection= connectionFactory.createConnection();
这里进入 ActiveMQConnectionFactory 的 createConnection方法会来到:
protected ActiveMQConnection createActiveMQConnection(String userName, String password) throws JMSException {

        if (brokerURL == null) {

            throw new ConfigurationException("brokerURL not set.");

        }

        ActiveMQConnection connection = null;

        try {// 果然发现了这个东东的初始化

            Transport transport = createTransport();

            // 创建连接

            connection = createActiveMQConnection(transport, factoryStats);

            // 设置用户密码

            connection.setUserName(userName);

            connection.setPassword(password);

            // 对连接做包装

            configureConnection(connection);

            // 启动一个后台传输线程

            transport.start();

            // 设置客户端消费的id

            if (clientID != null) {

                connection.setDefaultClientID(clientID);

            }

            return connection;

        } ......

   }
这里我们发现了 Transport transport = createTransport(); 这就是他的初始化:我们可以发现
protected Transport createTransport() throws JMSException {

        try {

            URI connectBrokerUL = brokerURL;

            String scheme = brokerURL.getScheme();

            if (scheme == null) {

                throw new IOException("Transport not scheme specified: [" + brokerURL + "]");

            }

            if (scheme.equals("auto")) {

                connectBrokerUL = new URI(brokerURL.toString().replace("auto", "tcp"));

            } else if (scheme.equals("auto+ssl")) {

                connectBrokerUL = new URI(brokerURL.toString().replace("auto+ssl", "ssl"));

            } else if (scheme.equals("auto+nio")) {

                connectBrokerUL = new URI(brokerURL.toString().replace("auto+nio", "nio"));

            } else if (scheme.equals("auto+nio+ssl")) {

                connectBrokerUL = new URI(brokerURL.toString().replace("auto+nio+ssl", "nio+ssl"));

            }

            return TransportFactory.connect(connectBrokerUL);

        } catch (Exception e) {

            throw JMSExceptionSupport.create("Could not create Transport. Reason: " + e, e);

        }

    }
这里有点类似于基于URL驱动的意思,这里进来先是构建一个 URI ,根据URL去创建一个连接TransportFactory.connect,会发现默认使用的是tcp的协议。这里由于我们在创建连接的时候就已经指定了tcp所以这里的判断都没用,直接进入创建连接TransportFactory.connect(connectBrokerUL):
public static Transport connect(URI location) throws Exception {

        TransportFactory tf = findTransportFactory(location);

        return tf.doConnect(location);

    }
这里做连接需要创建一个 tf 对象。这就要看看findTransportFactory(location) :
public static TransportFactory findTransportFactory(URI location) throws IOException {

        String scheme = location.getScheme();

        if (scheme == null) {

            throw new IOException("Transport not scheme specified: [" + location + "]");

        }

        TransportFactory tf = TRANSPORT_FACTORYS.get(scheme);

        if (tf == null) {

            // Try to load if from a META-INF property.

            try {

                tf = (TransportFactory)TRANSPORT_FACTORY_FINDER.newInstance(scheme);

                TRANSPORT_FACTORYS.put(scheme, tf);

            } catch (Throwable e) {

                throw IOExceptionSupport.create("Transport scheme NOT recognized: [" + scheme + "]", e);

            }

        }

        return tf;

    }
不难理解以上的 代码是根据 scheme通过TRANSPORT_FACTORYS 这个map 来创建的 TransportFactory ,如果获取不到,就会通过TRANSPORT_FACTORY_FINDER 去获取一个实例。TRANSPORT_FACTORY_FINDER 这个FINDER是什么东西呢? 我们看看他的初始化:
private static final FactoryFinder TRANSPORT_FACTORY_FINDER = new FactoryFinder("META-INF/services/org/apache/activemq/transport/");
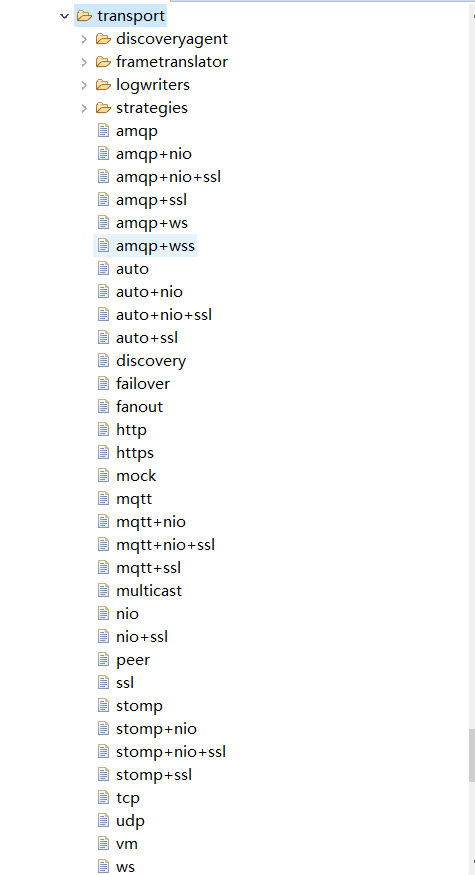
我们通过源码中指定路径以下的东西:

这有点类似于 java 中SPI规范的意思。我们可以看看 tcp 其中的内容:
class=org.apache.activemq.transport.tcp.TcpTransportFactory
这里是键值对的方式,上述获取实例的代码中其实就是获取一个 TcpTransportFactory 实例,那么我们就知道tf.doConnect(location) 是哪个实现类做的,就是TcpTransportFactory,但是我们点开一看并未发现 TcpTransportFactory实现,这就说明该类使用的是父类里面的方法,这里就是TransportFactory 类:
public Transport doConnect(URI location) throws Exception {

        try {

            Map<String, String> options = new HashMap<String, String>(URISupport.parseParameters(location));

            if( !options.containsKey("wireFormat.host") ) {

                options.put("wireFormat.host", location.getHost());

            }

            WireFormat wf = createWireFormat(options);

            //创建一个Transport 这里才是我们要找的真相

            Transport transport = createTransport(location, wf);

            //配置configure,这个里面是对Transport做链路包装,思想类似于dubbo的cluster

            Transport rc = configure(transport, wf, options);

            //remove auto

            IntrospectionSupport.extractProperties(options, "auto.");

            if (!options.isEmpty()) {

                throw new IllegalArgumentException("Invalid connect parameters: " + options);

            }

            return rc;

        } catch (URISyntaxException e) {

            throw IOExceptionSupport.create(e);

        }

    }
我们进入 createTransport(location, wf) 方法,这里是使用Tcp子类的实现。会发现里面创建了一个 Sokect 连接 ,这就是准备后来进行发送的Sokect。然后这里返回的 Transport 就是 TcpTransport .接下去就是对这个 transport 进行包装 configure(transport, wf, options):
public Transport configure(Transport transport, WireFormat wf, Map options) throws Exception {

//组装一个复合的transport,这里会包装两层,一个是IactivityMonitor.另一个是WireFormatNegotiator

        transport = compositeConfigure(transport, wf, options);

        //再做一层包装,MutexTransport

        transport = new MutexTransport(transport);

        //包装ResponseCorrelator

        transport = new ResponseCorrelator(transport);

        return transport;

    }
到目前为止,这个transport实际上就是一个调用链了,他的链结构为ResponseCorrelator(MutexTransport(WireFormatNegotiator(IactivityMonitor(TcpTransport()))每一层包装表示什么意思呢?
ResponseCorrelator 用于实现异步请求。
MutexTransport 实现写锁,表示同一时间只允许发送一个请求
WireFormatNegotiator 实现了客户端连接broker的时候先发送数据解析相关的协议信息,比如解析版本号,是否使用缓存等
InactivityMonitor 用于实现连接成功成功后的心跳检查机制,客户端每10s发送一次心跳信息。服务端每30s读取一次心跳信息。
通过这层层的分析,我们回到 ActiveMQConnection 发送消息的doAsyncSendPacket 方法:
private void doAsyncSendPacket(Command command) throws JMSException {

        try {

            this.transport.oneway(command);

        } catch (IOException e) {

            throw JMSExceptionSupport.create(e);

        }

    }
这里的 oneway(command)方法会先后经历上述调用链的处理最后调用到 TcpTransport 的oneway(command) ,我们一步一步来看看都做了些什么:
ResponseCorrelator.oneway(command):里面就设置了两个属性
public void oneway(Object o) throws IOException {

        Command command = (Command)o; //对前面的对象做一个强转,组装一些信息

        command.setCommandId(sequenceGenerator.getNextSequenceId());

        command.setResponseRequired(false);

        next.oneway(command);

    }
MutexTransport.oneway(command):
 public void oneway(Object command) throws IOException {

        writeLock.lock();// 通过 ReentrantLock做加锁

        try {

            next.oneway(command);

        } finally {

            writeLock.unlock();

        }

    }
WireFormatNegotiator.oneway(command):这个里面调用了父类的 oneway ,父类是 TransportFilter 类
public void oneway(Object command) throws IOException {

        boolean wasInterrupted = Thread.interrupted();

        try {

            if (readyCountDownLatch.getCount() > 0 && !readyCountDownLatch.await(negotiateTimeout, TimeUnit.MILLISECONDS)) {

                throw new IOException("Wire format negotiation timeout: peer did not send his wire format.");

            }

        } catch (InterruptedException e) {

            InterruptedIOException interruptedIOException = new InterruptedIOException("Interrupted waiting for wire format negotiation");

            interruptedIOException.initCause(e);

            try {

                onException(interruptedIOException);

            } finally {

                Thread.currentThread().interrupt();

                wasInterrupted = false;

            }

            throw interruptedIOException;

        }  finally {

            if (wasInterrupted) {

                Thread.currentThread().interrupt();

            }

        }

        super.oneway(command); //里面没做什么事情进入下一个调用链

    }
从WireFormatNegotiator的父类TransportFilter进入下一个调用链应该调用的是InactivityMonitor.oneway(command),可是并未发现又该类实现,所以这里进入InactivityMonitor 的父类AbstractInactivityMonitor:
public void oneway(Object o) throws IOException {

        // To prevent the inactivity monitor from sending a message while we

        // are performing a send we take a read lock. The inactivity monitor

        // sends its Heart-beat commands under a write lock. This means that

        // the MutexTransport is still responsible for synchronizing sends

        sendLock.readLock().lock();//获取发送读锁 锁定

        inSend.set(true);//设置属性

        try {

            doOnewaySend(o);//通过这个逻辑进入下一个调用链

        } finally {

            commandSent.set(true);

            inSend.set(false);

            sendLock.readLock().unlock();

        }

    }
在doOnewaySend 里面的next.oneway(command) 方法最终调用 TcpTransport 的实现:
public void oneway(Object command) throws IOException {

        checkStarted();

        //进行格式化内容 通过Sokct 发送

        wireFormat.marshal(command, dataOut);

        // 流的刷新

        dataOut.flush();

}
最后通过Sokect进行数据的传输。这样子异步发送的流程就结束了。下面来走一下同步的流程:通过this.connection.syncSendPacket() 进入同步发送流程。
public Response syncSendPacket(Command command, int timeout) throws JMSException {

        if (isClosed()) {

            throw new ConnectionClosedException();

        } else {

            try {// 进行发送,阻塞获取结果

                Response response = (Response)(timeout > 0

                        ? this.transport.request(command, timeout)

                        : this.transport.request(command));

                if (response.isException()) {

                    ExceptionResponse er = (ExceptionResponse)response;

                    if (er.getException() instanceof JMSException) {

                        throw (JMSException)er.getException();

                    }

                 。。。。。。。。。

                return response;

            } catch (IOException e) {

                throw JMSExceptionSupport.create(e);

            }

        }

    }
这里的 transport 跟异步发送过程中的transport时一样的,即 ResponseCorrelator(MutexTransport(WireFormatNegotiator(IactivityMonitor(TcpTransport())) 一个调用链,进入ResponseCorrelator 的实现:
public Object request(Object command, int timeout) throws IOException {

        FutureResponse response = asyncRequest(command, null);

        return response.getResult(timeout);

    }
从这个方法我们可以得到的信息时,在发送的时候采用的是 asyncRequest 方法,意思是异步请求,但是在下行采用 response.getResult(timeout) 去同步阻塞的方式去获取结果:
public Response getResult(int timeout) throws IOException {

        final boolean wasInterrupted = Thread.interrupted();

        try {

            Response result = responseSlot.poll(timeout, TimeUnit.MILLISECONDS);

              .........

    }
这里会从 ArrayBlockingQueue 去 阻塞的处理请求。其实这里的同步发送实质上采用的不阻塞发送,阻塞的去等待broker 的反馈结果。
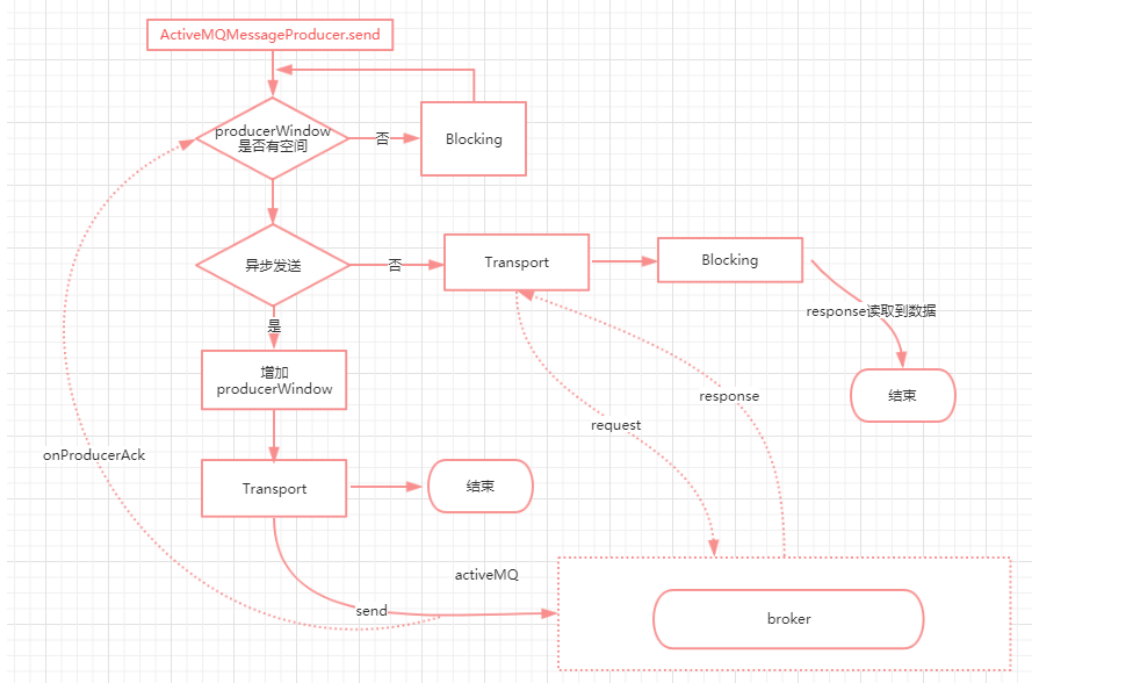
最后整理一下这个发送流程图

延迟和定时消息投递(Delay and Schedule Message Delivery):
有时候我们不希望消息马上被broker投递出去,而是想要消息60秒以后发给消费者,或者我们想让消息没隔一定时间投递一次,一共投递指定的次数。。。类似这种需求,ActiveMQ提供了一种broker端消息定时调度机制。我们只需要把几个描述消息定时调度方式的参数作为属性添加到消息,broker端的调度器就会按照我们想要的行为去处理消息。当然需要在xml中配置schedulerSupport属性为true(broker的属性)即:<broker schedulerSupport="true">
使用延迟消息必须遵守如下配置属性:属性名称 类型 描述
- AMQ_SCHEDULED_DELAY (long) 消息延迟时间单位:毫秒
- AMQ_SCHEDULED_PERIOD( long) 消息发送周期单位时间:毫秒。如 5秒一次 配置 AMQ_SCHEDULED_PERIOD = 5*1000
- AMQ_SCHEDULED_REPEAT (int) 消息重复发送次数
- AMQ_SCHEDULED_CRON (string) 使用Cron 表达式 设置定时发送
延迟60秒发送消息
MessageProducer producer = session.createProducer(destination);

TextMessage message = session.createTextMessage("test msg");

long time = 60 * 1000;

message.setLongProperty(ScheduledMessage.AMQ_SCHEDULED_DELAY, time);

producer.send(message);
开始延迟30秒发送,重复发送10次,每次之间间隔10秒
MessageProducer producer = session.createProducer(destination);

TextMessage message = session.createTextMessage("test msg");

long delay = 30 * 1000;

long period = 10 * 1000;

int repeat = 9;

message.setLongProperty(ScheduledMessage.AMQ_SCHEDULED_DELAY, delay);

message.setLongProperty(ScheduledMessage.AMQ_SCHEDULED_PERIOD, period);

message.setIntProperty(ScheduledMessage.AMQ_SCHEDULED_REPEAT, repeat);

producer.send(message);
使用Cron 表示式定时发送消息
MessageProducer producer = session.createProducer(destination);

TextMessage message = session.createTextMessage("test msg");

message.setStringProperty(ScheduledMessage.AMQ_SCHEDULED_CRON, "0 * * * *");

producer.send(message);
Cron 的优先级大于消息延迟,只要设置了Cron 表达式会优先执行Cron规则,如下:消息定时发送10次,每个小时执行,延迟1秒之后发送。
MessageProducer producer = session.createProducer(destination);

TextMessage message = session.createTextMessage("test msg");

message.setStringProperty(ScheduledMessage.AMQ_SCHEDULED_CRON, "0 * * * *");

message.setLongProperty(ScheduledMessage.AMQ_SCHEDULED_DELAY, 1000);

message.setLongProperty(ScheduledMessage.AMQ_SCHEDULED_PERIOD, 1000);

message.setIntProperty(ScheduledMessage.AMQ_SCHEDULED_REPEAT, 9);

producer.send(message);
ActiveMQ消息的发送原理的更多相关文章
- ActiveMQ消息的消费原理
消费端消费消息: 在 初识ActiveMQ 中我提到过,两种方法可以接收消息,一种是使用同步阻塞的ActiveMQMessageConsumer#receive方法.另一种是使用消息监听器Messag ...
- ActiveMQ实现消息的发送与接受
activemq是apache的一个JMS接口的实现产品,java中定义了JMS规范,虽然RocketMQ,kafka现在比较火,但是还是建议先学一下activeMQ再学其他两个就容易很多 首先可以下 ...
- Runtime - 消息发送原理
Runtime - 消息发送原理. Objective-C运行时的核心就在于消息分派器objc_msgSend,消息分派器把选择器映射为函数指针,并调用被引用的函数. 要想理解objc_msgSend ...
- ActiveMQ 实现消息接收发送
一.接收者 package com.demo.initservice; import javax.jms.Connection; import javax.jms.ConnectionFactory; ...
- Netty构建分布式消息队列实现原理浅析
在本人的上一篇博客文章:Netty构建分布式消息队列(AvatarMQ)设计指南之架构篇 中,重点向大家介绍了AvatarMQ主要构成模块以及目前存在的优缺点.最后以一个生产者.消费者传递消息的例子, ...
- ActiveMQ消息的持久化策略
持久化消息和非持久化消息的存储原理: 正常情况下,非持久化消息是存储在内存中的,持久化消息是存储在文件中的.能够存储的最大消息数据在${ActiveMQ_HOME}/conf/activemq.xml ...
- Activemq消息确认机制 --转载
转自:http://blog.csdn.net/czp11210/article/details/47022639 ActiveMQ消息传送机制以及ACK机制详解 AcitveMQ是作为一种消息存 ...
- 2.RabbitMQ 的可靠性消息的发送
本篇包含 1. RabbitMQ 的可靠性消息的发送 2. RabbitMQ 集群的原理与高可用架构的搭建 3. RabbitMQ 的实践经验 上篇包含 1.MQ 的本质,MQ 的作用 2.R ...
- JMS学习八(ActiveMQ消息持久化)
ActiveMQ的消息持久化机制有JDBC,AMQ,KahaDB和LevelDB,还有一种内存存储的方式,由于内存不属于持久化范畴,而且如果使用内存队列,可以考虑使用更合适的产品,如ZeroMQ.所以 ...
随机推荐
- python之MD5加密
一. MD5加密import hashlib #Python3里的引用#import md5 #Python2里的引用 1. md5是不可逆的,不能解密2. 所有语言生成的md5串都是一样的 3. 不 ...
- CSS公共清除浏览器默认样式
/*Vue隐藏*/ [v-cloak] { display: none; } /*清除样式*/ body, ol, ul, dl, li, dt, dd, h1, h2, h3, h4, h5, h6 ...
- window 安装gcc交叉编译器
参考网址: https://blog.csdn.net/zsy19881226/article/details/46952535
- Shiro入门 - 通过ini文件进行授权
shiro-permission.ini #用户 [users] #admin的密码是111111,此用户具有role1.role2两个角色 admin=111111,role1,role2 zhan ...
- jquery禁用a标签
jquery禁用a标签方法1 01 02 03 04 05 06 07 08 09 10 11 12 $(document).ready(function () { $("a ...
- delete 和 delete []的区别
(1). 针对简单类型 使用new分配后的不管是数组还是非数组形式内存空间用两种方式均可 如: int *a = new int[10]; delete a; delete [] a; ...
- 【Math for ML】矩阵分解(Matrix Decompositions) (上)
I. 行列式(Determinants)和迹(Trace) 1. 行列式(Determinants) 为避免和绝对值符号混淆,本文一般使用\(det(A)\)来表示矩阵\(A\)的行列式.另外这里的\ ...
- CF1100F Ivan and Burgers
题目地址:CF1100F Ivan and Burgers 一道有难度的线性基题,看了题解才会做 预处理两个数组: \(p_{r,i}\) 表示满足下列条件的最大的 \(l\) :线性基第 \(i\) ...
- Java 类加载机制(阿里面试题)-何时初始化类
(1)阿里的面试官问我,可以不可以自己写个String类 答案:不可以,因为 根据类加载的双亲委派机制,会去加载父类,父类发现冲突了String就不再加载了; (2)能否在加载类的时候,对类的字节码进 ...
- Windows Server 2008 R2忘记密码导致无法修改密码
其实有个记住密码的工具还是简单的,登陆系统后,CMD输入命令: net user administrator NewPassword 新密码即时生效
