mybaits源码分析--缓存模块(六)
一、缓存模块
MyBatis作为一个强大的持久层框架,缓存是其必不可少的功能之一,Mybatis中的缓存分为一级缓存和二级缓存。但本质上是一样的,都是使用Cache接口实现的。缓存位于 org.apache.ibatis.cache包下。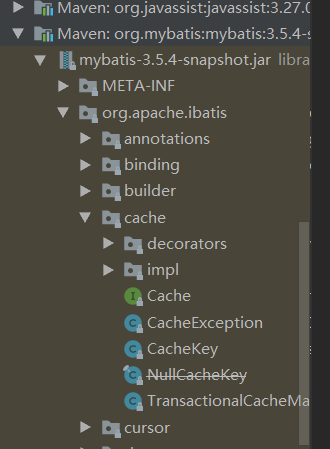
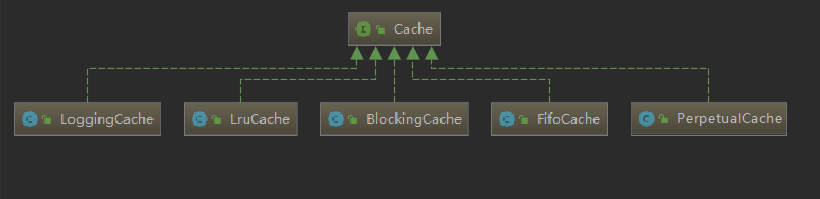
通过结构能够发现Cache其实使用到了装饰器模式来实现缓存的处理。先来看看Cache中的基础类的API;Cache接口的实现类很多,但是大部分都是装饰器,只有PerpetualCache提供了Cache接口的基本实现。
1.1 Cache接口
Cache接口是缓存模块中最核心的接口,它定义了所有缓存的基本行为,Cache接口的定义如下:
public interface Cache {

  /**

   * 缓存对象的 ID

   * @return The identifier of this cache

   */

  String getId();

  /**

   * 向缓存中添加数据,一般情况下 key是CacheKey  value是查询结果

   * @param key Can be any object but usually it is a {@link CacheKey}

   * @param value The result of a select.

   */

  void putObject(Object key, Object value);

  /**

   * 根据指定的key,在缓存中查找对应的结果对象

   * @param key The key

   * @return The object stored in the cache.

   */

  Object getObject(Object key);

  /**

   * As of 3.3.0 this method is only called during a rollback

   * for any previous value that was missing in the cache.

   * This lets any blocking cache to release the lock that

   * may have previously put on the key.

   * A blocking cache puts a lock when a value is null

   * and releases it when the value is back again.

   * This way other threads will wait for the value to be

   * available instead of hitting the database.

   *   删除key对应的缓存数据

   *

   * @param key The key

   * @return Not used

   */

  Object removeObject(Object key);

  /**

   * Clears this cache instance.

   * 清空缓存

   */

  void clear();

  /**

   * Optional. This method is not called by the core.

   * 缓存的个数。

   * @return The number of elements stored in the cache (not its capacity).

   */

  int getSize();

  /**

   * Optional. As of 3.2.6 this method is no longer called by the core.

   * <p>

   * Any locking needed by the cache must be provided internally by the cache provider.

   *  获取读写锁

   * @return A ReadWriteLock

   */

  default ReadWriteLock getReadWriteLock() {

    return null;

  }

}
1.2 PerpetualCache
PerpetualCache在缓存模块中扮演了ConcreteComponent的角色,其实现比较简单,底层使用HashMap记录缓存项,具体的实现如下
/**

 * 在装饰器模式用 用来被装饰的对象

 * 缓存中的  基本缓存处理的实现

 * 其实就是一个 HashMap 的基本操作

 * @author Clinton Begin

 */

public class PerpetualCache implements Cache {

  private final String id; // Cache 对象的唯一标识

  // 用于记录缓存的Map对象

  private final Map<Object, Object> cache = new HashMap<>();

  public PerpetualCache(String id) {

    this.id = id;

  }

  @Override

  public String getId() {

    return id;

  }

  @Override

  public int getSize() {

    return cache.size();

  }

  @Override

  public void putObject(Object key, Object value) {

    cache.put(key, value);

  }

  @Override

  public Object getObject(Object key) {

    return cache.get(key);

  }

  @Override

  public Object removeObject(Object key) {

    return cache.remove(key);

  }

  @Override

  public void clear() {

    cache.clear();

  }

  @Override

  public boolean equals(Object o) {

    if (getId() == null) {

      throw new CacheException("Cache instances require an ID.");

    }

    if (this == o) {

      return true;

    }

    if (!(o instanceof Cache)) {

      return false;

    }

    Cache otherCache = (Cache) o;

    // 只关心ID

    return getId().equals(otherCache.getId());

  }

  @Override

  public int hashCode() {

    if (getId() == null) {

      throw new CacheException("Cache instances require an ID.");

    }

    // 只关心ID

    return getId().hashCode();

  }

}
然后可以来看看cache.decorators包下提供的装饰器。他们都实现了Cache接口。这些装饰器都在PerpetualCache的基础上提供了一些额外的功能,通过多个组合实现一些特殊的需求。
1.3 BlockingCache
这是一个阻塞同步的缓存,它保证只有一个线程到缓存中查找指定的key对应的数据
/**

 * Simple blocking decorator

 *   阻塞版的缓存 装饰器

 * Simple and inefficient version of EhCache's BlockingCache decorator.

 * It sets a lock over a cache key when the element is not found in cache.

 * This way, other threads will wait until this element is filled instead of hitting the database.

 *

 * @author Eduardo Macarron

 *

 */

public class BlockingCache implements Cache {

  private long timeout; // 阻塞超时时长

  private final Cache delegate; // 被装饰的底层 Cache 对象

  // 每个key 都有对象的 ReentrantLock 对象

  private final ConcurrentHashMap<Object, ReentrantLock> locks;

  public BlockingCache(Cache delegate) {

    // 被装饰的 Cache 对象

    this.delegate = delegate;

    this.locks = new ConcurrentHashMap<>();

  }

  @Override

  public String getId() {

    return delegate.getId();

  }

  @Override

  public int getSize() {

    return delegate.getSize();

  }

  @Override

  public void putObject(Object key, Object value) {

    try {

      // 执行 被装饰的 Cache 中的方法

      delegate.putObject(key, value);

    } finally {

      // 释放锁

      releaseLock(key);

    }

  }

  @Override

  public Object getObject(Object key) {

    acquireLock(key); // 获取锁

    Object value = delegate.getObject(key); // 获取缓存数据

    if (value != null) { // 有数据就释放掉锁,否则继续持有锁

      releaseLock(key);

    }

    return value;

  }

  @Override

  public Object removeObject(Object key) {

    // despite of its name, this method is called only to release locks

    releaseLock(key);

    return null;

  }

  @Override

  public void clear() {

    delegate.clear();

  }

  private ReentrantLock getLockForKey(Object key) {

    return locks.computeIfAbsent(key, k -> new ReentrantLock());

  }

  private void acquireLock(Object key) {

    Lock lock = getLockForKey(key);

    if (timeout > 0) {

      try {

        boolean acquired = lock.tryLock(timeout, TimeUnit.MILLISECONDS);

        if (!acquired) {

          throw new CacheException("Couldn't get a lock in " + timeout + " for the key " +  key + " at the cache " + delegate.getId());

        }

      } catch (InterruptedException e) {

        throw new CacheException("Got interrupted while trying to acquire lock for key " + key, e);

      }

    } else {

      lock.lock();

    }

  }

  private void releaseLock(Object key) {

    ReentrantLock lock = locks.get(key);

    if (lock.isHeldByCurrentThread()) {

      lock.unlock();

    }

  }

  public long getTimeout() {

    return timeout;

  }

  public void setTimeout(long timeout) {

    this.timeout = timeout;

  }

}
通过源码我们能够发现,BlockingCache本质上就是在操作缓存数据的前后通过ReentrantLock对象来实现了加锁和解锁操作。
| 缓存实现类 | 缓存实现类 | 作用 | 装饰条件 |
|
基本缓存 |
缓存基本实现类 |
默认是PerpetualCache,也可以自定义比如RedisCache、EhCache等,具备基本功能的缓存类 | 无 |
| LruCache |
LRU策略的缓存 |
当缓存到达上限时候,删除最近最少使用的缓存(Least Recently Use) |
eviction="LRU"(默认) |
| FifoCache |
FIFO策略的缓存 |
当缓存到达上限时候,删除最先入队的缓存 |
eviction="FIFO" |
| SoftCacheWeakCache |
带清理策略的缓存 |
通过JVM的软引用和弱引用来实现缓存,当JVM内存不足时,会自动清理掉这些缓存,基于SoftReference和WeakReference |
eviction="SOFT"eviction="WEAK" |
| LoggingCache |
带日志功能的缓存 |
比如:输出缓存命中率 | 基本 |
| SynchronizedCache |
同步缓存 |
基于synchronized关键字实现,解决并发问题 |
基本 |
| BlockingCache |
阻塞缓存 |
通过在get/put方式中加锁,保证只有一个线程操作缓存,基于Java重入锁实现 |
blocking=true |
| SerializedCache |
支持序列化的缓存 |
将对象序列化以后存到缓存中,取出时反序列化 |
readOnly=false(默认) |
| ScheduledCache |
定时调度的缓存 |
在进行get/put/remove/getSize等操作前,判断缓存时间是否超过了设置的最长缓存时间(默认 |
flushInterval不为空 |
| TransactionalCache |
事务缓存 |
在二级缓存中使用,可一次存入多个缓存,移除多个缓存 |
在TransactionalCacheManager中用Map维护对应关系 |
1.4 缓存的应用
1.4.1 缓存对应的初始化
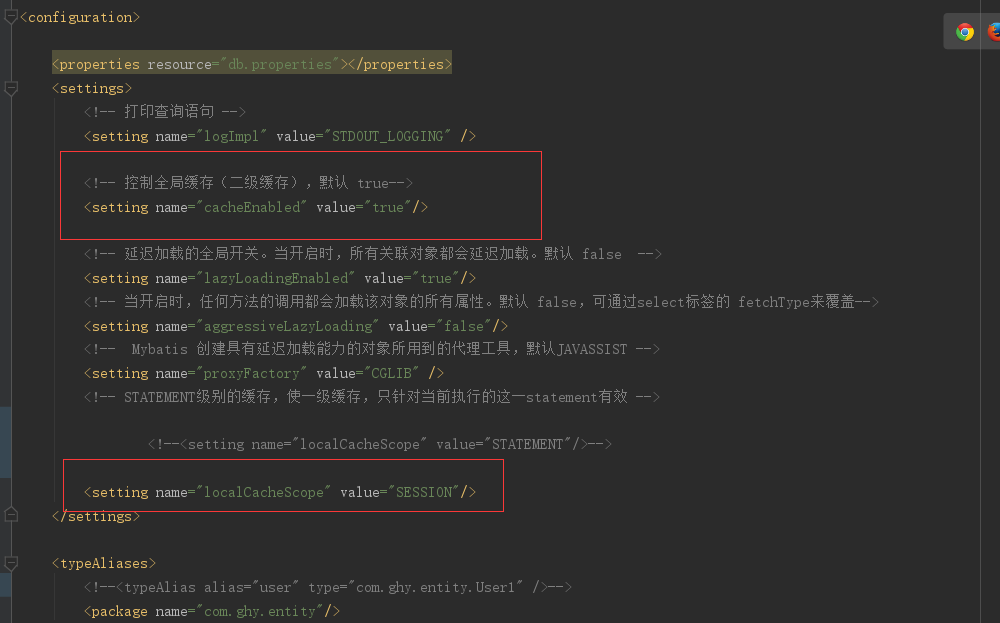
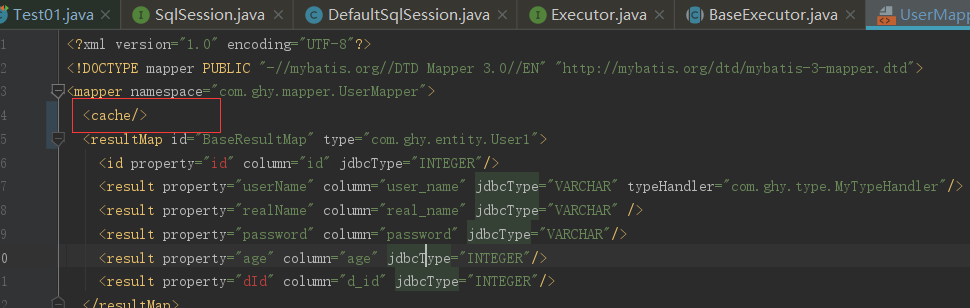
在之前写的代码中断个点看下可能直接点,在断点前说明下要求,如要开启缓存要在配置文件开启一级和二级缓存
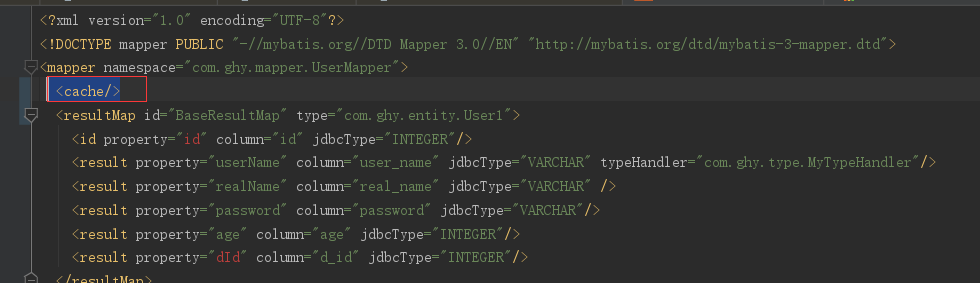
然后呢在mapper.XML文件加入<cache/>标签就可以了
下面来断点看下
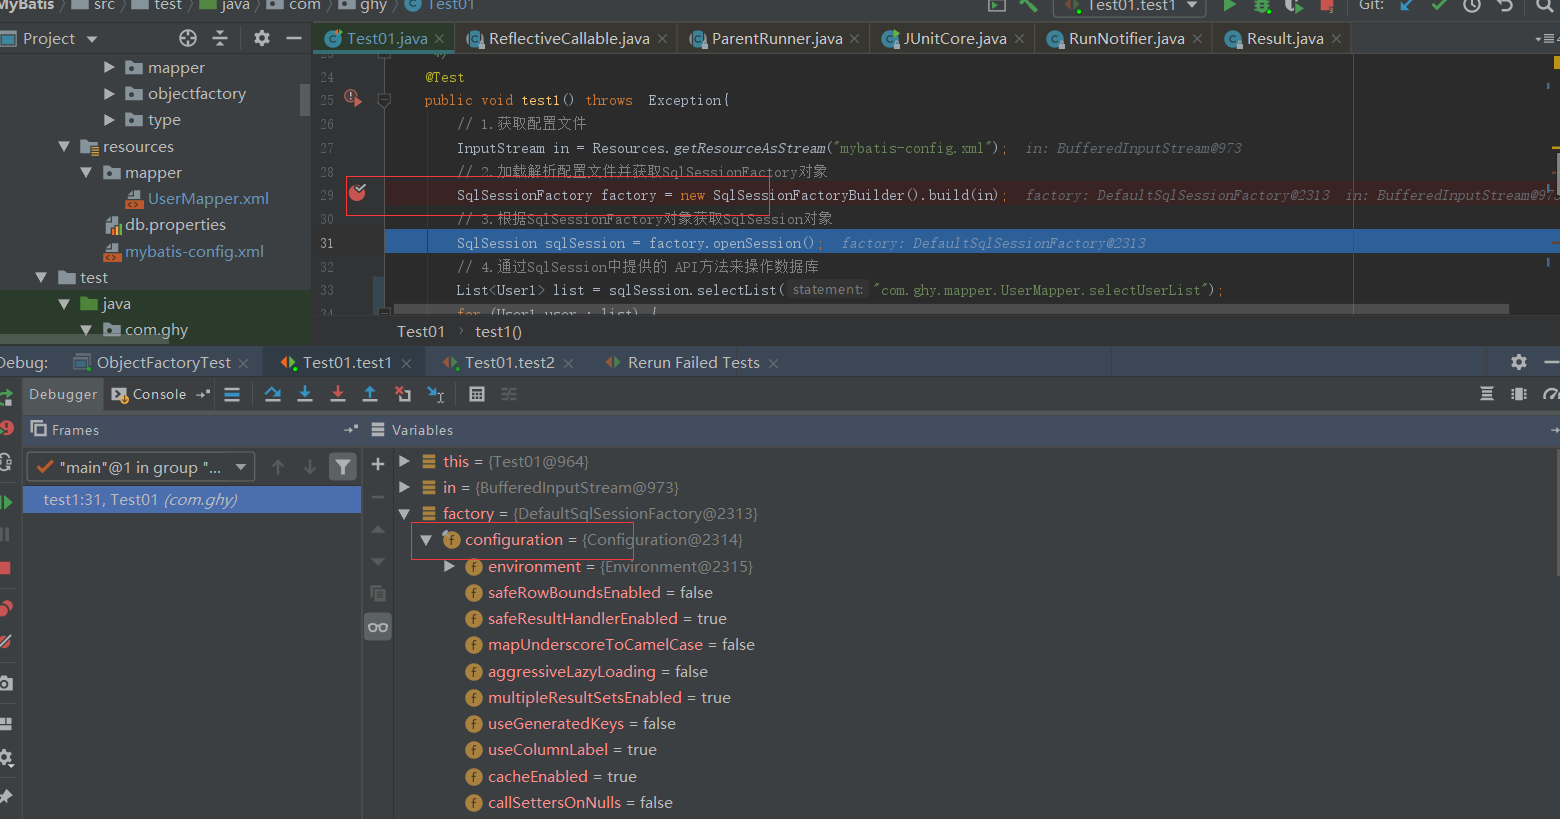
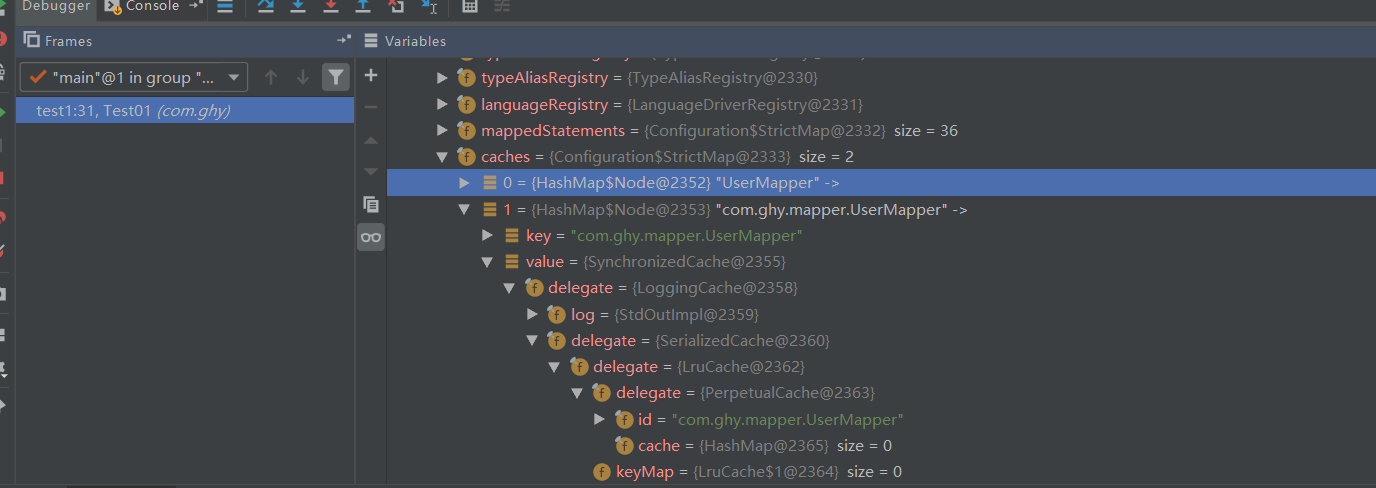
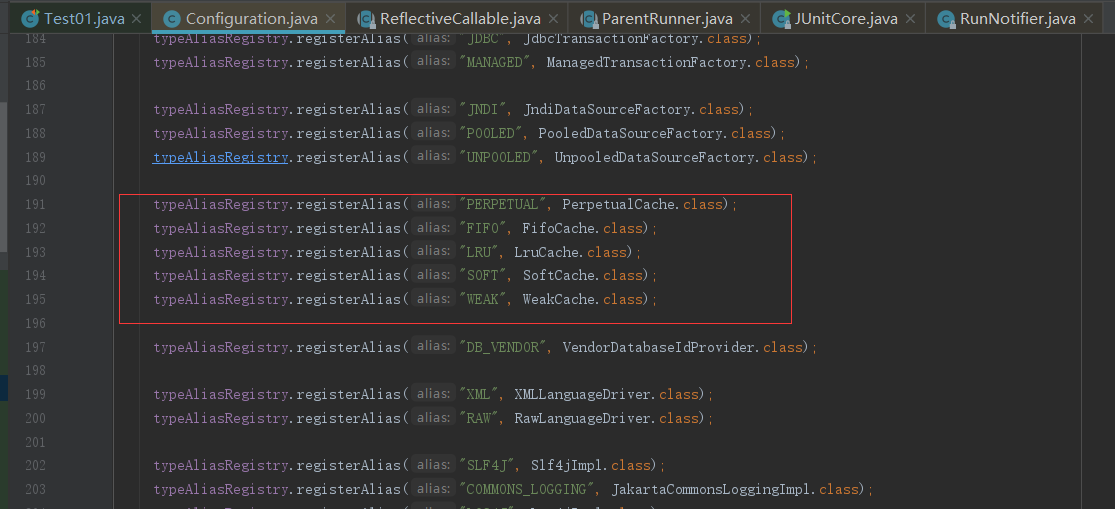
通过上面截图可以很清楚的看到这是一个装饰器过程,接下来看下在Configuration初始化的时候怎么给我们的各种Cache实现注册对应的别名
在解析settings标签的时候,设置的默认值有如下;因为前面源码跟了好多次,这里面我直接进到解析这一段代码了

 public Configuration parse() {

    //检查是否已经解析过了

    if (parsed) {

      throw new BuilderException("Each XMLConfigBuilder can only be used once.");

    }

    parsed = true;

    // XPathParser,dom 和 SAX 都有用到 >>

    parseConfiguration(parser.evalNode("/configuration"));

    return configuration;

  }
private void parseConfiguration(XNode root) {

    try {

      //issue #117 read properties first

      // 对于全局配置文件各种标签的解析

      propertiesElement(root.evalNode("properties"));

      // 解析 settings 标签

      Properties settings = settingsAsProperties(root.evalNode("settings"));

      // 读取文件

      loadCustomVfs(settings);

      // 日志设置

      loadCustomLogImpl(settings);

      // 类型别名

      typeAliasesElement(root.evalNode("typeAliases"));

      // 插件

      pluginElement(root.evalNode("plugins"));

      // 用于创建对象

      objectFactoryElement(root.evalNode("objectFactory"));

      // 用于对对象进行加工

      objectWrapperFactoryElement(root.evalNode("objectWrapperFactory"));

      // 反射工具箱

      reflectorFactoryElement(root.evalNode("reflectorFactory"));

      // settings 子标签赋值,默认值就是在这里提供的 >>

      settingsElement(settings);

      // read it after objectFactory and objectWrapperFactory issue #631

      // 创建了数据源 >>

      environmentsElement(root.evalNode("environments"));

      //解析databaseIdProvider标签,生成DatabaseIdProvider对象(用来支持不同厂商的数据库)。

      databaseIdProviderElement(root.evalNode("databaseIdProvider"));

      typeHandlerElement(root.evalNode("typeHandlers"));

      // 解析引用的Mapper映射器

      mapperElement(root.evalNode("mappers"));

    } catch (Exception e) {

      throw new BuilderException("Error parsing SQL Mapper Configuration. Cause: " + e, e);

    }

  }
在上面的全局配置文件中在settingsElement(settings);的赋值中会做一些默认的处理,点进去看下

通过上面发现cacheEnabled默认为true,localCacheScope默认为 SESSION,在初始化过程中关键的还是映射文件的解析,点击mapperElement(root.evalNode("mappers"));进去看下
 private void mapperElement(XNode parent) throws Exception {

    if (parent != null) {

      for (XNode child : parent.getChildren()) {

        // 不同的定义方式的扫描,最终都是调用 addMapper()方法(添加到 MapperRegistry)。这个方法和 getMapper() 对应

        // package    包

        if ("package".equals(child.getName())) {

          String mapperPackage = child.getStringAttribute("name");

          configuration.addMappers(mapperPackage);

        } else {

          String resource = child.getStringAttribute("resource");

          String url = child.getStringAttribute("url");

          String mapperClass = child.getStringAttribute("class");

          if (resource != null && url == null && mapperClass == null) {

            // resource    相对路径

            ErrorContext.instance().resource(resource);

            InputStream inputStream = Resources.getResourceAsStream(resource);

            XMLMapperBuilder mapperParser = new XMLMapperBuilder(inputStream, configuration, resource, configuration.getSqlFragments());

            // 解析 Mapper.xml,总体上做了两件事情 >>

            mapperParser.parse();

          } else if (resource == null && url != null && mapperClass == null) {

            // url    绝对路径

            ErrorContext.instance().resource(url);

            InputStream inputStream = Resources.getUrlAsStream(url);

            XMLMapperBuilder mapperParser = new XMLMapperBuilder(inputStream, configuration, url, configuration.getSqlFragments());

            mapperParser.parse();

          } else if (resource == null && url == null && mapperClass != null) {

            // class     单个接口

            Class<?> mapperInterface = Resources.classForName(mapperClass);

            configuration.addMapper(mapperInterface);

          } else {

            throw new BuilderException("A mapper element may only specify a url, resource or class, but not more than one.");

          }

        }

      }

    }

  }
直接进入他的关键代码mapperParser.parse();,
 public void parse() {

    // 总体上做了两件事情,对于语句的注册和接口的注册

    if (!configuration.isResourceLoaded(resource)) {

      // 1、具体增删改查标签的解析。

      // 一个标签一个MappedStatement。 >>

      configurationElement(parser.evalNode("/mapper"));

      configuration.addLoadedResource(resource);

      // 2、把namespace(接口类型)和工厂类绑定起来,放到一个map。

      // 一个namespace 一个 MapperProxyFactory >>

      bindMapperForNamespace();

    }

    parsePendingResultMaps();

    parsePendingCacheRefs();

    parsePendingStatements();

  }
上面是映射文件的解析操作,可以看他进了标签的解析,进去看下
  private void configurationElement(XNode context) {

    try {

      String namespace = context.getStringAttribute("namespace");

      if (namespace == null || namespace.equals("")) {

        throw new BuilderException("Mapper's namespace cannot be empty");

      }

      builderAssistant.setCurrentNamespace(namespace);

      // 添加缓存对象

      cacheRefElement(context.evalNode("cache-ref"));

      // 解析 cache 属性,添加缓存对象

      cacheElement(context.evalNode("cache"));

      // 创建 ParameterMapping 对象

      parameterMapElement(context.evalNodes("/mapper/parameterMap"));

      // 创建 List<ResultMapping>

      resultMapElements(context.evalNodes("/mapper/resultMap"));

      // 解析可以复用的SQL

      sqlElement(context.evalNodes("/mapper/sql"));

      // 解析增删改查标签,得到 MappedStatement >>

      buildStatementFromContext(context.evalNodes("select|insert|update|delete"));

    } catch (Exception e) {

      throw new BuilderException("Error parsing Mapper XML. The XML location is '" + resource + "'. Cause: " + e, e);

    }

  }
看到这里好像找到了想找的东西,可以看到上面代码我标的两个地方的标签解析,跟进去看下
 private void cacheElement(XNode context) {

    // 只有 cache 标签不为空才解析

    if (context != null) {

      String type = context.getStringAttribute("type", "PERPETUAL");

      Class<? extends Cache> typeClass = typeAliasRegistry.resolveAlias(type);

      String eviction = context.getStringAttribute("eviction", "LRU");

      Class<? extends Cache> evictionClass = typeAliasRegistry.resolveAlias(eviction);

      Long flushInterval = context.getLongAttribute("flushInterval");

      Integer size = context.getIntAttribute("size");

      boolean readWrite = !context.getBooleanAttribute("readOnly", false);

      boolean blocking = context.getBooleanAttribute("blocking", false);

      Properties props = context.getChildrenAsProperties();

      builderAssistant.useNewCache(typeClass, evictionClass, flushInterval, size, readWrite, blocking, props);

    }

  }
会发现上面开始解析相关的属性信息了,并在最后一步进行了保存,继续跟进去看下
 public Cache useNewCache(Class<? extends Cache> typeClass,

      Class<? extends Cache> evictionClass,

      Long flushInterval,

      Integer size,

      boolean readWrite,

      boolean blocking,

      Properties props) {

    Cache cache = new CacheBuilder(currentNamespace)

        .implementation(valueOrDefault(typeClass, PerpetualCache.class))

        .addDecorator(valueOrDefault(evictionClass, LruCache.class))

        .clearInterval(flushInterval)

        .size(size)

        .readWrite(readWrite)

        .blocking(blocking)

        .properties(props)

        .build();

    configuration.addCache(cache);

    currentCache = cache;

    return cache;

  }
然后可以发现 如果存储 cache 标签,那么对应的 Cache对象会被保存在 currentCache 属性中。
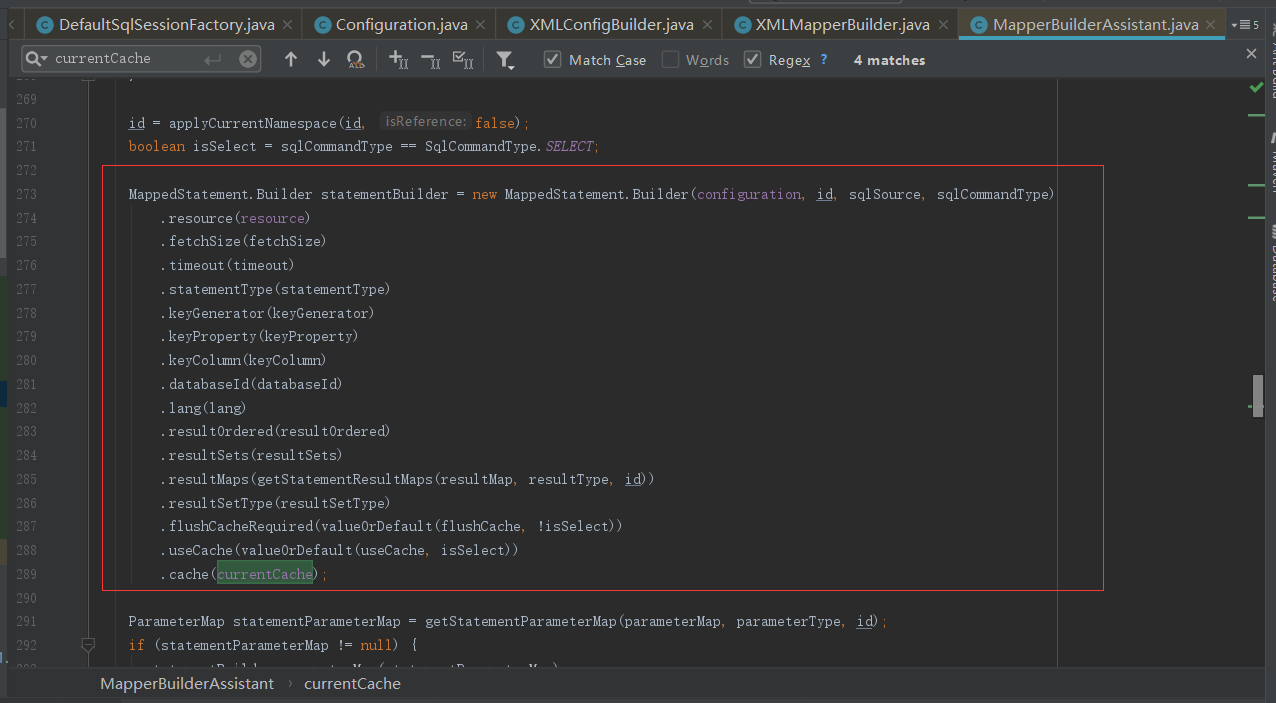
进而在 Cache 对象 保存在了 MapperStatement 对象的 cache 属性中。这就是cache节点创建的整个过程。
1.4.2 一级缓存
一级缓存也叫本地缓存(Local Cache),MyBatis的一级缓存是在会话(SqlSession)层面进行缓存的。MyBatis的一级缓存是默认开启的,不需要任何的配置(如果要关闭,localCacheScope设置为STATEMENT)。在BaseExecutor对象的query方法中有关闭一级缓存的逻辑
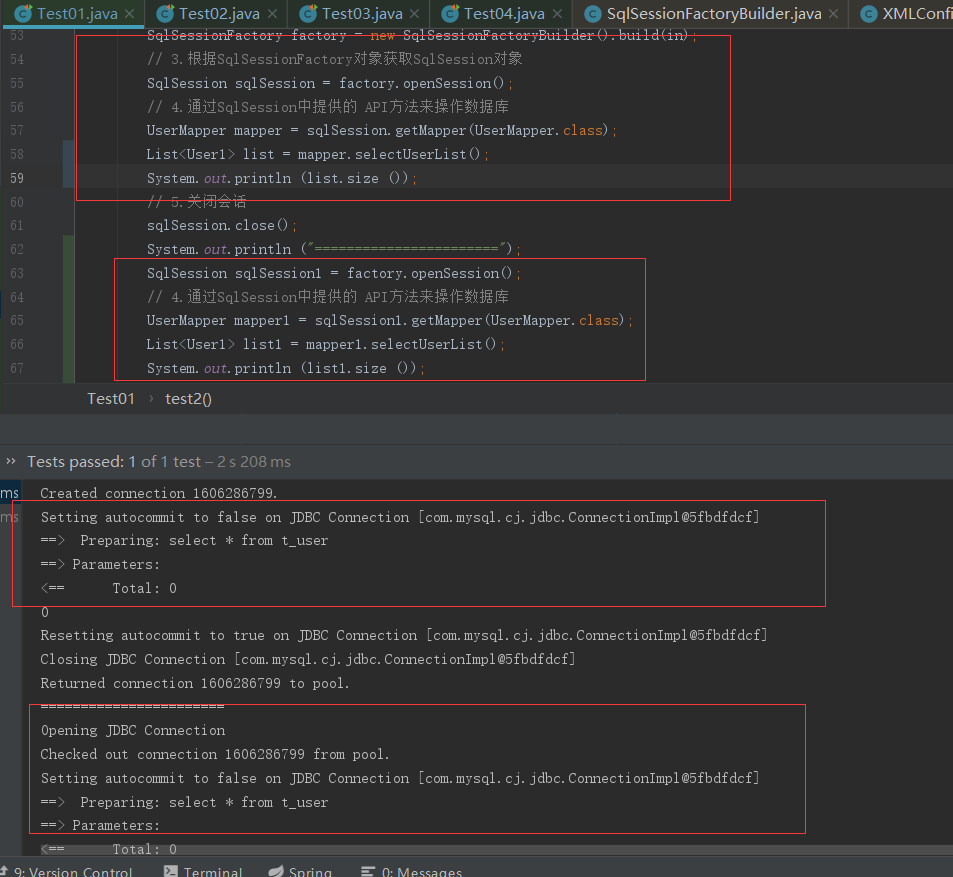
从上面的效果可以很清楚的感受到在一个会话内,第二次查询是直接走缓存的,在不同会话内缓存是不起效的。下面会了解缓存做了啥跟进代码看下。入口从上面演示就可以猜到是从
SqlSession sqlSession = factory.openSession();进入的
  @Override

  public SqlSession openSession() {

    return openSessionFromDataSource(configuration.getDefaultExecutorType(), null, false);

  }
 private SqlSession openSessionFromDataSource(ExecutorType execType, TransactionIsolationLevel level, boolean autoCommit) {

    //事务对象

    Transaction tx = null;

    try {

      final Environment environment = configuration.getEnvironment();

      // 获取事务工厂

      final TransactionFactory transactionFactory = getTransactionFactoryFromEnvironment(environment);

      // 创建事务

      tx = transactionFactory.newTransaction(environment.getDataSource(), level, autoCommit);

      // 根据事务工厂和默认的执行器类型,创建执行器 >>执行SQL语句操作

      final Executor executor = configuration.newExecutor(tx, execType);

      return new DefaultSqlSession(configuration, executor, autoCommit);

    } catch (Exception e) {

      closeTransaction(tx); // may have fetched a connection so lets call close()

      throw ExceptionFactory.wrapException("Error opening session.  Cause: " + e, e);

    } finally {

      ErrorContext.instance().reset();

    }

  }
在创建对应的执行器的时候会有缓存的操作
 public Executor newExecutor(Transaction transaction, ExecutorType executorType) {

    executorType = executorType == null ? defaultExecutorType : executorType;

    executorType = executorType == null ? ExecutorType.SIMPLE : executorType;

    Executor executor;

    if (ExecutorType.BATCH == executorType) {

      executor = new BatchExecutor(this, transaction);

    } else if (ExecutorType.REUSE == executorType) {//针对Statement做缓存

      executor = new ReuseExecutor(this, transaction);

    } else {

      // 默认 SimpleExecutor,每一次只是SQL操作都创建一个新的Statement对象

      executor = new SimpleExecutor(this, transaction);

    }

    // 二级缓存开关,settings 中的 cacheEnabled 默认是 true

    if (cacheEnabled) {

      executor = new CachingExecutor(executor);

    }

    // 植入插件的逻辑,至此,四大对象已经全部拦截完毕;这里面是一个拦截器链

    executor = (Executor) interceptorChain.pluginAll(executor);

    return executor;

  }
从上面代码可以知道如果 cacheEnabled 为 true 就会通过 CachingExecutor 来装饰executor 对象,然后就是在执行SQL操作的时候会涉及到缓存的具体使用。这个就分为一级缓存和二级缓存,通过这个跟踪会发现在创建会话时会创建执行器,而执行器里面跟缓存有关系的是二级缓存,跟我想找的一级缓存没什么关系;那么一级缓存在哪呢,这时候我想一级缓存是跟会话有关,那么他的位置一定在会话内的这段代码里,那我就找下一段代码
 // 4.通过SqlSession中提供的 API方法来操作数据库

        List<User1> list = sqlSession.selectList("com.ghy.mapper.UserMapper.selectUserList");
进入selectList看下
  @Override

  public <E> List<E> selectList(String statement) {

    return this.selectList(statement, null);

  }
  @Override

  public <E> List<E> selectList(String statement, Object parameter, RowBounds rowBounds) {

    try {

      MappedStatement ms = configuration.getMappedStatement(statement);

      // 如果 cacheEnabled = true(默认),Executor会被 CachingExecutor装饰

      return executor.query(ms, wrapCollection(parameter), rowBounds, Executor.NO_RESULT_HANDLER);

    } catch (Exception e) {

      throw ExceptionFactory.wrapException("Error querying database.  Cause: " + e, e);

    } finally {

      ErrorContext.instance().reset();

    }

  }
在上面代码中可以看到一个查询操作,那肯定是要进去看下他在查询前有没有缓存判断,如果没有说明selectList代码是不走缓存的;
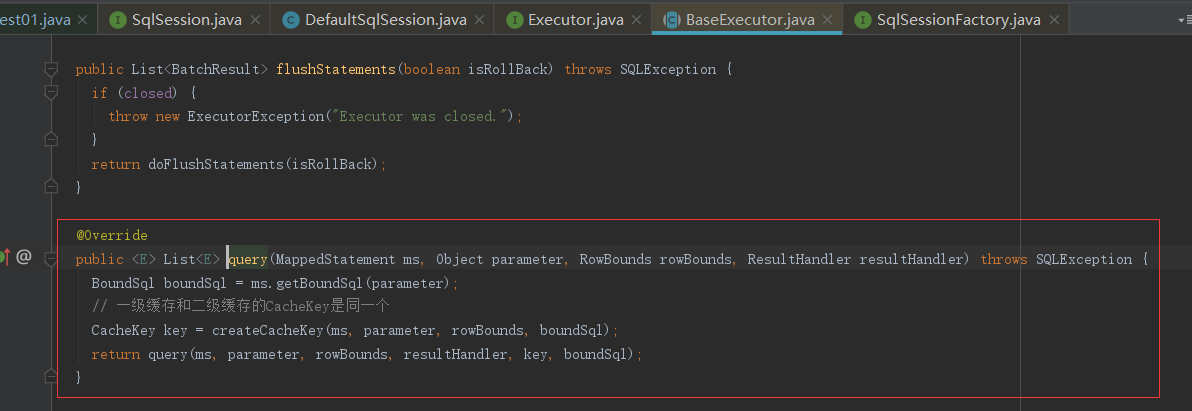
在上面代码中发现了一些跟缓存相关的操作CacheKey
 @Override

  public CacheKey createCacheKey(MappedStatement ms, Object parameterObject, RowBounds rowBounds, BoundSql boundSql) {

    if (closed) {

      throw new ExecutorException("Executor was closed.");

    }

    CacheKey cacheKey = new CacheKey();

    cacheKey.update(ms.getId());

    cacheKey.update(rowBounds.getOffset()); // 0

    cacheKey.update(rowBounds.getLimit()); // 2147483647 = 2^31-1

    cacheKey.update(boundSql.getSql());

    List<ParameterMapping> parameterMappings = boundSql.getParameterMappings();

    TypeHandlerRegistry typeHandlerRegistry = ms.getConfiguration().getTypeHandlerRegistry();

    // mimic DefaultParameterHandler logic

    for (ParameterMapping parameterMapping : parameterMappings) {

      if (parameterMapping.getMode() != ParameterMode.OUT) {

        Object value;

        String propertyName = parameterMapping.getProperty();

        if (boundSql.hasAdditionalParameter(propertyName)) {

          value = boundSql.getAdditionalParameter(propertyName);

        } else if (parameterObject == null) {

          value = null;

        } else if (typeHandlerRegistry.hasTypeHandler(parameterObject.getClass())) {

          value = parameterObject;

        } else {

          MetaObject metaObject = configuration.newMetaObject(parameterObject);

          value = metaObject.getValue(propertyName);

        }

        cacheKey.update(value); // development

      }

    }

    if (configuration.getEnvironment() != null) {

      // issue #176

      cacheKey.update(configuration.getEnvironment().getId());

    }

    return cacheKey;

  }
发现上面是一个缓存创建的逻辑,这个东西debugger看一下其实就明白了;其实这写了一堆就是生成一个东西,生成一个缓存的KEY,而且这个KEY是跟我们写的SQL有关;明白了这个key的作用后回退一步跟进query看他拿这个key去做了什么
 @Override

  public <E> List<E> query(MappedStatement ms, Object parameter, RowBounds rowBounds, ResultHandler resultHandler, CacheKey key, BoundSql boundSql) throws SQLException {

    // 异常体系之 ErrorContext

    ErrorContext.instance().resource(ms.getResource()).activity("executing a query").object(ms.getId());

    if (closed) {

      throw new ExecutorException("Executor was closed.");

    }

    if (queryStack == 0 && ms.isFlushCacheRequired()) {

      // flushCache="true"时,即使是查询,也清空一级缓存

      clearLocalCache();

    }

    List<E> list;

    try {

      // 防止递归查询重复处理缓存

      queryStack++;

      // 查询一级缓存

      // ResultHandler 和 ResultSetHandler的区别

      list = resultHandler == null ? (List<E>) localCache.getObject(key) : null;

      if (list != null) {

        //缓存中有数据

        handleLocallyCachedOutputParameters(ms, key, parameter, boundSql);

      } else {

        // 真正的查询流程

        list = queryFromDatabase(ms, parameter, rowBounds, resultHandler, key, boundSql);

      }

    } finally {

      queryStack--;

    }

    if (queryStack == 0) {

      for (DeferredLoad deferredLoad : deferredLoads) {

        deferredLoad.load();

      }

      // issue #601

      deferredLoads.clear();

      if (configuration.getLocalCacheScope() == LocalCacheScope.STATEMENT) {

        // issue #482

        clearLocalCache();

      }

    }

    return list;

  }
从上面就找到了查找一级缓存的位置了,如果list判断是空说明缓存没数据他会走queryFromDatabase去查询并且把数据缓存起来
 private <E> List<E> queryFromDatabase(MappedStatement ms, Object parameter, RowBounds rowBounds, ResultHandler resultHandler, CacheKey key, BoundSql boundSql) throws SQLException {

    List<E> list;

    // 先占位

    localCache.putObject(key, EXECUTION_PLACEHOLDER);

    try {

      // 三种 Executor 的区别,看doUpdate

      // 默认Simple

      list = doQuery(ms, parameter, rowBounds, resultHandler, boundSql);

    } finally {

      // 移除占位符

      localCache.removeObject(key);

    }

    // 写入一级缓存

    localCache.putObject(key, list);

    if (ms.getStatementType() == StatementType.CALLABLE) {

      localOutputParameterCache.putObject(key, parameter);

    }

    return list;

  }

1.4.3 二级缓存
二级缓存是用来解决一级缓存不能跨会话共享的问题的,范围是namespace级别的,可以被多个SqlSession共享(只要是同一个接口里面的相同方法,都可以共享),生命周期和应用同步。二级缓存的设置,首先是settings中的cacheEnabled要设置为true,当然默认的就是为true,这个步骤决定了在创建Executor对象的时候是否通过CachingExecutor来装饰。前面源码中也有说明过;要想看二级缓存效果,</cache>标签要打开
然后把一级缓存配置关闭了,其实由于一级缓存的作用域太小,在实际生产中用的也比较少

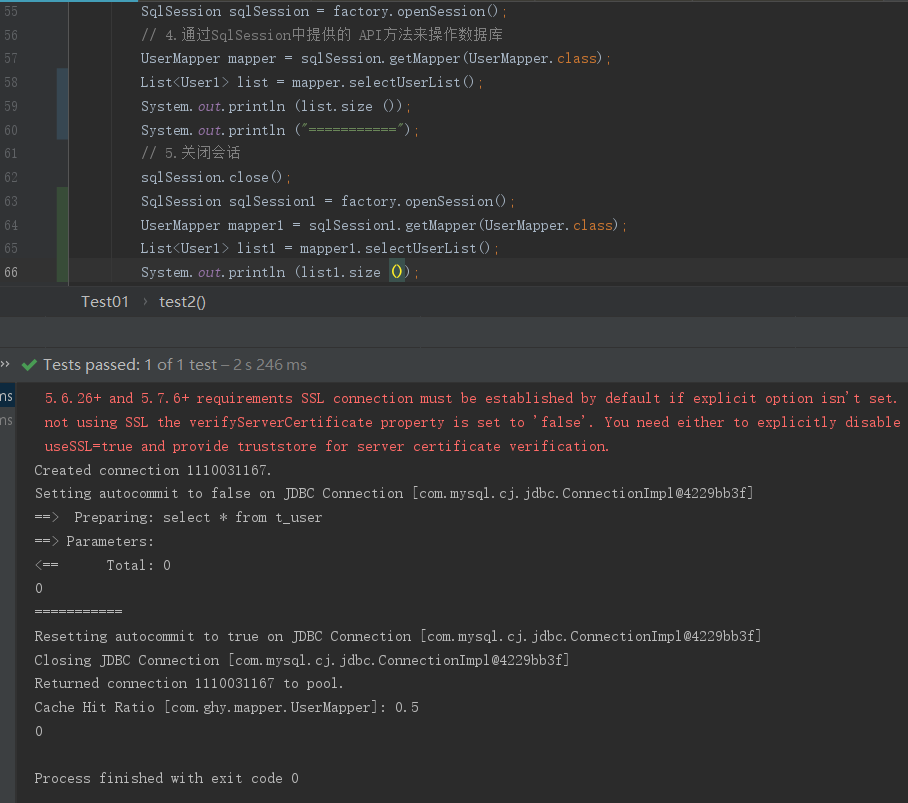
从上面可以发现第二次查询就没走数据库查询,说明二级缓存生效了。接下来看下二级缓存源码,其实在上面已经写出来了,入口是factory.openSession();
  @Override

  public SqlSession openSession() {

    return openSessionFromDataSource(configuration.getDefaultExecutorType(), null, false);

  }
  private SqlSession openSessionFromDataSource(ExecutorType execType, TransactionIsolationLevel level, boolean autoCommit) {

    //事务对象

    Transaction tx = null;

    try {

      final Environment environment = configuration.getEnvironment();

      // 获取事务工厂

      final TransactionFactory transactionFactory = getTransactionFactoryFromEnvironment(environment);

      // 创建事务

      tx = transactionFactory.newTransaction(environment.getDataSource(), level, autoCommit);

      // 根据事务工厂和默认的执行器类型,创建执行器 >>执行SQL语句操作

      final Executor executor = configuration.newExecutor(tx, execType);

      return new DefaultSqlSession(configuration, executor, autoCommit);

    } catch (Exception e) {

      closeTransaction(tx); // may have fetched a connection so lets call close()

      throw ExceptionFactory.wrapException("Error opening session.  Cause: " + e, e);

    } finally {

      ErrorContext.instance().reset();

    }

  }
  public Executor newExecutor(Transaction transaction, ExecutorType executorType) {

    executorType = executorType == null ? defaultExecutorType : executorType;

    executorType = executorType == null ? ExecutorType.SIMPLE : executorType;

    Executor executor;

    if (ExecutorType.BATCH == executorType) {

      executor = new BatchExecutor(this, transaction);

    } else if (ExecutorType.REUSE == executorType) {//针对Statement做缓存

      executor = new ReuseExecutor(this, transaction);

    } else {

      // 默认 SimpleExecutor,每一次只是SQL操作都创建一个新的Statement对象

      executor = new SimpleExecutor(this, transaction);

    }

    // 二级缓存开关,settings 中的 cacheEnabled 默认是 true

    if (cacheEnabled) {

      executor = new CachingExecutor(executor);

    }

    // 植入插件的逻辑,至此,四大对象已经全部拦截完毕;这里面是一个拦截器链

    executor = (Executor) interceptorChain.pluginAll(executor);

    return executor;

  }
从这里可以看到如果判断成立,那么会对executor做一个装饰;后面做查询操作时就要从sqlSession.selectList("com.ghy.mapper.UserMapper.selectUserList");跟踪起了
  @Override

  public <E> List<E> selectList(String statement, Object parameter, RowBounds rowBounds) {

    try {

      MappedStatement ms = configuration.getMappedStatement(statement);

      // 如果 cacheEnabled = true(默认),Executor会被 CachingExecutor装饰

      return executor.query(ms, wrapCollection(parameter), rowBounds, Executor.NO_RESULT_HANDLER);

    } catch (Exception e) {

      throw ExceptionFactory.wrapException("Error querying database.  Cause: " + e, e);

    } finally {

      ErrorContext.instance().reset();

    }

  }
一样,进入query方法看他是怎么执行的

这里要进的就是CachingExecutor里面了,这里面是二级缓存的东西
  @Override

  public <E> List<E> query(MappedStatement ms, Object parameterObject, RowBounds rowBounds, ResultHandler resultHandler) throws SQLException {

    // 获取SQL

    BoundSql boundSql = ms.getBoundSql(parameterObject);

    // 创建CacheKey:什么样的SQL是同一条SQL? >>

    CacheKey key = createCacheKey(ms, parameterObject, rowBounds, boundSql);

    return query(ms, parameterObject, rowBounds, resultHandler, key, boundSql);

  }
这里面创建createCacheKey的过程和一级缓存一样,这里就不想再写一次了;
 @Override

  public <E> List<E> query(MappedStatement ms, Object parameterObject, RowBounds rowBounds, ResultHandler resultHandler, CacheKey key, BoundSql boundSql)

      throws SQLException {

    Cache cache = ms.getCache();

    // cache 对象是在哪里创建的?  XMLMapperBuilder类 xmlconfigurationElement()

    // 由 <cache> 标签决定

    if (cache != null) {

      // flushCache="true" 清空一级二级缓存 >>

      flushCacheIfRequired(ms);

      if (ms.isUseCache() && resultHandler == null) {

        ensureNoOutParams(ms, boundSql);

        // 获取二级缓存

        // 缓存通过 TransactionalCacheManager、TransactionalCache 管理

        @SuppressWarnings("unchecked")

        List<E> list = (List<E>) tcm.getObject(cache, key);

        if (list == null) {

          list = delegate.query(ms, parameterObject, rowBounds, resultHandler, key, boundSql);

          // 写入二级缓存

          tcm.putObject(cache, key, list); // issue #578 and #116

        }

        return list;

      }

    }

    // 走到 SimpleExecutor | ReuseExecutor | BatchExecutor

    return delegate.query(ms, parameterObject, rowBounds, resultHandler, key, boundSql);

  }
这就是二级缓存过程;
cache属性详解:
| 属性 | 含义 | 取值 |
| type |
缓存实现类 |
需要实现Cache接口,默认是PerpetualCache,可以使用第三方缓存 |
| size |
最多缓存对象个数 |
默认1024 |
| eviction |
回收策略(缓存淘汰算法) |
LRU – 最近最少使用的:移除最长时间不被使用的对象(默认)。FIFO |
| flushInterval |
定时自动清空缓存间隔 |
自动刷新时间,单位 ms,未配置时只有调用时刷新 |
| readOnly |
是否只读 |
true:只读缓存;会给所有调用者返回缓存对象的相同实例。因此这些 |
| blocking |
启用阻塞缓存 |
通过在get/put方式中加锁,保证只有一个线程操作缓存,基于Java重入锁实现 |
1.4.4 第三方缓存
在实际开发的时候我们一般也很少使用MyBatis自带的二级缓存,这时我们会使用第三方的缓存工具Ehcache获取Redis来实现https://github.com/mybatis/redis-cache
添加依赖
        <dependency>

            <groupId>org.mybatis.caches</groupId>

            <artifactId>mybatis-redis</artifactId>

            <version>1.0.0-beta2</version>

        </dependency>
然后加上Cache标签的配置
<cache type="org.mybatis.caches.redis.RedisCache"

eviction="FIFO"

flushInterval="60000"

size="512"

readOnly="true"/>
然后添加redis的属性文件
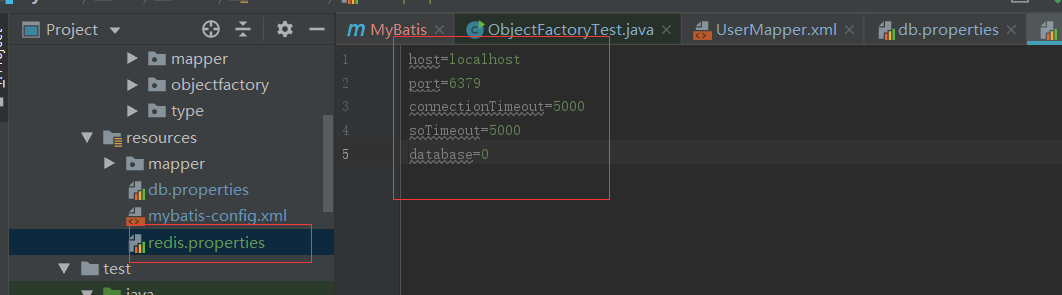
这样缓存就存入redis中了,至于怎么读到redis.properites文件的,这个可以从源码中找下

从上面看到在构造方法中会做一些初始的操作,其中的JedisPool是操作连接去操作redis的;
    public RedisConfig parseConfiguration() {

        return parseConfiguration(getClass().getClassLoader());

    }
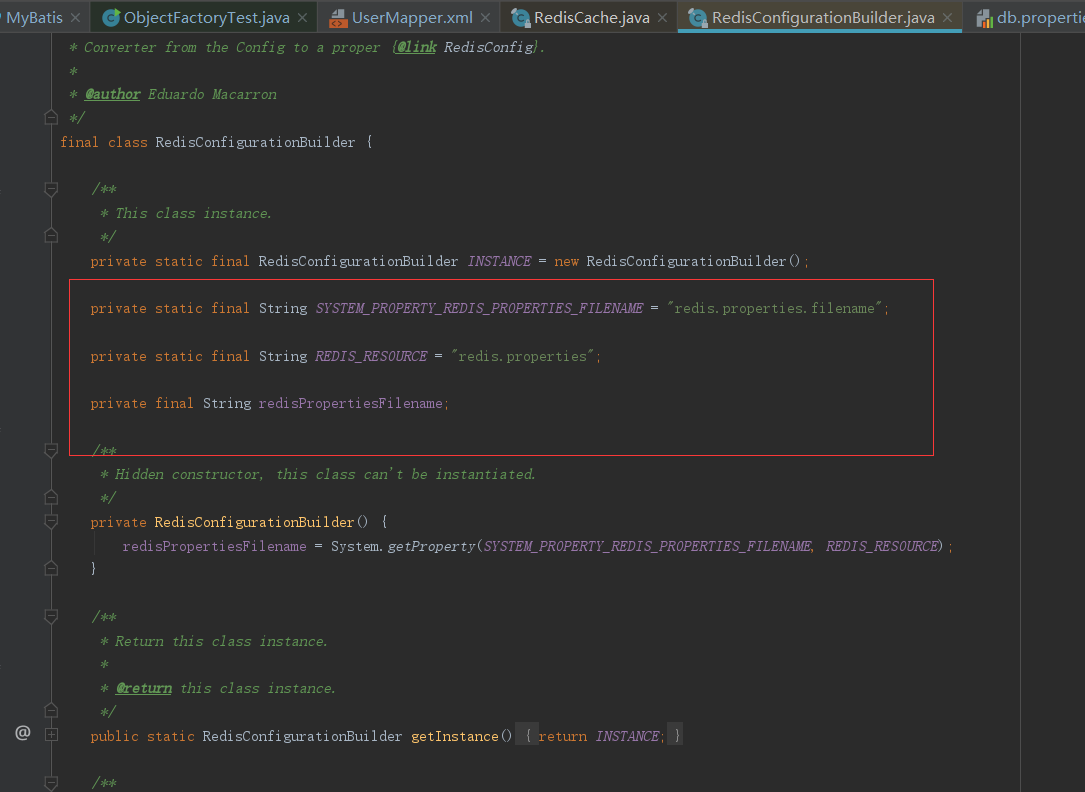
从源码中可以发现他已经做好了redis连接配置文件的默认命名了;
mybaits源码分析--缓存模块(六)的更多相关文章
- mybaits源码分析--日志模块(四)
一.日志模块 首先日志在我们开发过程中占据了一个非常重要的地位,是开发和运维管理之间的桥梁,在Java中的日志框架也非常多,Log4j,Log4j2,Apache Commons Log,java.u ...
- mybaits源码分析--binding模块(五)
一.binding模块 接下来我们看看在org.apache.ibatis.binding包下提供的Binding模块 ,binding其实在执行sqlSession.getMapper(UserMa ...
- MyBatis 源码分析 - 缓存原理
1.简介 在 Web 应用中,缓存是必不可少的组件.通常我们都会用 Redis 或 memcached 等缓存中间件,拦截大量奔向数据库的请求,减轻数据库压力.作为一个重要的组件,MyBatis 自然 ...
- 手机自动化测试:appium源码分析之bootstrap六
手机自动化测试:appium源码分析之bootstrap六 poptest是国内唯一一家培养测试开发工程师的培训机构,以学员能胜任自动化测试,性能测试,测试工具开发等工作为目标.poptest测试 ...
- ABP源码分析四十六:ABP ZERO中的Ldap模块
通过AD作为用户认证的数据源.整个管理用户认证逻辑就在LdapAuthenticationSource类中实现. LdapSettingProvider:定义LDAP的setting和提供Defaut ...
- mybaits源码分析(一)
一.源码下载 1.手动编译源码 为了方便在看源码的过程中能够方便的添加注释,可以从官网下载源码编译生成对应的Jar包,然后上传到本地maven仓库,再引用这个Jar. 首先需要编译打包parent项目 ...
- nginx源码分析之模块初始化
在nginx启动过程中,模块的初始化是整个启动过程中的重要部分,而且了解了模块初始化的过程对应后面具体分析各个模块会有事半功倍的效果.在我看来,分析源码来了解模块的初始化是最直接不过的了,所以下面主要 ...
- ABP源码分析三十六:ABP.Web.Api
这里的内容和ABP 动态webapi没有关系.除了动态webapi,ABP必然是支持使用传统的webApi.ABP.Web.Api模块中实现了一些同意的基础功能,以方便我们创建和使用asp.net w ...
- [Abp vNext 源码分析] - 2. 模块系统的变化
一.简要说明 本篇文章主要分析 Abp vNext 当中的模块系统,从类型构造层面上来看,Abp vNext 当中不再只是单纯的通过 AbpModuleManager 来管理其他的模块,它现在则是 I ...
随机推荐
- 【Java基础上】一、简述Java
一.简述Java Java是一种高级的面向对象的程序语言,在此处,不需要了解什么叫做面向对象,因为后面的文章中自然会谈到这方面的论述.那么,Java就是一个计算机的编程语言. 1.1 Java的历 ...
- golang可执行文件瘦身(缩小文件大小)
起因 golang部署起来极其遍历,但有时候希望对可执行文件进行瘦身(缩小文件大小) 尝试 情况允许情况下,交叉编译为32位 删除不必要的符号表.调试信息 尝试用对应平台的upx打压缩壳 解决 经过多 ...
- 使用Maven打包可运行jar和javaagent.jar的区别
简介 javaagent 是 Java1.5 之后引入的新特性,其主要作用是在class被加载之前对其拦截,以插入我们的字节码. java1.5 之前使用的是JVMTI(jvm tool interf ...
- SQL SERVER 按时间计算每天某值的平均值
在报表需求中,有针对求每天按时间分配数据的平均值,在经过查找后,找到一种方法,供参考. 1.新建视图 2.编写语句 SELECT TOP (100) PERCENT AVG(dbo.漕盈日运行.CO ...
- PHP 接受提交变量过滤类
Filter.class.php : 1 <?php 2 class Filter{ 3 4 /** 5 * 将\n转化为<br/> 6 * 7 * @param stri ...
- 剑指 Offer 29. 顺时针打印矩阵
剑指 Offer 29. 顺时针打印矩阵 输入一个矩阵,按照从外向里以顺时针的顺序依次打印出每一个数字. 示例 1: 输入:matrix = [[1,2,3],[4,5,6],[7,8,9]] 输出: ...
- HCNA Routing&Switching之STP基础
前文我们了解了VLAN动态注册协议GVRP相关话题,回顾请参考https://www.cnblogs.com/qiuhom-1874/p/15113770.html:今天我们来讨论下二层环路和STP相 ...
- 原生ajax练习-post&xml
<!doctype html> <html lang="en"> <head> <meta charset="UTF-8&quo ...
- [C++]-vector 向量
什么是向量容器 向量容器是一种支持高效的随机访问和高效的尾部插入新元素的容器. 向量容器一般实现为一个动态分配的数组,向量中的元素连续的存放在这个数组中,因此对向量容器进行随机访问具有和动态访问动态数 ...
- Java代码操作zookeeper
.personSunflowerP { background: rgba(51, 153, 0, 0.66); border-bottom: 1px solid rgba(0, 102, 0, 1); ...