深入理解Spring IOC容器及扩展
本文将从纯xml模式、xml和注解结合、纯注解的方式讲解Spring IOC容器的配置和相关应用。
纯XML模式
实例化Bean的三种方式:
- 使用无参构造函数
默认情况下,会使用反射调用无参构造函数来创建对象。
<bean id="connectionUtils" class="com.mmc.ioc.utils.ConnectionUtils"></bean>
- 使用静态方法创建
在实际开发中,我们使用的方法有时候不是通过构造函数创建出来的,他可能在创建的时候会做很多额外的操作。此时会提供一个创建对象的方法,如果这个方法是static修饰的,就是用这种配置方式。
<bean id="druidUtils" class="com.mmc.ioc.utils.DruidUtils" factory-method="getInstance"></bean>
- 使用实例化方法创建
当方法不是静态的时候,用这种方式
 <bean id="connectionUtils" class="com.mmc.ioc.utils.ConnectionUtils"></bean>

 <bean id="account" factory-bean="connectionUtils" factory-method="createAccount"></bean>
bean的作用范围和声明周期
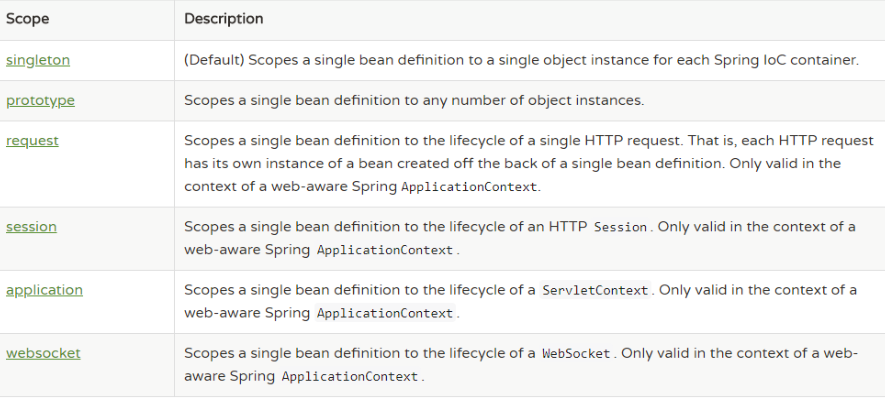
常用的是singleton【默认】(单例模式)和prototype(原型模式或多例模式)。通过scope属性可以进行配置
<bean id="account" factory-bean="connectionUtils" factory-method="createAccount" scope="singleton"></bean>
不同作用范围的生命周期
单例模式:singleton
对象创建:当创建容器时,对象就被创建
对象活着:只要容器在,对象一直活着
对象死亡:当容器销毁,对象就被销毁
总结:单例模式的bean对象生命周期与容器相同
多例模式:prototype
对象创建:当使用对象时,创建新的对象实例
对象活着:只要对象在使用中,就一直活着
对象死亡:当对象长时间不用时,被垃圾回收器回收
总结:多例模式的bean对象,spring框架只负责创建,不负责销毁。
Bean的标签属性
- id属性: ⽤于给bean提供⼀个唯⼀标识。在⼀个标签内部,标识必须唯⼀。
- class属性:⽤于指定创建Bean对象的全限定类名。
- name属性:⽤于给bean提供⼀个或多个名称。多个名称⽤空格分隔。
- factory-bean属性:⽤于指定创建当前bean对象的⼯⼚bean的唯⼀标识。当指定了此属性之后,
class属性失效。 - factory-method属性:⽤于指定创建当前bean对象的⼯⼚⽅法,如配合factory-bean属性使⽤,
则class属性失效。如配合class属性使⽤,则⽅法必须是static的。 - scope属性:⽤于指定bean对象的作⽤范围。通常情况下就是singleton。当要⽤到多例模式时,
可以配置为prototype。 - init-method属性:⽤于指定bean对象的初始化⽅法,此⽅法会在bean对象装配后调⽤。必须是
⼀个⽆参⽅法。 - destory-method属性:⽤于指定bean对象的销毁⽅法,此⽅法会在bean对象销毁前执⾏。它只
能为scope是singleton时起作⽤。
DI依赖注入
- 按照注入的方式分类
- 构造函数注入:就是利用带参构造函数实现对类成员的属性赋值
<bean id="account" class="com.mmc.ioc.bean.Account">

        <constructor-arg name="cardNo" value="123"></constructor-arg>

        <constructor-arg name="money" value="23"></constructor-arg>

        <constructor-arg name="name" value="aa"></constructor-arg>

    </bean>
- set方法注入:通过类成员的set方法实现数据注入
 <bean id="account" class="com.mmc.ioc.bean.Account">

        <property name="name" value="mmc"></property>

        <property name="cardNo" value="abc"></property>

        <property name="money" value="22"></property>

    </bean>
- 按照注入的数据类型分类
- 基本数据类型和String
- 其他Bean类型
- 复杂类型(集合类型)
基本类型使用value,其他bean类型使用ref,复杂类型使用对应的array、map、set标签
<bean id="user" class="com.mmc.ioc.bean.User">

        <property name="id" value="1"></property>

        <property name="account" ref="account"></property>

        <property name="list">

            <array>

                <value>aa</value>

                <value>bb</value>

            </array>

        </property>

        <property name="map">

            <map>

                <entry key="a" value="1"></entry>

                <entry key="b" value="2"></entry>

            </map>

        </property>

    </bean>
web.xml
<!DOCTYPE web-app PUBLIC

 "-//Sun Microsystems, Inc.//DTD Web Application 2.3//EN"

 "http://java.sun.com/dtd/web-app_2_3.dtd" >

<web-app>

  <display-name>Archetype Created Web Application</display-name>

  <!--配置spring ioc容器的配置文件-->

  <context-param>

    <param-name>contextConfigLocation</param-name>

    <param-value>classpath:applicationContext.xml</param-value>

  </context-param>

  <!--使用监听器启动Spring的IOC容器-->

  <listener>

    <listener-class>org.springframework.web.context.ContextLoaderListener</listener-class>

  </listener>

</web-app>
xml与注解结合的方式
注意:实际开发中,纯xml模式使用已经很少了,引入注解功能,不需要引入额外的jar包。xml+注解结合模式中,xml文件依然存在,所以Spring IOC容器的启动仍然从加载xml开始。
一般来说第三方jar包里面的bean定义在xml里面,自己开发的bean使用注解。
将第三方jar包的bean放入容器
<?xml version="1.0" encoding="UTF-8"?>

<beans xmlns="http://www.springframework.org/schema/beans"

       xmlns:xsi="http://www.w3.org/2001/XMLSchema-instance"

       xmlns:context="http://www.springframework.org/schema/context"

       xsi:schemaLocation="http://www.springframework.org/schema/beans

        https://www.springframework.org/schema/beans/spring-beans.xsd

    http://www.springframework.org/schema/context

       https://www.springframework.org/schema/context/spring-context.xsd

">

    <!--包扫描-->

    <context:component-scan base-package="com.mmc.ioc"></context:component-scan>

    <!--引入配置文件-->

    <context:property-placeholder location="classpath:jdbc.properties"></context:property-placeholder>

    <bean id="dataSource" class="com.alibaba.druid.pool.DruidDataSource">

        <property name="driverClassName" value="${jdbc.driver}"></property>

        <property name="url" value="${jdbc.url}"></property>

        <property name="username" value="${jdbc.username}"></property>

        <property name="password" value="${jdbc.password}"></property>

    </bean>

</beans>
xml中标签与注解的对应
| xml形式 | 注解 |
|---|---|
| 标签 | @Component,注解加在类上。默认情况下bean的id为类名(首字母小写)。另外,针对分层代码开发提供了@Componenet的三种别名@Controller、 |
@Service、@Repository分别⽤于控制层类、服务层类、dao层类的bean定义,这
四个注解的⽤法完全⼀样,只是为了更清晰的区分⽽已
标签的scope属性 | @Scope("prototype")
DI依赖注入的注解实现方式
- @Autowired(推荐使用)
@Autowired为Spring提供的注解。策略是按类型注入
public class TransferServiceImpl implements TransferService {

    @Autowired

    private AccountDao accountDao;

}
如上代码所示,这样装配会去spring容器中找到类型为AccountDao的bean,然后将其中如。但如果一个类型有多个bean怎么办呢?可以配合@Qualifier("bean的id")使用。
public class TransferServiceImpl implements TransferService {

    @Autowired

    @Qualifier("jdbcAccountDao")

    private AccountDao accountDao;

}
- @Resource
@Resource注解由j2EE提,如果指定了name或type就会根据指定的来,如果都没有指定就自动按照ByName方式装配。
注意:@Resource在Jdk11中已经移除,如果要使用,需要单独引入jar包。
<dependency>

    <groupId>javax.annotation</groupId>

    <artifactId>javax.annotation-api</artifactId>

    <version>1.3.2</version>

</dependency>
在Servlet类里面获取applicationContext
public class TransferServlet extends HttpServlet {

    @Override

    public void init() throws ServletException {

        WebApplicationContext webApplicationContext = WebApplicationContextUtils.getWebApplicationContext(this.getServletContext());

        ProxyFactory proxyFactory = (ProxyFactory) webApplicationContext.getBean("proxyFactory");

        transferService= (TransferService) proxyFactory.getJdkProxy(webApplicationContext.getBean("transferService"));

    }

}
纯注解模式
将xml配置改为java代码:
在配置类上声明@Configuration,表明是配置类。
@Configuration

@ComponentScan("com.mmc.ioc")

@PropertySource("classpath:jdbc.properties")

public class SpringConfig {

    @Value("${jdbc.driver}")

    private String driverClass;

    @Value("${jdbc.url}")

    private String url;

    @Value("${jdbc.username}")

    private String username;

    @Value("${jdbc.password}")

    private String password;

    @Bean

    public DataSource dataSource(){

        DruidDataSource druidDataSource=new DruidDataSource();

        druidDataSource.setDriverClassName(driverClass);

        druidDataSource.setUrl(url);

        druidDataSource.setUsername(username);

        druidDataSource.setPassword(password);

        return druidDataSource;

    }

}
如果还有其他配置类,可以通过@Import引入进来。
web.xml配置如下:
<!DOCTYPE web-app PUBLIC

 "-//Sun Microsystems, Inc.//DTD Web Application 2.3//EN"

 "http://java.sun.com/dtd/web-app_2_3.dtd" >

<web-app>

  <display-name>Archetype Created Web Application</display-name>

   <!--告诉ContextLoaderListener是注解方式启动ioc容器-->

   <context-param>

     <param-name>contextClass</param-name>

     <param-value>org.springframework.web.context.support.AnnotationConfigWebApplicationContext</param-value>

   </context-param>

  <!--配置spring ioc容器的配置文件-->

  <context-param>

    <param-name>contextConfigLocation</param-name>

    <param-value>com.mmc.ioc.SpringConfig</param-value>

  </context-param>

  <!--使用监听器启动Spring的IOC容器-->

  <listener>

    <listener-class>org.springframework.web.context.ContextLoaderListener</listener-class>

  </listener>

</web-app>
高级特性
延迟加载
xml方式:
<bean id="testBean" calss="cn.lagou.LazyBean" lazy-init="true" />
也可以在容器层次配置默认释放延迟加载,如:
<beans default-lazy-init="true">

<!-- no beans will be eagerly pre-instantiated... -->

</beans>
注解方式:
@Lazy注解
    @Bean

    @Lazy

    public DataSource dataSource(){

    }
FactoryBean
Spring中的Bean有两种,一种是普通bean,一种是工厂bean(FactoryBean),FactoryBean可以生产某一个类型的Bean实例,也就是说我们可以借助它自定义Bean的创建过程。
@Component("user")

public class UserFactoryBean implements FactoryBean<User> {

    @Override

    public User getObject() throws Exception {

        User user=new User();

        Account account=new Account();

        account.setName("mmc");

        user.setAccount(account);

        List<String> list=new ArrayList<>();

        list.add("a");

        user.setList(list);

        user.setId(2);

        return user;

    }

    @Override

    public Class<?> getObjectType() {

        return User.class;

    }

    @Override

    public boolean isSingleton() {

        return true;

    }

}
运行测试代码,取出beanname为user的对象。
@Test

    public void testAno(){

        AnnotationConfigApplicationContext applicationContext = new AnnotationConfigApplicationContext(SpringConfig.class);

        Object user = applicationContext.getBean("user");

        System.out.println(user);

    }
运行结果如下:

可以看出虽然是UserFactoryBean放入了容器,但是取出来的却是User对象。这就是FactoryBean的作用。
Spring扩展接口和方法
- BeanNameAware
- BeanFactoryAware
- ApplicationContextAware
- InitializingBean
- DisposableBean
- @PostConstruct
- @PreDestroy
- init-method
- destroy-method
- BeanPostProcessor
- BeanFactoryPostProcessor
从获取Spring里的东西来分有:
- BeanNameAware
- BeanFactoryAware
- ApplicationContextAware
初始化:
- @PostConstruct
- InitializingBean
- init-method
销毁:
- @PreDestroy
- DisposableBean
- destroy-method
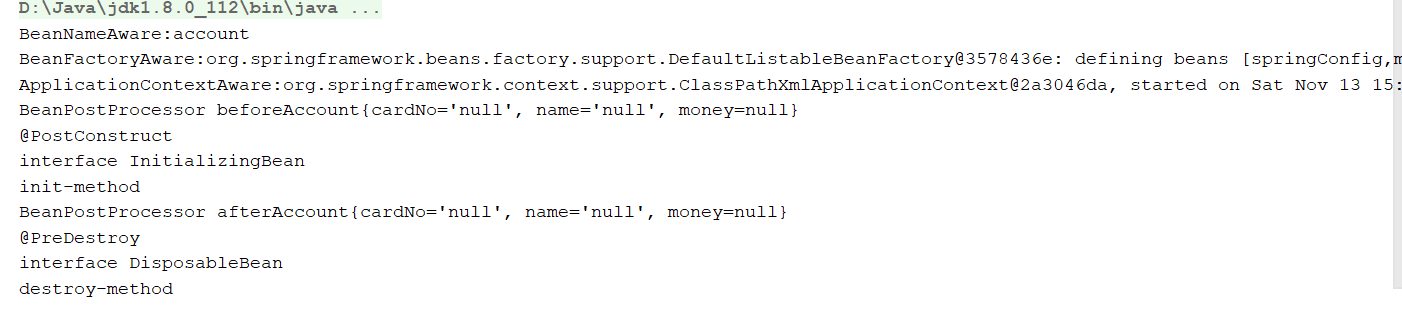
初始化和销毁的执行先后顺序都是注解->接口->xml
使用示例:
<bean id="account" class="com.mmc.ioc.bean.Account" init-method="initMethod" destroy-method="destroyMethod"></bean>
public class Account implements BeanNameAware,BeanFactoryAware,ApplicationContextAware,InitializingBean,DisposableBean {

    @Override

    public void setBeanFactory(BeanFactory beanFactory) throws BeansException {

        System.out.println("BeanFactoryAware:"+beanFactory);

    }

    @Override

    public void setBeanName(String name) {

        System.out.println("BeanNameAware:"+name);

    }

    @Override

    public void destroy() throws Exception {

        System.out.println("DisposableBean");

    }

    @Override

    public void afterPropertiesSet() throws Exception {

        System.out.println("InitializingBean");

    }

    @Override

    public void setApplicationContext(ApplicationContext applicationContext) throws BeansException {

        System.out.println("ApplicationContextAware:"+applicationContext);

    }

    @PostConstruct

    public void postConstruct(){

        System.out.println("postConstruct");

    }

    @PreDestroy

    public void preDestroy(){

        System.out.println("preDestroy");

    }

    public void initMethod(){

        System.out.println("init-method");

    }

    public void destroyMethod(){

        System.out.println("destroy-method");

    }

}
全局的:
BeanFactoryPostProcessor是在BeanFactory初始化之后可以处理一些事情,是针对Bean的工厂进行处理,典型应用:PropertyPlaceholderConfigurer
BeanPostProcessor是针对所有的bean进行拦截进行处理,使用如下:
@Component

public class MyBeanPostProcessor implements BeanPostProcessor {

    @Override

    public Object postProcessBeforeInitialization(Object bean, String beanName) throws BeansException {

        if(beanName.equals("account")){

            System.out.println("BeanPostProcessor before"+bean);

        }

        return bean;

    }

    @Override

    public Object postProcessAfterInitialization(Object bean, String beanName) throws BeansException {

        if(beanName.equals("account")){

            System.out.println("BeanPostProcessor after"+bean);

        }

        return bean;

    }

}
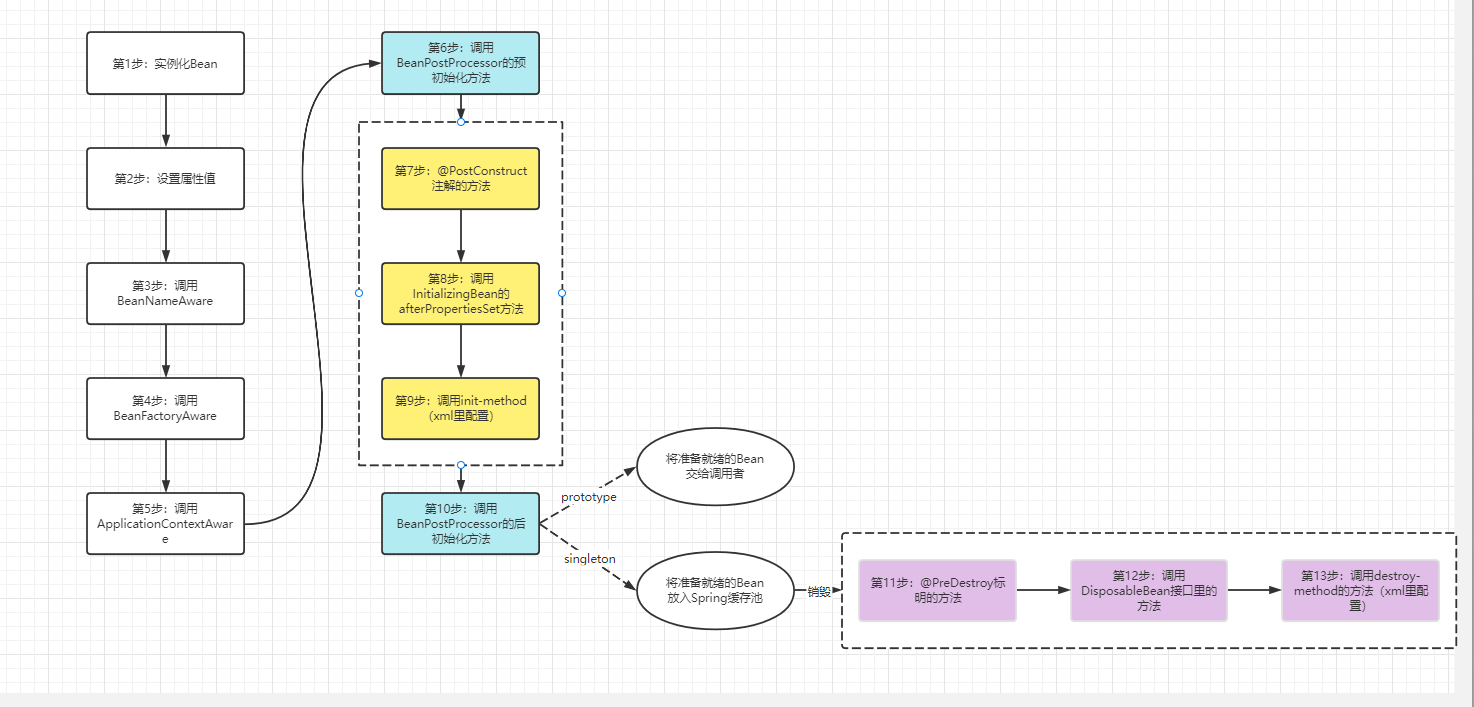
全部配置好后,打印查看执行先后顺序:
可以得到下面的执行流程图:
高频面试题:
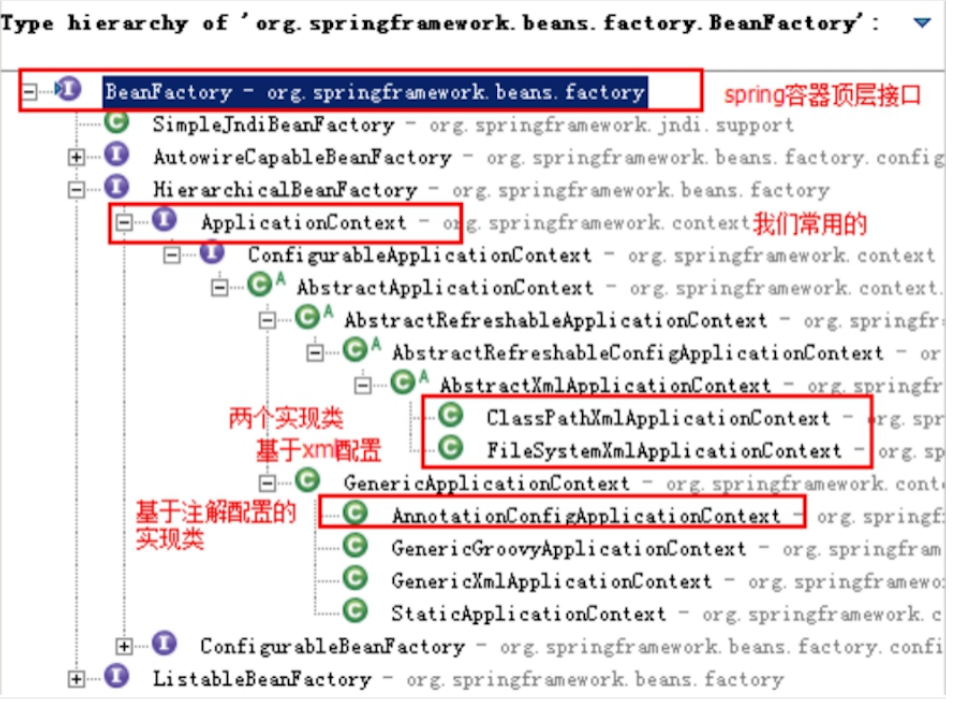
BeanFactory、FactoryBean、ApplicationContext的区别
- BeanFactory是Spring框架中IOC容器的顶层接口,它只是用来定义一些基础功能
- ApplicationContext是它的一个子接口,它拥有更多的功能,如国际化支持和资源访问等等。
- FactoryBean:一般情况下,Spring通过反射机制实例化Bean,在某些情况下,实例化bean过程比较复杂,这时配置起来就比较麻烦。如果采用编码的方式会简单一些。于是Spring给我们提供了FactoryBean的接口,用户就可以通过实现这个接口来自定义实例化Bean的逻辑。
总结:BeanFactory是负责生产和管理Bean的一个工厂接口,提供一个Spring Ioc容器规范。FactoryBean是一种Bean创建的方法,对Bean的一种扩展。
类图如下:
深入理解Spring IOC容器及扩展的更多相关文章
- Spring IoC 容器的扩展
前言 本篇文章主要介绍 Spring 中 BeanFactory 的扩展 ApplicationContext,我们平时日常开发中也基本上是使用它,不会去直接使用 BeanFactory. 那么在 S ...
- 深入理解Spring IoC容器和动态代理机制
Deployment期间验证 实现一: <bean id="theTargetBean" class="..."/> <bean id=&qu ...
- 深入理解Spring IOC容器
本文将从纯xml模式.xml和注解结合.纯注解的方式讲解Spring IOC容器的配置和相关应用. 纯XML模式 实例化Bean的三种方式: 使用无参构造函数 默认情况下,会使用反射调用无参构造函数来 ...
- 理解 Spring IoC 容器
控制反转与大家熟知的依赖注入同理, 这是通过依赖注入对象的过程. 创建 Bean 后, 依赖的对象由控制反转容器通过构造参数 工厂方法参数或者属性注入. 创建过程相对于普通创建对象的过程是反向, 称之 ...
- 【转】Spring学习---Spring IoC容器的核心原理
[原文] Spring的两个核心概念:IoC和AOP的雏形,Spring的历史变迁和如今的生态帝国. IoC和DI的基本概念 IoC(控制反转,英文含义:Inverse of Control)是Spr ...
- 【死磕 Spring】----- IOC 之深入理解 Spring IoC
在一开始学习 Spring 的时候,我们就接触 IoC 了,作为 Spring 第一个最核心的概念,我们在解读它源码之前一定需要对其有深入的认识,本篇为[死磕 Spring]系列博客的第一篇博文,主要 ...
- Spring IOC容器基本原理
2.2.1 IOC容器的概念IOC容器就是具有依赖注入功能的容器,IOC容器负责实例化.定位.配置应用程序中的对象及建立这些对象间的依赖.应用程序无需直接在代码中new相关的对象,应用程序由IOC容器 ...
- 【spring源码分析】spring ioc容器之前生今世--DefaultListableBeanFactory源码解读
spring Ioc容器的实现,从根源上是beanfactory,但真正可以作为一个可以独立使用的ioc容器还是DefaultListableBeanFactory,因此可以这么说, DefaultL ...
- Spring IOC 容器源码分析
声明!非原创,本文出处 Spring 最重要的概念是 IOC 和 AOP,本篇文章其实就是要带领大家来分析下 Spring 的 IOC 容器.既然大家平时都要用到 Spring,怎么可以不好好了解 S ...
随机推荐
- 深入浅出WPF-07.Property(属性)
依赖属性 1)字段与属性:字段被封装在实例中,要么能够被外界访问(非Private),要么不能够被外界访问(Private).但是我们直接把数据暴露给外界的做法不安全,容易把错误的数据写入字段.于是我 ...
- 洛谷3233 HNOI2014(虚树+dp)
膜拜一发\(mts\_246,forever\_shi\) 这两位爷是真的无敌! 首先来看这个题,一看题目的数据范围和"关键点"字眼,我们就能得知这是一道虚树题 那就先一如既往的建 ...
- Postman实现SHA256withRSA签名
@ 目录 获取pmlib 引入依赖bundle.js,有以下两种方式: 使用Pre-request Script对请求进行加签(具体加签字段请看自己项目) 获取pmlib 引入依赖bundle.js, ...
- 这12种场景Spring事务会失效!
前言 对于从事java开发工作的同学来说,spring的事务肯定再熟悉不过了.在某些业务场景下,如果一个请求中,需要同时写入多张表的数据.为了保证操作的原子性 (要么同时成功,要么同时失败),避免数据 ...
- HTML中的emment
emment的优点和使用方法: 优点:Emment是前端开发者必备的工具,使用它可以大大提高前端开发效率. 使用方法:Emment的使用方法非常简单,直接在编辑器上输入HTML和CSS代码的缩写,然后 ...
- Java:修饰符小记
Java:修饰符小记 对 Java 中的 修饰符,做一个微不足道的小小小小记 Java 语言提供了很多修饰符,大概分为两类: 访问权限修饰符 非访问权限修饰符 访问权限修饰符 修饰符 说明 publi ...
- OO前三次作业思考(第一次OO——Blog)
OO前三次作业总结 基于度量分析程序结构 由于三次作业较多,决定分析内容.功能最为复杂的第三次作业. 上图为第三次作业的类图.我使用了一个抽象类Factor,写了五个因子继承Factor,然后又单独开 ...
- WEB前端工程师如何做职业规划?
对于一个WEB前端的职业规划,其实是有各种的答案,没有哪种答案是完全正确的,全凭自己的选择,只要是自己选定了,坚持去认真走,就好.在这里, 我只是 简要说一下自己对于这块儿内容的理解.有一个观点想要分 ...
- (五)、Docker 容器数据卷
1.什么是数据卷 将运用与运行的环境打包形成容器运行 ,运行可以伴随着容器,但是我们对数据的要求希望是持久化的 容器之间希望有可能共享数据 Docker容器产生的数据,如果不通过docker comm ...
- Spring:所有依赖项注入的类型
一.前言 Spring文档严格只定义了两种类型的注入:构造函数注入和setter注入.但是,还有更多的方式来注入依赖项,例如字段注入,查找方法注入.下面主要是讲使用Spring框架时可能发生的类型. ...