06.SpringBoot核心技术
一、配置文件
SpringBoot除了可以在全局编写一个properties配置文件外,还可以使用yaml作为配置文件
新建一个类
@ConfigurationProperties(prefix = "person")

@Component

@Data

public class Person {

    private String userName;

    private Boolean boss;

    private Date birth;

    private Integer age;

    private String[] interests;

    private List<String> animal;

    private Map<String, Object> score;

    private Set<Double> salarys;

}
编写yaml配置文件
person:

  username: ss

  boss: true

  Date: 2019/7/8

  age: 20

  interests: [ylc,ww]

  animal:

    - 篮球

    - 足球

    - 羽毛球

  score: {English: 99,math: 66,chinese: 100}

  salarys:

    - 99.9

    - 12.3

    - 45.0
发起请求
@Autowired

Person person;

@RequestMapping("/GetPerson")

public  Person getPerson()

{

    return  person;

}

单引号会将/n作为字符串输出,双引号会将字符串作为换行输出,双引号会转义
properties配置文件优先级大于yaml
让自定义的类和配置文件绑定一般有提示可以引入下包,可以更方便的开发
<dependency>

            <groupId>org.springframework.boot</groupId>

            <artifactId>spring-boot-configuration-processor</artifactId>

            <optional>true</optional>

        </dependency>
二、Web开发
先新建一个自动配置的SpringBoot项目
静态资源访问
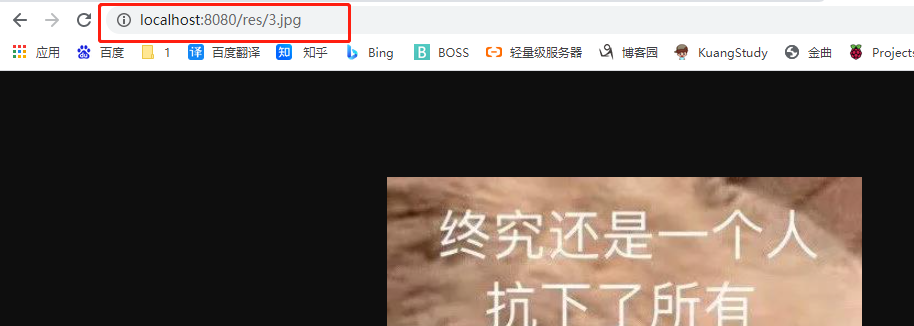
只要静态资源放在类路径(main)下: /static(or/publicor/resourcesor/META-INF/resources`
访问 : 当前项目根路径/ + 静态资源名
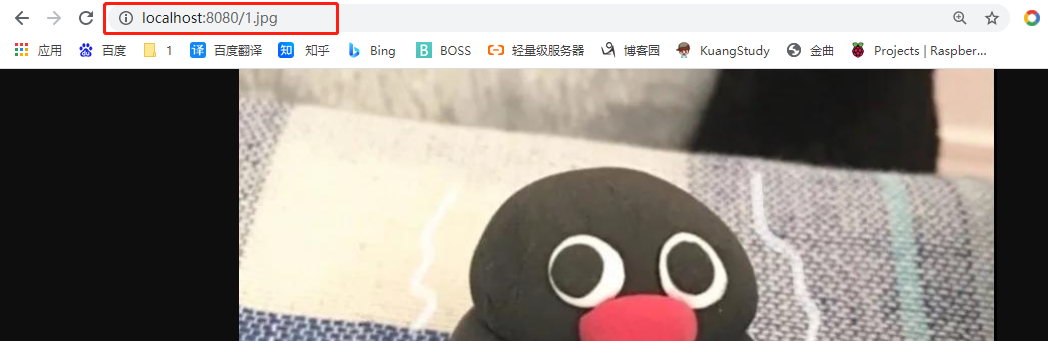
原理:当有控制器的情况下,请求会先找Controller处理,没有找到就找静态资源处理器,如果静态资源也找不到返回404
一般项目相会指定静态资源访问路径前缀:
application.yaml
spring:

  mvc:

    static-path-pattern: /res/**
还可以指定静态资源的目录:
  web:

    resources:

      static-locations: [classpath:/Picture/]
欢迎页支持
在静态资源路径下 index.html,如果配置静态资源能访问前缀就会导致index.html页面不能被访问
自定义 Favicon
欢迎页图标:默认在static下引入favicon.ico图标就可以实现
普通参数和基本注解
1.1 @PathVariable
用于接收RestFul风格的参数,路径变量
@RestController

public class HelloController {

    //restFul风格

    @GetMapping("/hello/{name}")

    public Map<String,String>  Hello(@PathVariable("name") String name)

    {

        Map<String,String> map = new HashMap<>();

        map.put("name",name);

        return  map;

    }

 }

还可以用一个Map集合全部接收出来
@GetMapping("/hello/{name}/age/{age}")

public Map<String,Object>  Hello2(@PathVariable Map<String,String> pv)

{

    Map<String,Object> map = new HashMap<>();

    map.put("pv",pv);

    return  map;

}


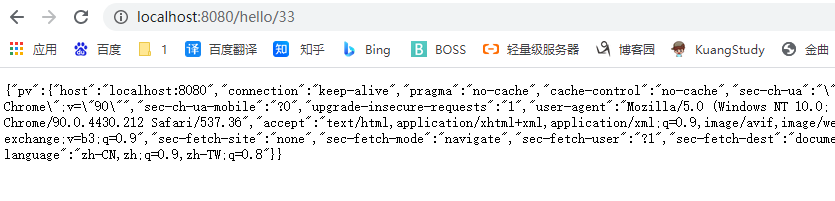
1.2 @RequestHeader
用于获取指定请求头
@GetMapping("/hello/{name}")

public Map<String,String>  Hello3(@PathVariable("name") String name,@RequestHeader("User-Agent") String length )

{

    Map<String,String> map = new HashMap<>();

    map.put("name",name);

    map.put("User-Agent",length);

    return  map;

}
获取全部请求头,把头部参数用一个Map接收
@GetMapping("/hello/{name}")

public Map<String,Object>   Hello3(@PathVariable("name") String name,@RequestHeader Map<String,String> pv )

{

    Map<String,Object> map = new HashMap<>();

    map.put("pv",pv);

    return  map;

}
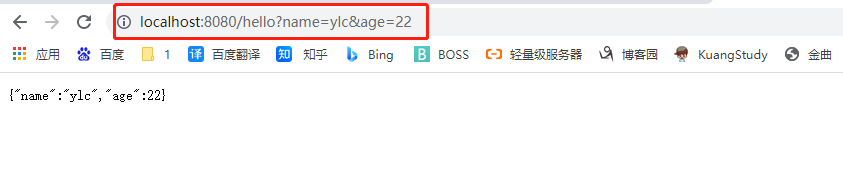
1.3 @RequestParam
获取指定请求参数
@GetMapping("/hello")

public Map<String,Object>   Hello3(@RequestParam("name") String name,@RequestParam("age") Integer age )

{

    Map<String,Object> map = new HashMap<>();

    map.put("name",name);

    map.put("age",age);

    return  map;

}
获取全部参数
@GetMapping("/hello2")

public Map<String,Object>   Hello4(@RequestParam Map<String,String> params )

{

    Map<String,Object> map = new HashMap<>();

    map.put("params",params);

    return  map;

}

1.4 @CookieValue
获取指定的Cookie值
@GetMapping("/GetCookie")

public Map<String,Object>   Hello5(@CookieValue("_ga") String _ga )

{

    Map<String,Object> map = new HashMap<>();

    map.put("_ga",_ga);

    return  map;

}
获取Cookie
@GetMapping("/GetCookie")

public Map<String,Object>   Hello5(@CookieValue("_ga") Cookie cookie )

{

    Map<String,Object> map = new HashMap<>();

    map.put("cookie",cookie);

    System.out.println(cookie.getName());

    System.out.println(cookie.getValue());

    return  map;

}
1.5 @RequestBody
获取请求体,只有Post请求才有请求体,表单提交
<form action="/save" method="post">

    用户名:<input name="username"/>

    密码:<input name="pwd"/>

    <input type="submit" value="提交">

</form>
 @PostMapping("/save")

public  Map<String,Object> PostMethod(@RequestBody String content)

 {

     Map<String,Object> map = new HashMap<>();

     map.put("content",content);

     return  map;

 }

1.6 @RequestAttribute
获取request的属性
@Controller

public class TextController {

    @GetMapping("/goto")

    public  String goToPage(HttpServletRequest request)

    {

        request.setAttribute("msg","成功");

        return "forward:/success";

    }

    @ResponseBody

    @GetMapping("/success")

    public Map<String,Object> Success(HttpServletRequest request)

    {

        Object msg = request.getAttribute("msg");

        Map<String,Object> map = new HashMap<>();

        map.put("msg",msg);

        return map;

    }

}
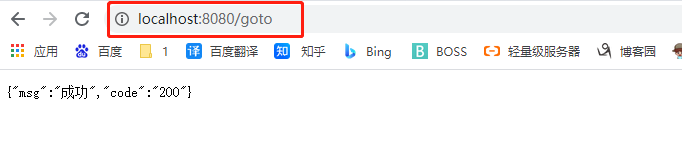
发送请求响应成功,利用转发把信息发送到成功页面
视图解析和模板引擎
Web原生组件注入
1.1 使用Selvlet API
Servlet
在主方法指定Servlet放置的位置
//servlet扫描的位置

@ServletComponentScan(basePackages = "com.ylc")

@SpringBootApplication

public class SpringBootWebApplication {

    public static void main(String[] args) {

        SpringApplication.run(SpringBootWebApplication.class, args);

    }

}
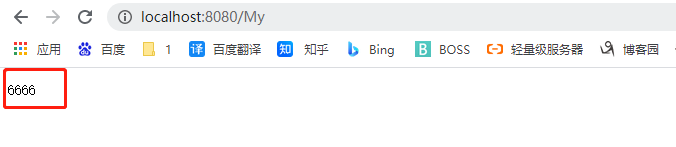
编写Servlet
@WebServlet(urlPatterns = "/My")

public class MyServlet  extends HttpServlet {

    @Override

    protected void doGet(HttpServletRequest req, HttpServletResponse resp) throws ServletException, IOException {

      resp.getWriter().write("6666");

    }

}
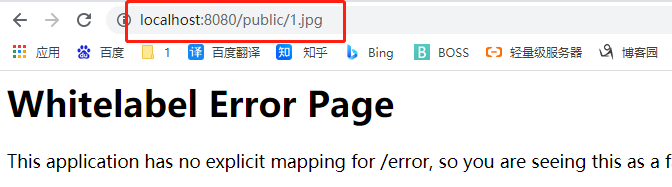
Filter
@Slf4j

@WebFilter(urlPatterns = {"/public/*"})

public class MyFilter implements Filter {

    //filter初始化

    @Override

    public void init(FilterConfig filterConfig) throws ServletException {

      log.info("Filter初始化");

    }

    @Override

    public void destroy() {

        log.info("Filter销毁");

    }

    @Override

    public void doFilter(ServletRequest servletRequest, ServletResponse servletResponse, FilterChain filterChain) throws IOException, ServletException {

        log.info("Filter过滤");

        filterChain.doFilter(servletRequest,servletResponse);

    }

}
访问public下的都会被拦截

Listener
@Slf4j

@WebListener

public class MyListener implements ServletContextListener {

    @Override

    public void contextInitialized(ServletContextEvent sce) {

      log.info("MyListener监听到项目初始化");

    }

    @Override

    public void contextDestroyed(ServletContextEvent sce) {

        log.info("MyListener监听到项目完成");

    }

}

1.2 RegistrationBean Springboot中注入组件
ServletRegistrationBean、FilterRegistrationBean、 ServletListenerRegistrationBean
//保证组件始终是单实例

@Configuration(proxyBeanMethods = true)

public class MyRegistConfig {

    @Bean

    public ServletRegistrationBean myServlet()

    {

        MyServlet myServlet=new MyServlet();

        return  new ServletRegistrationBean(myServlet,"/My");

    }

    @Bean

    public FilterRegistrationBean myFilter()

    {

        MyFilter myFilter=new MyFilter();

        //第一种

        //这里只有通过myServlet的请求下才会显示666 才会被过滤器找到

        //return  new FilterRegistrationBean(myFilter,myServlet());

        //第二种 自己定义过滤url

        FilterRegistrationBean filterRegistrationBean=new FilterRegistrationBean(myFilter);

        filterRegistrationBean.setUrlPatterns(Arrays.asList("/public/*"));

        return  filterRegistrationBean;

    }

    @Bean

    public ServletListenerRegistrationBean myLister()

    {

        MyListener  myListener=new MyListener();

       return new ServletListenerRegistrationBean(myListener);

    }

}
此方法同理
定制化
Web应用 编写一个配置类实现WebMvcConfigurer 即可定制化web功能,里面加@Bean给容器中再扩展一些组件
@EnableWebMvc + 实现WebMvcConfigurer接口 —— @Bean 可以全面接管SpringMVC,所有规则全部自己重新配置; 实现定制和扩展功能
三、数据访问
数据源配置
导入JDBC场景
   <dependency>

            <groupId>org.springframework.boot</groupId>

            <artifactId>spring-boot-starter-data-jdbc</artifactId>

        </dependency>
场景里面已经导入了数据源、JDBC、事务,还需要导入数据库的驱动,因为官方不知道我们接下要操作什么数据库
默认版本:<mysql.version>8.0.22</mysql.version>
 数据库版本要和驱动版本对应

 <dependency>

            <groupId>mysql</groupId>

            <artifactId>mysql-connector-java</artifactId>

             <version>8.0.22</version>

        </dependency>

//重新声明版本(maven的属性的就近优先原则)

    <properties>

        <java.version>1.8</java.version>

        <mysql.version>5.1.49</mysql.version>

    </properties>
分析自动配置
DataSourceAutoConfiguration : 数据源的自动配置
修改数据源相关的配置:spring.datasource
数据库连接池的配置,是自己容器中没有DataSource才自动配置的
底层配置好的连接池是:HikariDataSource
	@Configuration(proxyBeanMethods = false)

	@Conditional(PooledDataSourceCondition.class)

	@ConditionalOnMissingBean({ DataSource.class, XADataSource.class })

	@Import({ DataSourceConfiguration.Hikari.class, DataSourceConfiguration.Tomcat.class,

			DataSourceConfiguration.Dbcp2.class, DataSourceConfiguration.OracleUcp.class,

			DataSourceConfiguration.Generic.class, DataSourceJmxConfiguration.class })

	protected static class PooledDataSourceConfiguration
DataSourceTransactionManagerAutoConfiguration: 事务管理器的自动配置
JdbcTemplateAutoConfiguration: JdbcTemplate的自动配置,可以来对数据库进行crud
JndiDataSourceAutoConfiguration: jndi的自动配置
XADataSourceAutoConfiguration: 分布式事务相关的
修改配置
spring:

  datasource:

    url: jdbc:mysql://waiwanga.mysql.rds.aliyuncs.com:3306/student

    username: root

    password: XXXX

    driver-class-name: com.mysql.jdbc.Driver
@SpringBootTest

@Slf4j

class SpringBootWebApplicationTests {

    @Autowired

    JdbcTemplate jdbcTemplate;

    @Test

    void contextLoads() {

        Long aLong = jdbcTemplate.queryForObject("select count(*) from student", Long.class);

        log.info("记录总数:{}",aLong);

    }

}

使用Druid数据源
官方文档:https://github.com/alibaba/druid
引入jar包
<dependency>

    <groupId>com.alibaba</groupId>

    <artifactId>druid</artifactId>

    <version>1.1.17</version>

</dependency>
编写一个数据源配置类和配置文件关联起来
@Configuration

public class MyDataSourseConfig {

    //把DruidDataSource属性跟配置文件绑定起来

    @ConfigurationProperties("spring.datasource")

    @Bean

    public DataSource dataSource()

    {

        return new DruidDataSource();

    }

}
配置文件
spring:

  datasource:

    url: jdbc:mysql://waiwanga.mysql.rds.aliyuncs.com:3306/student

    username: root

    password: xxxx

    driver-class-name: com.mysql.cj.jdbc.Driver
测试类
@SpringBootTest

@Slf4j

class SpringBootWebApplicationTests {

    @Autowired

    JdbcTemplate jdbcTemplate;

    @Autowired

    DataSource dataSource;

    @Test

    void contextLoads() {

        Long aLong = jdbcTemplate.queryForObject("select count(*) from student", Long.class);

        log.info("记录总数:{}",aLong);

        log.info("数据源"+dataSource.getClass());

    }

}
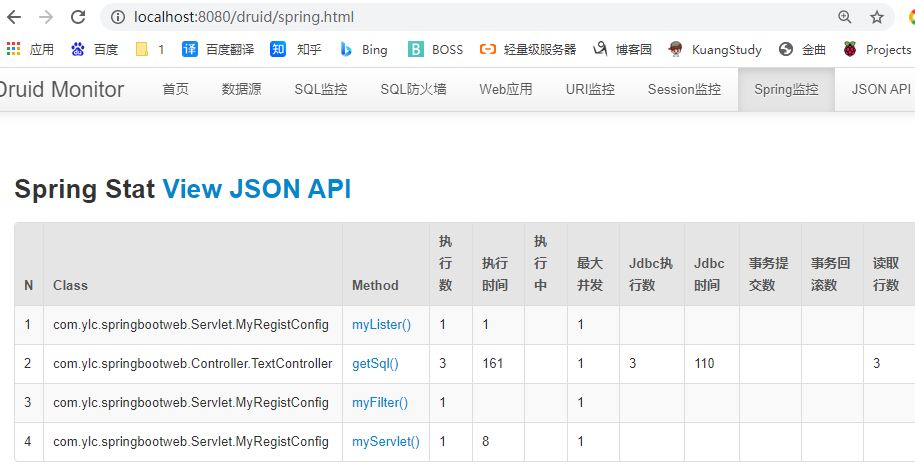
查看监控页
访问http://localhost:8080/druid/
@Configuration

public class MyDataSourseConfig {

    //把DruidDataSource属性跟配置文件绑定起来

    @ConfigurationProperties("spring.datasource")

    @Bean

    public DataSource dataSource()

    {

        return new DruidDataSource();

    }

    //配置监控功能

    @Bean

    public ServletRegistrationBean servletRegistrationBean()

    {

        StatViewServlet statViewServlet=new StatViewServlet();

        ServletRegistrationBean<StatViewServlet> registrationBean=new ServletRegistrationBean<>(statViewServlet,"/druid/*");

        return  registrationBean;

    }

}

开启监控功能
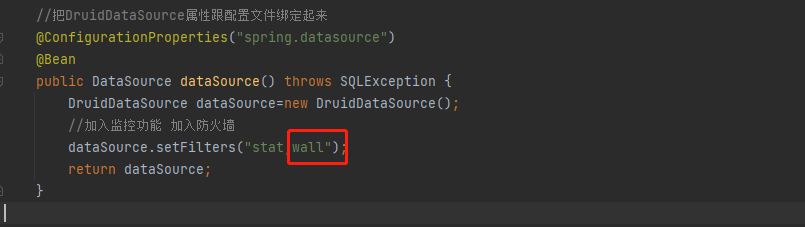
需要在DataSourse中Filter参数配置stat
@ConfigurationProperties("spring.datasource")

@Bean

public DataSource dataSource() throws SQLException {

    DruidDataSource dataSource=new DruidDataSource();

    //加入监控功能

    dataSource.setFilters("stat");

    return dataSource;

}
执行sql
@Autowired

JdbcTemplate jdbcTemplate;

@ResponseBody

@GetMapping("/sql")

public  String getSql()

{

    Long aLong = jdbcTemplate.queryForObject("select count(*) from student", Long.class);

    return  aLong.toString();

}
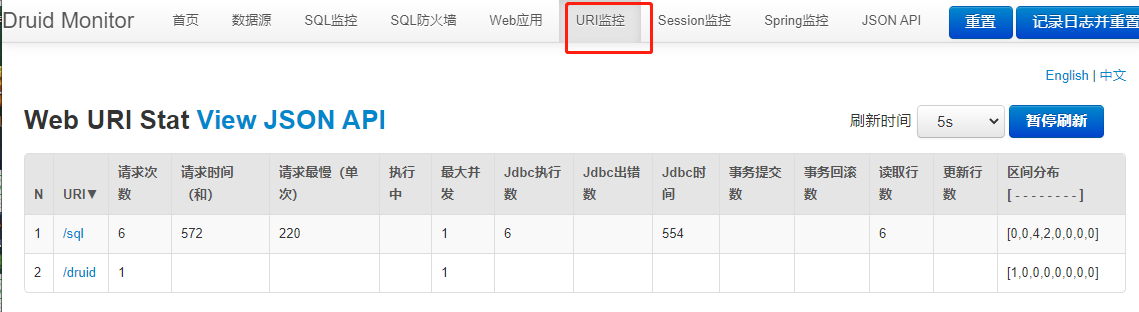
查看监控信息

开启URl监控
WebStatFilter用于采集web-jdbc关联监控的数据
exclusions配置经常需要排除一些不必要的url,比如.js,/jslib/等等。配置在init-param中。比如:
 	<init-param>

  		<param-name>exclusions</param-name>

  		<param-value>*.js,*.gif,*.jpg,*.png,*.css,*.ico,/druid/*</param-value>

  	</init-param>
根据官方xml,写成注解的方式
@Bean

public FilterRegistrationBean webstatFilter()

{

    WebStatFilter webStatFilter=new WebStatFilter();

    FilterRegistrationBean<WebStatFilter> filterRegistrationBean=new FilterRegistrationBean<>(webStatFilter);

    filterRegistrationBean.setUrlPatterns(Arrays.asList("/*"));

    filterRegistrationBean.addInitParameter("exclusions","*.js,*.gif,*.jpg,*.png,*.css,*.ico,/druid/*");

return  filterRegistrationBean;

}
可以查看每次请求的信息
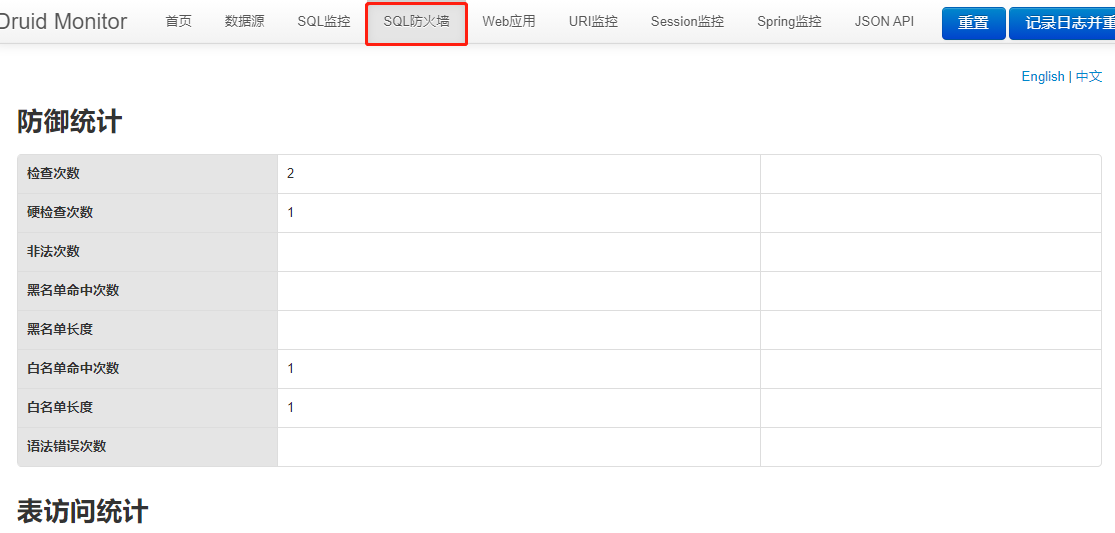
开启防火墙
使用缺省配置的WallFilter
  <bean id="dataSource" class="com.alibaba.druid.pool.DruidDataSource" init-method="init" destroy-method="close">

      ...

      <property name="filters" value="wall"/>

  </bean>
根据官方文档,只需要在之前的filters中再添加一个参数wall
开启Session监控
需要配置Servlet的 loginUsername 和 loginPassword这两个初始参数
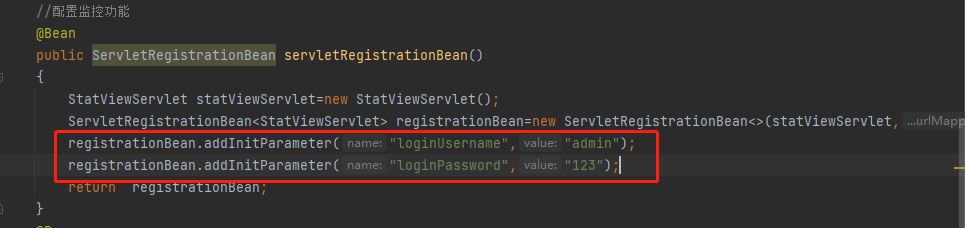
再次刷新进入
登陆上就可以看到Session信息

引入官方starter方式
引入druid-starter
<dependency>

    <groupId>com.alibaba</groupId>

    <artifactId>druid-spring-boot-starter</artifactId>

    <version>1.1.17</version>

</dependency>
分析自动配置
扩展配置项 spring.datasource.druid
DruidSpringAopConfiguration.class, 监控SpringBean的;配置项:spring.datasource.druid.aop-patterns
DruidStatViewServletConfiguration.class, 监控页的配置:spring.datasource.druid.stat-view-servlet;默认开启
DruidWebStatFilterConfiguration.class, web监控配置;spring.datasource.druid.web-stat-filter;默认开启
DruidFilterConfiguration.class}) 所有Druid自己filter的配置
#spring:
# mvc:
# static-path-pattern: /res/**
# web:
# resources:
# static-locations: [classpath:/Picture/]
spring:
datasource:
url: jdbc:mysql://waiwanga.mysql.rds.aliyuncs.com:3306/student
username: root
password: xxxxx
driver-class-name: com.mysql.cj.jdbc.Driver
druid:
aop-patterns: com.ylc.* #监控SpringBean
filters: stat,wall # 底层开启功能,stat(sql监控),wall(防火墙)
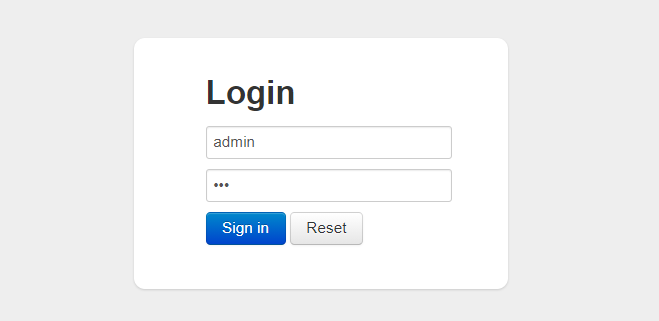
stat-view-servlet: # 配置监控页功能
enabled: true
login-password: 123
login-username: admin
reset-enable: true
web-stat-filter: # 监控web
enabled: true
urlPattern: /*
exclusions: '*.js,*.gif,*.jpg,*.png,*.css,*.ico,/druid/*'
filter:
stat: # 对上面filters里面的stat的详细配置
slow-sql-millis: 1000
logSlowSql: true
enabled: true
wall:
enabled: true
config:
drop-table-allow: false
SpringBoot配置示例
https://github.com/alibaba/druid/tree/master/druid-spring-boot-starter
配置项列表
整合Mybatis操作
官方文档:https://github.com/mybatis
引入jar包
  <dependency>

            <groupId>org.mybatis.spring.boot</groupId>

            <artifactId>mybatis-spring-boot-starter</artifactId>

            <version>2.1.4</version>

        </dependency>

    <dependency>

            <groupId>mysql</groupId>

            <artifactId>mysql-connector-java</artifactId>

    </dependency>

 <dependency>

            <groupId>org.springframework.boot</groupId>

            <artifactId>spring-boot-starter-web</artifactId>

        </dependency>
编写全局配置文件
spring:

  datasource:

    url: jdbc:mysql://waiwanga.mysql.rds.aliyuncs.com:3306/student

    username: xxx

    password: XXX

    driver-class-name: com.mysql.cj.jdbc.Driver

mybatis:

  #config-location: classpath:Mybatis/mybatis-config.xml

  mapper-locations: classpath:mapper/*.xml

  configuration:  #指定Mybatis全局配置文件中的配置项  有了这个就不需要mybatis-config.xml

    map-underscore-to-camel-case: true
编写实体类
@Data

public class Student {

    public  String name;

    public int id;

    public int getId;

}
编写Mapper接口
@Mapper

public interface StudentMapper {

    //获取所有学生

    List<Student> getStudent();

}
在resourse文件夹下编写mapper文件
<?xml version="1.0" encoding="UTF-8" ?>

<!DOCTYPE mapper

        PUBLIC "-//mybatis.org//DTD Mapper 3.0//EN"

        "http://mybatis.org/dtd/mybatis-3-mapper.dtd">

<mapper namespace="com.ylc.springbootweb.mapper.StudentMapper">

    <select id="getStudent" resultType="com.ylc.springbootweb.bean.Student">

        select * from student

    </select>

</mapper>
编写StudentService
@Service

public class StudentService {

    @Autowired

    StudentMapper studentMapper;

    public List<Student> getStudent()

    {

        return studentMapper.getStudent();

    }

}
编写控制器
@Controller
@ResponseBody
public class StudentController {
@Autowired
StudentService studentService;
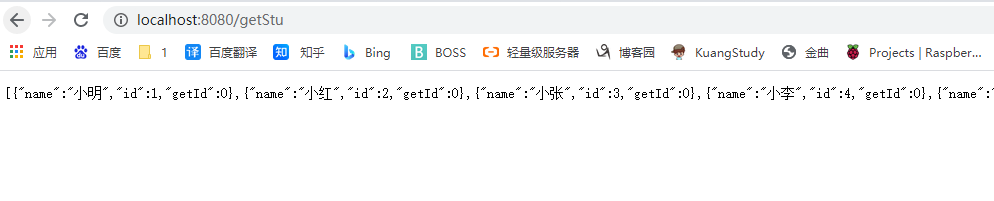
@GetMapping("/getStu")
public List<Student> getStudent()
{
List<Student> students=studentService.getStudent();
for (Student student : students) {
System.out.println(student);
}
return students;
}
}
注意mapper.xml文件和Mybatis配置文件不能放在同一层级,不然系统识别不了哪个是配置文件
整合Mybatis-Plus
引入Mybatis-Plus jar包
        <dependency>

            <groupId>com.baomidou</groupId>

            <artifactId>mybatis-plus-boot-starter</artifactId>

            <version>3.4.1</version>

        </dependency>
在SpringBootWebApplication中用@MapperScan扫描Mapper接口
继承BaseMapper实现crud
public interface PlusStudentMapper<T> extends BaseMapper<Student> {

}
测试
@Autowired

PlusStudentMapper plusStudentMapper;

@Test

void  plusText()

{

    Student student = (Student) plusStudentMapper.selectById(2);

    System.out.println(student);

}

Crud操作
编写Mapper接口
public interface StudentMapper<T> extends BaseMapper<Student> {

}
编写service接口
public interface TService extends IService<Student> {

}
编写service实现类
@Service

public class StudentTServiceImp extends ServiceImpl<StudentMapper<Student>,Student> implements TService {

}
测试类
@Autowired

StudentTServiceImp serviceImp;

@Test

void  Crud()

{

    List<Student> list = serviceImp.list();

    for (Student student : list) {

        System.out.println(student);

    }

}

06.SpringBoot核心技术的更多相关文章
- springboot核心技术(五)-----消息(rabbitmq)
消息 1. 大多应用中,可通过消息服务中间件来提升系统异步通信.扩展解耦能力 2. 消息服务中两个重要概念: 消息代理(message broker)和目的地(destination) 当消息发送者发 ...
- springboot核心技术(四)-----Docker、数据访问、自定义starter
Docker 1.简介 Docker是一个开源的应用容器引擎:是一个轻量级容器技术: Docker支持将软件编译成一个镜像:然后在镜像中各种软件做好配置,将镜像发布出去,其他使用者可以直接使 用这个镜 ...
- springboot核心技术(三)-----web开发
web开发 1.简介 使用SpringBoot: 1).创建SpringBoot应用,选中我们需要的模块: 2).SpringBoot已经默认将这些场景配置好了,只需要在配置文件中指定少量配置就可以运 ...
- springboot核心技术(二)-----自动配置原理、日志
自动配置原理 配置文件能配置的属性参照 1.自动配置原理: 1).SpringBoot启动的时候加载主配置类,开启了自动配置功能 @EnableAutoConfiguration 2).@Enable ...
- springboot核心技术(一)-----入门、配置
Hello World 1.创建一个maven工程:(jar) 2.导入spring boot相关的依赖 <parent> <groupId>org.springframewo ...
- 【SpringBoot】06.SpringBoot访问静态资源
SpringBoot访问静态资源 1.SpringBoot从classpath/static的目录 目录名称必须是static 启动项目,访问http://localhost:8080/0101.jp ...
- SpringBoot 企业级核心技术学习专题
专题 专题名称 专题描述 001 Spring Boot 核心技术 讲解SpringBoot一些企业级层面的核心组件 002 Spring Boot 核心技术章节源码 Spring Boot 核心技术 ...
- 物联网架构成长之路(13)-SpringBoot入门
1. 前言 下载最新版的JavaEE eclipse-jee-oxygen-2-win32-x86_64.zip 安装STS插件 Window->Eclipse Marketplace -> ...
- SpringBoot日记——缓存的使用
SpringBoot核心技术的东西基本上都有介绍过了,接下来,进阶点~来说说缓存吧~ 缓存这个词不少同学应该不会很陌生.而我们这里主要使用的就是Redis. 客户端第一次请求的时候是从库里拿出我们需要 ...
随机推荐
- NSURLSession的简单使用
NSURLSession的简单使用(不同于NSURLConnection,仅仅支持异步请求) dataTask,简单请求直接block里面执行,不走代理 NSURLSessionDataTaskDel ...
- Android单元测试问题解决
1.'java.lang.RuntimeException: Method isEmpty in android.text.TextUtils not mocked'报错 https://www.ji ...
- Pytest学习笔记12-配置文件pytest.ini
前言 pytest配置文件可以改变pytest的运行方式,它是一个固定的文件pytest.ini文件,读取配置信息,按指定的方式去运行. 常用的配置项 marks 作用:测试用例中添加了自定义标记( ...
- Charles使用笔记001
一.抓电脑的请求 Proxy-->勾选Windows Proxy 二.Charles 拦截原理 三.Charles 拦截修改数据 选择一个链接-->右键-->勾选Breakpoint ...
- Gauge自动化测试框架的安装和入门
- PYTHON 得到ADB的输出结果
#利用ADB DEVICES结果判断指定手机是否正常连接,如果为offline,则adb disconnect sjh:adb connect sjh#如果没有,则执行adb connect sjhd ...
- 视频场景切换检测的FPGA实现
本文将继续讲述图像处理算法的FPGA实现,后续可能更新图像旋转(1080P).画中画.快速DCT等算法.视频场景切换检测常用于视频编解码领域,我选用的算法是双阈值灰度直方图检测法,起初在MATLAB上 ...
- [004] .NET 的现状和未来
我们总是能听到一些人说,.NET 不行.学 .NET 没发展前途之类的言论,有的童鞋听多了便也开始怀疑自己选择的 .NET 方向是不是错了. 不得不承认,在 .NET 没有实现跨平台之前,市场行情确实 ...
- C语言变量为何先定义后使用
C语言中,对变量的使用,首先要先定义.说明其数据类型.原因可能如下: 1不同类型的变量,其编码表示方式可能不同. 2不同类型的变量,其占有的空间大小不同.不事先说明无法在内存中开辟空间.
- 五个 .NET 性能小贴士
原文:bit.ly/3wSpO4o 作者:Nikita Starichenko 翻译:精致码农 大家好!今天我想和大家分享几个 .NET 的性能小贴士与基准测试. 我的系统环境: BenchmarkD ...