
s11 day Linux 和nginx 部署
https://www.cnblogs.com/pyyu/p/9481344.html
,开机初始化的配置

iptables -F 清空防火墙

/etc/init.d/iptables stop  #关闭iptables

setenforce   #暂停selinux

#编译安装python3

环境准备

yum install gcc patch libffi-devel python-devel  zlib-devel bzip2-devel openssl-devel ncurses-devel sqlite-devel readline-devel tk-devel gdbm-devel db4-devel libpcap-devel xz-devel -y

#下载python3的源码包

wget https://www.python.org/ftp/python/3.4.7/Python-3.4.7.tar.xz

#解压缩源码包

xz -d Python-3.4..tar.xz

tar -xf Python-3.4..tar
#切换python3目录
cd Python-3.4.
#释放脚本文件
./configure --prefix=/opt/python347
#编译,编译安装
make && make install
#建立软连接
ln -s /opt/python347/bin/python3 /usr/local/bin/python3
#将编译的python3的环境变量添加到pATH
vim /etc/profile
#写入到配置文件,永久生效 在最底行写入
export PATH=$PATH:/opt/python347/bin/ 然后 source /etc/profile
使得配置文件生效
#python解释器的自动补全功能 yum install -y readline-devel -y pip install readline import readline,rlcompleter readline.parse_and_bind('tab:complete')
#python虚拟环境 virtualenv --no-site-packages venv
#创建venv虚拟环境 #激活虚拟环境 source venv/bin/activate
#虚拟环境主要是对环境变量进行更改 echo $PATH
#退出虚拟环境 deactivate #ipython pip3 install ipython
#交互式的解释器 #notebook pip3 install notebook
安装python
,开机初始化的配置

iptables -F 清空防火墙

/etc/init.d/iptables stop  #关闭iptables

setenforce   #暂停selinux

#编译安装python3

环境准备

yum install gcc patch libffi-devel python-devel  zlib-devel bzip2-devel openssl-devel ncurses-devel sqlite-devel readline-devel tk-devel gdbm-devel db4-devel libpcap-devel xz-devel -y

#下载python3的源码包

wget https://www.python.org/ftp/python/3.4.7/Python-3.4.7.tar.xz

#解压缩源码包

xz -d Python-3.4..tar.xz

tar -xf Python-3.4..tar

#切换python3目录

cd Python-3.4.

#释放脚本文件

./configure --prefix=/opt/python347

#编译,编译安装

 make && make install

 #建立软连接

 ln -s /opt/python347/bin/python3 /usr/local/bin/python3

下载 readline
 yum install -y readline -devel


 查看环境变量:
[root@tencentcloud ~]# echo $PATH
/usr/local/sbin:/usr/local/bin:/usr/sbin:/usr/bin:/root/bin
虚拟环境的安装
#python虚拟环境

virtualenv --no-site-packages venv #创建venv虚拟环境

#激活虚拟环境

source venv/bin/activate

#虚拟环境主要是对环境变量进行更改

echo $PATH

#退出虚拟环境

deactivate
1. 下载NGINX
wget http://nginx.org/download/nginx-1.14.0.tar.gz
2.解压
tar xf nginx-1.14..tar.gz
3. 编译安装三部曲
进入 nginx 目录下 ,注意目录里有个configure 文件

./configure --prefix=/opt/nginx-1.14.

make && make install
4.开启服务
.启动nginx,进入sbin目录,找到nginx启动命令

cd sbin

./nginx #启动

./nginx -s stop #关闭

./nginx -s reload #重新加载
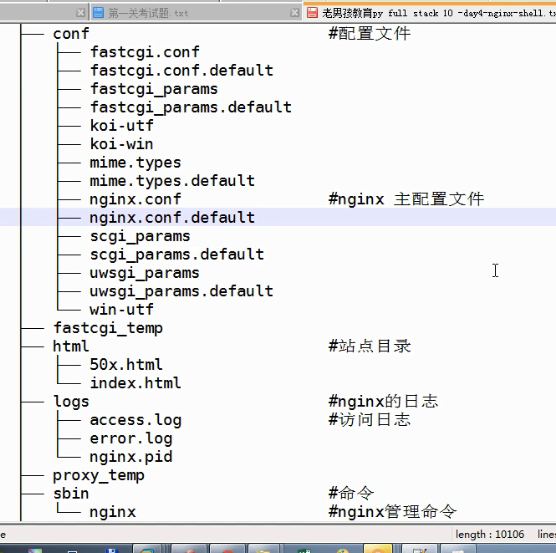
5.查看conf文件
cat conf/nginx.conf
[root@tencentcloud nginx-1.12.]# cat conf/nginx.conf

#user  nobody;

worker_processes  ;

#error_log  logs/error.log;

#error_log  logs/error.log  notice;

#error_log  logs/error.log  info;

#pid        logs/nginx.pid;

events {

    worker_connections  ;

}

http {

    include       mime.types;

    default_type  application/octet-stream;

    #log_format  main  '$remote_addr - $remote_user [$time_local] "$request" '

    #                  '$status $body_bytes_sent "$http_referer" '

    #                  '"$http_user_agent" "$http_x_forwarded_for"';

    #access_log  logs/access.log  main;

    sendfile        on;

    #tcp_nopush     on;

    #keepalive_timeout  ;

    keepalive_timeout  ;

    #gzip  on;

    server {

        listen       ;

        server_name  localhost;

        #charset koi8-r;

        #access_log  logs/host.access.log  main;

        location / {

            root   html;

            index  index.html index.htm;

        }

        #error_page                /.html;

        # redirect server error pages to the static page /50x.html

        #

        error_page        /50x.html;

        location = /50x.html {

            root   html;

        }

        # proxy the PHP scripts to Apache listening on 127.0.0.1:

        #

        #location ~ \.php$ {

        #    proxy_pass   http://127.0.0.1;

        #}

        # pass the PHP scripts to FastCGI server listening on 127.0.0.1:

        #

        #location ~ \.php$ {

        #    root           html;

        #    fastcgi_pass   127.0.0.1:;

        #    fastcgi_index  index.php;

        #    fastcgi_param  SCRIPT_FILENAME  /scripts$fastcgi_script_name;

        #    include        fastcgi_params;

        #}

        # deny access to .htaccess files, if Apache's document root

        # concurs with nginx's one

        #

        #location ~ /\.ht {

        #    deny  all;

        #}

    }

    # another virtual host using mix of IP-, name-, and port-based configuration

    #

    #server {

    #    listen       ;

    #    listen       somename:;

    #    server_name  somename  alias  another.alias;

    #    location / {

    #        root   html;

    #        index  index.html index.htm;

    #    }

    #}

    # HTTPS server

    #

    #server {

    #    listen        ssl;

    #    server_name  localhost;

    #    ssl_certificate      cert.pem;

    #    ssl_certificate_key  cert.key;

    #    ssl_session_cache    shared:SSL:1m;

    #    ssl_session_timeout  5m;

    #    ssl_ciphers  HIGH:!aNULL:!MD5;

    #    ssl_prefer_server_ciphers  on;

    #    location / {

    #        root   html;

    #        index  index.html index.htm;

    #    }

    #}

}

6.创建软连接
[root@tencentcloud nginx-1.12.]# ln -s /sbin/nginx /sbin/

5.关闭防护墙
chkconfig iptables off

永久关闭。

chkconfig|grep ipt
vim /etc/selinux/config

6. 去掉文件里的# 和空行
egrep -v "^$|#" nginx.conf.default

egrep -v "^$|#" nginx.conf.default >nginx.conf
4. 测试
curl 10.10.0.1
今日内容:

    saltstack(python编写的自动化工具)

    原本公司的组织架构是;

        apahce+oralce数据库+redis+saltstack+java+perl(收费)

        走向一个开源,免费的技术架构(省钱)

        nginx + mysql + redis +stal +java +python(glances一个开源的服务器监控工具)

    ansible + 一号车面试的时候,ansible+python+django 开发的cmdb平台

    saltstack + python +django  运维平台

#salt环境准备,需要再两台机器一起执行

准备好2台服务器

master 192.168.12.44

slave  192.168.12.45

#设置好本地/etc/hosts解析

vim /etc/hosts#写入以下解析记录

192.168.12.44 master

192.168.12.45 slave

#关闭服务器安全策略

/etc/init.d/iptables stop

iptables -F

#关闭服务器selinux

getenforce #检测selinux是否开启

setenforce  #临时关闭selinux

#使用sed永久关闭selinux(此步骤需要重启linux)

sed -i 's/SELINUX=enforcing/SELINUX=disabled/' /etc/selinux/config

#epel源配置,默认的yum源提供的软件包有限,epel源提供额外的软件包下载(新的仓库)

#下载epel源

wget -O /etc/yum.repos.d/epel.repo http://mirrors.aliyun.com/repo/epel-6.repo

#清空yum源缓存,然后更新新的yum缓存(非必须的操作)

yum clean all

yum makecache

#yum install xxx

#安装salt-master   #############################

yum install salt-master -y

#安装好后修改配置文件/etc/salt/master

#写入如下配置即可

[root@master ~]# grep -v '^#' /etc/salt/master |grep -v '^$'

interface: 0.0.0.0

publish_port:

user: root

worker_threads:

ret_port:

pidfile: /var/run/salt-master.pid

log_file: /var/log/salt/master

#启动salt-master

/etc/init.d/salt-master start  #启动

/etc/init.d/salt-master status  #查看状态

/etc/init.d/salt-master stop #停止

#修改minion的配置   ######################

yum install salt-minion -y

#vim /etc/salt/minion

[root@slave ~]# grep -v '^#' /etc/salt/minion |grep -v '^$'

master: master

master_port:

user: root

id: slave

output: nested

backup_mode: minion

acceptance_wait_time:

random_reauth_delay:

log_file: /var/log/salt/minion

#修改完配置之后,启动salt-minion

/etc/init.d/salt-minion start

######################

#salt-master和salt-minion都启动之后

#在salt-master端执行

[root@master ~]# salt-key -L

Accepted Keys:

Denied Keys:

Unaccepted Keys:

slave    #此时已经出现slave

Rejected Keys:

#然后salt-master 通过命令接收slave节点的key

[root@master ~]# salt-key -a slave

The following keys are going to be accepted:

Unaccepted Keys:

slave

Proceed? [n/Y] y

Key for minion slave accepted.

#确认接收秘钥后,检验minion秘钥是否被接收

[root@master ~]# salt-key -L

Accepted Keys:

slave

Denied Keys:

Unaccepted Keys:

Rejected Keys:

########################

#此时salt-master已经和salt-minion通信了

#测试用master 控制minion,创建一个文本

[root@master ~]# salt 'slave' cmd.run 'echo '我是master,我在slave上创建了一个文本' > /tmp/master.txt'

#############

#在minion节点查看效果即可

[root@slave ~]# cat /tmp/master.txt

我是master,我在slave上创建了一个文本

#

在主节点上,可以分发命令,一条命令即可获取所有被管控机器的ip,hostname等信息

Unaccepted Keys:

slave:  :f2:0c:ea:be:b3::b1:c9::::9b:3c:2e:

local:

        :f2:0c:ea:be:b3::b1:c9::::9b:3c:2e:

#############################################################################################################

#uWSGI 安装配置

#更详细的查看博客 https://www.cnblogs.com/pyyu/p/9481344.html

#基础环境配置

yum groupinstall "Development tools"

yum install zlib-devel bzip2-devel pcre-devel openssl-devel ncurses-devel sqlite-devel readline-devel tk-devel

#提前安装好python3环境

https://www.cnblogs.com/pyyu/p/7402145.html

#virtualenv

#请确保你的虚拟环境正常工作

https://www.cnblogs.com/pyyu/p/9015317.html

#安装django1.

pip3 install django==1.11

#创建django项目mysite

django-admin startproject mysite

#创建app01

python3 manage.py startapp app01

#mysite/settings.py

#settings.py设置

ALLOWED_HOSTS = ['*']

install app01

#mysite/urls.py

from app01 import views

urlpatterns = [

    url(r'^admin/', admin.site.urls),

    url(r'^hello_django/', views.hello),

]

#app01/views.py

from django.shortcuts import render,HttpResponse

# Create your views here.

def hello(request):

    print('request is :',request)

    return HttpResponse('django is ok ')

#pip3安装uwsgi

#进入虚拟环境venv,安装uwsgi

(venv) [root@slave 192.168.11.64 /opt]$pip3 install uwsgi

#检查uwsgi版本

(venv) [root@slave 192.168.11.64 /opt]$uwsgi --version

2.0.17.1

#检查uwsgi python版本

uwsgi --python-version

############################################

#启动一个python web服务

uwsgi --http : --wsgi-file test.py

http :: 使用http协议,端口8000

wsgi-file test.py: 加载指定的文件,test.py

#test.py

def application(env, start_response):

    start_response('200 OK', [('Content-Type','text/html')])

    return [b"Hello World"] # python3

#uWsgi热加载python程序

#在启动命令后面加上参数

uwsgi --http : --module mysite.wsgi --py-autoreload=

#此时修改django代码,uWSGI会自动加载django程序,页面生效

运行django程序

#mysite/wsgi.py  确保找到这个文件

uwsgi --http : --module mysite.wsgi

module mysite.wsgi: 加载指定的wsgi模块

#二、nginx+uWSGI+django+virtualenv+supervisor(进程管理工具)发布我们的django项目

.配置nginx,通过反向代理结合uWSGI

       location / {

            root   html;

            include /opt/nginx112/conf/uwsgi_params;

            uwsgi_pass 0.0.0.0:;

            index  index.html index.htm;

        }

.安装好supervisor

#在python2环境下安装

yum install python-setuptools

easy_install supervisor

#通过命令生成supervisor的配支文件

echo_supervisord_conf > /etc/supervisord.conf

#然后再/etc/supervisord.conf末尾添加上如下代码!!!!!!

[program:s10_django]

command= /home/venv1/bin/uwsgi --uwsgi 0.0.0.0: --chdir /home/mysite --home=/home/venv1 --module mysite.wsgi

directory=/home/mysite

startsecs=

stopwaitsecs=

autostart=true

autorestart=true

.启动好nginx

/opt/nginx112/sbin/nginx

.启动supervisor

supervisord -c /etc/supervisord.conf

    -管理supervisor的命令

    supervisorctl start s10_django

    supervisorctl stop  s10_django

    supervisorctl restart s10_django

.此时访问192.168.12. 访问nginx的80端口,已经反向代理找到后端的django应用

####补充:

PS1命令提示符的更改

export PS1='[\u@\h \w \t]\$'

#使得永久生效

vim /etc/profile

#写入

export PS1='[\u@\h \w \t]\$'

#三、docker容器基本使用

大家可能接触到的服务器环境(代码运行的环境)

物理机+centos

vmware esxi  + centos

阿里云/腾讯云/亚马逊云

docker容器   (项目跑在容器中)

#环境准备

#查看linux发行版

cat /etc/redhat-release

#内核版本查看

uname -r

#安装docker,配置yum的epel源

yum install docker

#启停docker

systemctl status docker  #检查docker状态

systemctl start  docker #启动docker

systemctl stop    docker  #关闭docker

#配置docker镜像源加速

curl -sSL https://get.daocloud.io/daotools/set_mirror.sh | sh -s http://95822026.m.daocloud.io

#查看镜像源加速

[root@oldboy_python ~ ::]#cat /etc/docker/daemon.json

{

    "registry-mirrors": ["http://95822026.m.daocloud.io"],

    "insecure-registries": []

}

#下载hello-world镜像

docker pull hello-world

#查看docker镜像

docker images

#运行docker hello-world镜像

docker run 镜像名/镜像id/镜像id的前3位

#搜索docker镜像(image)

docker search centos

docker search django(#搜索django镜像)

#运行一个交互式的centos容器

docker run -it centos /bin/bash

#在后台运行一个容器,执行shell,每秒打印一个hellodocker,(此命令会返回一个容器id)

docker run -d centos /bin/sh -c "while true;do echo hello centos; sleep 1;done"

#查看容器进程

docker ps #用于查看正在运行的容器

docker ps -a #用于查看所有运行过的容器

#查看容器运行的日志

docker logs 容器id

#删除容器

    -先停止正在运行的容器

    docker stop 容器id

    docker rm 容器id

    -强制删除正在运行的容器

    docker rm -f 容器id

#删除已有的docker镜像(image)

docker rmi 镜像id

#https://www.cnblogs.com/pyyu/p/9485268.html  docker部署博客

###########重要性

.uwsgi发布django程序

.docker容器的使用

.mysql主从复制

.把笔记所有linux命令敲一遍
s11 day Linux 和nginx 部署的更多相关文章
- Linux +Docker +Nginx 部署代理转发初探
很多开发人员仅仅只会码代码,如果让开发人员部署一些深入点的东西,或者做负载均衡等,很多开发人员估计就懵逼了,作为一个专业的开发还需要懂一些基本的运维知识:虽然说在互联网行业中,中小企业都有一个牛逼的运 ...
- Linux使用nginx部署Laravel
问题描述 Laravel是PHP下当今最受欢迎的web应用开发框架,github上start数远超第二名Symfony,以前我用这个框架做项目的时候通常就是扔到apache里面,然后配置.htacce ...
- linux下nginx部署以及配置详解
1.下载源码包解压编译 启动多个,请看:在linux系统下安装两个nginx以及启动 查看nginx包路径:http://nginx.org/download/,两种下载方式: 1.在官网下载使用Xf ...
- Linux上Nginx部署配置--二级域名配置
http://www.cnblogs.com/yaunion/archive/2013/03/16/2962385.html http://blog.csdn.net/LBinin/article/d ...
- Linux上Nginx部署配置
一.下载软件 openssl-fips-2.0.10.tar.gz pcre-8.40.tar.gz zlib-1.2.11.tar.gz nginx-1.10.2.tar.gz gcc-c++ 下载 ...
- Django Linux环境下部署CentOS7+Python3+Django+uWSGI+Nginx(含Nginx返回400问题处理、防火墙管理)
本文将介绍如何在Linux系统上部署Django web项目,本次部署基于下面的架构: CentOS7+ Python3.5 + Django1.11 + uWSGI + Nginx 亲测可行!!按照 ...
- linux vue uwsgi nginx 部署路飞学城 安装 vue
vue+uwsgi+nginx部署路飞学城 有一天,老男孩的苑日天给我发来了两个神秘代码,听说是和mjj的结晶 超哥将这两个代码,放到了一个网站上,大家可以自行下载 路飞学城django代码#这个代码 ...
- Linux 集群概念 , wsgi , Nginx负载均衡实验 , 部署CRM(Django+uwsgi+nginx), 部署学城项目(vue+uwsgi+nginx)
Linux 集群概念 , wsgi , Nginx负载均衡实验 , 部署CRM(Django+uwsgi+nginx), 部署学城项目(vue+uwsgi+nginx) 一丶集群和Nginx反向代理 ...
- linux nginx 部署多套服务(以react包为例)
前言 今天我特地写下笔记,希望可以完全掌握这个东西,也希望可以帮助到任何想对学习这个东西的同学. 本文用nginx部署服务为主要内容,基于CentOs 7.8系统. 文档版本:1.0.1 更新时间:2 ...
随机推荐
- dede5.7 GBK 在php5.4环境下 后台编辑器无法显示文章内容
问题的原因是:是htmlspecialchars,PHP 5.4后GBK编码下默认不支持中文,转换后内容为空,UTF-8编码没有任何问题. 解决方法如下: 在\include\ckeditor\c ...
- Spring的3.0提供了一种:SpEL注入方式(了解)
1. SpEL:Spring Expression Language是Spring的表达式语言,有一些自己的语法 2. 语法 * #{SpEL} 3. 例如如下的代码 <!-- SpEL的方式 ...
- 深入浅出 JMS(三) - ActiveMQ 消息传输
深入浅出 JMS(三) - ActiveMQ 消息传输 一.消息协商器(Message Broker) broke:消息的交换器,就是对消息进行管理的容器.ActiveMQ 可以创建多个 Broker ...
- jetty无法即时更新html、js、css等静态文件的解决办法
网上搜了一大堆方法.最常见的是找到jetty\etc\webdefault.xml文件,找到useFileMappedBuffer参数,把true改为false <init-param> ...
- 2013.7.15 非html 标签 ,外层 要用 ‘’
当使用 非 html 标签 是 ,要使用 单引号 作外层 , 双引号 用单层 ,如 <s:if test='direction=="出"'> 可以执行 ,, ...
- HTML <img> 标签的 alt 属性
定义和用法 alt 属性是一个必需的属性,它规定在图像无法显示时的替代文本. 假设由于下列原因用户无法查看图像,alt 属性可以为图像提供替代的信息: 网速太慢 src 属性中的错误 浏览器禁用图像 ...
- 如何配置JDK?
有很多人,java都下载好,却因不会配置JDK,而无法编程.今天巩固就来教大家配置JDK. 第一步:将下载好的java放在D盘(最好不要占用C盘). 第二步:右击我的电脑,选择"属性 ...
- 22. Valuing Water 珍惜水资源
. Valuing Water 珍惜水资源 ① Humanity uses a little less than half the water available worldwide.Yet occu ...
- Django(4)
https://www.cnblogs.com/yuanchenqi/articles/7439088.html
- Oracle之SQL语句性能优化(34条优化方法)
(1)选择最有效率的表名顺序(只在基于规则的优化器中有效): ORACLE的解析器按照从右到左的顺序处理FROM子句中的表名,FROM子句中写在最后的表(基础表 driving table)将被最先处 ...