
google tensorflow bert代码分析
参考网上博客阅读了bert的代码,记个笔记。代码是 bert_modeling.py
参考的博客地址:
https://blog.csdn.net/weixin_39470744/article/details/84401339
https://www.jianshu.com/p/2a3872148766
主要分为三部分:
1、输入数据处理,将词(中文的字)转换为对应的embeddging,增加positional embeddding 和token type embedding.
positional embedding 是词的位置信息,词在句子中的位置。token type embedding表示是哪个句子中的词。
输出的数据格式是[batch_size,seq_length;width], width是词向量的长度。
2、encoder部分主要是使用transformer对句子进行编码,transformer的主要结构是来自 attention is all you need,但是和论文中的结构有些小区别。
3、decoder部分主要是解码部分。
先介绍数据处理部分:
1、bert模型输入的文本处理之后封装为InputExample类,这个类包扩 guid,text_a,text_b,label
这些内容会被转换成一下的格式。##表示被mark的词,[CLS]起始第一个,在分类任务中表示句子的 sentence vector
[seq]表示句子的分隔符,如果只有一个句子text_b可以为空
tokens:   [CLS] is this jack ##son ##ville ? [SEP] no it is not . [SEP]
#  type_ids: 0     0  0    0    0     0       0 0     1  1  1  1   1 1
这里的输入句子会限定一个最大输入长度,不足的补0,这个0是指词对应的token_id。处理完成之后,将词的ID序列
转化为词向量的序列。
词ID序列到词向量序列的代码如下:
 # Perform embedding lookup on the word ids.

 (self.embedding_output, self.embedding_table) = embedding_lookup(

     input_ids=input_ids,

     vocab_size=config.vocab_size,

     embedding_size=config.hidden_size,

     initializer_range=config.initializer_range,

     word_embedding_name="word_embeddings",

     use_one_hot_embeddings=use_one_hot_embeddings)
下面代码在词向量序列上增加了 positional embeddings 和 token type embeddings。embedding_postprocessor 它包括token_type_embedding和position_embedding。也就是图中的Segement Embeddings和Position Embeddings。

##配置项 这部分代码注释写的非常详细,embedding_postprocessor的具体实现可以看源码的注释,Bert的position Embedding是作为参数学习得到的,
transformer的论文里是计算得到的。
 self.embedding_output = embedding_postprocessor(

     input_tensor=self.embedding_output,

     use_token_type=True,

     token_type_ids=token_type_ids,

     token_type_vocab_size=config.type_vocab_size,

     token_type_embedding_name="token_type_embeddings",

     use_position_embeddings=True,

     position_embedding_name="position_embeddings",

     initializer_range=config.initializer_range,

     max_position_embeddings=config.max_position_embeddings,

     dropout_prob=config.hidden_dropout_prob)
特别说明一下,最后的输出增加了 norm和dropout output = layer_norm_and_dropout(output, dropout_prob)
2、Encoder部分代码
首先是对输入做了个attention_mask的处理
attention_mask = create_attention_mask_from_input_mask(input_ids, input_mask)
这个主要是减少对于mask的词和填充部分的词的关注。mask部分和填充部分在计算attention的时候分数自然应该很低才对。
然后是transformer_model,这部分主要是transformer,关于transformer可以参考 attention is all you need,这篇博客写的也不错,https://blog.csdn.net/yujianmin1990/article/details/85221271,这是翻译的一篇。
 self.all_encoder_layers = transformer_model(

     input_tensor=self.embedding_output,

     attention_mask=attention_mask,

     hidden_size=config.hidden_size,

     num_hidden_layers=config.num_hidden_layers,

     num_attention_heads=config.num_attention_heads,

     intermediate_size=config.intermediate_size,

     intermediate_act_fn=get_activation(config.hidden_act),

     hidden_dropout_prob=config.hidden_dropout_prob,

     attention_probs_dropout_prob=config.attention_probs_dropout_prob,

     initializer_range=config.initializer_range,

     do_return_all_layers=True)
接下来详细写写transformer_model的代码
函数定义如下:
 def transformer_model(input_tensor,

                       attention_mask=None,

                       hidden_size=768,

                       num_hidden_layers=12,

                       num_attention_heads=12,

                       intermediate_size=3072,

                       intermediate_act_fn=gelu,

                       hidden_dropout_prob=0.1,

                       attention_probs_dropout_prob=0.1,

                       initializer_range=0.02,

                       do_return_all_layers=False):
input_tensor是[batch_size, seq_length, hidden_size]
attention_mask就是之前提过的用于处理padding部分和mask部分attention值的 形状[batch_size, seq_length,seq_length]
hidden_size这个是transformer的隐层的大小
num_hidden_layers:transformer有多少层,也就是blocks的数目。一个block的结构如下:
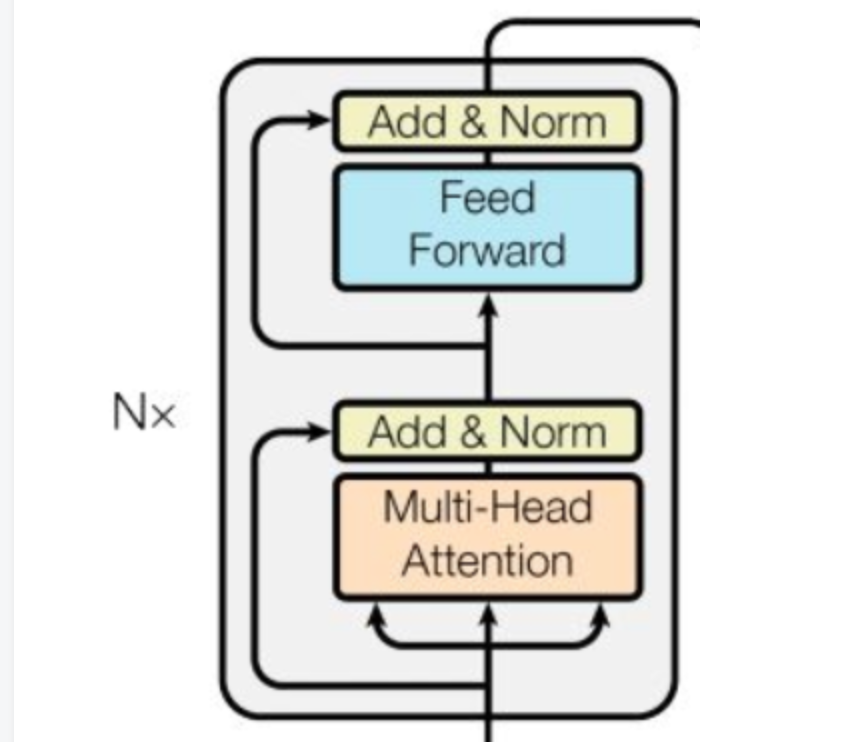
num_attention_heads: transformer中attention heads的个数,比如bert设置的是12,多头机制中head数。
intermediate_size:feed forward中间层的大小
接下来开始介绍代码,开始判断了一下hidden_size是否是num_attention_size的整数倍
对输入由三维改为二维,避免处理过程中多次tensor的变相,提高效率。
这一步将[batch_size,seq_len,width]改为[batch_size*seq_len,width]
prev_output = reshape_to_matrix(input_tensor)

接下来是 attention layer,这个是计算self-attention,当然如果 query和key一样的话,就是self-attention
首先第一步是计算query_layer,key_layer,value_layer。
这里把attention的计算抽象为 query,key和value三部分,通常key和value是一样的,然后根据query来计算不同的key 其value贡献的大小。
比如如果RNN这种seq2seq的话(encoder和decoder都是RNN),query是decoder前一时刻的输出,key和value是encoder RNN各个时刻的状态。
在计算时query_layer=W*query ,其他key value类似
 # `query_layer` = [B*F, N*H]

 query_layer = tf.layers.dense(

     from_tensor_2d,

     num_attention_heads * size_per_head,

     activation=query_act,

     name="query",

     kernel_initializer=create_initializer(initializer_range))

 # `key_layer` = [B*T, N*H]

 key_layer = tf.layers.dense(

     to_tensor_2d,

     num_attention_heads * size_per_head,

     activation=key_act,

     name="key",

     kernel_initializer=create_initializer(initializer_range))

 # `value_layer` = [B*T, N*H]

 value_layer = tf.layers.dense(

     to_tensor_2d,

     num_attention_heads * size_per_head,

     activation=value_act,

     name="value",

     kernel_initializer=create_initializer(initializer_range))
然后是计算attention的分数,这个和transformer论文中的计算方式一致,
 attention_scores = tf.matmul(query_layer, key_layer, transpose_b=True)

 attention_scores = tf.multiply(attention_scores,

                                1.0 / math.sqrt(float(size_per_head)))
这部分代码中tensor的形状变化,和矩阵乘法的应用比较巧妙,可以推一下看看,代码写的很简洁。
这个部分是对attention mask的使用,如果是之前被mask和padding的部分,对应的分数设置为-10000,然后使用softmax计算分数
if attention_mask is not None:

  # `attention_mask` = [B, 1, F, T]

  attention_mask = tf.expand_dims(attention_mask, axis=[1])

  # Since attention_mask is 1.0 for positions we want to attend and 0.0 for

  # masked positions, this operation will create a tensor which is 0.0 for

  # positions we want to attend and -10000.0 for masked positions.

  adder = (1.0 - tf.cast(attention_mask, tf.float32)) * -10000.0

  # Since we are adding it to the raw scores before the softmax, this is

  # effectively the same as removing these entirely.

  attention_scores += adder

# Normalize the attention scores to probabilities.

# `attention_probs` = [B, N, F, T]

attention_probs = tf.nn.softmax(attention_scores)
attention的分数这部分也有dropout

# This is actually dropping out entire tokens to attend to, which might
# seem a bit unusual, but is taken from the original Transformer paper.
attention_probs = dropout(attention_probs, attention_probs_dropout_prob)
接下来就是value_layer乘以attention_probs
attention_layer最后的输出是
[B*F, N*V]或者[B, F, N*V]
# Scalar dimensions referenced here:
#   B = batch size (number of sequences)
#   F = `from_tensor` sequence length
#   T = `to_tensor` sequence length
#   N = `num_attention_heads`
#   H = `size_per_head`

对于多头机制,每个head都计算完attention_layer之后,将这些结果全都拼接起来。
attention_output = tf.concat(attention_heads, axis=-1)
注意这里attention_output最后一维的维度和layer_input一样的
attention_output = dropout(attention_output, hidden_dropout_prob)
attention_output = layer_norm(attention_output + layer_input)
这个是加上残差链接。
两个全连接层,最后加上dropout和 layer_norm
 # The activation is only applied to the "intermediate" hidden layer.

 with tf.variable_scope("intermediate"):

   intermediate_output = tf.layers.dense(

       attention_output,

       intermediate_size,

       activation=intermediate_act_fn,

       kernel_initializer=create_initializer(initializer_range))

 # Down-project back to `hidden_size` then add the residual.

 with tf.variable_scope("output"):

   layer_output = tf.layers.dense(

       intermediate_output,

       hidden_size,

       kernel_initializer=create_initializer(initializer_range))

   layer_output = dropout(layer_output, hidden_dropout_prob)

   layer_output = layer_norm(layer_output + attention_output)

   prev_output = layer_output

   all_layer_outputs.append(layer_output)
google tensorflow bert代码分析的更多相关文章
- tensorflow笔记:多层LSTM代码分析
tensorflow笔记:多层LSTM代码分析 标签(空格分隔): tensorflow笔记 tensorflow笔记系列: (一) tensorflow笔记:流程,概念和简单代码注释 (二) ten ...
- tensorflow笔记:多层CNN代码分析
tensorflow笔记系列: (一) tensorflow笔记:流程,概念和简单代码注释 (二) tensorflow笔记:多层CNN代码分析 (三) tensorflow笔记:多层LSTM代码分析 ...
- AI繁荣下的隐忧——Google Tensorflow安全风险剖析
本文由云+社区发表 作者:[ Tencent Blade Team ] Cradmin 我们身处一个巨变的时代,各种新技术层出不穷,人工智能作为一个诞生于上世纪50年代的概念,近两年出现井喷式发展,得 ...
- 完整全面的Java资源库(包括构建、操作、代码分析、编译器、数据库、社区等等)
构建 这里搜集了用来构建应用程序的工具. Apache Maven:Maven使用声明进行构建并进行依赖管理,偏向于使用约定而不是配置进行构建.Maven优于Apache Ant.后者采用了一种过程化 ...
- wifi display代码 分析
转自:http://blog.csdn.net/lilian0118/article/details/23168531 这一章中我们来看Wifi Display连接过程的建立,包含P2P的部分和RTS ...
- AngularJS PhoneCat代码分析
转载自:http://www.tuicool.com/articles/ym6Jfen AngularJS 官方网站提供了一个用于学习的示例项目:PhoneCat.这是一个Web应用,用户可以浏览一些 ...
- Linux内核启动代码分析二之开发板相关驱动程序加载分析
Linux内核启动代码分析二之开发板相关驱动程序加载分析 1 从linux开始启动的函数start_kernel开始分析,该函数位于linux-2.6.22/init/main.c start_ke ...
- MVP模式, 开源库mosby的使用及代码分析
Android中的构架模式一直是一个很hot的topic, 近年来Architecture components推出之后, MVVM异军突起, 风头正在逐渐盖过之前的MVP. 其实我觉得MVP还是有好 ...
- 【转载】word2vec原理推导与代码分析
本文的理论部分大量参考<word2vec中的数学原理详解>,按照我这种初学者方便理解的顺序重新编排.重新叙述.题图来自siegfang的博客.我提出的Java方案基于kojisekig,我 ...
随机推荐
- Git小技巧:VIM中如何填写注释信息
使用Git命令行工具的时候,经常一不小心就进入VIM界面,例如git commit没有填写任何描述信息.对于习惯了Windows可视化操作界面的用户,可能一下子会觉得无所适从,只能在键盘上一顿短按.下 ...
- linux系统编程之信号(二):信号处理流程(产生、注册、注销、执行)
对于一个完整的信号生命周期(从信号发送到相应的处理函数执行完毕)来说,可以分为三个阶段: 信号诞生 信号在进程中注册 信号在进程中的注销 信号处理函数执行 1 信号诞生 信号事件 ...
- .net core Memcached使用
首先,你要在你电脑上安装配置好Memcached环境哦 Startup类的ConfigureServices中加入 //memcachedcore1 services.AddEnyimMemcache ...
- 网易云首席安全架构师谈安全新形势:DDOS两三天,游戏玩家数从几万降到几百
本文由 网易云发布. 安全是一个永恒的话题,在业务不断云化.攻击越来越复杂的当下,互联网安全呈现了出什么样的严峻形势?对这些形势,网易云又是如何应对的? 网易云首席安全架构师沈明星 4月13日,网易 ...
- Android学习之Fragment解析
1.定义 Fragment中文解释是碎片的意思,主要用在大屏幕设备上,例如平板电脑上,支持更加动态和灵活的UI设计.Fragment在你的应用中相当于是一个模块化和可重用的组件,因为Fragm ...
- Eclipse (JavaEE版)中修改web项目的访问路径
访问路径,也就是指在浏览器中访问该web系统时的根路径,比如http://localhost:8080/xxxx/index.jsp 这里的xxxx. 也就是request.getContextPa ...
- Day 9 函数的初识1
def my_len(): l1 = [1,2,3,5,6] print(111) print(222) return print(333)print(my_len()) 一.函数的定义1.遇到ret ...
- 修改tomcat7编码问题(重定向等)
修改tomcat默认编码格式: 修改tomcat下的conf/server.xml文件,找到如下代码: <Connector port="8080" protocol=&qu ...
- 《Python绝技:运用Python成为顶级黑客》 用Python进行取证调查
1.你曾经去过哪里?——在注册表中分析无线访问热点: 以管理员权限开启cmd,输入如下命令来列出每个网络显示出profile Guid对网络的描述.网络名和网关的MAC地址: reg query &q ...
- js处理url中的请求参数(编码/解码)
在处理 a 链接跳转其他页面时,总会遇到需要传递一些当前页面的信息到其他页面,然后其他页面利用这些信息进行相关操作.利用 get 请求或 hash 传递是常见的方式. 首先,需要对传递的参数进行编码, ...